Category: Java – Updates, How-Tos, and Tutorials

Become a better Java programmer! The latest Java features, how-tos and tutorials on advanced Java development topics.

  • Java 26 Features (with Examples)

    Java 26 Features (with Examples)

    Java 26 has been in the so-called “Rampdown Phase One” since December 4, 2025, meaning no further JDK Enhancement Proposals (JEPs) will be included in the release. The feature set has therefore been finalized. Only bugs will be fixed and minor improvements made where necessary.

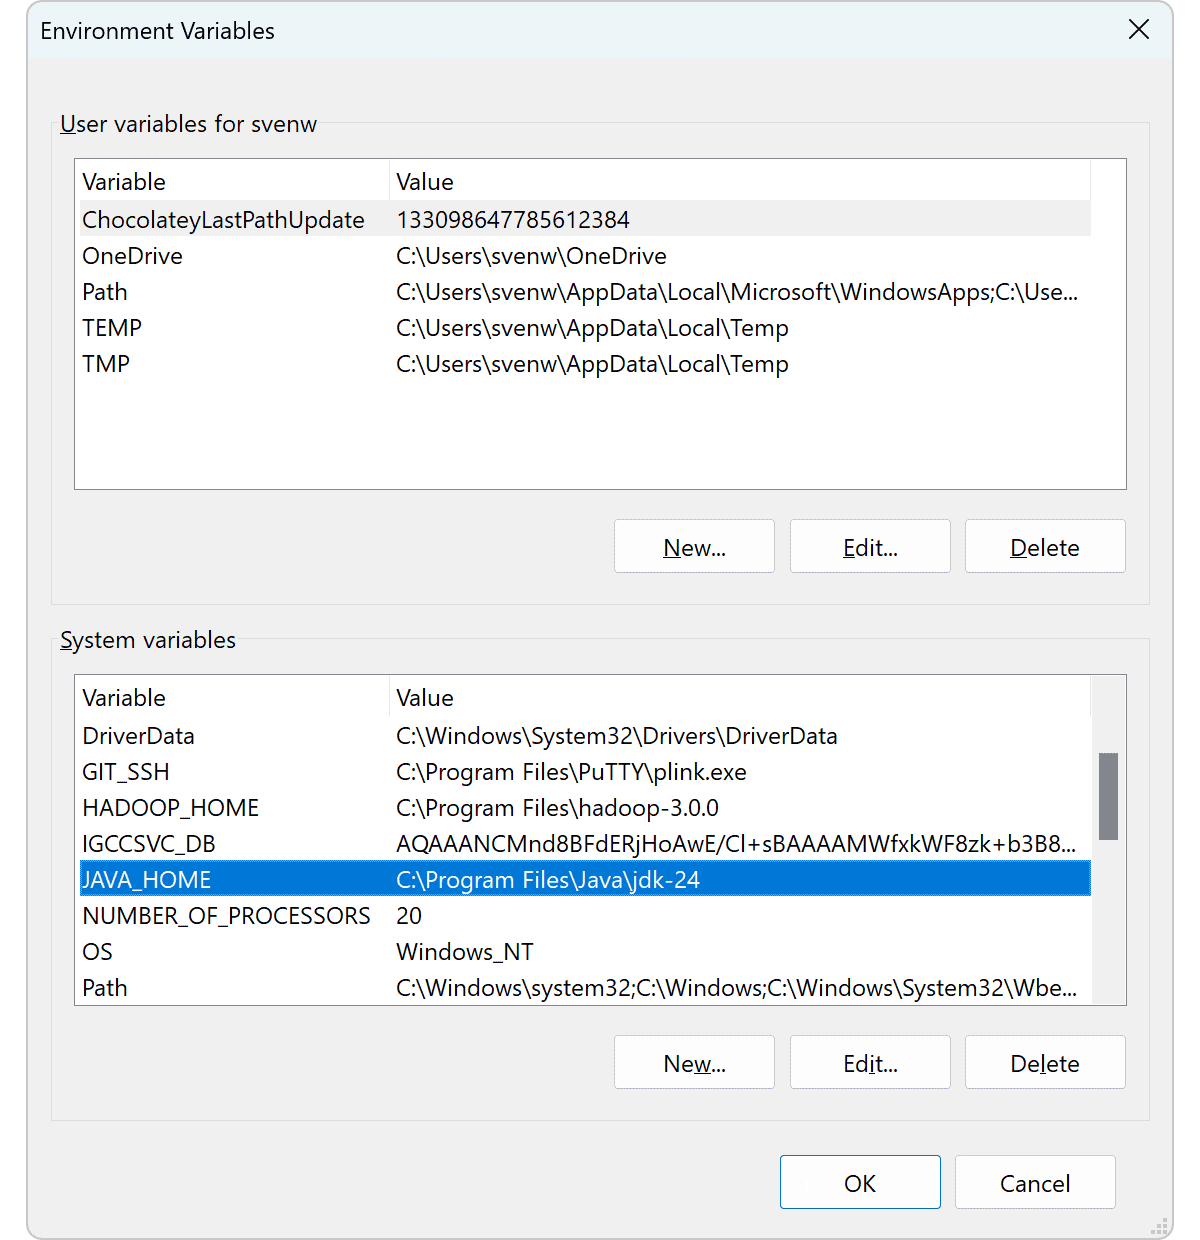
    The target release date is March 17, 2026. You can download the current Early Access version here.

    With 10 delivered JDK Enhancement Proposals (JEPs), Java 26 is one of the more manageable releases of recent years. Half of the JEPs are minor to medium-sized changes – such as warnings for mutating final fields and HTTP/3 support.

    The other half are re-proposed previews – i.e., updates to features that have already been introduced but not yet finalized. Except for Lazy Constants (previously known as Stable Values), there were only minimal changes here.

    For all JEPs and changes from the release notes, I use the original English terms as always.

    Prepare to Make Final Mean Final – JEP 500

    Most developers assume that a field we mark as final is immutable. In fact, we cannot simply assign a new value to a final field using an equals sign. However, so-called Deep Reflection allows us to bypass this restriction.

    Here is a small example class to which we pass a value in the constructor, which is then stored in the final field value:

    public class Box {
      private final Object value;
    
      public Box(Object value) {
        this.value = value;
      }
    
      @Override
      public String toString() {
        return "Box{value=" + value + "}";
      }
    }Code language: Java (java)

    The following code shows how easily the content of the final field can be changed – even from outside the object:

    Box box = new Box("Rubic's Cube");
    
    IO.println("box = " + box);
    
    Field valueField = Box.class.getDeclaredField("value");
    valueField.setAccessible(true);
    valueField.set(box, "Magic Wand");
    
    IO.println("box = " + box);Code language: Java (java)

    Here we bypass both the encapsulation of the field via private and immutability via final. And this code can be executed from anywhere, for example, by third-party libraries that we don’t even know are on the classpath.

    This problem was recognized years ago, and therefore, with Hidden Classes in Java 15 and Records in Java 16, Deep Reflection was not allowed from the outset.

    In Java 16, “Strong Encapsulation” for JDK internals was also introduced. Since then, we have had to explicitly allow Deep Reflection across module boundaries with --add-opens. However, this only works for custom applications if they also use the module system.

    To make Java more secure, the modification of final fields via Deep Reflection will be fundamentally prohibited in the future – even within a module.

    Warnings in Java 26

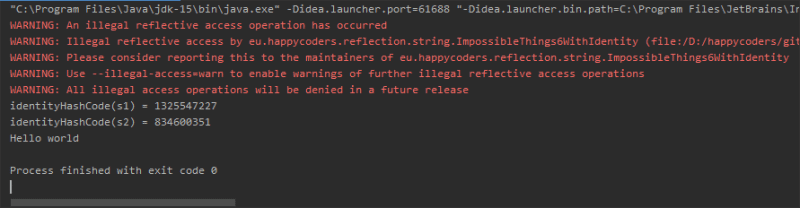
    In Java 26, JDK Enhancement Proposal 500 introduces warnings as a first step. The code shown above runs without issues in Java 25; in Java 26, it now displays the following warning:

    WARNING: Final field value in class eu.happycoders.java26.jep500.Box has been mutated reflectively by class eu.happycoders.java26.jep500.FinalTest in unnamed module @3f99bd52
    WARNING: Use --enable-final-field-mutation=ALL-UNNAMED to avoid a warning
    WARNING: Mutating final fields will be blocked in a future release unless final field mutation is enabledCode language: plaintext (plaintext)

    The use of Deep Reflection can be explicitly allowed for specific modules via --enable-final-field-mutation=<Modulname> – thus preventing the warning.

    In a future Java version, Deep Reflection will be forbidden by default – instead of a warning, an exception will be thrown, unless Deep Reflection is explicitly allowed via --enable-final-field-mutation.

    The future behavior can already be enabled using the VM option --illegal-final-field-mutation. The option offers the following possibilities:

    --illegal-final-field-mutation=allowFinal fields can be modified without warning (default behavior before Java 26).
    --illegal-final-field-mutation=warnA warning appears when a final field is first modified (default behavior from Java 26).
    --illegal-final-field-mutation=debugA warning appears every time a final field is modified.
    --illegal-final-field-mutation=denyFinal fields must not be changed – attempting to do so leads to an IllegalAccessException.

    In a future Java version, deny will become the default setting, and allow will no longer be allowed. Then, Deep Reflection must be activated at the module level via --enable-final-field-mutation.

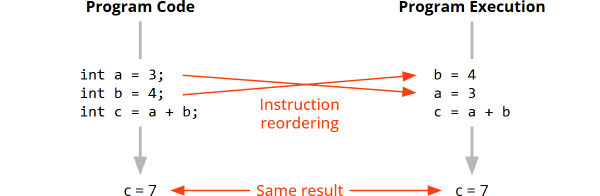
    The guarantee that final fields are truly final not only protects against unexpected behavior but also improves application performance: If the JVM knows that a field cannot be changed, it can optimize access to it via Constant Folding – a type of inlining for constants.

    Ahead-of-Time Object Caching with Any GC – JEP 516

    In Java 24, Ahead-of-Time Class Loading & Linking was introduced – the ability to store the classes required by an application in an architecture-specific binary format in a so-called Ahead-of-Time cache – and to load them from there to significantly accelerate application startup (by up to 42% in tests).

    Previously, classes were stored in the cache exactly as the Garbage Collector places them on the heap, including headers and references to other objects (e.g., from Class objects to strings). This has the advantage that the Ahead-of-Time cache file can be mapped directly from the file system to the heap – and this happens with virtually no time loss if the Ahead-of-Time cache file is in the file system cache.

    However, the binary representation of both object headers and references can differ from Garbage Collector to Garbage Collector or depending on VM options:

    • With Compressed OOPs (default for heaps up to 32 GB), references are 32 bits long.
    • Without Compressed OOPs (with a heap larger than 32 GB or with the VM option -XX:-UseCompressedOOPs), they are 64 bits long.
    • ZGC uses some bits of the references for metadata.
    • By activating Compact Object Headers (-XX:+UseCompactObjectHeaders) or deactivating Compressed Class Pointers (deprecated since Java 25), the binary format of the header changes.

    Therefore, an Ahead-of-Time cache created with G1, Serial GC, or Parallel GC could not previously be read by applications using ZGC – and vice versa. Similarly, a cache created with Compressed OOPs or Compact Object Headers enabled could not be read by an application where Compressed OOPs or Compact Object Headers were disabled – and vice versa.

    GC-Independent Ahead-of-Time Cache

    To use the Ahead-of-Time cache more flexibly, starting with Java 26, we can create a GC-independent Ahead-of-Time cache. In this approach, objects in the cache file are referenced by their index within the cache. The cache file can no longer be directly mapped to the heap. Instead, objects are gradually read from the file and then stored on the heap in the GC-specific format and correctly linked there – or, in other words: they are streamed from the cache file to the heap.

    The GC-independent format (also called “Streamable Objects”) is used if, during the training run…

    • ZGC was used – or
    • Compressed OOPs were deactivated with -XX:-CompressedOops – or
    • the heap was larger than 32 GB – or
    • the VM option -XX:+AOTStreamableObjects was specified.

    If, on the other hand, an application was started with G1, Serial GC, or Parallel GC and a heap of a maximum of 32 GB, the previous, GC-specific format is used.

    HTTP/3 for the HTTP Client API – JEP 517

    The next feature is already fully explained by the heading: The HttpClient API supports version 3 of the HTTP protocol (introduced in 2022) starting with Java 26.

    With the HttpClient API, you could, for example, load the content of my homepage and store it in a string as follows:

    HttpClient client = HttpClient.newHttpClient();
    
    HttpRequest request = HttpRequest.newBuilder()
        .uri(URI.create("https://www.janice.happycoders.eu/"))
        .build();
    
    HttpResponse<String> response =
        client.send(request, BodyHandlers.ofString());
    
    String responseBody = response.body();Code language: Java (java)

    By default, HTTP/2 was used here – and that doesn’t change with Java 26, as only about one-third of all websites currently support HTTP/3.

    However, you can now explicitly enable HTTP/3 as follows:

    HttpRequest request = HttpRequest.newBuilder()
        .uri(URI.create("https://www.janice.happycoders.eu/"))
        .version(HttpClient.Version.HTTP_3) // ← Try to use HTTP/3
        .build();Code language: Java (java)

    Thus, an attempt is made to communicate with the server via HTTP/3. If the server does not support HTTP/3, it will transparently switch to HTTP/2.

    G1 GC: Improve Throughput by Reducing Synchronization – JEP 522

    G1 is the default Garbage Collector of the JVM – it offers a balanced ratio of high throughput and low latencies (in contrast, Serial GC and Parallel GC are designed for the highest possible throughput, and ZGC and Shenandoah for the lowest possible latencies).

    When the Garbage Collector moves an object, it must also adjust all references to that object. Scanning the entire heap for this would be very inefficient. Therefore, G1 only scans objects within a region (as a reminder: G1 divides the heap into approximately 2,048 regions) – references from one region to another, however, are stored in a separate, efficient data structure called Card Table. G1 can search this particularly quickly.

    How does G1 know that the application code has set a reference from one object to another, which also needs to be stored in the Card Table? Through so-called Write Barriers: short pieces of machine code that G1 weaves into the code when an application starts.

    To ensure that scanning the Card Table after moving an object is as fast as possible, G1 continuously optimizes the Card Table in the background. Since G1 runs in parallel with the application, access to the Card Table by application threads via Write Barriers and access by the optimization thread must be synchronized. This, in turn, represents a significant overhead.

    Reducing Synchronization Overhead in Java 26

    Therefore, G1 is optimized in Java 26 as follows:

    A second Card Table is introduced. While the application threads access one of these two Card Tables, the optimization thread optimizes the other. As soon as a Card Table has been modified so heavily by the application threads that the time required to scan it exceeds a certain limit, the Card Tables are swapped. The application thread then accesses the previously optimized Card Table, while the optimization thread re-optimizes the Card Table that has become cumbersome.

    The optimization thread therefore does not need to be synchronized with the concurrently running application. The reduced synchronization overhead can lead to an increase in overall throughput of 5 to 15%. The costs for this are minimal: a Card Table occupies 0.2% of the heap – accordingly, with a constant heap size, only 0.2% more native memory is required.

    This optimization takes effect after an upgrade to Java 26 without any code changes or VM parameter adjustments.

    Re-proposed Preview and Incubator Features

    None of the five features that were in preview or incubator status in Java 25 were finalized in Java 26. All five features were re-proposed with minor or major changes. The following sections describe the features with a focus on the changes compared to Java 25.

    PEM Encodings of Cryptographic Objects (Second Preview) – JEP 524

    PEM stands for Privacy-Enhanced Mail and represents an encoding scheme for cryptographic objects. You have certainly seen PEM-encoded objects before – such as the following PEM-encoded cryptographic certificate:

    -----BEGIN CERTIFICATE-----
    MIIDtzCCAz2gAwIBAgISBUCeYELtjMmr4FAIqHapebbFMAoGCCqGSM49BAMDMDIx
    CzAJBgNVBAYTAlVTMRYwFAYDVQQKEw1MZXQncyBFbmNyeXB0MQswCQYDVQQDEwJF
    . . .
    DBeMde1YpWNXpF9+B/OMKgn7RgXRj5b2QpBCnFsP92T4cK/Nn+xFIjYCMCCx4E79
    toSQBlYnNHv0eXnWkI8TmXsU/A6rU4Gxdr9GbGixgRJvkw0C6zjL/lH2Vg==
    -----END CERTIFICATE-----Code language: plaintext (plaintext)

    Writing or reading PEM-encoded objects in Java was previously extremely complicated and required over a dozen lines of code. The following example shows what you had to write to read a PEM-encoded private key in Java:

    String encryptedPrivateKeyPemEncoded = . . .
    String passphrase = . . .
    
    String encryptedPrivateKeyBase64Encoded = encryptedPrivateKeyPemEncoded
        .replace("-----BEGIN ENCRYPTED PRIVATE KEY-----", "")
        .replace("-----END ENCRYPTED PRIVATE KEY-----", "")
        .replaceAll("[\\r\\n]", "");
    
    Base64.Decoder decoder = Base64.getDecoder();
    byte[] encryptedPrivateKeyBytes = decoder.decode(encryptedPrivateKeyBase64Encoded);
    EncryptedPrivateKeyInfo encryptedPrivateKeyInfo =
        new EncryptedPrivateKeyInfo(encryptedPrivateKeyBytes);
    
    String algorithmName = encryptedPrivateKeyInfo.getAlgName();
    SecretKeyFactory secretKeyFactory = SecretKeyFactory.getInstance(algorithmName);
    
    PBEKeySpec pbeKeySpec = new PBEKeySpec(passphrase.toCharArray());
    Key pbeKey = secretKeyFactory.generateSecret(pbeKeySpec);
    
    Cipher cipher = Cipher.getInstance(algorithmName);
    AlgorithmParameters algParams = encryptedPrivateKeyInfo.getAlgParameters();
    cipher.init(Cipher.DECRYPT_MODE, pbeKey, algParams);
    
    KeyFactory rsaKeyFactory = KeyFactory.getInstance("RSA");
    KeySpec keySpec = encryptedPrivateKeyInfo.getKeySpec(cipher);
    PrivateKey privateKey = rsaKeyFactory.generatePrivate(keySpec);Code language: Java (java)

    In Java 25, a dedicated PEM API was introduced as a preview feature, intended to significantly simplify handling PEM-encoded objects. Reading the encrypted private key is thus possible with just a few lines of code (or just one, if you write everything on a single line):

    PrivateKey privateKey = PEMDecoder.of()
        .withDecryption(passphrase.toCharArray())
        .decode(encryptedPrivateKeyPemEncoded, PrivateKey.class);Code language: Java (java)

    In addition to the PEMDecoder shown above, there is a corresponding PEMEncoder with a encode() method.

    In Java 26, the basic functionality of this API remains the same – only a few details have been changed and the scope of functions has been slightly increased:

    • Some classes and methods have been renamed, and some methods have been added (the simple example above was not affected by these changes).
    • Some exceptions have been adjusted.
    • In addition to the existing cryptographic objects, key pairs and PKCS#8-encoded keys can now also be encoded and decoded.

    More details on the new API and these changes can be found in JDK Enhancement Proposal 524.

    Structured Concurrency (Sixth Preview) – JEP 525

    Structured Concurrency is already in its sixth preview round. If you are already familiar with the API and just want to know what has changed in Java 26, you can jump to the section Structured Concurrency – Changes in Java 26.

    What is Structured Concurrency?

    Structured Concurrency means – in contrast to Unstructured Concurrency and based on Structured Programming – that the execution paths created when starting concurrent threads converge at a single point in the code – and that it is guaranteed that no orphaned threads are still running at that point.

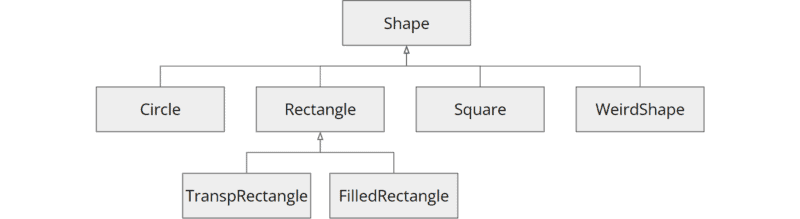
    The following graphic illustrates this. It also shows that “scopes” (= the areas in which concurrent tasks are executed) created by Structured Concurrency can be nested:

    nested structured concurrency

    This was previously possible – to a limited extent – with a ExecutorService and the invocation of close() or shutdown() and awaitTermination(). However, the Java API for Structured Concurrency, , offers additional ways to prematurely terminate a scope upon the occurrence of certain events and cancel all still-running tasks. With a ExecutorService, this was only possible with extremely complex and thus error-prone orchestration.

    StructuredTaskScope API

    The following example shows how multiple subtasks can be started in parallel with the StructuredTaskScope API, and then the result of all subtasks is awaited. Should one of the subtasks fail, the still-running subtasks are canceled, and scope.join() throws the exception that occurred in the failed subtask.

    Invoice createInvoice(int orderId, int customerId, String language)
        throws InterruptedException {
      try (var scope = StructuredTaskScope.open()) {
        var orderTask    = scope.fork(() -> orderService.getOrder(orderId));
        var customerTask = scope.fork(() -> customerService.getCustomer(customerId));
        var templateTask = scope.fork(() -> templateService.getTemplate(language));
    
        scope.join();
    
        var order    = orderTask.get();
        var customer = customerTask.get();
        var template = templateTask.get();
    
        return Invoice.generate(order, customer, template);
      }
    }Code language: Java (java)

    The following example shows another strategy (enabled by Joiner.anySuccessfulOrThrow()): Here, only the result of one of the subtasks is needed – and as soon as it is available, the other subtasks are canceled:

    AddressVerificationResponse verifyAddress(Address address) throws InterruptedException {
      try (var scope = StructuredTaskScope.open(
          Joiner.<AddressVerificationResponse>anySuccessfulOrThrow())) {
    
        scope.fork(() -> verificationService.verifyViaServiceA(address));
        scope.fork(() -> verificationService.verifyViaServiceB(address));
        scope.fork(() -> verificationService.verifyViaServiceC(address));
    
        return scope.join();
      }
    }Code language: Java (java)

    The Joiner interface used here provides further strategies. You can find out what these are and how you can implement your own strategies in the main article on Structured Concurrency in Java.

    Structured Concurrency – Changes in Java 26

    Structured Concurrency was first introduced in Java 21. In Java 25, the API was fundamentally revised (keyword: “Composition over Inheritance”). In Java 26, the following extensions and adjustments were made through JDK Enhancement Proposal 525:

    • The Joiner interface has received an additional method onTimeout(), in addition to onFork() and onComplete(). This method is called by StructuredTaskScope.join() in case of a timeout and throws a TimeoutException by default. However, it can be overridden in a custom Joiner to handle timeouts alternatively – e.g., to return a specific value.
    • The Joiner created by Joiner.allSuccessfulOrThrow() no longer returns a stream of subtasks (which are all successful anyway), but a list of the results of the subtasks.
    • The Joiner created by Joiner.allUntil(...) returns a list of subtasks instead of a stream of subtasks.
    • The method Joiner.anySuccessfulResultOrThrow() was renamed to anySuccessfulOrThrow() (the word Result was removed, as it is not used in the other Joiner factory methods either).
    • There is an overloaded StructuredTaskScope.open(...) method that allows customizing the configuration of a joiner. In this method, the type for the configuration parameter was changed from Function<Configuration, Configuration> to UnaryOperator<Configuration> (which is ultimately a Function<Configuration, Configuration> again).

    Code written with Java 25 therefore requires only minor (or no) adjustments to run on Java 26.

    Lazy Constants (Second Preview) – JEP 526

    Lazy Constants were introduced in Java 25 as Stable Values. If you are already familiar with Stable Values and are only interested in the changes in Java 26, you can jump to the section Lazy Constants – Changes in Java 26.

    What problem do we want to solve?

    Constants – i.e., immutable values – have many advantages: They make the code simpler and safer, as they can only be in one state and can be safely accessed from multiple threads. In addition, they enable performance optimizations by the JVM, e.g., through Constant Folding (already mentioned above for final fields).

    Until now, constants could only be defined by final fields:

    • final static fields, which are initialized when a class is loaded – or
    • final instance fields, which are initialized when an object is created.

    If you want to initialize an immutable value only when needed, e.g., because the initialization is expensive, you have to use the concept of “Lazy Initialization”. To make lazy initialization thread-safe in Java, we previously had to resort to either the Double-Checked-Locking-Idiom or the Initialization-on-Demand-Holder-Idiom. Anyone who has done this before knows that errors can easily creep in.

    Lazy Constants API

    In Java 25, the Stable Values API was introduced to simplify Lazy Initialization. After extensive feedback, the API in Java 26 was greatly simplified by JDK Enhancement Proposal 526 and renamed to Lazy Constants.

    The following example shows how we define a LazyConstant that initializes a Settings object by loading it from a database only upon its first access:

    private final LazyConstant<Settings> settings =
        LazyConstant.of(this::loadSettingsFromDatabase);
    
    public Locale getLocale() {
      return settings.get().getLocale(); // ⟵ Here we access the lazy constant
    }Code language: Java (java)

    Only on the first call to settings.get() will the loadSettingsFromDatabase() method be invoked. The value is then stored in the LazyConstant object, and subsequent calls to settings.get() will return this stored value. Thread safety is also guaranteed: Should settings.get() be called simultaneously from multiple threads, loadSettingsFromDatabase() will still be called at most once.

    Once the LazyConstant is initialized, it is interpreted as immutable by the JVM, and access to it is optimized through Constant Folding.

    Lazy Lists

    In addition to individual Lazy Constants, we can also define Lazy Lists – lists where each element is a Lazy Constant. The following example shows a simple Lazy List in which each field is lazily initialized with the square root of the field index:

    private final List<Double> squareRoots = List.ofLazy(100, Math::sqrt);Code language: Java (java)

    Here too, initialization only occurs on first access – and separately for each element of the list, e.g., during direct access with get(int index) – or when iterating over the list. And here too, initialization is thread-safe, and after initialization, the values are treated and optimized by the JVM like constants.

    Lazy Maps

    Maps can also be lazily initialized in the future. The following example shows a Lazy Map where Locales are mapped to ResourceBundles:

    Set<Locale> supportedLocales = getSupportedLocales();
    Map<Locale, ResourceBundle> resourceBundles =
        Map.ofLazy(supportedLocales, this::loadResourceBundle);Code language: Java (java)

    On the first access to a map element for a specific Locale, the corresponding ResourceBundle is loaded via loadResourceBundle() and then stored in the map as a constant. Just like Lazy Constants and Lazy Lists, Lazy Maps are also thread-safe.

    Lazy Constants – Changes in Java 26

    In addition to the obvious change – the renaming to Lazy Constants – the following simplifications were made in Java 26:

    • Low-level methods such as orElseSet(), setOrThrow(), and trySet() were removed, as they made the API unnecessarily complicated.
    • Lazy Lists and Lazy Maps were previously created via StableValue.list(...) and StableValue.map(...). These factory methods were moved to the List and Map interfaces, respectively.
    • The Function and IntFunction implementations created via StableValue.function(...) and StableValue.intFunction(...), respectively, were removed without replacement, as they offered no added value compared to Lazy Lists and Lazy Maps.
    • For performance reasons, Lazy Constants, Lazy Lists, and Lazy Maps may no longer contain null values. If the computation function returns null, an NullPointerException is thrown.

    So, if you have already relied on Stable Values in Java 25, extensive refactoring will be required.

    Vector API (Eleventh Incubator) – JEP 529

    And now, for the eleventh time, we come to the Vector API.

    With the Vector API, mathematical vector operations can be calculated particularly efficiently using the vector instruction sets of modern CPUs (such as SSE and AVX) – e.g., a vector addition like the following:

    java vector addition
    Example of a vector addition

    As Java code, this operation would be implemented as follows, where a and b are the input vectors and c is the output vector:

    static final VectorSpecies<Float> SPECIES = FloatVector.SPECIES_PREFERRED;
    
    void addVectors(float[] a, float[] b, float[] c) {
      int i = 0;
      int upperBound = SPECIES.loopBound(a.length);
      for (; i < upperBound; i += SPECIES.length()) {
        var va = FloatVector.fromArray(SPECIES, a, i);
        var vb = FloatVector.fromArray(SPECIES, b, i);
        var vc = va.add(vb);
        vc.intoArray(c, i);
      }
      for (; i < a.length; i++) {
        c[i] = a[i] + b[i];
      }
    }Code language: Java (java)

    Currently, quite a lot of boilerplate is still necessary for such a simple operation:

    • Via SPECIES.length(), it is queried how many vector elements can be processed simultaneously in one CPU cycle.
    • SPECIES.loopBound(...) calculates into how many complete sub-vectors of this length the output vector can be split.
    • All sub-vectors are added via the first loop.
    • If the length of the output vector is not a multiple of the sub-vector length, a remainder remains. Its elements are individually added via the second loop.

    I am curious if the API will be further simplified after it reaches the preview stage.

    However, we still have to be patient until the first JEP from Project ValhallaJEP 401: Value Classes and Objects – reaches the preview stage. This is because the Vector class is intended to be a Value Class from the start – i.e., a class whose objects will manage without identity.

    When will it be ready? Brian Goetz, Language Architect at Oracle, has consistently answered the question about Project Valhalla’s release date for years with: “It’s ready when it’s ready” – he has not yet been persuaded to give a more concrete statement. On October 10, 2025, the Java community was finally provided with a first Early-Access Build of Project Valhalla.

    The eleventh incubator version of the Vector API is described in JDK Enhancement Proposal 529: There are no substantial changes compared to the previous version.

    You can find more examples and details in the main article about lazy constants.

    Primitive Types in Patterns, instanceof, and switch (Fourth Preview) – JEP 530

    Pattern Matching with primitive types was first introduced in Java 23 as a preview feature. Since then, there have been no fundamental changes. If you are already familiar with the feature and are interested in the minor refinements in Java 26, feel free to jump to the section Primitive Types in Patterns – Changes in Java 26.

    Pattern Matching and switch with Primitive Types – Current Status

    Pattern Matching has so far been limited to reference types, for example, as follows:

    Object obj = . . .
    switch (obj) {
      case String s when s.length() >= 5 -> IO.println(s.toUpperCase());
      case Integer i                     -> IO.println(i * i);
      case null, default                 -> IO.println(obj);
    }Code language: Java (java)

    A switch over primitive types is possible – but only with byte, short, char and int – and in the case-labels, only constants are allowed:

    int code = . . .
    switch (code) {
      case 200 -> IO.println("OK");
      case 404 -> IO.println("Not Found");
    }Code language: Java (java)

    Pattern Matching and switch with Primitive Types – What will change?

    In the future, all primitive types should be allowed in switch, including long, double, float, and even boolean. And patterns should also be allowed in the case labels. This would allow us to check, for example, a int value against specific number ranges:

    int code = . . .
    switch (code) {
      case int i when i >= 100 && i < 200 -> IO.println("information");
      case int i when i >= 200 && i < 300 -> IO.println("success");
      case int i when i >= 300 && i < 400 -> IO.println("redirection");
      case int i when i >= 400 && i < 500 -> IO.println("client error");
      case int i when i >= 500 && i < 600 -> IO.println("server error");
      default -> throw new IllegalArgumentException();
    }Code language: Java (java)

    Patterns with reference types also match derived types, e.g., a case Number n would also match an object of type Integer. With primitive types, there is no inheritance – therefore, the JDK developers have come up with something different here:

    In the future, we can check with switch (and similarly with instanceof) whether the value of a primitive variable can be represented by another primitive type without loss of precision:

    double value = . . .
    switch (value) {
      case byte   b -> IO.println(value + " instanceof byte:   " + b);
      case short  s -> IO.println(value + " instanceof short:  " + s);
      case char   c -> IO.println(value + " instanceof char:   " + c);
      case int    i -> IO.println(value + " instanceof int:    " + i);
      case long   l -> IO.println(value + " instanceof long:   " + l);
      case float  f -> IO.println(value + " instanceof float:  " + f);
      case double d -> IO.println(value + " instanceof double: " + d);
    }Code language: Java (java)

    If value here were, for example, 42, then the pattern byte b would match, since 42 can also be stored in a byte. If value were, for example, 50,000, then the pattern char c would match. For 65,000, int i would match, for 0.5 float f, and for 0.7, only double d.

    The dominance principle also applies to primitive types: The order of the case labels in the previous example must not be changed, as individual case labels would then no longer be reachable. For example, the pattern int i should not appear before byte b, as every possible byte would already match int i.

    Primitive Types in Patterns – Changes in Java 26

    Through JDK Enhancement Proposal 530, the dominance check was mainly improved in Java 26. The following code, for example, can still be compiled without errors with Java 25:

    int i1 = . . .
    switch (i1) {
      case float f -> {}
      case 16_777_216 -> {}
      default -> {}
    }
    
    int i2 = . . .
    switch (i2) {
      case int _ -> {}
      case float _ -> {}
    }
    
    byte b = . . .
    switch (b) {
      case short s -> {}
      case 42 -> {}
    }Code language: Java (java)

    In Java 26, however, all three switch statements are met with compiler errors:

    • In the first switch, the constant 16,777,216 can never match, since this number can also be precisely represented by a float, and thus the constant is dominated by the pattern float f.
    • In the second switch, the pattern float f can never match, since every value that i2 can take is already matched by the pattern int _.
    • In the third switch, the constant 42 can never match, since 42 can also be stored in a short, and thus the constant is dominated by the pattern short s.

    Apart from the improved dominance check, there are no other changes in Java 26.

    Deprecations and Deletions

    In Java 26, the Applet API and the Thread.stop() method were removed. You can find details in the following two sections.

    Remove the Applet API – JEP 504

    The Applet API and the Security Manager, which was responsible for securing applets, were marked as deprecated in Java 9 in 2017, as applets were no longer supported by any modern web browser at that time. In Java 17, the Applet API and Security Manager were marked as deprecated for removal.

    The Security Manager was disabled in Java 24.

    In Java 26, the Applet API – i.e., all classes in the java.applet package as well as some others, such as java.beans.AppletInitializer and javax.swing.JApplet – has now been completely removed via JDK Enhancement Proposal 504.

    Thread.stop is removed

    Thread.stop() It was already marked as deprecated in Java 1.2 – in December 1998 – because it could lead to inconsistent states and unpredictable behavior. In Java 18, it was marked as deprecated for removal, and since Java 20, it throws an UnsupportedOperationException.

    In Java 26 – more than 27 years after being marked as deprecated – the method is now completely removed.

    (There is no JEP for this change; it is registered in the bug tracker under JDK-8368226.)

    Other Changes in Java 26

    In this section, you will find a selection of minor changes from the release notes for which no JDK Enhancement Proposals were written.

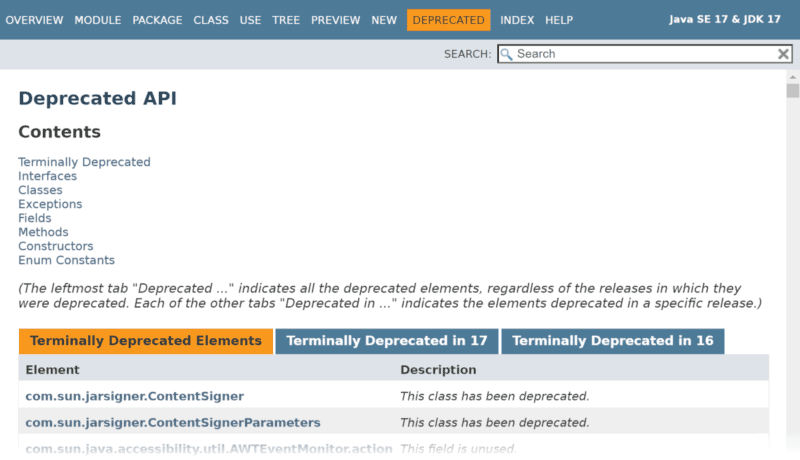
    Add Dark Theme to API Documentation

    This feature is quickly explained: in Java 26, the Javadoc documentation offers a dark mode. You can already try it out in the Early-Access documentation of 26 by clicking on the sun or moon icon in the menu bar.

    Here’s an impression of the new mode:

    java 26 dark mode.v2

    (There is no JEP for this change; it is registered in the bug tracker under JDK-8342705.)

    New ofFileChannel Method in java.net.http.HttpRequest.BodyPublishers

    To send a file with the HttpClient API (available since Java 11), it previously had to be completely loaded into RAM and passed as a byte array to the HttpRequest:

    byte[] fileContent = Files.readAllBytes(Path.of("test.bin"));
    
    try (HttpClient client = HttpClient.newHttpClient()) {
      HttpRequest request =
          HttpRequest.newBuilder()
              .uri(URI.create("https://www.example.com/upload"))
              .POST(BodyPublishers.ofByteArray(fileContent))
              .build();
    
      HttpResponse<Void> response =
          client.send(request, HttpResponse.BodyHandlers.discarding());
    }Code language: Java (java)

    Starting with Java 26, a file (or part of it) can also be streamed via FileChannel to the HttpRequest and thus no longer needs to be fully available in memory beforehand. This is particularly helpful for very large files:

    try (FileChannel fileChannel = 
            FileChannel.open(Path.of("test.bin"), StandardOpenOption.READ);
        HttpClient client = HttpClient.newHttpClient()) {
    
      HttpRequest request =
          HttpRequest.newBuilder()
              .uri(URI.create("https://www.example.com/upload"))
              .POST(BodyPublishers.ofFileChannel(fileChannel, 0, fileChannel.size()))
              .build();
    
      HttpResponse<Void> response =
          client.send(request, HttpResponse.BodyHandlers.discarding());
    }Code language: Java (java)

    (There is no JEP for this change; it is registered in the bug tracker under JDK-8329829.)

    Default initial heap size is trimmed down

    If neither -Xms nor -XX:InitialRAMPercentage is used to specify a minimum heap size when starting a Java application, the heap is set by default to 1/64 (= 1.5625%) of the physical RAM. Today, computers have significantly more RAM than twenty years ago, so many applications are equipped with an unnecessarily large heap. On my 64 GB laptop, for example, even a Hello World application is started with a 1 GB heap.

    Besides the unnecessarily occupied RAM, this can also noticeably delay the start of an application, because the Garbage Collector has to create initial data structures for the heap, which scale with the heap size.

    In Java 26, the initial heap size is changed by default to 0.2%, i.e., 1/500 of the physical RAM. On my 64 GB laptop, this is still a sufficient 128 MB for many small applications.

    (There is no JEP for this change; it is registered in the bug tracker under JDK-8348278.)

    Virtual threads now unmount when waiting for another thread to execute a class initializer

    Under certain circumstances, virtual threads are “pinned” to their carrier thread, meaning that if the virtual thread blocks, it cannot be unmounted from its carrier thread (the operating system thread on which the virtual thread is executed). Thus, the carrier thread is also blocked and cannot execute another virtual thread.

    Already in Java 24, the serious pinning issue within synchronized blocks was resolved.

    Before Java 26, a virtual thread was also pinned if it tried to initialize a class that was currently being initialized by another thread. This no longer happens either.

    (There is no JEP for this change; it is registered in the bug tracker under JDK-8369238.)

    Support for Unicode 17.0

    Java 26 increases Unicode support to version 17.0.

    Why is this relevant? All character-processing classes such as String and Character must be able to process the characters and code blocks introduced in the new Unicode version.

    (For this change, there is no JEP; it is registered in the bug tracker under JDK-8346944.)

    Complete List of All Changes in Java 26

    In this article, I have presented all JDK Enhancement Proposals that were delivered with Java 26, as well as a selection of changes from the release notes. You can find the complete list of all changes in the Java 26 Release Notes.

    Conclusion

    Compared to the last two Java versions, the changes in Java 26 are quite manageable:

    • Mutating final fields with deep reflection now issues a warning – in the future, an exception will be thrown.
    • The Ahead-of-Time Class Loading & Linking introduced in Java 24 now works with any garbage collector – no longer just with G1.
    • HttpClient now supports HTTP/3.
    • The G1 Garbage Collector has been optimized, leading to an increase in throughput.
    • The Applet API and Thread.stop() have been removed.
    • Stable Values have been renamed to Lazy Constants – and the API has been radically simplified.
    • For the remaining features currently in preview, minor improvements have been made.

    As always, various other changes round off the release. You can download the current Java 26 Early-Access Release here.

    Which of the changes do you find most exciting? Share your opinion in the comments!

  • Withers in Java: “Derived Record Creation Expressions”

    Withers in Java: “Derived Record Creation Expressions”

    Derived Record Creation Expressions (or, in short: Withers) are a concise way to create records derived from Java records that differ from the original record in one or more (or even no) fields.

    In this article you will find out:

    • Why do we need Derived Record Creation Expressions (Withers)?
    • What are explicit wither methods?
    • How do Derived Record Creation Expressions work?
    • What restrictions apply when using Derived Record Creation Expressions?

    Derived Record Creation Expressions will be released as a preview feature in one of the upcoming Java versions. Which Java version that will be is currently not clear, as the corresponding JDK Enhancement Proposal 468 is still in Candidate status.

    Why Do We Need Withers?

    Java Records are immutable – and that’s a good thing. Because immutability makes code more understandable, reliable, and secure. But there are always use cases in which we want to derive a new record from an existing record that differs from the existing record in only one or a few fields.

    I would like to show you this with an example – namely with the following record:

    public record Point3D(double x, double y, double z) { }Code language: Java (java)

    Let’s assume we have an existing Point3D point and now only want to increase the Z coordinate by 10.0. Then we have to create a new record as follows:

    Point3D pointNew = new Point3D(point.x(), point.y(), point.z() + 10.0);Code language: Java (java)

    So we have to read all fields from the existing record and then specify all fields for the new record – the changed ones and also the unchanged ones. On the one hand, this is complex, and on the other hand, it can quickly become error-prone – especially with more complex records.

    Wouldn’t it be nice if we only had to specify the fields that have changed?

    Previous Solution: Explicit Wither Methods

    One way to make the work easier for the “users” of the record is to provide so-called wither methods. These are methods within the record that return a derived record with one (or more) changed fields.

    In our Point3D, for example, we could provide the following wither methods:

    public record Point3D(double x, double y, double z) {
      public Point3D withX(double newX) {
        return new Point3D(newX, y, z);
      }
    
      public Point3D withY(double newY) {
        return new Point3D(x, newY, z);
      }
    
      public Point3D withZ(double newZ) {
        return new Point3D(x, y, newZ);
      }
    }Code language: Java (java)

    This now allows us to change the Z coordinate as follows:

    Point3D pointNew = point.withZ(point.z() + 10.0);Code language: Java (java)

    Disadvantages of Explicit Wither Methods

    Explicit wither methods have two disadvantages.

    The first is obvious:

    We have to implement a lot of boilerplate code, and this represents an increased implementation and maintenance effort.

    The second disadvantage:

    If there are semantic restrictions on the combination of several fields of a record, these fields may not be changed individually. Let’s assume that the distance of our Point3D from the origin of the coordinate system must not be greater than 100.0.

    We could ensure this relatively easily with the following compact constructor:

    public record Point3D(double x, double y, double z) {
      public Point3D {
        double distance = Math.sqrt(x * x + y * y + z * z);
        if (distance > 100.0) {
          throw new IllegalArgumentException("Point lies outside the allowed distance " +
                                             "of 100 units from origin (0, 0, 0).");
        }
    
      // . . .
    }Code language: Java (java)

    Let’s assume we have a point with the coordinates (0, 80, 10) and want to swap its X and Y coordinates:

    Point3D point = new Point3D(0, 80, 10);
    Point3D pointNew = point
        .withX(point.y())
        .withY(point.x());Code language: Java (java)

    Unfortunately, this leads to an IllegalArgumentException, because in the first step – i.e. when calling withX(point.y()) – an attempt is made to create a point with the coordinates (80, 80, 10).

    So we would have to provide another wither method in Point3D that sets both X and Y coordinates (a so-called Compound Wither Method):

    public record Point3D(double x, double y, double z) {
      // . . .
    
      public Point3D withXY(double newX, double newY) {
        return new Point3D(newX, newY, z);
      }
    
      // . . .
    }Code language: Java (java)

    The following call would then be successful:

    Point3D point = new Point3D(0, 80, 10);
    Point3D pointNew = point.withXY(point.y(), point.x());Code language: Java (java)

    If we want to swap other coordinate pairs, we would need correspondingly more wither methods. With more complex records, this quickly becomes confusing and error-prone.

    The Solution: Derived Record Creation Expressions

    Wouldn’t it be nicer if we could avoid all the boilerplate code and concentrate on specifying which record components should change in what way?

    JEP 468 will make exactly that possible with Derived Record Creation Expressions!

    Note:
    Derived Record Creation Expressions are currently not available in any Java version, i.e. you have to be patient until you can try out the following code.

    First of all, we remove all explicit wither methods from our record – it now looks like it did at the very beginning:

    public record Point3D(double x, double y, double z) { }Code language: Java (java)

    To increase the Z coordinate by 10.0, for example, we can simply use the new with keyword:

    Point3D pointNew = point with {
      z += 10;
    };Code language: Java (java)

    This means: “Create a new record with z increased by 10.0”. This code is much more readable and maintainable than anything before, as it only focuses on what changes and does not require any further boilerplate code.

    A few more examples…

    x and y could be swapped as follows:

    Point3D pointNew = point with {
      double helper = x;
      x = y;
      y = helper;
    };Code language: Java (java)

    We could multiply all coordinates by 2.0 like this:

    Point3D pointNew = point with {
      x *= 2.0;
      y *= 2.0;
      z *= 2.0;
    };Code language: Java (java)

    We can also call the with keyword multiple times – multiplying all coordinates by 2.0 would also be possible as follows:

    Point3D pointNew = point 
        with { x *= 2.0 }
        with { y *= 2.0 }
        with { z *= 2.0 };Code language: Java (java)

    But be careful: The last two examples are not identical! In the first, one new record is created. In the second, three new records are created – one for each with call. This is more effort on the one hand, and on the other hand, validations that relate to the combination of several fields could fail.

    More on this in the next section.

    How Exactly Does Derived Record Creation Work?

    I will explain the exact functionality of Derived Record Creation Expressions using the first with example from above – here it is again:

    Point3D pointNew = point with {
      z += 10;
    };Code language: Java (java)

    A Derived Record Creation Expression consists of three parts:

    1. the Origin Expression – in the example: point
    2. the keyword with
    3. the Transformation Block – in the example: { z += 10; }

    Within the transformation block, all fields of the original record are provided in local, changeable variables by calling its accessor methods. It is as if the following code were executed before the transformation block is executed:

    double x = x();
    double y = y();
    double z = z();Code language: Java (java)

    So the fields are not accessed directly: If the accessor methods have been overwritten and contain further logic, this is executed.

    Then the transformation block is executed – in the example, the local variable z is increased by 10.0.

    At the end of the transformation block, a new record is created based on the (possibly changed) local variables, i.e. like this:

    new Point3D(x, y, z)Code language: Java (java)

    The record constructor is also actually called to execute any validations that may be present there.

    This also helps you understand why the last two examples in the previous section are different: When with is called once, the constructor is called once – with all changes. When with is called several times, the constructor is called mehrfach – each time with only one change. In this way, validations that relate to the combination of several parameters would fail in the event of an invalid intermediate state.

    Here are a few more notes:

    • If the original expression – in the example point – is null, an NullPointerException occurs.
    • The transformation block may also be empty – in this case, an unchanged copy of the original record is returned.
    • If a variable exists outside the Derived Record Creation Expression with the same name as a field of the record, then it is not visible within the transformation block (it is “shadowed”).

    Here is the third point explained again with an example:

    double x = 50;
    
    Point3D point = new Point3D(10, 20, 30);
    Point3D pointNew = point with {
      // x is 10 here, not 50.
      // The "outer" x is not visible here.
      x = 20;
    }
    
    // x is 50 here, not 20.
    // The "inner" x is not visible here.Code language: Java (java)

    Nested Derived Record Creation

    In the case of nested records, the with expressions can also be nested. The following record defines a line in three-dimensional space:

    public record Line3D(Point3D start, Point3D end) { }Code language: Java (java)

    Let’s create such a line:

    Line3D line = new Line3D(new Point3D(1, 2, 3), new Point3D(4, 5, 6));Code language: Java (java)

    Then we could now change the end point as follows (not yet nested):

    line = line with { 
      end = new Point3D(4, 5, 10); 
    };Code language: Java (java)

    The new end point differs from the original end point only in the Z coordinate. We can also write this more concisely as follows – with nested with expressions:

    line = line with { 
      end = end with { z = 10; }
    };Code language: Java (java)

    Inner Derived Record Creation

    Derived Record Creation Expressions may also be used within the record. For example, we could offer a scaling method for the Point3D record:

    public record Point3D(double x, double y, double z) {
      // . . .
    
      public Point3D scale(double factor) {
        return this with {
          x *= factor;
          y *= factor;
          z *= factor;
        };    
      }
    }Code language: Java (java)

    Restrictions of Derived Record Creation Expressions

    The following restrictions apply to Derived Record Creation Expressions:

    • The transformation block must not contain an return expression.
    • The transformation block must not contain an yield, break or continue expression whose target lies outside the transformation block.

    I will also explain the second point again with an example.

    The following (admittedly strongly constructed) code, in which the targets of yield and break lie within the transformation block, is permitted, for example:

    Point3D point = new Point3D(10, 20, 30);
    Point3D pointNew = point with {
      y = switch (x) {
        case double d when d < 0.0 -> -1;
        case double d when d > 0.0 -> {
          double newValue = d;
          for (int i = 0; i < 10; i++) {
            newValue *= 2.0;
            if (newValue > 100.0) break;  // allowed
          }
          yield newValue;  // allowed
        }
        default -> 0;
      };
    }Code language: Java (java)

    The following (also strongly constructed) code, on the other hand, would not be allowed, since here the target of break would be the for loop outside the Derived Record Creation Expression:

    Point3D point = new Point3D(10, 20, 30);
    for (int i = 0; i < 10; i++) {
      point = point with {
        if (x > 0.0) {
          x -= 1.0;
        } else {
          break;  // not allowed
        }
      };
    }Code language: Java (java)

    Conclusion

    Derived Record Creation Expressions are a concise syntax for creating derived records and specifying only the changed fields – without having to write explicit, maintenance-intensive wither methods yourself.

    Unfortunately, it is currently not possible to predict when Derived Record Creation will be available – as soon as that changes, you will find out here early.

  • Java Modernization: How to get your Team and Management on Board

    Java Modernization: How to get your Team and Management on Board

    You probably know this: A new Java version is just around the corner – and while one or two team members are enthusiastic, the rest remain rather reserved or even block it. Even in management, enthusiasm is often limited when it comes to modernization, upgrades or investments in developer skills. After all, everything works somehow – and “Never change a running system” is a proven motto.

    But once you’ve experienced how much more fun modern Java features make in everyday life, how much they speed up development, make code clearer and noticeably conserve resources, you won’t want to miss these advantages. The problem: To get modernization going, you need everyone on board – your team and the decision-makers.

    In this article, you’ll learn how to convince both sides – with the right arguments, practical examples and concrete tips from everyday project work. Whether you’re passionate about an upgrade yourself or want to take your team with you as a manager: Here you’ll learn how modernization succeeds – and everyone wins.

    Why It’s Often Difficult to get Everyone on Board with Java Modernization

    Although modern Java versions bring numerous advantages – faster development, better readable code, more efficient use of resources – the path to modernization in many teams is not without obstacles. A field of tension often arises between developers who are enthusiastic about new language features such as Records, Pattern Matching or Virtual Threads, and colleagues who hesitate or are fundamentally skeptical of change.

    On the other hand, there is management: Investments in upgrades, training or modernization measures must be justified in a comprehensible manner. The central question is usually: How great is the benefit in relation to the effort? Without clear answers – such as falling cloud costs, shorter release cycles or higher developer productivity – there is also a lack of willingness to invest, and modernization projects are put on the back burner.

    Typical patterns that I see again and again in projects:

    • Some team members are driving new features and improvements, but are met with reluctance or uncertainty in the rest of the team.
    • The management level remains cautious as long as the existing code works and no critical incidents occur.
    • There is uncertainty as to whether modern features are really stable – or change the existing code base too much.
    • More urgent projects and day-to-day business repeatedly push modernization out of focus.

    The consequence:

    Innovation potentials remain unused, technical debts grow, and the concrete advantages of modern Java versions remain theory. This affects not only technical aspects – but also the motivation and further development of the team.

    In the next sections, I’ll show you how to break through this dynamic: with arguments that resonate with the team, and with a language that convinces decision-makers – so that modernization is understood and supported as a joint project.

    The Dynamics in the Team: What Slows down, What Motivates?

    Every modernization project brings movement into the team – in the best case motivation, in the worst case uncertainty or even resistance. This dynamic is quite normal, because technical changes affect not only the code, but also established routines, ways of thinking and sometimes even the self-image as a developer.

    What slows you down?

    • Fear of extra effort: New language features mean training. Anyone who is already under time pressure fears additional stress – especially when deadlines are looming.
    • Unclear benefits: If it is not visible how new features specifically affect your own project, the motivation remains low. Theory alone rarely convinces.
    • Stability and security: Many developers rely on proven solutions. “What we know works” – this thinking is understandable, but risky in the long run.
    • Heterogeneous levels of knowledge: There is often a wide range in the team: While some are already experimenting with the new features, others have remained with Java 8.
    • Complexity of the code base: Especially when the existing code has grown historically and is difficult to understand, people shy away from changes – for fear of breaking something.
    Comparison of two development teams: frustrated on the left with an old Java 8 code base, motivated on the right with a modern Java 21 environment

    What motivates?

    • Visible improvements: If modern features make the code leaner, reduce sources of errors or make tasks more efficient, interest grows quickly.
    • Joint learning: Exchange within the team – for example through coding sessions or internal dojos – creates a positive learning culture and reduces fears.
    • Quick wins: Even small modernizations with a measurable effect, e.g. reduced boilerplate or better readable code, often have a more convincing effect than any PowerPoint presentation.
    • Recognition and further development: Anyone who contributes new things and implements them successfully strengthens their own role in the team – and promotes their own development.
    • Clear benefits in everyday life: Modern Java features ensure a more understandable syntax and help to express intentions in the code more precisely – the code becomes easier to read and maintain for everyone.

    Conclusion:

    The motivation for modernization does not arise from regulations – but from tangible improvements and a common understanding. The better you address uncertainties in the team and make concrete advantages visible, the easier it will be to get everyone on board.

    In the next step, we’ll take a look at how you can specifically get your team excited about modern Java versions – and which arguments work best.

    Convincing your Team: how to Make Them Want Modern Java Versions

    If there is skepticism in the team or the benefits of new Java versions are not yet tangible, it takes more than an abstract feature list. It is crucial that the advantages can be experienced in your own everyday life – and that no one feels overwhelmed or left alone.

    Which arguments are really convincing?

    • Less boilerplate, more clarity: Modern features such as Records, Pattern Matching or Switch Expressions help to significantly reduce redundant code. This makes applications leaner, more understandable – and saves time in development, reviews and maintenance.
    • Express intention more precisely – with modern syntax: New language tools make it possible to map complex business logic more clearly. The code becomes more self-explanatory, less error-prone and still easy to understand months later – for yourself and for your colleagues.
    • Performance and resource consumption: New Java versions bring continuous optimizations in execution – for example through modern garbage collectors or improvements in the hotspot compiler. The result: better performance without changes to the code.
    • Asynchronous logic – without reactive complexity: Virtual threads enable a simple, imperative structure – with simultaneous scalability. Instead of complex reactive frameworks, classic code can often be used, which is more readable and maintainable.
    • Motivation and further development: Current tools and language features bring a breath of fresh air into everyday development. It’s simply more fun to develop yourself further with current techniques – this strengthens motivation, competence and employer attractiveness.
    • Quick wins: Even small changes – such as a first refactoring to records or a more elegant pattern matching – show how clarity and maintainability can be improved. Such quick wins are often more convincing than any theoretical presentation.
    Developer team in a workshop atmosphere works together on laptops and whiteboard with Java diagrams.

    How to get your team on board:

    • Start with realistic dry runs: Even if the project is (still) running on an older Java version, you can show in a separate branch how a piece of legacy code can be improved with modern language tools – initially without interfering with CI/CD or deployment.
    • Use brown bag sessions: Informal short formats during the lunch break are perfect for sharing knowledge in a relaxed and pressure-free way.
    • Create space for questions and exchange: Not everyone gets through immediately. Encourage them to ask questions openly and express uncertainties – for example in team meetings, internal forums or Slack channels.
    • Focus on joint learning: Organize small coding sessions or dojos in which the team tries out new features together. This often leads to new ideas, and enthusiasm spills over to others.
    • Actively involve skeptics: Encourage critical voices to formulate their concerns. Often a convincing example is enough to turn doubt into interest.
    • Make progress visible: Record successes – for example with a small “Hall of Fame” for particularly successful code modernizations. Visible successes motivate – and invite imitation.

    Conclusion:

    Your team not only needs to know modern Java versions – it needs to feel their value. If you show how new language features noticeably improve everyday life, motivation, curiosity and willingness to learn arise all by themselves. The rest is a process – but one that is worthwhile.

    The next chapter is about how to convince management – with arguments that translate technology into business benefits.

    Inspiring Management: Translating Technology into Business Benefits

    Even the most motivated development team reaches its limits when support from management is lacking. Investments in modernization, training or new tools must assert themselves against other priorities. That’s why it’s crucial not only to justify technical innovations technically – but to show their concrete benefits for the business.

    What convinces decision-makers?

    • Measurable results: Show how modernization affects concrete KPIs – for example through shorter release cycles, fewer failures or higher productivity in the team. Before-and-after comparisons from pilot projects or simple time/cost estimates are often particularly convincing.
    • Reduced costs: Modern Java versions can significantly reduce resource requirements through targeted JVM optimizations and improved garbage collectors. Less CPU load, lower memory consumption and faster start-up times lead directly to lower cloud costs.
    • Competitive advantages: An up-to-date technology stack not only increases the speed of innovation, but also makes the company more attractive to new talent. Those who use modern tools can develop new features faster and react more flexibly to market changes.
    • Future security: Regular updates and modern language elements reduce technical ballast. This reduces the risk of security vulnerabilities and compliance problems. Maintenance becomes more predictable – and cheaper in the long run.
    • Risk and error reduction: Modern code is more readable, more understandably structured and less prone to errors. Bugs are found faster, downtimes are reduced and support costs are lowered.
    Developer presents KPIs such as lower cloud costs and higher developer productivity to a manager on a large screen

    How do you argue effectively?

    1. Speak the language of management: Focus on business metrics, not technical details. Instead of “Pattern Matching is more elegant” rather: “We reduce development time and lower maintenance costs through clearer code.” Instead of “ZGC enables low-pause garbage collection” better: “Customers experience fewer dropouts and faster response times – a measurable competitive advantage.”
    2. Use practical examples: Show how similar companies or other teams in your own company have benefited from modernization. You can find a selection of impressive examples in the box “Concrete practical examples” at the end of the section.
    3. Prepare decision templates: Summarize benefits, effort and possible risks in a compact way. A well-structured presentation or a compact PDF can already make the difference.
    4. Show the Return on Investment (ROI): Show how quickly the investment in an upgrade or training pays for itself – for example through savings, faster time-to-market or fewer support tickets.
    5. Offer concrete next steps: A non-binding modernization workshop or targeted proof of concept quickly delivers initial results and makes the benefits of new features tangible – without changing existing processes.

    Conclusion:

    Management rarely decides purely technically – it needs comprehensible figures, risks and opportunities. If you manage to translate the technical added value of modern Java development into measurable, entrepreneurial advantages, you create the basis for willingness to invest and strategic support.

    In the next chapter, we’ll take a look at which path to modernization might be the best fit for your company – bottom-up, top-down or together.

    Concrete practical examples: This is how Java modernization works in reality

    • Alibaba was able to increase throughput by up to 20% and reduce latency by up to 60% by upgrading from Java 8 to 17 (source).
    • Netflix reports savings in the six- to seven-figure range by switching to Spring Boot 3 and Java 17 (source).
    • Amazon saves around USD 260 million annually by switching to Java 17 and the associated performance optimizations (source).
    • Very Good Security (VGS) reduced the number of garbage collections by up to 87.5% by upgrading to Java 17 – with 50% less cumulative GC pause time (source).
    • Netflix was able to reduce the maximum response time from 2500 ms to under 1 ms by upgrading to Java 21 and using the Generational ZGC (source).
    • Amazon reduced memory consumption by up to 22% by using Compact Object Headers (Java 25) – with 11% higher throughput (source).
    • In a JetBrains study, 52% of developers stated that outdated technology significantly complicates their daily work – in a StackOverflow survey, it was even 58% (source).
    • According to a Storyblok survey, 58% of developers considered changing jobs last year because of an outdated tech stack. 73% know colleagues who have already quit for this reason. 74% say that the stack they use significantly shapes their professional identity (source).
    • The same article says: Employers pay a “legacy surcharge” – in the form of higher salaries or external consultants, just to be able to continue operating old systems.
    • Ryan Morgan, Senior Director by VMware says aptly: “There is no better ROI than being on the latest version.” (source).

    Which Path Suits You? Bottom-up, Top-Down – or Together?

    As soon as the desire for modernization is in the room, the question arises: How do you best get the change rolling? Do you wait for a clear signal from above, do you start yourself in the team – or do you look for a common path with management? Each of these approaches has strengths and weaknesses. The most effective is often a clever combination.

    Bottom-up: the Initiative from the Team

    Many successful modernization projects arise because individual developers or small groups take the first step. They try out new features, prepare examples and present them in the team or company-wide in brownbag sessions.

    Benefits:

    • Practical examples and quick wins are often more convincing than abstract arguments.
    • The team develops initiative and motivation.
    • Acceptance is usually higher because the change arises from everyday work.

    Risks:

    • Without backing from management, important resources or budgets are often lacking.
    • Changes may remain limited to individual projects and not reach the entire company.

    Top-down: Management Sets the Direction

    In some companies, the initiative comes from management. The leadership strategically decides on an upgrade and implements the modernization course in a binding manner.

    Benefits:

    • Resources and budgets are secured.
    • The direction is clear and consistent – even across team boundaries.
    • Decisions can be made and implemented more quickly.

    Risks:

    • If the team is not involved, resistance can easily arise – the project seems like a measure imposed from above.
    • Without technical expertise in the decision-making process, important framework conditions from the developers’ everyday work might not be sufficiently considered.
    Infographic with three scenes: developer initiative, management directive, and joint modernization approach.

    Strong Together: the Hybrid Approach

    The best results are achieved when bottom-up engagement and top-down support go hand in hand. The team contributes ideas and concrete use cases – the management provides the structural framework, resources, freedom, and creates strategic commitment.

    How to make the collaboration succeed:

    • Early, open communication between tech leads, the team, and the management level.
    • Jointly defined pilot projects that consider both technical and economic goals.
    • Feedback loops: Experiences from the team are systematically incorporated into further planning and prioritization.
    • Visible successes – for example, through small lighthouse projects that also inspire other teams.

    Conclusion:

    Whether bottom-up, top-down, or together – the crucial thing is that all participants are picked up, involved, and empowered early on. Change does not succeed through pressure, but through understanding, participation, exchange, and initial positive experiences.

    In the next chapter, I’ll show you how you can actively shape this process – and how you can use it to build a sustainable culture of change.

    Conclusion: Start Now – and Bring Everyone Along

    The introduction of modern Java versions is not a sure thing – but it is worth it. If you manage to inspire both your team and management with the advantages, you create the basis for sustainable progress: more maintainable code, motivated developers, and visible business advantages.

    Bird's-eye view of a long meeting table with a colorful roadmap, surrounded by developers and managers discussing modernization goals for Java projects together.

    The most important learnings at a glance:

    • Show real benefits in everyday work: Features like Records, Pattern Matching, or Virtual Threads are convincing not through theory, but through concrete simplifications in everyday work.
    • Speak openly about concerns: Uncertainties are normal. A learning culture in which questions are welcome creates trust and openness to new things.
    • Translate technical advantages into business language: Decision-makers want to see results – lower cloud costs, higher velocity, decreasing maintenance effort.
    • Rely on pilot projects and quick wins: First small modernizations – visible, tangible, low-risk – create trust and motivation for the next steps.
    • Understand modernization as a process: Not a “Big Bang”, but a structured path. With a clear roadmap, iterative implementation, and continuous learning support.

    Most importantly: Just start – with a small step. You don’t have to modernize everything at once. Even a small example, a brownbag session, or an exploration branch can be the beginning. Share your experiences, involve others – and stick with it, even if there are setbacks.

    Every step creates clarity, trust, and direction – and brings you and your team closer to a modern, maintainable, future-proof Java project.

    Do you have questions, need concrete arguments for your next meeting, or want to initiate a modernization project?

    Feel free to write to me or bring your experiences and ideas to the comments – I look forward to the exchange!

  • Java 25 Features (with Examples)

    Java 25 Features (with Examples)

    Java 25 has been released on September 16, 2025. You can download it here.

    My Java 25 highlights:

    • Two years after Virtual Threads, Scoped Values are now also a production feature. With Scoped Values, data can be provided across method chains without having to pass them as parameters from method to method.
    • Compact Source Files and Instance Main Methods: For small test and demo programs, as often written when trying out new features, a class declaration is no longer required, and the signature of the main() method has been greatly simplified: more than void main() is no longer necessary.
    • With Flexible Constructor Bodies, we are now allowed to execute code in the constructor before calling super() or this(). This allows, for example, validating or calculating parameters before calling the super constructor.
    • With Compact Object Headers, object headers can be compressed from 12 to 8 bytes. This saves memory space and improves performance, especially in applications with many small objects.
    • With Stable Values (currently still in preview stage), values can be initialized thread-safely on first access – then they are considered constants and can be optimized by the JVM like final fields, e.g., through constant folding.

    Scoped Values – JEP 506

    With Java 25, the second feature from “Project Loom” (after Virtual Threads) is completed: After several rounds as an incubator and preview feature, Scoped Values have now also been finalized.

    Scoped Values offer an elegant way to make data available across method chains without having to pass them as parameters. Typical example: In a web application, after successful authentication, the logged-in user is stored in a Scoped Value. All subsequent methods – no matter how deep in the call stack they are called – can then directly access this User object:

    public class Server {
      public static final ScopedValue<User> LOGGED_IN_USER = ScopedValue.newInstance();
    
      private void serve(Request request) {
        User loggedInUser = authenticateUser(request);
        ScopedValue.where(LOGGED_IN_USER, loggedInUser)
                   .run(() -> restAdapter.processRequest(request));
      }
    }Code language: Java (java)

    Within the call of restAdapter.processRequest(...), the logged-in user can be retrieved at any time via LOGGED_IN_USER.get() – without explicit passing as a parameter. The mechanism is reminiscent of ThreadLocal, but has several advantages:

    • Limited scope: The scope is clearly defined and automatically ends with the expiration of run() or call().
    • Immutability: The stored value cannot be changed – unlike ThreadLocal – which prevents race conditions and unexpected side effects.
    • Lower memory footprint: When using InheritableThreadLocal, values are copied to child threads so that changes in the child thread do not affect the parent thread. Due to immutability, it is not necessary to copy values with Scoped Values.

    Scoped Values were first introduced in Java 20 as an incubator feature. With Java 23, they were extended by the generic interface ScopedValue.CallableOp, which enables type-safe exception handling. In Java 24, the convenience methods callWhere() and runWhere() were removed – in favor of a more consistent, fluent style:

    // Before Java 24:
    Result result = ScopedValue.callWhere(LOGGED_IN_USER, loggedInUser, 
                                          () -> doSomethingSmart());
    
    // Since Java 24:
    Result result = ScopedValue.where(LOGGED_IN_USER, loggedInUser)
                               .call(() -> doSomethingSmart());Code language: Java (java)

    In Java 25, Scoped Values are finalized through JDK Enhancement Proposal 506 and can thus be used in production code.

    If you have been using ThreadLocal so far, it’s worth taking a look at the new possibilities. Scoped Values not only offer better readability and maintainability but also fit perfectly into the new world of virtual threads.

    👉 You can find a detailed introduction in the main article about Scoped Values.

    Module Import Declarations – JEP 511

    After two rounds as a preview in Java 23 and Java 24, Module Import Declarations have also been finalized in Java 25 through JDK Enhancement Proposal 511 – without further changes.

    What Does import module Do?

    Since Java 1.0, classes from the package java.lang have been automatically made available. We have always been able to include entire packages with the import statement. What was not possible for a long time: importing entire modules. This is now made possible by import module.

    A module import allows you to use all classes from the exported packages of a module:

    import module java.base;
    
    public static Map<Character, List<String>> groupByFirstLetter(String... values) {
      return Stream.of(values).collect(
          Collectors.groupingBy(s -> Character.toUpperCase(s.charAt(0))));
    }Code language: Java (java)

    In the example above, you don’t need to import java.util.List or java.util.stream.Collectors individually – they all belong to the java.base module.

    Important: You don’t need a module-info.java for this. Even classic projects without modules benefit from the new mechanism.

    Name Conflicts with Multiple Occurring Classes

    When two imported modules provide a class with the same name, the compiler cannot immediately know which one is needed. An example is the class Date – it is contained in both java.base and java.sql:

    import module java.base;
    import module java.sql;
    
    // . . .
    
    Date date = new Date();  // Compiler error: "reference to Date is ambiguous"Code language: Java (java)

    The solution? You specify which variant you want to use through an explicit class name import:

    import module java.base;
    import module java.sql;
    import java.util.Date;  // ⟵ This resolves the ambiguity
    
    // . . .
    
    Date date = new Date();Code language: Java (java)

    Since Java 24, you can also resolve such conflicts through package imports:

    import module java.base;
    import module java.sql;
    import java.util.*; // ⟵ This also resolves the ambiguity
    
    // . . .
    
    Date date = new Date();Code language: Java (java)

    Transitive Module Dependencies

    A major advantage of import module lies in the support of transitive dependencies: When a module transitively includes another, its exported packages are also available – without any additional import.

    Example: java.sql declares a transitive dependency on java.xml:

    module java.sql {
      requires transitive java.xml;
    }Code language: Java (java)

    This allows you to directly use classes like SAXParserFactory without explicitly importing java.xml:

    import module java.sql;
    
    SAXParserFactory factory = SAXParserFactory.newInstance();Code language: Java (java)

    New in Java 24 (and now final in Java 25) is that java.base also works as a transitive dependency – for example, when you import java.se, which previously had not transitively included java.base.

    Effects on JShell and Compact Source Files

    JShell and the so-called Compact Source Files, which are also finalized in Java 25 and described in the next section, now automatically import java.base. This reduces boilerplate code in interactive sessions and in compact source files.

    👉 You can find more background information, practical examples, and in-depth explanations in the main article about Module Import Declarations.

    Compact Source Files and Instance Main Methods – JEP 512

    When Java beginners write their first program, it often looks like this:

    public class HelloWorld {
      public static void main(String[] args) {
        System.out.println("Hello world!");
      }
    }Code language: Java (java)

    For experienced developers, this may seem completely self-evident – but beginners are overwhelmed by visibility modifiers like public, classes, static methods, an unused args array, and a somewhat cumbersome System.out.

    With Java 25, all of this becomes optional. Compact Source Files and Instance Main Methods – finalized through JDK Enhancement Proposal 512 after four preview rounds with varying feature names – enables compact Java programs without explicit class structure:

    void main() {
      IO.println("Hello world!");
    }Code language: Java (java)

    Functionality in Detail

    A Compact Source File is a .java file that contains no explicit class or package declaration. When compiling, the Java compiler automatically generates a so-called implicitly declared class. This class is not visible and cannot be referenced by other classes.

    The main() method – whether in conventional or compact source files – no longer needs to be static or public, and the args parameter is also optional. If the method is not static, i.e., it’s an instance method, an instance of the class is automatically created when the program starts, and the main() method of this instance is called.

    The new IO class provides the three most important input and output methods with print(), println(), and readln(). It is located in the java.lang package and is thus automatically available in all Java files without an import statement.

    In compact source files, the module java.base is automatically imported. This means all classes of the packages exported by this module are immediately available (i.e., without imports). You can find more information about module imports in the Module Import Declarations section.

    Why is this Important?

    These innovations make getting started with Java noticeably easier. Compact programs like this can be executed directly:

    void main() {
      IO.println(greet("world"));
    }
    
    String greet(String name) {
      return "Hello " + name + "!";
    }Code language: Java (java)

    The full expressiveness of the language is retained, just with significantly less syntactic overhead. Classes, modifiers, packages, modules can then be introduced when they are needed – as soon as the programs grow larger and require more structure.

    Review

    In Java 21, the feature was first introduced under the name Unnamed Classes and Instance Main Methods.

    In Java 22, the concept of “unnamed classes” was replaced by “implicitly declared classes”. At the same time, the launch protocol that controls which main()-method is executed if multiple main()-methods exist was simplified.

    In Java 23, the java.io.IO-helper class was introduced.

    In Java 24, the feature was renamed to Simple Source Files and Instance Main Methods without any other changes.

    In Java 25, the feature was finalized by JDK Enhancement Proposal 512 and renamed one last time to Compact Source Files and Instance Main Methods. The IO class, which was previously in the java.io package and whose methods were automatically statically imported, was moved to the java.lang package, and its methods must be explicitly imported. Thus, there is no longer a special rule for this one class.

    👉 You can find further details about the main()-method, the “launch protocol” and special cases in the section Compact Source Files and Instance Main Method in the article about the main()-method.

    Flexible Constructor Bodies – JEP 513

    Constructors in Java were long strictly limited in their structure: no custom code was allowed before calling super(…) or this(…). This often led to sometimes cumbersome constructions – especially when wanting to validate or pre-calculate parameters.

    The Problem so Far: Cumbersome Constructor Logic

    An example makes this clear:

    public class Square extends Rectangle {
      public Square(Color color, int area) {
        this(color, Math.sqrt(validateArea(area)));
      }
    
      private static double validateArea(int area) {
        if (area < 0) throw new IllegalArgumentException();
        return area;
      }
    
      private Square(Color color, double sideLength) {
        super(color, sideLength, sideLength);
      }
    }Code language: Java (java)

    Here, the validation must be outsourced to a separate method and the conversion of the area to a side length to a separate constructor. Why? Because (until now) super(...) or this (...) always had to be the first statement in a constructor.

    This makes the code unnecessarily complex and hard to read – as you surely noticed at first glance at the code ;-)

    Flexible Constructors in Java 25

    Since Java 25, this anti-pattern is a thing of the past – thanks to “Flexible Constructor Bodies” finalized by JDK Enhancement Proposal 513.

    From now on, the rule is: Any code may precede the call to super(...) or this(...) – as long as it doesn’t read from uninitialized instance fields.

    This means:

    • You can validate parameters.
    • You can calculate local variables.
    • You can even initialize fields – and this is especially helpful when the super constructor calls methods that are overridden in the subclass.

    This leads to much more readable code:

    public class Square extends Rectangle {
      public Square(Color color, int area) {
        if (area < 0) throw new IllegalArgumentException();
        double sideLength = Math.sqrt(area);
        super(color, sideLength, sideLength);
      }
    }Code language: Java (java)

    Here it is clear at first glance what happens:

    1. The area is validated.
    2. The side length is calculated
    3. The Rectangle constructor is called.

    Fewer Surprises with Inheritance

    A frequently underestimated problem was also the following:

    If a method is called in the super constructor, and that method is overridden in the subclass and accesses fields of the subclass there, this can lead to surprises.

    Here’s an example:

    public class SuperClass {
      public SuperClass() {
        logCreation();  // ⟵ 2.
      }
    
      protected void logCreation() {
        System.out.println("SuperClass created");  // ⟵ not invoked; 
                                                   // method is overriden in ChildClass
      }
    }
    
    public class ChildClass extends SuperClass {
      private final String parameter;
    
      public ChildClass(String parameter) {
        super();                     // ⟵ 1.
        this.parameter = parameter;  // ⟵ 4.
      }
    
      @Override
      protected void logCreation() {
        System.out.println("parameter = " + parameter);  // ⟵ 3.
      }
    }Code language: Java (java)

    A call to new ChildClass("foo") would not output “SuperClass created” or “parameter = foo”. No, this call would output the following:

    parameter = nullCode language: plaintext (plaintext)

    The reason: parameter is only set in step 4 (see source code comments) – i.e., after the super constructor call. The method logCreation() called by the super constructor, which is overridden by ChildClass, therefore accesses an uninitialized field in step 3.

    With Flexible Constructor Bodies, this can be easily prevented:

    public ChildClass(String parameter) {
      this.parameter = parameter;
      super();
    }Code language: Java (java)

    We can now assign fields before we call the super constructor.

    Review

    Flexible Constructor Bodies started in Java 22 under the name “Statements before super(…)”.

    In Java 23, the feature received its current name, and the possibility to initialize fields before calling the super constructor was added.

    In Java 24, the feature was re-proposed as a preview without changes.

    In Java 25, the feature is finalized without changes through JDK Enhancement Proposal 513 and can thus be used in production code.

    👉 You can find further use cases, details, and peculiarities in the main article: Flexible Constructor Bodies in Java: Call Code Before super()

    Performance Improvements

    Java 25 brings performance improvements in various areas of the JVM: Compact Object Headers make memory usage more efficient; Generational Shenandoah optimizes garbage collection. Additionally, there are two extensions to the Ahead-of-Time Class Loading and Linking feature released in Java 24.

    Compact Object Headers – JEP 519

    Every Java object contains an object header in addition to the actual data fields. This header contains metadata such as the object’s hash code, lock information (for synchronization), object age (for garbage collection), and a pointer to the class data structure.

    Until now, this header was typically 12 bytes in size – even 16 bytes with Compressed Class Pointers disabled.

    As part of Project Lilliput, JDK developers have managed to reduce the header to 8 bytes – without losing functionality. This more compact variant is called Compact Object Header and saves considerable memory, especially with a large number of small objects.

    Structure of the Previous 12-Byte Object Header

    This is how the 12-byte header looks so far:

    Java Object Header: Mark Word and Class Word

    The 12-byte header consists of:

    • a Mark Word containing the object’s identity hash code, its age, and two so-called tag bits (for synchronization)
    • and a Class Word with a compressed pointer to the class data structure.

    Structure of the “Compact” 8-Byte Object Header

    And this is how the new 8-byte header is structured (Note: scale changed):

    Structure of Compact Object Header in Java 25

    The Compact Object Header is no longer divided into Mark Word and Class Word. It now consists of:

    • 22 bits for the class pointer (instead of 32 previously),
    • 31 bits for the identity hash code (unchanged),
    • 4 reserved bits for Project Valhalla,
    • 4 bits for the object age (unchanged),
    • 2 bits for locking information (tag bits, unchanged),
    • 1 bit for the new Self Forwarded Tag.

    What has changed?

    1. Unused bits removed: In the previous structure, there were 27 unused bits in the Mark Word – these have been removed.
    2. Class Pointer compressed: The 32-bit pointer to the class data structure has been reduced to 22 bits – you can learn exactly how this works in the main article about Compact Object Headers.

    In Java 24, Compact Object Headers were introduced as an experimental feature. As they have proven to be stable and performant, they are declared a productive feature in Java 25 through JDK Enhancement Proposal 519.

    You can activate them with the following VM option:

    -XX:+UseCompactObjectHeaders

    The additional enabling of experimental features through -XX:+UnlockExperimentalVMOptions is no longer required in Java 25.

    You can find more details in the main article about Compact Object Headers mentioned above.

    Generational Shenandoah – JEP 521

    In Java 24, the Generational Mode for the Shenandoah garbage collector was introduced as an experimental feature.

    A Generational Garbage Collector takes advantage of the so-called “Weak Generational Hypothesis”: Most objects die shortly after their creation, while long-lived objects typically continue to exist for longer.

    To efficiently utilize this property, the garbage collector divides the heap into two areas – a young and an old generation. New objects initially land in the Young Space. Only if they survive multiple GC cycles are they moved to the Old Space. Due to the expected stability of the old generation, it is scanned less frequently – this reduces the number of unnecessary scans and ideally shortens pause times significantly.

    This strategy is not new: The G1 Garbage Collector – in use since Java 7 – has always worked on a generational basis. The ZGC has also been using a comparable approach by default since Java 23. With Java 24, Shenandoah followed suit, initially only in experimental mode. The implementation proved to be stable and efficient in practice: Users reported positive results with latency-sensitive applications.

    In Java 25, the Generational Mode is now declared a productive feature through JDK Enhancement Proposal 521. You can now activate it as follows:

    -XX:+UseShenandoahGC -XX:ShenandoahGCMode=generational

    The additional option -XX:+UnlockExperimentalVMOptions is no longer required.

    Ahead-of-Time Command-Line Ergonomics – JEP 514

    When starting a Java application, it can sometimes take seconds to minutes until all Java classes are read, parsed, loaded, and linked. Through Ahead-of-Time Class Loading and Linking introduced in Java 24, which is based on Application Class Data Sharing (AppCDS), these steps can be executed before the application starts, thereby significantly accelerating the application’s startup.

    The process previously consisted of three steps:

    Step 1: In “Record Mode”, the JVM analyzes the application in a training run and stores information about the loaded and linked classes in the AOT configuration (in the example AotTest.conf):

    java -XX:AOTMode=record -XX:AOTConfiguration=AotTest.conf \
        -cp AotTest.jar eu.happycoders.AotTestCode language: plaintext (plaintext)

    Step 2: In “Create Mode”, the JVM generates the AOT cache (AotTest.aot) from the AOT configuration:

    java -XX:AOTMode=create -XX:AOTConfiguration=AotTest.conf -XX:AOTCache=AotTest.aot \
        -cp AotTest.jarCode language: plaintext (plaintext)

    Step 3: On each subsequent start of the application, the JVM loads the classes in loaded and linked form directly from this cache and starts correspondingly faster:

    java -XX:AOTCache=AotTest.aot -cp AotTest.jar eu.happycoders.AotTestCode language: MIPS Assembly (mipsasm)

    (In the article linked above, you will be guided step by step through this process.)

    JDK Enhancement Proposal 514 introduces the new command-line option -XX:AOTCacheOutput, which allows the first two steps to be executed with a single command:

    java -XX:AOTCacheOutput=AotTest.aot -cp AotTest.jar eu.happycoders.AotTestCode language: plaintext (plaintext)

    Through a new environment variable JDK_AOT_VM_OPTIONS, you can specify VM options that should only apply to the second sub-step (“Create Mode”) – without affecting the first sub-step, the training run (“Record Mode”).

    The new combined mode does not replace the two old modes, as there are use cases where it may still make sense to execute the steps separately. For example, if step 1 (the training run) should be executed on a small cloud instance – while step 2 (cache generation, which may take significantly longer in the future due to new optimizations) should be run on a more powerful machine.

    Ahead-of-Time Method Profiling – JEP 515

    When a Java application is running, the JVM continuously collects data about the called methods, especially about which methods require the most CPU time. These methods are then dynamically optimized and translated into assembler code for the target platform. Since this process takes a while, a Java application is slower at the beginning – in the so-called “warm-up phase” – and only reaches its full performance after a few seconds.

    Through Ahead-of-Time Class Loading and Linking, as described in the previous section, a training run creates an AOT cache that contains the classes needed by an application in loaded and linked form, thus accelerating the start of an application.

    JDK Enhancement Proposal 515 extends the training run and AOT cache so that, in addition to the binary class data, the aforementioned data on CPU usage of methods (so-called “method profiles”) are also stored in the AOT cache.

    Thus, at program start, the most frequently called methods (the so-called “hotspots”) can be directly translated into machine code. This has resulted in measured improvements in startup time of up to 19%, while the size of the AOT cache has only increased by 2.5%.

    The changes introduced by JEP 515 do not affect the continuous analysis of method calls and further optimization at runtime, so the application continues to be continuously optimized by the JVM when its behavior changes in production.

    Improvements to Java Flight Recorder (JFR)

    Java Flight Recorder (JFR) is a tool built into the JVM since Java 11 for diagnosing Java applications. With the JFR, you can profile the application and capture certain events without significantly impacting the application’s performance.

    Java 25 includes three improvements to the Java Flight Recorder – one of which is still in Experimental status.

    JFR Cooperative Sampling – JEP 518

    One function of the Java Flight Recorder is “profiling”. This is not about individual events, but about statistics, e.g., on which methods take up how much time.

    This is not done by exact measurement, but by so-called “sampling”: At fixed intervals, the call stacks of all threads are read and stored. From the stored call stacks, the approximate call duration of all methods is then derived using statistical methods.

    However, reading an exact stack trace is only possible at so-called “safepoints” – these are designated points in the JVM code where certain required metadata is available. Reading exclusively at these safepoints, however, leads to the so-called “safepoint bias”: If frequently called code is executed disproportionately often far from a safepoint, it is measured inaccurately.

    For this reason, sampling has not been performed only at these safepoints until now. However, without the metadata available at the safepoints, heuristics had to be used to generate the call stack. These heuristics are extremely inefficient and can, in the worst case, cause the JVM to crash.

    Therefore, the sampling mechanism was modified as follows through JDK Enhancement Proposal 518:

    • At regular sampling intervals, only the CPU’s program counter and stack pointer are read.
    • Stack traces are read at the subsequent safepoints.
    • The call stack at the sampling time is reconstructed using the recorded program counter and stack pointer.

    This approach is more performant on the one hand, and simpler in implementation and therefore more stable on the other.

    JFR Method Timing & Tracing – JEP 520

    In the previous section, I described how the Java Flight Recorder (JFR) profiling works: At certain points in time, call stacks of all threads are read, and the approximate call frequencies and durations of all methods are derived through statistical calculations. However, this method is inaccurate and will never be able to determine the exact number of calls and duration.

    Third-party providers such as JProfiler, YourKit or DataDog have always provided tools that connect to the JVM as a so-called Java agent and inject code into the methods to be measured, which precisely measures the call frequency and duration. This, of course, results in a certain overhead.

    JDK Enhancement Proposal 520 now creates the possibility within the JVM to measure method calls and their duration precisely. Filters can be used to select specific classes, specific methods, or methods with specific annotations. The advantages: higher accuracy compared to sampling and less overhead compared to using third-party agents.

    For example, you can log the stack trace of all interactions with HashMaps using the following options:

    java -XX:StartFlightRecording:jdk.MethodTrace#filter=java.util.HashMap,filename=recording.jfr Demo.javaCode language: plaintext (plaintext)

    Then you can print the stack traces like this:

    jfr print --events jdk.MethodTrace --stack-depth 20 recording.jfrCode language: plaintext (plaintext)

    You can log and print the call times as follows:

    java -XX:StartFlightRecording:jdk.MethodTiming#filter=java.util.HashMap,filename=recording.jfr Demo.java
    jfr print --events jdk.MethodTiming recording.jfrCode language: plaintext (plaintext)

    JFR CPU-Time Profiling (Experimental) – JEP 509

    In the JFR Cooperative Sampling section, I described how the call frequency and duration of methods can be derived by reading stack traces at fixed intervals.

    The times determined in this process are the so-called execution time, i.e., the time that has elapsed from entering the method to exiting it. This time is independent of how the method has used the CPU. A method that executes a sorting algorithm for one second, utilizing 100% of the CPU, has the same execution time as a method that sends a request to the database and waits one second for the response – which, in contrast, uses only minimal CPU resources.

    The time during which the method uses the CPU is called CPU time.

    If we know which methods use the most CPU time, we can optimize these methods, for example, by replacing a search algorithm with a more efficient one – and thereby reduce the CPU load of the application.

    Until now, the Java Flight Recorder did not offer a way to analyze CPU time. This changes with JDK Enhancement Proposal 509 – initially, however, only for Linux.

    The new option jdk.CPUTimeSample#enabled=true allows you to activate CPU time sampling. For example, the following command starts a Java application with CPU time sampling activated and outputs the measured data to the file profile.jfr:

    java -XX:StartFlightRecording=jdk.CPUTimeSample#enabled=true,filename=profile.jfr ...Code language: plaintext (plaintext)

    The new option is independent of the option jdk.ExecutionSample#enabled=true, which activates execution time sampling – so you can activate both sampling methods simultaneously and measure execution times and CPU times.

    CPU-Time Profiling is currently only available for Linux and is still in the experimental stage. Since it is not a regular VM option, but a JFR option, you do not need to specify the VM option -XX:+UnlockExperimentalVMOptions to activate it.

    New Preview Features in Java 25

    Even though Java 25 is a long-term support release, that’s no reason for JDK developers not to publish new preview features. A particularly interesting preview feature is Stable Values – values that are initialized once when first accessed and then remain constant, allowing the JVM to optimize access to them.

    Preview features are not intended for production use, but for initial experimentation and must be activated with the following VM options:

    --enable-preview --source 25

    Stable Values (Preview) – JEP 502

    Stable Values solve an old problem – the clean, performant, and thread-safe initialization of values that should not (or cannot) be set at program startup, but only upon first access.

    Why Do We Need Stable Values?

    Immutable values make code simpler, safer, and allow the JVM to perform extensive performance optimizations such as constant folding. Until now, this was only possible by marking a field as final. However, final fields are initialized immediately when a class is loaded (final static fields) or when an object is created (final instance fields).

    But if the initialization is complex or context-dependent – for example, because a service is only available later – we have to make do with various forms of lazy initialization. Trivial implementations are often not thread-safe, and thread-safe variants, such as the double-checked locking idiom, are difficult to implement correctly and thus error-prone. In the end, all available solutions are workarounds and exclude JVM optimizations.

    Here’s an example of a trivial, non-thread-safe implementation to load program settings from a database upon first access:

    private Settings settings;
    
    private Settings getSettings() {
      if (settings == null) {
        settings = loadSettingsFromDatabase();
      }
      return settings;
    }
    
    public Locale getLocale() {
      return getSettings().getLocale();
    }Code language: Java (java)

    With synchronized, we could make the getSettings() method thread-safe, but that wouldn’t be very performant. You can find a thread-safe and performant – but significantly more complex – variant in the Optimized Double-Checked Locking in Java section of the article on double-checked locking.

    The solution: Stable Values

    Stable Values bridge the gap between final and mutable:

    • They can be initialized exactly once – at any time and in a thread-safe manner.
    • After that, they are considered immutable, allowing the JVM to optimize them like final fields.
    • They eliminate typical sources of errors in self-built lazy initializations.

    Here’s the example from above with a Stable Value:

    private final Supplier<Settings> settings =
        StableValue.supplier(this::loadSettingsFromDatabase);
    
    public Locale getLocale() {
      return settings.get().getLocale(); // ⟵ Here we access the stable value
    }Code language: Java (java)

    On the first call to settings.get(...), loadSettingsFromDatabase() is called and the settings are cached within settings. All subsequent accesses then return the cached value. This all happens in a thread-safe manner, meaning if get(...) is called simultaneously from multiple threads, loadSettingsFromDatabase() is only called in one of the threads. The other threads wait until the value is available.

    Also Usable as a List

    With StableValue.list(), you can define a list whose elements are initialized upon access and then frozen. Example:

    List<Double> squareRoots = StableValue.list(100, Math::sqrt);Code language: Java (java)

    Only upon the first access to a list element – whether with first(), get(int index), last(), or during an iteration – is it calculated. After that, it remains constant, and further accesses to it can be optimized by the JVM – just like accesses to constants.

    In addition to Stable Lists, there are also Stable Maps, Stable Functions, and Stable IntFunctions.

    You can find the complete Stable Value API, along with a detailed explanation of its internal workings, in the main article on Stable Values (or Lazy Constants, as they have been called since Java 26). There I also take a closer look at the previous workarounds and their drawbacks.

    Stable Values have been released in Java 25 as a preview feature through JDK Enhancement Proposal 502.

    PEM Encodings of Cryptographic Objects (Preview) – JEP 470

    PEM (Privacy-Enhanced Mail) is a widely used format for storing cryptographic keys and certificates. A certificate in PEM format looks like this, for example:

    -----BEGIN CERTIFICATE-----
    MIIDtzCCAz2gAwIBAgISBUCeYELtjMmr4FAIqHapebbFMAoGCCqGSM49BAMDMDIx
    CzAJBgNVBAYTAlVTMRYwFAYDVQQKEw1MZXQncyBFbmNyeXB0MQswCQYDVQQDEwJF
    . . .
    DBeMde1YpWNXpF9+B/OMKgn7RgXRj5b2QpBCnFsP92T4cK/Nn+xFIjYCMCCx4E79
    toSQBlYnNHv0eXnWkI8TmXsU/A6rU4Gxdr9GbGixgRJvkw0C6zjL/lH2Vg==
    -----END CERTIFICATE-----Code language: plaintext (plaintext)

    Anyone who has ever tried to import keys or certificates in PEM format into a Java application or export them from it will have discovered after painstaking Stack Overflow research: Java does not offer a direct way to do this.

    For example, decoding an encrypted private key in PEM format requires more than a dozen lines of code:

    String encryptedPrivateKeyPemEncoded = . . .
    String passphrase = . . .
    
    String encryptedPrivateKeyBase64Encoded = encryptedPrivateKeyPemEncoded
        .replace("-----BEGIN ENCRYPTED PRIVATE KEY-----", "")
        .replace("-----END ENCRYPTED PRIVATE KEY-----", "")
        .replaceAll("[\\r\\n]", "");
    
    Base64.Decoder decoder = Base64.getDecoder();
    byte[] encryptedPrivateKeyBytes = decoder.decode(encryptedPrivateKeyBase64Encoded);
    EncryptedPrivateKeyInfo encryptedPrivateKeyInfo =
        new EncryptedPrivateKeyInfo(encryptedPrivateKeyBytes);
    
    String algorithmName = encryptedPrivateKeyInfo.getAlgName();
    SecretKeyFactory secretKeyFactory = SecretKeyFactory.getInstance(algorithmName);
    
    PBEKeySpec pbeKeySpec = new PBEKeySpec(passphrase.toCharArray());
    Key pbeKey = secretKeyFactory.generateSecret(pbeKeySpec);
    
    Cipher cipher = Cipher.getInstance(algorithmName);
    AlgorithmParameters algParams = encryptedPrivateKeyInfo.getAlgParameters();
    cipher.init(Cipher.DECRYPT_MODE, pbeKey, algParams);
    
    KeyFactory rsaKeyFactory = KeyFactory.getInstance("RSA");
    KeySpec keySpec = encryptedPrivateKeyInfo.getKeySpec(cipher);
    PrivateKey privateKey = rsaKeyFactory.generatePrivate(keySpec);Code language: Java (java)

    The feature PEM Encodings of Cryptographic Objects introduced in Java 25 as a preview is intended to significantly simplify this. The code monster above can be simplified in Java 25 with activated preview features as follows:

    PrivateKey privateKey = PEMDecoder.of()
        .withDecryption(passphrase.toCharArray())
        .decode(encryptedPrivateKeyPemEncoded, PrivateKey.class);Code language: Java (java)

    18 lines of code have been reduced to three lines!

    It’s just as easy to encrypt a private key and convert it to PEM format:

    String encryptedPrivateKeyPemEncoded = PEMEncoder.of()
        .withEncryption(passphrase.toCharArray())
        .encodeToString(privateKey);Code language: Java (java)

    At the center of the new feature are the classes PEMEncoder and PEMDecoder as well as the interface DEREncodable:

    • All classes that represent cryptographic keys and certificates (like PrivateKey in the example above) implement the new interface DEREncodable.
    • A PEMEncoder is created – as shown above – with the static method PEMEncoder.of(). The instance methods encode(...) and encodeToString(...) can then be used to convert cryptographic objects to PEM format (binary or as a string).
    • A PEMDecoder is created with the static method PEMDecoder.of(). PEM files can then be converted into a cryptographic object using the decode() method.
    • The PEMDecoder.decode() method also exists without the second parameter, which in the example above specifies the expected return type PrivateKey.class. This variant returns a DEREncodable, which can then be evaluated using Pattern Matching for switch, for example.
    • To encrypt a private key, the PEMEncoder must be created with PEMEncoder.of().withEncryption(passphrase) – as in the example above. To decrypt it again, the PEMDecoder must be created analogously with PEMDecoder.of().withDecryption(passphrase).
    • PEMEncoder– and PEMDecoder instances are stateless and thread-safe – thus a single instance can be shared and reused by multiple threads.
    • If the decode() method cannot decode the PEM data, no exception is thrown, but a generic PEMRecord object is returned containing the binary data of the PEM file.

    PEM Encodings of Cryptographic Objects is specified in JDK Enhancement Proposal 470.

    Resubmitted Preview and Incubator Features

    Three features didn’t make it to be finalized in Java 25 and are going into a new preview or incubator round: Structured Concurrency, Primitive Type Patterns, and – not surprisingly – the Vector API.

    Structured Concurrency (Fifth Preview) – JEP 505

    When a task can be broken down into multiple subtasks that can be executed independently and in parallel, you can use Structured Concurrency to coordinate these subtasks in a clearly structured, traceable, and efficient manner.

    Instead of complex and error-prone logic with, for example, ExecutorService or parallel streams, we get an API that summarizes the start, completion, and error handling of all subtasks in a clearly defined code block.

    Structured concurrency scopes can be nested arbitrarily. This allows you to clearly model complex task structures while maintaining an overview and control over the lifecycle of all subtasks at all times:

    nested structured concurrency

    With Java 25, Structured Concurrency is already entering its fifth preview round – for the first time since the first preview version in Java 21, however, with significant changes to the API. The changes are specified in JDK Enhancement Proposal 505 and are based on extensive feedback from the community.

    If you haven’t dealt with Structured Concurrency yet and therefore aren’t interested in the changes, feel free to jump directly to the section Example: The Fastest Response Wins.

    What’s New in Java 25?

    The way a StructuredTaskScope is opened has been fundamentally revised:

    • Instead of using new and the constructor, a StructuredTaskScope is now opened via the static factory method StructuredTaskScope.open().
    • If open() is called without parameters, a StructuredTaskScope is created that waits for all subtasks to complete successfully … or one subtask to fail – just like the previous specialized implementation ShutdownOnFailure. Thus, new StructuredTaskScope.ShutdownOnFailure() becomes StructuredTaskScope.open().
    • Other strategies are no longer created by deriving from StructuredTaskScope, but by a so-called joiner, which is passed as a parameter to the open() method.
    • The Joiner interface defines static factory methods to create joiners for frequently needed strategies.
    • Joiner.anySuccessfulResultOrThrow() creates a joiner that returns a result as soon as the first subtask is successful – just like the specialized StructuredTaskScope implementation ShutdownOnSuccess did before. Thus, new StructuredTaskScope.ShutdownOnSuccess() becomes StructuredTaskScope.open(Joiner.anySuccessfulResultOrThrow()).
    • Custom join strategies can be implemented by implementing the Joiner interface instead of extending StructuredTaskScope.

    Additionally, the completion of processing has been simplified:

    • The method StructuredTaskScope.result() has been removed – now StructuredTaskScope.join() returns the result. For example, scope.join(); return scope.result(); thus becomes return scope.join();
    • Similarly, the method StructuredTaskScope.throwIfFailed() has been removed – in case of an exception, it is now also thrown by StructuredTaskScope.join(). This makes error handling more robust.
    • StructuredTaskScope.join() no longer throws a generic ExecutionException in case of an error, but a Structured Concurrency-specific FailedException or a TimeoutException.

    Here you can see the changes using the example of the race() method, which I have shown in some previous articles:

    Old implementation up to Java 24:

    public static <R> R race(Callable<R> task1, Callable<R> task2)
        throws InterruptedException, ExecutionException {
      try (var scope = new StructuredTaskScope.ShutdownOnSuccess<R>()) {
        scope.fork(task1);
        scope.fork(task2);
        scope.join();
        return scope.result();
      }
    }Code language: Java (java)

    New implementation from Java 25:

    public static <R> R race(Callable<R> task1, Callable<R> task2)
        throws InterruptedException {
      Joiner<R, R> joiner = Joiner.anySuccessfulResultOrThrow();
      try (var scope = StructuredTaskScope.open(joiner)) {
        scope.fork(task1);
        scope.fork(task2);
        return scope.join();
      }
    }Code language: Java (java)

    These changes decouple StructuredTaskScope and join strategy, leading to more flexible and maintainable code (keyword: Composition over inheritance).

    Example: the Fastest Response Wins

    A common scenario is querying multiple services in parallel, where the first valid response should be used – in the following example when obtaining weather data:

    WeatherResponse getWeatherFast(Location location) throws InterruptedException {
      Joiner<WeatherResponse, WeatherResponse> joiner = Joiner.anySuccessfulResultOrThrow();
      try (var scope = StructuredTaskScope.open(joiner)) {
        scope.fork(() -> weatherService.readFromStation1(location));
        scope.fork(() -> weatherService.readFromStation2(location));
        scope.fork(() -> weatherService.readFromStation3(location));
        return scope.join();
      }
    }Code language: Java (java)

    As soon as one of the tasks is successful, the others are automatically canceled. The scope.join() method returns the result of the first successful task or throws a FailedException if no task was completed successfully.

    Without Structured Concurrency, you would have to implement the same task with significantly more code, manual thread handling, and custom error logic – which would not only be more time-consuming but also much more prone to bugs.

    Conclusion

    With JEP 505, Structured Concurrency takes a big step towards finalization. The revised API is more clearly structured, easier to understand, and more robust in error handling.

    It once again shows how valuable the feedback from the Java community is during the preview phase of a feature: Only through feedback from practical use could the weaknesses of the previous API be identified and specifically improved.

    You can find a more detailed description and numerous other examples in the main article about Structured Concurrency.

    Primitive Types in Patterns, Instanceof, and Switch (Third Preview) – JEP 507

    Pattern Matching is one of the most exciting developments in recent years. What began with Pattern Matching for instanceof in Java 16 and was expanded with Pattern Matching for switch in Java 21 is now being extended – to primitive data types like int, double, or boolean.

    Until now, pattern matching was limited to reference types. For example, like this:

    switch (obj) {
      case String s when s.length() >= 5 -> System.out.println(s.toUpperCase());
      case Integer i                     -> System.out.println(i * i);
      case null, default                 -> System.out.println(obj);
    }Code language: Java (java)

    This wasn’t possible with primitive values. While you could long compare primitive values like int with constants in the classic switch

    int code = ...
    switch (code) {
      case 200 -> System.out.println("OK");
      case 404 -> System.out.println("Not Found");
    }Code language: Java (java)

    … but this only worked with byte, short, char and int – but not with long, float, double or boolean. And instanceof didn’t work with primitive types at all.

    This will change with Primitive Types in Patterns, instanceof, and switch:

    • All primitive types (int, long, float, double, char, byte, short, boolean) can now be used in switch statements and expressions – both with constants and with pattern matching.
    • Pattern matching with primitive types is now also possible with instanceof.

    What Exactly Does Pattern Matching with Primitive Types Mean?

    When pattern matching with reference types, you ask: “Is this object an instance of type XY or one of its subclasses?” With primitive types, it works differently because there is no inheritance. Instead, it checks: Can the current value be represented in a specific target type without loss of precision?

    An example:

    int i = ...
    if (i instanceof byte b) {
      System.out.println("b = " + b);
    }Code language: Java (java)

    Here, i matches the pattern byte b if the value also fits in a byte. For i = 100 this would be the case, for i = 500 it wouldn’t.

    Or with floating-point numbers:

    double d = ...
    if (d instanceof float f) {
      System.out.println("f = " + f);
    }Code language: Java (java)

    Here, the rule is: Only if d fits into a float without loss of precision does the pattern match. This works for d = 1.5, but not for d = Math.PI or d = 16.777.217. Both numbers are too precise to be stored in a 32-bit float variable.

    You can – as with reference types – attach additional conditions:

    int a = ...
    if (a instanceof byte b && b > 0) {
      System.out.println("b = " + b);
    }Code language: Java (java)

    In this case, the pattern only matches if a can be represented losslessly as byte and the value is additionally greater than 0.

    Pattern Matching with Switch and Primitive Types

    This doesn’t just work with instanceof, but also with switch. Here’s a complete example:

    double value = ...
    switch (value) {
      case byte   b -> System.out.println(value + " instanceof byte:   " + b);
      case short  s -> System.out.println(value + " instanceof short:  " + s);
      case char   c -> System.out.println(value + " instanceof char:   " + c);
      case int    i -> System.out.println(value + " instanceof int:    " + i);
      case long   l -> System.out.println(value + " instanceof long:   " + l);
      case float  f -> System.out.println(value + " instanceof float:  " + f);
      case double d -> System.out.println(value + " instanceof double: " + d);
    }Code language: Java (java)

    Depending on the specific value, the first matching case is executed:

    • For value = 42, for example, the pattern byte b matches because the value can be stored as byte without loss of information.
    • For value = 200, byte no longer fits, but short does – so the short s branch is executed.
    • For value = 65000, short also no longer applies, but char c does, as char can represent values from 0 to 65,535.
    • For value = 500000, byte, short, and char are too small – here int i fits.
    • For value = 3.14, no integer representation is possible, but the value fits into a float without loss of precision, so the branch behind float f is executed.
    • For value = Math.PI, only double d remains, as Math.PI is too precise for float.

    As with object types, the same applies here: You must cover all cases or specify a default branch to ensure exhaustive checking.

    Subtleties: Dominance and Completeness

    The principle of dominance also plays an important role for primitive types: An int value basically also fits into a long, so a pattern long l would also catch all int values – and therefore must not stand before a pattern int i in the code.

    Additionally, as with all modern switch features, the rule of exhaustiveness applies: The switch block must cover all theoretically possible cases. If this is not possible or not sensible, you must define a default branch to avoid compiler errors.

    You can find more about the exact rules for dominance and exhaustiveness, as well as further examples and peculiarities, in the main article Primitive Types in Patterns, instanceof and switch.

    Review

    Primitive Types in Patterns, instanceof, and switch was first introduced in Java 23 and reintroduced without changes as a preview in Java 24. In Java 25, it now goes into the third preview round, specified by JDK Enhancement Proposal 507 – again without changes, to gather further feedback from the Java community.

    Vector API (Tenth Incubator) – JEP 508

    The Vector API is presented for the tenth time in the incubator stage – specified by JDK Enhancement Proposal 508.

    The API allows mathematical vector operations like the following to be executed particularly efficiently:

    java vector addition
    Example of a vector addition

    The JVM can map these operations so that they – depending on the vector size – directly access the vector instruction sets of modern CPUs. In many cases, such a calculation can be executed in a single CPU cycle.

    The Vector API remains an incubator feature until the building blocks it requires from Project Valhalla have reached the preview stage. As soon as the Vector API is available in a first preview version, I will describe it in detail with practical examples.

    Other Changes in Java 25

    In this section, you’ll find changes that couldn’t be sorted into the other chapters. These are less prominent JEPs, removals, and some (selected by me from the release notes) minor changes that were implemented without a JEP.

    Key Derivation Function API – JEP 510

    A Key Derivation Function (KDF) allows additional cryptographic keys to be derived from a secret input value – such as a password, passphrase, or existing key.

    For KDFs to be used consistently and implemented by security providers, a standardized interface is needed. This is exactly what JDK Enhancement Proposal 510 provides with the Key Derivation Function API and the javax.crypto.KDF class.

    Through this API, you can load and use various KDF algorithms. In the following example, we use “HKDF-SHA256” to derive an AES key from a password and a salt:

    void main() throws InvalidAlgorithmParameterException, NoSuchAlgorithmException {
      KDF hkdf = KDF.getInstance("HKDF-SHA256");
    
      AlgorithmParameterSpec params =
          HKDFParameterSpec.ofExtract()
              .addIKM("the super secret passphrase".getBytes(StandardCharsets.UTF_8))
              .addSalt("the salt".getBytes(StandardCharsets.UTF_8))
              .thenExpand("my derived key".getBytes(StandardCharsets.UTF_8), 32);
    
      SecretKey key = hkdf.deriveKey("AES", params);
    
      System.out.println("key = " + HexFormat.of().formatHex(key.getEncoded()));
    }Code language: Java (java)

    If you’re wondering about the compact main() method: This is part of the innovations covered in the Compact Source Files and Instance Main Methods section.

    Explanations for the abbreviations used in the code can be found in the following Wikipedia articles:

    When you run the example, you should get the following output:

    key = 7ee15549ddce956194ca1d6df5aa34c1a1334d15c875e67ea67fb5850ee48b0cCode language: plaintext (plaintext)

    The key generated in this way can be used, for example, as a session key for secure data transfer.

    The Key Derivation Function API was first introduced in Java 24 as a preview feature and is now a permanent part of the JDK from Java 25 onwards, without changes compared to the preview version.

    Remove the 32-Bit X86 Port – JEP 503

    After the 32-bit port for Windows was removed in Java 24, the last remaining 32-bit variant – the one for Linux – is now being completely removed in Java 25 through JDK Enhancement Proposal 503.

    This eliminates the extra effort for developing and testing 32-bit ports, allowing JDK developers to focus entirely on new features.

    Relax String Creation Requirements in StringBuilder and StringBuffer

    The specifications of the substring()-, subSequence()– and toString()-methods of the StringBuilder and StringBuffer classes previously required that a newly created String object is always returned. This requirement has been removed from the specification, so these methods can now, for example, return a "" constant for an empty string, which is faster than creating a new empty string.

    There is no JEP for this change; it is listed in the bug tracker under JDK-8138614.

    New Methods on BodyHandlers and BodySubscribers to Limit the Number of Response Body Bytes Accepted by the HttpClient

    The classes java.net.http.HttpResponse.BodyHandlers and java.net.http.HttpResponse.BodySubsribers have each been extended with a limiting() method, which can be used to limit the size of a response to an HTTP request.

    There is no JEP for this change; it is listed in the bug tracker under JDK-8328919.

    The UseCompressedClassPointers Option is Deprecated

    By default, the JVM works with Compressed Class Pointers – these are 32-bit compressed pointers in the object header that point to the class data structure belonging to the object.

    Before Compressed Class Pointers were introduced, these pointers were 64 bits long on 64-bit systems. This mode can currently still be reactivated through -XX:-UseCompressedClassPointers. However, this is practically irrelevant, as 32-bit pointers are sufficient to address 4 GB and thus approximately 6 million classes. Even large Java applications rarely count more than 100,000 classes.

    With Compact Object Headers activated in Java 25, class pointers are further compressed to just 22 bits, allowing approximately 4 million – still sufficient – classes to be addressed.

    Support for uncompressed class pointers is to be removed in a future Java version. Accordingly, the option UseCompressedClassPointers has now been marked as deprecated.

    There is no JEP for this change; it is listed in the bug tracker under JDK-8350753.

    Various Permission Classes Deprecated for Removal

    In Java 17, the Security Manager was marked as deprecated for removal. Since Java 24, the Security Manager can no longer be activated.

    In Java 25, numerous ...Permission classes, which were only usable in connection with the Security Manager, have now also been marked as deprecated for removal.

    You can read which classes are affected in detail in the bug tracker under JDK-8348967, JDK-8353641, JDK-8353642, and JDK-8353856.

    Syntax Highlighting for Code Fragments

    The javadoc tool has been extended with the command line option --syntax-highlight. If this option is specified when calling the javadoc command, the library Highlight.js is included in the generated documentation and the code in {@snippet} tags and HTML elements is color-coded accordingly.

    There is no JEP for this change; it is listed in the bug tracker under JDK-8348282.

    Keyboard Navigation

    JavaDoc documentation generated with Java 25 can now be navigated using the keyboard:

    • / focuses the search field in the top right.
    • . focuses the filter field in the sidebar.
    • Esc removes the focus from the search or filter field.
    • With Tab and the arrow keys, you can navigate in the sidebar and the search results.

    There is no JEP for this change; it is listed in the bug tracker under JDK-8350638.

    Add Standard System Property Stdin.Encoding

    The new system property stdin.encoding can be used to set the character encoding for reading System.in. If not explicitly specified – e.g., through -Dstdin.encoding=UTF-8 – the value is determined by the operating system and user environment.

    Note that this setting is not automatically used, but must be explicitly read and applied by an application, e.g., when using InputStreamReader or Scanner.

    There is no JEP for this change; it is listed in the bug tracker under JDK-8350703.

    The Jwebserver Tool -D Command Line Option Now Accepts Directories Specified with a Relative Path

    In Java 18, the so-called Simple Web Server was introduced – a rudimentary HTTP server that can be quickly started to serve static web pages.

    For example, the following command serves the /tmp directory at IP address 127.0.0.100 and port 4444:

    jwebserver -b 127.0.0.100 -p 4444 -d /tmpCode language: plaintext (plaintext)

    Previously, an absolute path had to be specified (via the -d parameter) – which was cumbersome when wanting to share a directory via HTTP within the current project. From Java 25 onwards, a relative directory name can now be specified.

    There is no JEP for this change; it is listed in the bug tracker under JDK-8355360.

    Java.Io.File Treats the Empty Pathname as the Current User Directory

    A java.io.File object created with new File("") previously led to undefined and inconsistent behavior when calling methods on this object. From Java 25 onwards, this creates a File object that represents the current directory.

    This aligns the behavior of File with java.nio.PathPath.of("") always created a representation of the current directory.

    There is no JEP for this change; it is listed in the bug tracker under JDK-8024695.

    Java.Io.File.Delete No Longer Deletes Read-Only Files on Windows

    Previously, calling File.delete() on Windows could also delete files marked as “read-only”. From Java 25 onwards, such files will no longer be deleted, and delete() will return false accordingly.

    The previous behavior can be restored with the system property -Djdk.io.File.allowDeleteReadOnlyFiles=true.

    There is no JEP for this change; it is listed in the bug tracker under JDK-8355954.

    Complete List of all Changes in Java 25

    In this article, I have presented all JDK Enhancement Proposals (JEPs) as well as a selection of other changes without JEP that were implemented in Java 25. A complete list of all changes can be found in the Java 25 Release Notes.

    Conclusion

    Java 25 is once again a well-rounded LTS (long-term-support) release.

    • With Scoped Values, the second feature from Project Loom has been finalized. It’s a shame that Structured Concurrency didn’t make it into this release – but thanks to the 6-month release cycle, we’d rather get a mature feature later than an immature one too early.
    • Module Import Declarations make the import block more organized – it remains to be seen to what extent this will be adopted (outside of JShell and compact source files) – nowadays, the IDE primarily takes care of managing imports.
    • Compact Source Files and Instance Main Methods allow us to write short test and demo programs more quickly. They are also intended to simplify learning the language for beginners.
    • Flexible Constructor Bodies finally allow us to call code in constructors before calling super() or this(), making unsightly workarounds, e.g., for checking parameters before calling the super constructor, obsolete.
    • Compact Object Headers, when activated, reduce the object header from 12 to 8 bytes, thereby reducing the memory footprint, especially for applications with many small objects.
    • Generational Shenandoah speeds up applications that use the Shenandoah Garbage Collector. However, specific figures are not mentioned in the JEPs.
    • Ahead-of-Time Command-Line Ergonomics simplify the creation of an AOT cache, and Ahead-of-Time Method Profiling also stores information about method calls in the AOT cache, which can lead to significant improvements in startup time as frequently called methods can be optimized immediately.

    Further minor changes round off the LTS release as always. You can download Java 25 here.

    Which Java 25 feature are you most excited about? Write it in the comments!

  • Initialization-on-Demand Holder Idiom in Java

    Initialization-on-Demand Holder Idiom in Java

    The Initialization-on-Demand Holder Idiom is a secure and efficient way to initialize static fields on demand in multithreading applications. It prevents subtle race conditions without impacting performance through complete synchronization of all accesses.

    In this article you will find out:

    • What is the motivation for the Initialization-on-Demand Holder Idiom?
    • Why is complete synchronization with synchronized not optimal?
    • How is the Initialization-on-Demand Holder Idiom implemented in Java?
    • What alternatives are there?

    Motivation

    For time-consuming initialization processes, it’s often advisable to perform them only when actually needed. For example, it might make sense to initialize a logger that establishes a connection to a database only when something is logged for the first time. This “Lazy Initialization” prevents unnecessary delays during program startup.

    In a single-thread environment, the implementation is straightforward:

    public class UserService {
      private static Logger logger;
    
      private static Logger getLogger() {
        if (logger == null) {
          logger = initializeLogger();
        }
        return logger;
      }
    
      public void createUser(User user) {
        // . . .
        getLogger().info("User created");
      }
    
      // . . .
    }Code language: Java (java)

    The first call to getLogger() initializes the logger and stores it in the static field logger. Subsequent calls directly return the stored object.

    However, this implementation is not thread-safe.

    In a multithreading application, various subtle effects can occur here, which can lead to race conditions that are difficult to reproduce and thus hard to fix:

    • With nearly simultaneous first calls to the getLogger() method from two threads, both threads could see the logger field as null, causing the logger to be initialized multiple times.
    • Due to thread caching effects, a thread could still see the logger field as null even if another thread has already assigned it.
    • Due to instruction reordering, a thread could see the logger field as not null, but it could point to a Logger object that is not yet fully initialized.

    I have described these three effects in detail in the article about the Double-Checked Locking Idiom.

    In multithreading applications, we must therefore synchronize access to the logger field through appropriate measures.

    Solution 1: Complete Synchronization

    The simplest approach is complete synchronization of the getLogger() method using synchronized (or alternatively an explicit lock):

    //           ↓     
    private synchronized static Logger getLogger() {
      if (logger == null) {
        logger = initializeLogger();
      }
      return logger;
    }Code language: Java (java)

    However, this implementation leads to significant performance losses because:

    • every call requires the administrative overhead of complete synchronization,
    • threads must wait during parallel accesses,
    • entry and exit from the synchronized block trigger complete cache-main memory synchronizations.

    Due to this significant overhead, this solution is not optimal, especially for frequently called methods.

    Solution 2: Double-Checked Locking

    Another possible solution is the Double-Checked Locking mentioned above. I have explained this in detail in the linked article.

    A correctly implemented Double-Checked Locking solves the performance problems mentioned above, but it is quite complicated and thus error-prone in implementation.

    Solution 3: Initialization-on-Demand Holder

    The third solution is the Initialization-on-Demand Holder Idiom. This also solves the performance problems mentioned above. It is easier to implement than Double-Checked Locking and thus less error-prone – but it only works with static fields, not with instance fields.

    And this is how it is implemented:

    public class UserService {
      private static class LoggerHolder {
        private static final Logger LOGGER = initializeLogger();
      }
    
      public void registerUser(User user) {
        // . . .
        LoggerHolder.LOGGER.info("User created");
      }
    
      // . . .
    }Code language: Java (java)

    Here, the Logger object is stored in the static LOGGER field of the inner class LoggerHolder.

    But doesn’t this initialize the logger at program startup? Didn’t we want to avoid exactly that?

    No, because the JVM only loads and initializes a class when it is needed.

    How does the Initialization-on-Demand Holder Idiom ensure Lazy Initialization?

    When the JVM (Java Virtual Machine) loads the UserService class, it does not automatically load the LoggerHolder class with it. It only loads the class when LoggerHolder.LOGGER is accessed for the first time at runtime.

    Here’s a small demo program you can try out:

    public class InitializationOnDemandHolderIdiomDemo {
      private static class LoggerHolder {
        private static final Logger LOGGER = initializeLogger();
    
        private static Logger initializeLogger() {
          System.out.println(">>>>>>>>>> Initializing logger <<<<<<<<<<");
          return Logger.getLogger(InitializationOnDemandHolderIdiomDemo.class.getName());
        }
      }
    
      public static void main(String[] args) {
        InitializationOnDemandHolderIdiomDemo demo =
            new InitializationOnDemandHolderIdiomDemo();
    
        demo.doSomethingWithoutLogging();
        demo.doSomethingWithoutLogging();
        demo.doSomethingWithoutLogging();
    
        demo.doSomethingWithLogging();
        demo.doSomethingWithLogging();
        demo.doSomethingWithLogging();
      }
    
      private void doSomethingWithoutLogging() {
        System.out.println("Not logging");
      }
    
      private void doSomethingWithLogging() {
        System.out.println("\nI'm going to log something...");
        LoggerHolder.LOGGER.info("Some log message");
        System.out.println("Logged something");
      }
    }Code language: Java (java)

    You will see the following output:

    Not logging
    Not logging
    Not logging
    
    I'm going to log something...
    >>>>>>>>>> Initializing logger <<<<<<<<<<
    Logged something
    
    I'm going to log something...
    Logged something
    
    I'm going to log something...
    Logged somethingCode language: plaintext (plaintext)

    You see: The logger is only initialized – and only then – when it is needed for the first time. With this, we can check off the requirement for “Lazy Initialization”.

    And what about thread safety?

    How does the Initialization-on-Demand Holder Idiom guarantee thread safety?

    Thread safety is automatically guaranteed by the JVM (Java Virtual Machine) when loading and initializing classes.

    This means that if the first access to LoggerHolder.LOGGER occurs simultaneously by two threads, the JVM ensures that LoggerHolder.LOGGER is initialized only once – and also that both threads see the fully initialized Logger object.

    That almost sounds too good to be true…

    Disadvantage of the Initialization-on-Demand Holder Idiom

    As with almost everything, this solution also has a drawback:

    If the call to the initializeLogger() method should fail during the first access to LoggerHolder.LOGGER, subsequent accesses will not attempt to call initializeLogger() again. No – once the initialization of a class has failed, the JVM will not try to initialize the class again. Instead, every subsequent access to LoggerHolder.LOGGER will immediately lead to a NoClassDefFoundError.

    Here is a small program that demonstrates this behavior:

    public class InitializationOnDemandHolderIdiomErrorDemo {
      private static class LoggerHolder {
        private static final Logger LOGGER = initializeLogger();
    
        private static Logger initializeLogger() {
          System.out.println(">>>>>>>>>> Initializing logger <<<<<<<<<<");
          throw new RuntimeException("Initialization failed");
        }
      }
    
      public static void main(String[] args) {
        InitializationOnDemandHolderIdiomErrorDemo demo =
            new InitializationOnDemandHolderIdiomErrorDemo();
    
        demo.doSomethingWithLogging();
        demo.doSomethingWithLogging();
        demo.doSomethingWithLogging();
      }
    
      private void doSomethingWithLogging() {
        try {
          System.out.println("\nI'm going to log something...");
          LoggerHolder.LOGGER.info("I did something smart");
          System.out.println("Logged something");
        } catch (Throwable t) {
          System.out.println(">>>>>>>>>> " + t.getClass().getName() + " <<<<<<<<<<");
        }
      }
    }Code language: Java (java)

    The program outputs the following:

    I'm going to log something...
    >>>>>>>>>> Initializing logger <<<<<<<<<<
    >>>>>>>>>> java.lang.ExceptionInInitializerError <<<<<<<<<<
    
    I'm going to log something...
    >>>>>>>>>> java.lang.NoClassDefFoundError <<<<<<<<<<
    
    I'm going to log something...
    >>>>>>>>>> java.lang.NoClassDefFoundError <<<<<<<<<<Code language: plaintext (plaintext)

    You see: Only on the first access to LoggerHolder.LOGGER is initializeLogger() called. All subsequent accesses lead directly to a NoClassDefFoundError.

    With the other solutions – complete synchronization and double-checked locking – each subsequent call to the getLogger() method would attempt to initialize the Logger object again.

    Here’s a corresponding demo for the variant with complete synchronization:

    public class LazyInitializationErrorDemo {
      private static Logger logger;
    
      private static Logger getLogger() {
        if (logger == null) {
          logger = initializeLogger();
        }
        return logger;
      }
    
      private static Logger initializeLogger() {
        System.out.println(">>>>>>>>>> Initializing logger <<<<<<<<<<");
        throw new RuntimeException("Initialization failed");
      }
    
      public static void main(String[] args) {
        LazyInitializationErrorDemo demo = new LazyInitializationErrorDemo();
    
        demo.doSomethingWithLogging();
        demo.doSomethingWithLogging();
        demo.doSomethingWithLogging();
      }
    
      private void doSomethingWithLogging() {
        try {
          System.out.println("\nI'm going to log something...");
          getLogger().info("I did something smart");
          System.out.println("Logged something");
        } catch (Throwable t) {
          System.out.println(">>>>>>>>>> " + t.getClass().getName() + " <<<<<<<<<<");
        }
      }
    }
    Code language: Java (java)

    And here’s the output of the program:

    I'm going to log something...
    >>>>>>>>>> Initializing logger <<<<<<<<<<
    >>>>>>>>>> java.lang.RuntimeException <<<<<<<<<<
    
    I'm going to log something...
    >>>>>>>>>> Initializing logger <<<<<<<<<<
    >>>>>>>>>> java.lang.RuntimeException <<<<<<<<<<
    
    I'm going to log something...
    >>>>>>>>>> Initializing logger <<<<<<<<<<
    >>>>>>>>>> java.lang.RuntimeException <<<<<<<<<<Code language: plaintext (plaintext)

    Here, with each call to getLogger(), there’s another attempt to initialize the logger.

    Whether this is desired or not, of course, depends on the requirements.

    Upcoming Alternative: Lazy Constants

    The JDK developers are also aware that the existing solutions are all less than ideal. For this reason, a new feature is currently in development: Lazy Constants.

    Lazy Constants were introduced in Java 25 as a preview feature under the name Stable Values and were renamed and fundamentally reworked as Lazy Constants in Java 26. A Lazy Constant is a container that encapsulates thread-safe initialization of constants upon their first access behind a simple API.

    Conclusion

    To initialize fields in multithreading applications only when needed, we can use the Double-Checked Locking Idiom or – for static fields – the Initialization-on-Demand Holder Idiom described in this article.

    Both variants are more performant than complete synchronization of the access method with synchronized or an explicit lock.

    However, both variants are also complicated to implement – and this can easily lead to errors – especially since a faulty implementation is only revealed by race conditions, and therefore usually not immediately, but potentially only after weeks or months.

    A performant and easy-to-implement variant is currently being developed: Lazy Constants (as of Java 26 still in preview).

  • Double-Checked Locking in Java

    Double-Checked Locking in Java

    Double-Checked Locking is a pattern used to lazily initialize objects (i.e., upon first access) in multi-threading environments without the risk of subtle race conditions – and without fully (and thus time-consumingly) synchronizing access to this object.

    In this article you will find out:

    • What is the motivation for Double-Checked Locking?
    • What subtle errors can be made with “Lazy Initialization”?
    • Why is full synchronization with synchronized not optimal?
    • Why is the original Double-Checked Locking idiom flawed?
    • How is Double-Checked Locking correctly implemented in Java?
    • What alternatives are there?

    Motivation

    Occasionally, we want to initialize an object only when it’s needed, as initialization is costly and we don’t want to unnecessarily delay program startup.

    In single-threaded applications, this is simple. For example, we could implement loading settings from the database on first access as follows:

    private Settings settings;
    
    private Settings getSettings() {
      if (settings == null) {
        settings = loadSettingsFromDatabase();
      }
      return settings;
    }Code language: Java (java)

    On the first method call, the settings are loaded and stored in the settings field. On each subsequent call, the object stored in the settings field is returned.

    However, this method is not thread-safe.

    There are three problematic effects that can occur when this method is called from multiple concurrently running threads – one obvious and two that even experienced Java developers often overlook.

    Effect 1: Multiple Initialization Due to Thread Execution Interleaving

    An effect that most Java developers immediately see is the following:

    If the method were called simultaneously from two threads, the execution of the two threads could interleave as follows:

    Multiple initialization of a field due to thread execution interleaving

    Simply put:

    If both threads start the method almost simultaneously, both see that settings null is null. Consequently, both threads would load the settings from the database, and the settings loaded second would overwrite those loaded first.

    Effect 2: Multiple Initialization Due to Cache Effects

    What even experienced developers often don’t see is this:

    In fact, the thread execution doesn’t even need to be interleaved. Even if one thread executes the method only after the other has finished it, multiple initialization can occur:

    Multiple initialization of a field due to cache effects

    How can this be? Why would thread 2 see settings as null and repeat the initialization?

    The answer lies in the CPU architecture:

    Each CPU core has a cache where data from main memory is temporarily stored. More precisely: In modern CPUs, each core even has two caches: a level 1 cache (L1) and a level 2 cache (L2). Additionally, the CPU has a level 3 cache (L3) shared by all cores:

    CPU core caches L1, L2 and shared CPU cache L3

    We can disregard the division into three cache levels when considering the effects of caches, so I will only refer to the CPU core cache in the following.

    For performance reasons, each CPU core primarily works with its cache.

    Let’s assume thread 1 and thread 2 run on different CPU cores – for simplicity: CPU core 1 and CPU core 2. Then the following could happen:

    • Thread 1 has so far only written the settings field to the cache of CPU core 1, but not yet to main memory. Thread 2 loads the settings field from main memory, where it is still null. Consequently, thread 2 sees it as null and initializes it again.
    • Or: thread 1 writes the settings field to main memory, but CPU core 2 has already loaded the field into its cache when it was still null. Thread 2 now accesses this cached field – so in this case also sees null and reinitializes the settings.

    Race Conditions

    Both effects – both repeated initialization due to thread execution interleaving and repeated initialization due to cache effects – do not occur deterministically, as it’s not predictable how threads will run temporally and when the CPU will synchronize the cache with main memory. These are therefore called “race conditions”.

    This means that the software may run correctly for months until an error occurs. It is then extremely difficult to reproduce the error, track it down, and fix it.

    And what if we don’t mind the repeated initialization?

    If this race condition only occurs every few months and the only consequence is that the settings are repeatedly loaded from the database – couldn’t we simply ignore it?

    On one hand: In this specific use case, probably yes. However, there are also use cases where repeated initialization could have serious consequences. For example, if the initialized object encapsulates a global state that is also accessed for writing. In such a use case, we must ensure that only one instance exists at any given time.

    On the other hand: I mentioned above that besides the obvious effect of the unfortunate thread interleaving, there are two subtle effects. One was CPU core caching.

    Before I go into more detail about the second subtle effect, I’ll first show you the most obvious (but also least performant) solution to make this method thread-safe.

    After that, I’ll show you the “original” double-checked locking, which is supposed to make this unperformant solution more performant. Unfortunately, the “original” double-checked locking still contains the second subtle effect.

    Then I will explain this effect and show you how to correctly and efficiently implement double-checked locking in Java.

    Least Performant Solution: Complete Synchronization

    The most obvious way to make the getSettings() method thread-safe is to synchronize it with the synchronized keyword (or alternatively with an explicit lock):

    //           ↓
    private synchronized Settings getSettings() {
      if (settings == null) {
        settings = loadSettingsFromDatabase();
      }
      return settings;
    }Code language: Java (java)

    However, this means that every access to the settings requires a complete synchronization, i.e., potentially waiting if another thread is currently blocking the method, then blocking access for other threads, and synchronizing all data between CPU cache and main memory when entering and leaving the synchronized block.

    This process is quite costly and therefore not recommended, especially for frequently called methods.

    The “Original” Double-Checked Locking

    Developers often try to optimize the code by first checking if the settings field is already set, and only entering the synchronized block if the field is still null and therefore needs to be initialized.

    In case after the first check – but before entering the synchronized block – another thread has set the settings field, it is checked a second time within the synchronized block whether it is null. Hence the term “Double-Checked Locking”:

    // Don't do this!!!
    // This is the original, broken implementation of the "Double-Checked Locking" idiom.
    private Settings settings;
    
    private Settings getSettings() {
      if (settings == null) {
        synchronized (this) {
          if (settings == null) {
            settings = loadSettingsFromDatabase();
          }
        }
      }
      return settings;
    }Code language: Java (java)

    At first glance, this seems to be a sensible solution, as no expensive synchronization is necessary – except for the first call. But as the comment in the first lines of the code already reveals, this implementation is flawed.

    And this brings us to the third effect.

    Effect 3: Instruction Reordering

    “Instruction Reordering” means that both compilers and CPUs are allowed to reorder CPU instructions within a thread for performance optimization, i.e., execute them in a different order – as long as it doesn’t change the semantics of program execution within this thread.

    For example, the code int a = 3; int b = 4; int c = a + b; could also be compiled or executed so that variable b is set to 4 first and then variable a to 3. For the calculation of c, it makes no difference:

    Instruction Reordering Example

    What does this have to do with initializing the settings field?

    The Java program code shown above is essentially translated into the following instructions:

    1. Load the settings from the database.
    2. Create a new Settings object.
    3. Initialize the Settings object with the values loaded from the database.
    4. Assign this Settings object to the settings field.
    5. Read settings from the settings field
      (this step is not visible in the example code above).

    The Java compiler is allowed to reorder these instructions, especially it may swap steps 3 and 4:

    1. Load the settings from the database.
    2. Create a new Settings object.
    3. Assign this Settings object to the settings field.
    4. Initialize the Settings object with the values loaded from the database.
    5. Read settings from the settings field.

    So the Settings object is first assigned to the field (in an uninitialized state) and only then initialized. Within a single thread, this doesn’t matter, as step 5 (the read access) is still executed after the initialization.

    But: If we consider this again in the context of interleaved thread execution, the following sequence would now be possible:

    Effect of Instruction Reordering on Double-Checked Locking

    What happens here?

    Thread 1 sees the uninitialized settings field, loads the settings from the database, creates a Settings object and assigns it to the settings field – before it is initialized. CPU core 1 coincidentally stores the settings field in main memory at this moment.

    Right now, CPU core 2 loads the settings field from main memory. And since this is not null, thread 2 does not attempt to enter the synchronized block, and consequently does not notice that thread 1 has not yet completed the initialization.

    And thus, thread 2 sees uninitialized settings at this point (i.e., for example, int fields that are still set to 0, or string fields that are still null).

    Of course, this doesn’t happen always, but only when the execution of the two threads and the synchronization between CPU core cache and main memory occurs exactly as interleaved as shown above. Even with faulty Double-Checked Locking, the application can run correctly for months until an error occurs. But then it will be virtually impossible to reproduce the error – and correspondingly difficult to track down and fix.

    This race condition can also occur with the non-synchronized version from the beginning of the article. I.e., we must answer the question from above (“And what if we don’t mind the repeated initialization?”) by saying that even then we must appropriately synchronize access to the shared field.

    Why CPU Core Cache and Instruction Reordering at all?

    Now the legitimate question arises:

    Why is the CPU core cache used at all, and why does Java allow “Instruction Reordering” if it can lead to so many problems?

    The answer lies in the basic assumption on which CPU architectures and compilers are based:

    Applications should run as performantly as possible, and with multithreading applications, it is assumed that by default, threads are independent of each other and their performance should be optimized individually.

    Access to shared data structures is the exception and must be synchronized by the programmer through appropriate measures.

    The “original” Double-Checked Locking is – as we have now seen – not an appropriate measure. So how do you do it correctly?

    Correct Double-Checked Locking in Java

    Before Java 5, there was no way to implement Double-Checked Locking correctly in Java. From Java 5 onwards, this is possible with a single additional keyword: volatile.

    Here is a correct (not yet optimized) version of the Double-Checked Locking idiom in Java:

    // Correct – but not yet optimized – version of the "Double-Checked Locking" idiom
    private volatile Settings settings; // ⟵ `settings` field must be volatile!
    
    private Settings getSettings() {
      if (settings == null) {
        synchronized (this) {
          if (settings == null) {
            settings = loadSettingsFromDatabase();
          }
        }
      }
      return settings;
    }Code language: Java (java)

    What does volatile do, and why is Double-Checked Locking correct with it?

    With the keyword volatile, we indicate that the value of a field can be changed by different threads. This achieves two things:

    1. Between writing and subsequent reading of a field, the caches of the involved CPU cores are synchronized with the main memory. Thus, changes to a field are always visible to other threads – thread caching problems are prevented this way.
    2. A newly created object is only assigned to a field when it is fully initialized – thus a thread can never see an incompletely initialized object from another thread.

    What does this mean specifically for Double-Checked Locking?

    volatile ensures that in the previous example, no instruction reordering is performed with respect to object initialization, i.e., steps 3 and 4 must not be swapped. Thus, the thread interleaving leading to a race condition, as shown above, is no longer possible.

    Optimized Double-Checked Locking in Java

    volatile however, also causes that, after settings has been initialized, every call to the getSettings() method synchronizes the CPU cache with the main memory twice – because the settings field is accessed twice: once when checking for null and once when returning with return.

    We can optimize this by first assigning the field settings to a local variable. Since each thread has its own local version of this variable, it can be kept on the thread stack and does not need to be synchronized with main memory:

    // Correct and optimized version of the "Double-Checked Locking" idiom
    private volatile Settings settings;
    
    private Settings getSettings() {
      Settings localRef = settings; // ⟵ Store `settings` in a thread-local variable
      if (localRef == null) {
        synchronized (this) {
          localRef = settings;
          if (localRef == null) {
            settings = localRef = loadSettingsFromDatabase();
          }
        }
      }
      return localRef; // ⟵ Return thread-local variable
                       //   without accessing main memory a second time
    }Code language: Java (java)

    In the regular case, i.e., when settings is already initialized, there is now only one access to main memory: when assigning localRef to settings. Returning it then only accesses the thread-local variable localRef.

    Sounds complicated?

    It is! And thus there’s always a risk of faulty implementation.

    For initializing at least static fields, there’s another variant: the Initialization-on-Demand Holder Idiom – but this is also more of a workaround than a solution.

    Isn’t there a nicer way?

    Soon! In Java 25, the so-called Stable Values were introduced as a preview feature. In Java 26, they were renamed to Lazy Constants. Lazy Constants are a wrapper that encapsulates thread-safe initialization of constants upon first access behind a simple API.

    Until Lazy Constants are finalized, however, we have to choose between full synchronization (simple to implement but slow) and a correctly implemented double-checked locking pattern (fast but complex and error-prone to implement).

    Conclusion

    The initialization of shared objects upon first access in multithreading applications can (so far) only be implemented through full synchronization (with synchronized or an explicit lock), through a correctly implemented Double-Checked Locking, or through the Initialization-on-Demand Holder Idiom.

    With Double-Checked Locking, it’s essential to mark the shared field as volatile to eliminate race conditions caused by thread caching effects or instruction reordering.

    In Java 26, Lazy Constants are available as a preview feature: a thread-safe and performance-optimized wrapper for objects that should be initialized on first access.

  • Lazy Constants in Java – Finally Initialize Values Safely!

    Lazy Constants in Java – Finally Initialize Values Safely!

    Lazy Constants (called Stable Values in Java 25) are values that can only be assigned once during the runtime of an application – though at any point in time – and remain constant thereafter. They standardize lazy initialization of constants and allow the JVM to optimize these constants in the same way as it can for final values.

    In this article, you will learn:

    • What are Lazy Constants, and how do you use them?
    • What are the advantages of the immutability of a Lazy Constant?
    • How have we implemented immutability so far, and what are the disadvantages of this?
    • What are Lazy Lists and Lazy Maps?
    • How do Lazy Constants work internally?

    Lazy Constants are a preview feature that was released in Java 25 under the name Stable Values (JDK Enhancement Proposal 502) and was significantly simplified and renamed to Lazy Constants in Java 26 (JEP 526).

    In the first few sections, I explain why we need Lazy Constants in the first place. If you can already guess, you may skip directly to the “The solution: Lazy Constants” section.

    Why Immutability?

    In the introduction, I explained that Lazy Constants are values that are only assigned once and then remain immutable. But what is the benefit of values being immutable? Immutability has several advantages:

    1. An immutable object can be used by several threads without any problems.

    There is no risk of race conditions, which, for mutable objects, we can only prevent through synchronization or memory barriers. Errors can easily creep in, even with experienced developers.

    2. The JVM can optimize immutable objects, e.g. by constant folding.

    For example, if the JVM recognizes that serviceRegistry.userService() is accessed in several places and it knows that serviceRegistry is constant and userService() returns a constant, then it can replace all calls to serviceRegistry.userService() with the userService constant.

    3. Immutable objects make the code easier to read.

    Code is more predictable, easier to understand, and easier to debug when you don’t have to worry about possible changes to object states. For mutable objects, we should create defensive copies for parameters and return values to ensure they are not inadvertently modified. This is not necessary for immutable objects.

    Immutability with “final”

    Until now, the only way to achieve immutability was to mark the fields of an object as final. Static final fields must be assigned during the declaration or in a static block and are initialized when the class is loaded. Final instance fields must be assigned during the declaration or in the constructor and are initialized when a new object of the class is created.

    In the following example, a static Logger field is initialized:

    public class UserService {
      private static final Logger LOGGER = LoggerFactory.getLogger(UserService.class);
    
      // . . .
    }Code language: Java (java)

    Alternatively, with a static block:

    public class UserService {
      private static final Logger LOGGER;
    
      static {
        LOGGER = LoggerFactory.getLogger(UserService.class);
      }
    
      // . . .
    }Code language: Java (java)

    In the following example, an unmodifiable UUID is generated for each new Task object:

    public class Task {
      private final UUID taskId = UUID.randomUUID();
    
      // . . .
    }Code language: Java (java)

    Alternatively, in the constructor:

    public class Task {
      private final UUID taskId;
    
      public Task() {
        taskId = UUID.randomUUID();
      }
    
      // . . .
    }Code language: Java (java)

    The initialization of constants is not always that simple. I will show you some less trivial examples below.

    Delayed a.k.a. Lazy Initialization

    Final fields are initialized in any case, even if they are not used at all (or much later). However, if the initialization, e.g., the creation of the logger, takes a while (e.g., because it establishes a connection to an external logging system), but the logger is then never (or only later) used in the program flow, the start of the application may have been unnecessarily slowed down by the early initialization.

    Fields that are expensive to initialize can be initialized with a delay, i.e. only when required (“lazy”). This is simple in a single-threaded application:

    public class UserService {
      private static Logger logger;
    
      // Not thread-safe!!!
      private static Logger getLogger() {
        if (logger == null) {
          logger = LoggerFactory.getLogger(UserService.class);
        }
        return logger;
      }
    
      // . . .
    }Code language: Java (java)

    A second use case:

    When creating an object, we do not always have all the information we need to initialize an immutable field. For example, a service could be created before a database connection has been established – but the service must access the database to initialize a field.

    We can also initialize such a field lazily:

    public class BusinessService {
      private Settings settings;
    
      // Not thread-safe!!!
      private Settings getSettings() { 
        if (settings == null) {
          settings = loadSettingsFromDatabase();
        }
        return settings;
      }
    
      // . . .
    }Code language: Java (java)

    In a Spring or Jakarta EE application, we could also initialize the settings variable in a method annotated with @PostConstruct:

    @Service
    public class BusinessService {
      private Settings settings;
    
      @PostConstruct
      private void initializeSettings() {
        settings = loadSettingsFromDatabase();
      }
    
      // . . .
    }Code language: Java (java)

    But these are all workarounds, and they have some significant disadvantages. You can find out what these are in the following section.

    Disadvantages of “Homemade” Lazy Initialization

    Looking at the examples from the previous section again, we notice that the logger and settings fields are no longer marked as final. This is only possible if they are initialized during the declaration, in a static block, or the constructor.

    This, in turn, means that we cannot guarantee that the fields will not be modified after initialization. Without the guarantee that the values are immutable, the JVM cannot perform constant folding.

    In addition, at least in the first two examples, we must ensure that we never access the fields directly but always via the getLogger() or getSettings() method.

    And if we look at these methods again, we realize that they are not (yet) thread-safe! This means that they cannot be called from multiple threads.

    To make the getSettings() method thread-safe, we could mark it with synchronized:

    private synchronized Settings getSettings() {
      if (settings == null) {
        settings = loadSettingsFromDatabase();
      }
      return settings;
    }Code language: Java (java)

    Although this makes it thread-safe, it also makes the application significantly slower, as the synchronized block must now be accessed every time the settings are accessed.

    Double-checked locking is faster (but also more error-prone):

    private volatile Settings settings; // ⟵ `settings` must be volatile!
    
    private Settings getSettings() {
      Settings localRef = settings;
      if (localRef == null) {
        synchronized (this) {
          localRef = settings;
          if (localRef == null) {
            settings = localRef = loadSettingsFromDatabase();
          }
        }
      }
      return localRef;
    }Code language: Java (java)

    You can find out why you should never forget volatile and the purpose of the additional (at first glance superfluous) variable localRef in the article on double-checked locking.

    An alternative is the so-called initialization-on-demand holder idiom, which exploits the fact that the JVM loads classes lazily and thread-safe. But this is also a workaround. Not everyone knows it, and it only works with static fields, not with instance fields.

    To summarize:

    1. Values initialized lazily cannot be marked as final; immutability is therefore not guaranteed.
    2. Accordingly, the JVM cannot optimize the code by constant folding.
    3. A lazily initialized value must always be accessed via a helper method.
    4. In multithreaded applications, this helper method must be thread-safe. Errors can easily creep in here, leading to subtle race conditions.

    What we lack in Java is a middle ground between final and modifiable. A value that is initialized when it is needed. A value that is guaranteed to be initialized only once. And a value that is initialized correctly even if accessed from multiple threads.

    And Lazy Constants are precisely this middle ground!

    The Solution: Lazy Constants

    A Lazy Constant is a container that holds an object, the so-called “content.” A Lazy Constant is initialized exactly once, before its content is accessed; after that, it is immutable. A Lazy Constant is thread-safe, i.e., if it is accessed from multiple threads, it will be initialized at most once. And the JVM can optimize a Lazy Constant through constant folding just as well as it can optimize a final field.

    Below you can see how to implement the Settings example using a Lazy Constant.

    public class BusinessService {
      private final LazyConstant<Settings> settings =
          LazyConstant.of(this::loadSettingsFromDatabase);
    
      public Locale getLocale() {
        return settings.get().getLocale(); // ⟵ Here we access the lazy constant
      }
    
      // . . .
    }Code language: Java (java)

    The method passed to LazyConstant.of() – in this case, the method that loads the settings from the database – is called the computing function. On the first call to the get() method, the contents of the Lazy Constant are initialized exactly once by invoking this computing function.

    By the way, you could also store the LazyConstant object returned by of() in a Supplier, since LazyConstant extends Supplier. However, LazyConstant offers two additional methods besides get():

    • isInitialized() – returns whether the value has already been initialized.
    • orElse(T other) – returns the computed value if it has been initialized; otherwise, it returns other.

    Neither of these methods triggers initialization of the lazy constant.

    Lazy Lists

    We can not only define individual Lazy Constants but also a list of Lazy Constants, i.e. a list in which each individual element is lazily initialized when it is first accessed – e.g. with first(), get(int index) or last().

    The following example creates a Lazy List in which each element is initialized with the square root of the list index the first time it is accessed:

    List<Double> squareRoots = List.ofLazy(100, Math::sqrt);Code language: Java (java)

    The size of the list and its elements cannot be changed. The methods add(), set(), and remove() lead to an UnsupportedOperationException. Derived lists – e.g. with subList() or reversed() – are also Lazy Lists.

    Here is a small demo program (I am using a simplified main method, which is available as a preview feature since Java 21 and as a production feature since Java 25.

    void main() {
      List<Double> squareRoots = List.ofLazy(100, i -> {
        IO.println("Initializing list element at index " + i);
        return Math.sqrt(i);
      });
    
      IO.println("squareRoots[0]    = " + squareRoots.get(0));
      IO.println("squareRoots[1]    = " + squareRoots.get(1));
      IO.println("squareRoots[2]    = " + squareRoots.get(2));
      IO.println("squareRoots[0]    = " + squareRoots.get(0));
      IO.println("squareRoots.first = " + squareRoots.getFirst());
      IO.println("squareRoots.last  = " + squareRoots.getLast());
    }Code language: Java (java)

    The program prints the following:

    Initializing list element at index 0
    squareRoots[0]    = 0.0
    Initializing list element at index 1
    squareRoots[1]    = 1.0
    Initializing list element at index 2
    squareRoots[2]    = 1.4142135623730951
    squareRoots[0]    = 0.0
    squareRoots.first = 0.0
    Initializing list element at index 99
    squareRoots.last  = 9.9498743710662Code language: plaintext (plaintext)

    You can see that the Lazy List only computes the element at position 0 once, although it is retrieved three times (twice with get(0) and once with getFirst()).

    Lazy Map

    Analogous to Lazy Lists, we can also create Lazy Maps. With a Lazy Map, for each key, the associated value is only initialized the first time it is looked up.

    The following example shows a Lazy Map with which we can dynamically load localization resources per language when first accessed:

    Set<Locale> supportedLocales = getSupportedLocales();
    Map<Locale, ResourceBundle> resourceBundles =
        Map.ofLazy(supportedLocales, this::loadResourceBundle);Code language: Java (java)

    The corresponding resource bundle is loaded via the loadResourceBundle(...) method passed as a method reference only when resourceBundles.get(...) is called for the first time.

    How Do Lazy Constants Work Internally?

    Lazy Constants are implemented exclusively in Java code. Changes to the compiler, bytecode, or JVM were not necessary, as you can see from the pull request for JEP 502.

    The content of a Lazy Constants is stored in a non-final field. This field is annotated with the JDK-internal @Stable annotation, which is also used in other parts of the JDK code for optimization. This annotation indicates to the JVM that the value will not change after initialization. And so, once the value has been set, the JVM can start with its constant folding optimization.

    Thread security is ensured by memory barriers set via the Unsafe class.

    Does this mean that LazyConstant is just a wrapper we could implement ourselves?

    Yes, but…

    Firstly, we cannot use the JDK-internal @Stable annotation or the internal Unsafe class without explicitly making them available to our module via --add-exports java.base/jdk.internal.vm.annotation or --add-exports java.base/jdk.internal.misc.

    Secondly, we should not use these JDK internals, as there is no guarantee that they will not change in a future Java release.

    And thirdly, we do not write a ConcurrentHashMap ourselves either, for example. Since LazyConstant is implemented by JDK specialists, we can be sure that all known performance tricks have been applied and that further performance optimizations will be made in the future. And if, in the future, LazyConstant is used by millions of Java developers, we can also be sure that any bugs – even subtle concurrency bugs – will be found and fixed quickly.

    Conclusion

    Lazy Constants are constants that can be initialized “on demand” at any time. They are then immutable and are treated by the JVM exactly like final fields, e.g., optimized by constant folding.

    Lazy Constants are thread-safe, so they can also be used in multithreaded programs without risking subtle concurrency bugs.

    In addition to Lazy Constants, there are Lazy Lists and Lazy Maps, which initialize the elements in lists and maps only once and then store them immutably.

    Lazy Constants are included as a preview feature in Java 25 (still under the name “Stable Values” there) and in the current early-access build of Java 26.

    What do you think of Lazy Constants? Share your opinion in the comments!

  • Java Compact Object Headers (JEP 519)

    Java Compact Object Headers (JEP 519)

    Every Java object has an object header that precedes the actual data in memory. The header mainly contains the hash code of the object and the information on which class the object is an instance of.

    As of Java 25, the object header is by default 96 bits (12 bytes) in size – or 128 bits (16 bytes) if Compressed Class Pointers are switched off (although there is no reason to do so, and this option has been deprecated in Java 25).

    As part of Project Lilliput, the JDK developers have been working for many years on ways to compress the header to a total of 64 bits or even 32 bits.

    In 2025, the time had come: In Java 24, Compact Object Headers were introduced as an experimental feature through JDK Enhancement Proposal 450 – and in Java 25 as a final feature through JDK Enhancement Proposal 519. Compact Object Headers make it possible to compress the object header from 96 bits to 64 bits and thus significantly reduce the heap size of existing applications.

    In this article you will find out:

    • How does header compression work?
    • Why does this not only reduce memory requirements but also increase application performance?

    Status Quo before Compact Object Headers

    You can find a detailed description of the structure of object headers in the main article on Java object headers. Here is a summary of the most essential points:

    The object header usually consists of a 64-bit “Mark Word” and a 32-bit “Class Word”. Mark Word and Class Word are structured as follows:

    JEP 450: Java Object Header with Mark Word and Class Word

    The Mark Word contains:

    • a 31-bit identity hash code (which is returned by the System.identityHashCode(Object) method),
    • 4 bits in which the garbage collector stores the age of an object (based on which it decides when to move an object from the young to the old generation),
    • 2 “tag bits” that indicate whether the object is not locked, locked uncontended (without waiting threads), or locked contended (with waiting threads).

    When using the outdated Legacy Stack Locking, the first 62 bits of the mark word in the locked state were replaced by a pointer to a lock data structure. Since Java 23, so-called Lightweight Locking has replaced this outdated mechanism.

    The old mode can still be reactivated using the VM option -XX:LockingMode=1; however, it cannot be combined with Compact Object Headers.

    The Class Word contains a 32-bit offset in the maximum 4 GB compressed class space to a so-called class data structure containing all relevant data about the object’s class.

    If Compressed Class Pointers have been deactivated with -XX:-UseCompressedClassPointers, then the Class Word is 64 bits in size and contains an uncompressed pointer. The deactivation of Compressed Class Pointers has been deprecated in Java 25 and cannot be combined with Compact Object Headers.

    From Compressed Class Pointer to Compact Object Header

    How can we further compress the object header?

    First of all, the Mark Word (as you can see above) currently contains 27 unused bits (25 at the beginning and one each before and after the “age bits”). That means that of the 96 bits of the entire object header, only 96 – 27 = 69 bits are required. To get to 64 bits, we must somehow save five bits.

    Where can we get them?

    The JDK developers experimented for a long time until they came up with the following solution (I changed the scale for better visualization – the 64 bits now cover the entire width):

    JEP 450: Compact Object Header

    The new 64-bit header is no longer divided into Mark Word and Class Word but contains the following information directly:

    • a class pointer further compressed from 32 bits to 22 bits (explained below),
    • the 31-bit Identity Hash Code (unchanged),
    • 4 bits reserved for Project Valhalla (new),
    • 4 bits for the age of the object (unchanged),
    • 1 bit for the so-called “Self Forwarded Tag” (explained below),
    • 2 Tag bits (unchanged).

    The class pointer has, therefore, been reduced by 10 bits. As we only had to save five bits, five additional bits are now available. Four of these were reserved for Project Valhalla, and the new “Self Forwarded Tag” is stored in one bit.

    How Could Class Pointers Be Compressed to 22 Bits?

    With the previous 32 bits, we could individually address each position within the 4 GB compressed class space.

    For the sake of simplicity, I will illustrate this in the following image with a 256-byte memory area:

    256 byte memory area

    As you can see, we need the numbers 0 to 255 to address each position of the memory area. To do this, we need an 8-bit pointer (28 = 256).

    But do we really need to be able to address every single position? No, we don’t!

    Just as a hard disk (whether a conventional one or an SSD) is divided into so-called blocks (usually 4 KB in size), we can also divide the memory area for the class data into blocks. This means we no longer have to address each individual byte but only each block. And so we can address the same memory area with significantly fewer bits.

    Here again is the simplified example, in which I divided the 256-byte memory area into 32 blocks of 8 bytes each:

    256 byte memory area divided into 8 byte blocks

    Now, we only need the numbers 0 to 31 to address the same memory area. Therefore, we only need 5-bit pointers (25 = 32). By dividing into blocks, we reduced the memory requirement per pointer from 8 bits to 5 bits.

    This also works with the memory area in which the class information is stored.

    When using Compact Object Headers, this memory area is divided into 1,024 (=210) byte blocks. The JDK developers chose this value because most classes occupy between half a kilobyte and one kilobyte.

    As a reminder, the area is 4 GB in size. This results in 4 × 1,024 × 1,024 × 1,024 / 1,024 blocks, i.e. 4 × 1,024 × 1,024, which is 4,194,304, or 222 blocks. And we can address these with 22 bits!

    To turn a 22-bit block number into a pointer, we only have to shift the 22 bits to the left by 10 bits and fill the last 10 bits with zeros, and we have a 32-bit pointer into the 4 GB memory area again:

    22-bit block number becomes a 32-bit class pointer

    The division into blocks now leads to class data fragmentation. However, the JDK developers have also considered this: the memory between the classes can also be used by other data structures in the metaspace.

    What Is the “Self Forwarded Tag”?

    When a garbage collector copies an object to a new memory address, it replaces the upper 62 bits of the mark word in the original object with a pointer to the new memory address and sets the tag bits to 0x11. It then finds the original mark word at the new address.

    If the copy operation fails, the mark word is replaced by a pointer to the object itself. As a result, the identity hash code and object age are lost, but this seems to be bearable (unfortunately, I could not find any reliable information about why this is the case, but I will update this section if I find a statement on this).

    However, if we were to replace a compact object header with a self-reference, the class pointer would also be lost. As this pointer is essential, a compact object header must never be replaced by such a self-reference.

    Instead, the new “Self Forwarded Tag” bit is set.

    Conclusion on Compact Object Headers

    Compact Object Headers significantly reduce the memory requirements of a Java program by reducing the object headers from 96 bits (12 bytes) to 64 bits (8 bytes).

    Not only that: because the objects are smaller, more objects fit into the CPU cache. This results in fewer cache misses – and this also has a positive effect on performance.

    As of Java 25, Compact Object Headers can be activated with the following VM option:

    -XX:+UseCompactObjectHeaders

    In Java 24, Compact Object Headers were still in the experimental stage and had to be activated as follows:

    -XX:+UnlockExperimentalVMOptions -XX:+UseCompactObjectHeaders

    Outlook

    In an upcoming Java release (the exact version is not yet known), Compact Object Headers will be enabled by default (see JEP draft “Compact Object Headers by Default”).

    Next, the Project Lilliput developers are working on 4-byte headers – effectively halving the header size once again! This further reduction will likely come at the cost of some performance. The JEP draft “4-byte Object Headers” targets a maximum throughput and latency reduction of 5%. How the compression to four bytes is to be achieved has not yet been detailed in the draft.

    Have you already tested Compact Object Headers? Did it bring the expected improvements? Share your experience in the comments!

  • Java 24 Features (with Examples)

    Java 24 Features (with Examples)

    Java 24 has been released on March 18, 2025. You can download it here.

    Java 24 contains … drum roll … exactly 24 JEPs – a new record after Java 11 (18 JEPs)! That sounds like a lot at first, but most of us will not be directly confronted with many of the changes in our day-to-day programming.

    Here are my highlights:

    Stream Gatherers – JEP 485

    The Stream API was introduced in Java 8 over ten years ago. Due to the somewhat limited selection of intermediate operations – filter, map, flatMap, mapMulti, distinct, sorted, peak, limit, skip, takeWhile, and dropWhile – there are loud calls in the Java community for additional operations such as window or fold.

    But instead of implementing all these feature requests, the JDK developers decided on a different solution: they implemented an API with which both the JDK developers and all other developers can implement intermediate stream operations themselves.

    This new API is called “Stream Gatherers.” It was first introduced as a preview version in Java 22 and went into a second preview round in Java 23 without any changes.

    In Java 24, JDK Enhancement Proposal 485 finalizes the Stream Gatherers API – again without any changes.

    For example, the following code shows how we can implement and use the intermediate stream operation “filter” as a stream gatherer. The short program displays all strings that are at least three characters long:

    void main() {
      List<String> words = List.of("the", "be", "two", "of", "and", "a", "in", "that");
    
      List<String> list = words.stream()
          .gather(filtering(string -> string.length() >= 3))
          .toList();
    
      System.out.println(list);
    }
    
    private <T> Gatherer<T, Void, T> filtering(Predicate<T> predicate) {
      return Gatherer.of(Gatherer.Integrator.ofGreedy(
          (_, element, downstream) -> {
            if (predicate.test(element)) {
              return downstream.push(element);
            } else {
              return true;
            }
          }));
    }Code language: Java (java)

    What are the components of this program, and how do they work?

    How do you implement more complex stream gatherers, and what are the limitations?

    Which predefined stream gatherers does Java 24 provide?

    You can find out all this in the main article about Stream Gatherers.

    Synchronize Virtual Threads Without Pinning – JEP 491

    Since its introduction in Java 21, Virtual Threads were “pinned” to their carrier thread when blocking code was called within a synchronized block, i.e., the carrier thread was blocked and could not serve any other virtual threads in the meantime. This could cause entire applications to freeze, as in the case of Netflix described here.

    As of Java 24, this problem is a thing of the past. When blocking code is called within a synchronized block, the virtual thread is now detached from the carrier thread, which can then execute other virtual threads.

    Why Were Virtual Threads “Pinned”?

    Firstly, with so-called Legacy Stack Locking, the mark word in the object header was replaced by a pointer to a memory address on the thread stack when a synchronized block was entered. As the stack is moved to the heap when a virtual thread is unmounted and back to the stack when mounted – but possibly to the stack of another carrier thread – this memory address would have become invalid.

    Lightweight Locking, activated by default since Java 23, solved this problem by not requiring any changes to the mark word.

    Secondly, when a synchronized block is entered, the JVM remembers which platform thread is in the block, not which virtual thread. If the virtual thread is now unmounted from the carrier thread and another virtual thread is mounted on this carrier, then this other virtual thread could also enter the synchronized block.

    Why does the JVM remember the platform thread and not the virtual thread? Quite simply, the JVM code is complex, and the JDK developers did not manage to adapt it in time for the release of Java 21.

    Pinning When Executing Native Code

    Native code (called via JNI or FFM-API) could also use pointers on the thread stack, which would become invalid after unmounting and mounting a virtual thread on another carrier thread. Therefore, when calling native code, a virtual thread is still pinned to its carrier thread.

    That has not been changed by this JEP and will probably not change in the future.

    The Diagnostic Property jdk.tracePinnedThreads Is Removed

    With the system property jdk.tracePinnedThreads, we could configure the JVM to print a stack trace when a virtual thread was pinned to its carrier upon entering a synchronized block. As the printing happened within the synchronized block, the duration of the pinning was extended.

    The property was removed without replacement in Java 24.

    Ahead-of-Time Class Loading & Linking – JEP 483

    Java applications are highly flexible and performant:

    • Classes can be loaded and unloaded dynamically.
    • Dynamic compilation, optimization, and re-optimization make them run faster than C code.
    • Reflection facilitates enterprise frameworks such as Jakarta EE and Spring Boot.

    However, the JVM must read, parse, load, and link thousands of classes at startup, which can lead to long startup times, especially for large backend applications.

    In Project Leyden, the JDK developers have long been working on solutions to carry out as many of these preparatory tasks as possible before an application is started. JDK Enhancement Proposal 483 introduces the first of these solutions in Java 24: Ahead-of-Time Class Loading & Linking.

    In a preparatory phase, all classes required by the application are read, parsed, loaded, and linked, then saved in this state in a cache. When the application is started, these steps no longer need to be carried out; the application can access the loaded and linked classes directly via the cache.

    You can find further details on how this works, a step-by-step guide to try it out yourself, and a comparison with AppCDS (Application Class Data Sharing) in the main article, Ahead-of-Time Class Loading & Linking.

    New Preview and Experimental Features in Java 24

    Java 24 comes with one new preview feature and two experimental features. 24.

    These features are intended for testing and providing feedback. They should not be used in production code, as they can still change or – as in the case of String Templates – be completely removed again.

    You must activate preview features in the Java compiler javac with --enable-preview --source 24. When starting a program with the java command, --enable-preview is sufficient.

    You can activate experimental features at run-time using -XX:+UnlockExperimentalVMOptions.

    Key Derivation Function API (Preview) – JEP 478

    A key derivation function (KDF) is a method for deriving one or more new cryptographic keys from a secret value such as a password, a passphrase, or a cryptographic key.

    For security providers to be able to implement and offer KDF algorithms and for us to be able to use them in applications, a standardized API is necessary.

    Such an API is provided by JDK Enhancement Proposal 478: We can now load and execute key derivation functions via the new class javax.crypto.KDF.

    The following sample code shows how to generate an AES key from a password or passphrase and a salt using the KDF algorithm “HKDF-SHA256”.

    void main() throws InvalidAlgorithmParameterException, NoSuchAlgorithmException {
      // 1. Get the implementation of the specified KDF algorithm
      KDF hkdf = KDF.getInstance("HKDF-SHA256");
    
      // 2. Specify the derivation parameters
      AlgorithmParameterSpec params =
          HKDFParameterSpec.ofExtract()
              // 2.1. The password / passphrase
              .addIKM("the super secret passphrase".getBytes(StandardCharsets.UTF_8))
              // 2.2. The salt value
              .addSalt("the salt".getBytes(StandardCharsets.UTF_8))
              // 2.3. Optional application-specific information
              .thenExpand("my derived key".getBytes(StandardCharsets.UTF_8), 32);
    
      // 3. Derive a 32-byte AES keys
      SecretKey key = hkdf.deriveKey("AES", params);
    
      System.out.println("key = " + HexFormat.of().formatHex(key.getEncoded()));
    }Code language: Java (java)

    If you are wondering about the missing class declaration, missing imports, and the short void main() instead of the usual public static void main(String[] args) – you can find a description of these simplifications in the section Simple Source Files and Instance Main Methods.

    There are a lot of abbreviations in the source code. An explanation of these concepts would go beyond the scope of this article, so I have put together a few links to Wikipedia articles for you:

    If you save the source code shown above in the file KDFTest.java, you can execute it with Java 24 as follows:

    java --enable-preview KDFTest.javaCode language: plaintext (plaintext)

    In my case, for example, this leads to the following output:

    key = 7ee15549ddce956194ca1d6df5aa34c1a1334d15c875e67ea67fb5850ee48b0cCode language: plaintext (plaintext)

    You can then use this key as a session key for encrypted data transmission, for example.

    The Key Derivation Function API will be finalized in Java 25.

    Generational Shenandoah (Experimental) – JEP 404

    Two new garbage collectors, ZGC and Shenandoah, were introduced in Java 15. Both promise extremely low pause times of less than 10 milliseconds.

    At the time of their introduction, these GCs made no distinction between “old” and “new” objects. Therefore, they did not make use of the so-called “Weak Generational Hypothesis,” which states that most objects die again shortly after their creation and that those objects that have already reached a certain age will generally live even longer.

    A “generational garbage collector” uses this hypothesis by dividing the heap into two logical areas: a “young generation” and an “old generation.” New objects are created in the young generation, and once they have survived a few GC cycles, they are moved to the old generation. As there is a high probability that the objects in the old generation will live longer, the garbage collector can increase the performance of an application by cleaning up the old generation less frequently.

    Java 21 introduced a “Generational Mode” for ZGC, which has been activated by default since Java 23.

    Initially, a “Generational Mode” mode was also planned for Shenandoah in Java 21, but the Shenandoah team withdrew the JEP shortly before its release because the implementation was not yet fully finished.

    The time has finally come: Java 24 introduces a “Generational Mode” for Shenandoah. This mode is currently still being tested and can be activated as follows:

    -XX:+UnlockExperimentalVMOptions -XX:ShenandoahGCMode=generational

    The changes are described in JDK Enhancement Proposal 404 – albeit quite superficially. If you are interested in how a generational garbage collector works, I recommend reading the detailed JEP 439 (Generational ZGC).

    Compact Object Headers (Experimental) – JEP 450

    The Java object header is currently 12 bytes in size (or 16 bytes if Compressed Class Pointers are switched off. To reduce the memory requirements of Java applications, the JDK developers are working (within Project Lilliput) on ways to compress the header to 8 bytes – and in the next step to 4 bytes.

    The first promising result from Project Lilliput was presented in Java 24: JDK Enhancement Proposal 450 allows the object header to be compressed to 8 bytes (currently in “experimental” status).

    How did the JDK developers achieve this?

    Status Quo

    A 12-byte object header consists of a 64-bit Mark Word and a 32-bit Class Word:

    JEP 450: Java Object Header with Mark Word and Class Word

    The Mark Word contains:

    • 27 unused bits (25 at the beginning and one each before and after the “age tag”),
    • a 31-bit long identity hash code,
    • 4 bits in which the garbage collector stores the age of an object,
    • 2 “tag bits” that indicate whether and how the object is locked.

    The Class Word contains:

    • a 32-bit pointer to the so-called klass data structure, in which the information about the class of which the object is an instance is stored.

    Compressing the Object Header

    The Mark Word contains 27 unused bits. That means that only 69 of the 96 bits are needed. To get to 64 bits, we must somehow save five bits. The result is as follows:

    JEP 450: Compact Object Header

    We now have a 64-bit header that is no longer divided into Mark Word and Class Word. The header contains:

    • a class pointer compressed from 32 bits to 22 bits,
    • the 31-bit Identity Hash Code (unchanged),
    • 4 bits reserved for Project Valhalla (new),
    • 4 bits for the age of the object (unchanged),
    • 1 bit for the so-called “Self Forwarded Tag” (new),
    • 2 tag bits (unchanged).

    The class pointer has therefore been reduced by 10 bits. As we only had to save five bits, there are now five additional bits available. Four of these were reserved for Project Valhalla, and the new “Self Forwarded Tag” is stored in one bit.

    You can find out how the JDK developers managed to compress the class pointer from 32 bits to 22 bits and what the “Self Forwarded Tag” is in the main article on Compact Object Headers.

    Compact Object Headers are still in the experimental stage in Java 24 and must be activated with the following VM option:

    -XX:+UnlockExperimentalVMOptions -XX:+UseCompactObjectHeaders

    Resubmitted Preview and Incubator Features

    Seven preview and incubator JEPs were resubmitted in Java 24 – four without changes compared to Java 23, one with changes only in the terminology and two with minor modifications. You can find out what these are in the following sections.

    Primitive Types in Patterns, instanceof, and switch (Second Preview) – JEP 488

    Pattern matching with instanceof was introduced in Java 16 and pattern matching with switch in Java 21.

    The following switch statement, for example, checks whether the object obj is a String of at least five characters and then prints it converted to upper case. However, if the object is an Integer, the number is printed squared:

    switch (obj) {
      case String s when s.length() >= 5 -> System.out.println(s.toUpperCase());
      case Integer i                     -> System.out.println(i * i);
      case null, default                 -> System.out.println(obj);
    }Code language: Java (java)

    So far, we could only match objects with patterns, not primitive data types like int, long, or double.

    However, what we have always been able to do in a switch (though not in modern arrow notation) was, for example, to compare an int variable with constants:

    int code = . . .
    switch (code) {
      case 200 -> System.out.println("OK");
      case 400 -> System.out.println("Bad Request");
      case 404 -> System.out.println("Not Found");
      . . .
    }Code language: Java (java)

    But beware: so far, this has only worked with the primitive data types byte, short, char, and int – but not with long,float, double, and boolean.

    With “Primitive Types in Patterns, instanceof, and switch” – first introduced in Java 23 by JDK Enhancement Proposal 455 and re-introduced in Java 24 by JDK Enhancement Proposal 488 without any changes – two things will change:

    1. In pattern matching with instanceof and switch, we can also use primitive types.
    2. In switch, we can use all primitive types, including long, float, double – and even boolean.

    However, pattern matching with primitive types differs from pattern matching with reference types:

    • In pattern matching with reference types, we check whether an object is an instance of a specific type (class or interface) or an instance of a type derived directly or indirectly from this type. For example, a variable of type Integer would match the pattern Integer i but also the patterns Number n, Object o, or even Comparable c or Serializable s.
    • In pattern matching with primitive types, on the other hand, we check whether a variable can be stored in a type without any loss of precision.

    This may sound complicated at first, but it can be easily explained using an example:

    int i = . . .
    if (i instanceof byte b) {
      . . .
    }Code language: Java (java)

    The code should be read as follows: If the content of the int variable i can also be represented in a byte, then the variable matches the pattern and is made available in the “then” block in the byte variable b.

    For example, the instanceof check above would result in true for a = 50 but false for a = 500, as a byte can only store values from -128 to +127.

    Here is a second example:

    double d = . . .
    if (d instanceof float f) {
      . . .
    }Code language: Java (java)

    This means that if the content of the double variable d can be stored in a float without loss of precision, then the variable matches the pattern.

    For example, the test would result in true for d = 1.5 but false for d = Math.PI, as Math.PI has more decimal places than float can accommodate (to put it simply).

    We can also use primitive type patterns in switch:

    double value = ...
    switch (value) {
      case byte   b -> System.out.println(value + " instanceof byte:   " + b);
      case short  s -> System.out.println(value + " instanceof short:  " + s);
      case char   c -> System.out.println(value + " instanceof char:   " + c);
      case int    i -> System.out.println(value + " instanceof int:    " + i);
      case long   l -> System.out.println(value + " instanceof long:   " + l);
      case float  f -> System.out.println(value + " instanceof float:  " + f);
      case double d -> System.out.println(value + " instanceof double: " + d);
    }Code language: Java (java)

    For value = 5, for example, the pattern byte b would match, for value = 500 the pattern short s, for value = 5000000 the pattern int i and for value = 1.5 the pattern float f.

    For example:

    • For value = 5, the pattern byte b would match.
    • For value = 500, the pattern short s would match.
    • For value = 5000000, the pattern int i would match.
    • And for value = 1.5, the pattern float f would match.

    Even with switch with primitive types, we must observe the principle of dominating and dominated types as well as the completeness check.

    You can find more about this and other examples in the main article Primitive types in patterns, instanceof and switch.

    Module Import Declarations (Second Preview) – JEP 494

    We have always been able to import individual classes or entire packages with the import statement.

    With import module, first introduced as a preview feature in Java 23 by JDK Enhancement Proposal 476, we can now also import entire modules – and thus directly use the classes of all packages exported by that module.

    In the following example, we import the module java.base and can therefore use the classes List, Map, Stream and Collectors without having to import them individually:

    import module java.base;
    
    public static Map<Character, List<String>> groupByFirstLetter(String... values) {
      return Stream.of(values).collect(
          Collectors.groupingBy(s -> Character.toUpperCase(s.charAt(0))));
    }Code language: Java (java)

    Resolving Ambiguous Class Names

    If a class name exists in several imported modules, e.g., List in the module java.base and in the module java.desktop, then the compiler would not know which class you mean, as in the following example:

    import module java.base;
    import module java.desktop;
    
    . . .
    List list = new ArrayList();  // Compiler error: "reference to List is ambiguous"
    . . .Code language: Java (java)

    You can resolve this ambiguity by importing the desired class:

    import module java.base;
    import module java.desktop;
    
    import java.util.List;  // ⟵ This resolves the ambiguity
    
    . . .
    List list = new ArrayList();
    . . .Code language: Java (java)

    What was not yet possible in Java 23 and was added in Java 24 in the second preview of this feature via JDK Enhancement Proposal 494 is the possibility of resolving the ambiguity using a package import, as follows:

    import module java.base;
    import module java.desktop;
    
    import java.util.*;  // ⟵ This resolves the ambiguity (since Java 24)
    
    . . .
    List list = new ArrayList();
    . . .Code language: Java (java)

    Transitive Imports

    If an imported module imports another module transitively, then you can also use all classes of the exported packages of the transitively imported module without explicit imports.

    You can find an example in the main article on module imports.

    However, in Java 23, this feature led to confusion in the Java community:

    When importing the module java.se (an aggregator module that defines dependencies on all modules of the Java Standard Edition “Java SE”), the module java.base was not imported. This was due to the fact that Java modules were previously not allowed to define a transitive dependency on java.base.

    JDK Enhancement Proposal 494 removes this restriction in the language specification and marks the dependency of java.se on java.base as transitive so that all classes from the java.base module are now also available via import module java.se.

    Adjustments to JShell and Simple Source Files

    JShell and Simple Source Files automatically import the java.base module if preview features are activated.

    You can find further examples of resolving ambiguous class names and transitive module dependencies in the main article in the main article, Importing Modules in Java: Module Import Declarations.

    Flexible Constructor Bodies (Third Preview) – JEP 492

    Previously, we were not allowed to execute code in constructors before calling super() or this(). For example, if we wanted to check a parameter before calling super(), this was only possible by calling a static method within the parentheses of the super(...) call:

    public class ChildClass extends SuperClass {
      public ChildClass(String parameter) {
        super(verifyParameter(parameter));
      }
    
      private static String verifyParameter(String parameter) {
        if (parameter == null || parameter.isEmpty()) {
          throw new IllegalArgumentException();
        }
        return parameter;
      }
    }Code language: Java (java)

    However, this workaround quickly becomes confusing if there are multiple parameters.

    Using “Flexible Constructor Bodies” – first introduced in Java 22 as a preview feature under the name “Statements before super(…)” by JDK Enhancement Proposal 447 – you can rewrite the code as follows:

    public class ChildClass extends SuperClass {
      public ChildClass(String parameter) {
        if (parameter == null || parameter.isEmpty()) {
          throw new IllegalArgumentException();
        }
        super(parameter);
      }
    }
    Code language: Java (java)

    This allowed read and write access to the constructor’s parameters and variables before calling super(…), but not to the fields of the class.

    In Java 23, the feature was renamed “Flexible Constructor Bodies” via JDK Enhancement Proposal 482. The restriction mentioned in the previous paragraph has been relaxed so that we can now initialize the classes’ fields before calling the super constructor.

    This is particularly helpful in cases where the super constructor calls methods overwritten in the derived class, where they read the classes’ fields.

    Here is an example:

    public class SuperClass {
      public SuperClass() {
        logCreation();
      }
    
      protected void logCreation() {
        System.out.println("SuperClass created");
      }
    }
    
    public class ChildClass extends SuperClass {
      private final String parameter;
    
      public ChildClass(String parameter) {
        this.parameter = parameter;
      }
    
      @Override
      protected void logCreation() {
        System.out.println("ChildClass created, parameter = " + parameter);
      }
    }Code language: Java (java)

    What would be the output when creating a new ChildClass object, e.g., with new ChildClass("foo")?

    We would probably expect the following output:

    ChildClass created, parameter = fooCode language: plaintext (plaintext)

    However, we actually get to see the following (null instead of foo):

    ChildClass created, parameter = nullCode language: plaintext (plaintext)

    Why is that?

    The ChildClass constructor first calls super() (this call is inserted by the compiler at the beginning of the ChildClass constructor). The SuperClass constructor then calls the logCreation() method, which we overwrote in ChildClass. However, the field parameter has not yet been assigned at this point and is, therefore, still null.

    Irrespective of the question of whether we should call non-final, i.e. overridable, methods in the constructor at all, we can solve the problem in Java 23 by modifying the ChildClass constructor as follows:

    public ChildClass(String parameter) {
      this.parameter = parameter;  // ⟵ First assign the parameter,
      super();                     // ⟵ then call super()
    }Code language: Java (java)

    This means that the super constructor (and, therefore, also the logCreation() method) is only called after the parameter field has been assigned. Accordingly, logCreation() will display the initialized field and no longer null.

    In Java 24, “Flexible Constructor Bodies” are resubmitted by JDK Enhancement Proposal 492 without any changes – the JEP authors just slightly revised the wording. Flexible Constructor Bodies will be finalized in Java 25.

    You can read about other use cases and particularities to consider in the main article, Flexible Constructor Bodies in Java: Executing Code Before super().

    Structured Concurrency (Fourth Preview) – JEP 499

    Structured Concurrency is a modern approach for dividing tasks into smaller parts that can be executed in parallel in virtual threads within a clearly recognizable source code block.

    The start and end of all subtasks are clearly visible, and as soon as the structured concurrency code section is left, the programming model ensures that all threads have been successfully or erroneously completed or canceled and that the status of all subtasks is known.

    Structured Concurrency blocks can be nested within each other, as the following graphic shows:

    JEP 499 Structured Concurrency in Java

    We can use various strategies to determine whether, for example, a subtask’s successful or incorrect completion should lead to the cancellation of all other subtasks and the successful or incorrect completion of the overall task.

    The following code example shows how an application reads weather information from three sources in parallel and, when the first answer is received, cancels the other requests and returns the response:

    WeatherResponse getWeatherFast(Location location)
        throws InterruptedException, ExecutionException {
      try (var scope = new ShutdownOnSuccess<AddressVerificationResponse>()) {
        scope.fork(() -> weatherService.readFromStation1(location));
        scope.fork(() -> weatherService.readFromStation2(location));
        scope.fork(() -> weatherService.readFromStation3(location));
    
        scope.join();
    
        return scope.result();
      }
    }Code language: Java (java)

    Without structured concurrency, this task would require significantly longer and more complex code, which would also be more error-prone.

    You can find a detailed description and numerous other examples in the main article on Structured Concurrency.

    Structured Concurrency was introduced in Java 21 as a preview feature and resubmitted in Java 22 and Java 23 without any changes. In Java 24, the feature will be resubmitted via JDK Enhancement Proposal 499 without any changes.

    Scoped Values (Fourth Preview) – JEP 487

    With scoped values, we can pass values to direct or indirect method calls without defining them as method parameters and, potentially, passing them through a lengthy call chain.

    The classic example is the user logged into a web application:

    Instead of passing a user object to all methods within the web application as a parameter, we can store the user in a Scoped Value. All methods invoked within the same request processing thread can then retrieve the user object from this Scoped Value.

    Does that sound familiar?

    That’s because we have previously implemented such use cases with ThreadLocal variables. However, Scoped Values have a range of advantages, which I describe in detail in the main article on Scoped Values.

    How do you implement such a Scoped Value as Java code?

    Once we have authenticated a user, we store them in a Scoped Value using ScopedValue.where() and then call up the application code in the context of this Scoped Value with run():

    public class Server {
      public final static ScopedValue<User> LOGGED_IN_USER = ScopedValue.newInstance();
    
      private void serve(Request request) {
        . . .
        User loggedInUser = authenticateUser(request);
        ScopedValue.where(LOGGED_IN_USER, loggedInUser)
                   .run(() -> restAdapter.processRequest(request));
        . . .
      }
    }Code language: Java (java)

    The method called within the run() method – and, in turn, every method called directly or indirectly by this method – can now access the User object via ScopedValue.get():

    public class ApplicationService {
      public void doSomethingSmart() {
        User loggedInUser = Server.LOGGED_IN_USER.get();
        . . .
      }
    }Code language: Java (java)

    Scoped values were first introduced as a preview feature in Java 21.

    In Java 23, the generic and functional interface ScopedValue.CallableOp was introduced to make exception handling type-safe – and therefore more readable and maintainable – when calling ScopedValue.call() and ScopedValue.callWhere().

    In Java 24, the methods ScopedValue.callWhere() and ScopedValue.runWhere() were removed via JDK Enhancement Proposal 487 to make the interface completely “fluid.” These convenience methods were defined as follows in Java 23:

    public static <T, R, X extends Throwable> R callWhere(
        ScopedValue<T> key, T value, CallableOp<? extends R, X> op) throws X {
      return where(key, value).call(op);
    }
    
    public static <T> void runWhere(ScopedValue<T> key, T value, Runnable op) {
      where(key, value).run(op);
    }Code language: Java (java)

    Instead of callWhere() or runWhere(), you must now call where() followed by call() or run().

    Simple Source Files and Instance Main Methods (Fourth Preview) – JEP 495

    When Java beginners write their first Java program, it usually looks something like this:

    public class HelloWorld {
      public static void main(String[] args) {
        System.out.println("Hello world!");
      }
    }Code language: Java (java)

    Multiple concepts are introduced here simultaneously: classes, visibility modifiers, static, and (unused) method arguments. This can quickly lead to cognitive overload.

    Wouldn’t it be nice if we could express the same instructions as follows?

    void main() {
      println("Hello world!");
    }Code language: Java (java)

    That is precisely what Simple Source Files and Instance Main Methods make possible!

    • A simple source file is a .java file that does not contain an explicit class specification. Instead, the compiler generates a so-called implicit class.
    • An instance main method does not have to be public or static, nor does it have to have parameters.

    In addition, the new class java.io.IO with the static methods print(), println(), and readln() is introduced. This class is located in the java.base module, which is automatically imported into simple source files (see section Module Import Declarations). That means that println() can be used without a preceding System.out and without an import statement.

    You can find further details, examples, restrictions, and constraints for overloaded main() methods in the main article on the Java main() method.

    Feature History

    This feature was first published in Java 21 as “Unnamed Classes and Instance Main Methods.” The concept of “implicitly declared classes” was then introduced in Java 22, and the java.io.IO class was added in Java 23.

    In Java 24, the term “Simple Source Files” was finally introduced by JDK Enhancement Proposal 495, and the feature was renamed “Simple Source Files and Instance Main Methods.”

    Vector API (Ninth Incubator) – JEP 489

    The Vector API is a new API that we can use to perform mathematical vector calculations such as the following:

    java vector addition

    The characteristic feature of the new API is that these calculations are optimized for vector instructions of modern CPUs. That means these calculations can be carried out (up to a certain vector size) in a single CPU cycle.

    The Vector API is submitted as an incubator feature for the ninth time via JDK Enhancement Proposal 489. It will remain an incubator feature until the necessary functions from Project Valhalla have reached the preview stage.

    As soon as the Vector API is promoted to a preview feature, I will describe it in more detail.

    Deprecations, Warnings, Deletions

    In Java 24, some functionalities were deprecated, some functions lead to run-time warnings, and others have been permanently removed. Discover which functionalities are affected in the following sections.

    Warn upon Use of Memory-Access Methods in sun.misc.Unsafe – JEP 498

    The sun.misc.Unsafe class introduced in Java 1.4 (over 20 years ago) has been a powerful but dangerous tool for directly accessing the working memory (both heap and native memory, i.e., memory not managed by the garbage collector).

    Developers were never supposed to use this class directly. However, on the one hand, it could not be prevented (due to a module system that did not yet exist at the time); on the other hand, we had no alternatives available.

    But today, we have alternatives:

    Since Java 9, VarHandles for accessing the Java heap and, since Java 22, the Foreign Function & Memory API for accessing native memory have been available as secure replacements.

    As a secure replacement, VarHandles have been available for accessing the Java heap since Java 9, and the Foreign Function & Memory API has been available for accessing native memory since Java 22.

    For this reason, the memory access methods from sun.misc.Unsafe are being removed step by step:

    1. In the first step, the corresponding methods were marked as deprecated for removal in Java 23.
    2. In Java 24, as defined by JDK Enhancement Proposal 498, the use of these methods will lead to warnings at run-time.
    3. In Java 26, these methods are expected to throw an UnsupportedOperationException.
    4. And in a later, as yet undetermined release, the methods will be completely removed.

    What does that mean for us?

    In the medium term, we need to check our applications to see whether they use the affected methods from java.misc.Unsafe and, if so, switch to the safer alternatives VarHandles and the Foreign Function & Memory API.

    We can deactivate the warnings in Java 24 using the VM setting --sun-misc-unsafe-memory-access=allow. However, I do not recommend this, as we will have to make the change sooner or later anyway if we want to upgrade to new Java versions. In addition, this option will no longer be available at the next level, i.e., probably in Java 26.

    The following values are available for this VM option --sun-misc-unsafe-memory-access:

    • allow – switches off the warnings, as just explained.
    • warn – This is the default setting in Java 24, i.e. the use of the methods is still permitted but leads to a warning at run-time when such a method is invoked for the first time.
    • debug – leads to warnings and the output of a stack trace with every call (i.e., not just the first).
    • deny – leads to an UnsupportedOperationException when such a method is called. This will probably be the default setting in Java 26.

    You can find a complete list of the affected methods in the section sun.misc.Unsafe memory-access methods and their replacements of JEP 471, which deprecated the methods in Java 23.

    Permanently Disable the Security Manager – JEP 486

    The “Security Manager,” which was initially developed to secure Java applets and is almost irrelevant for today’s Java applications, was marked as “deprecated for removal” in Java 17. The intention was to allocate the resources used to maintain the Security Manager to more important projects.

    In Java 24, the Security Manager can no longer be activated, either when starting an application or during run-time. The attempt leads to an error message.

    The deactivation of the Security Manager is documented in JDK Enhancement Proposal 486.

    The Security Manager will be completely removed in a future Java release.

    ZGC: Remove the Non-Generational Mode – JEP 490

    Java 21 introduces the “Generational Mode” for the Z Garbage Collector (ZGC). This mode divides objects into short-lived (young generation) and long-lived (old generation) objects to optimize garbage collection performance.

    Since Java 23, this mode is activated by default when ZGC is selected. However, we could still deactivate it using the VM option -XX:+UseZGC -XX:-ZGenerational.

    To avoid maintaining two modes, JDK Enhancement Proposal 490 removes the “Non-Generational Mode” in Java 24.

    The VM option -XX:-ZGenerational no longer has any effect and leads to a warning. It will be removed in a future Java version.

    Remove the Windows 32-bit x86 Port – JEP 479

    In Java 21, the 32-bit Java port for Windows was marked as “deprecated for removal.” There was hardly any need for this version, maintenance was expensive, and, for example, Virtual Threads were not even implemented in this port.

    Consequently, the 32-bit port for Windows is completely removed in Java 24 by JDK Enhancement Proposal 479.

    Deprecate the 32-bit x86 Port for Removal – JEP 501

    With the removal of the 32-bit port for Windows (see previous section), the 32-bit port for Linux is the last remaining 32-bit port – and thus the last port for which the JDK developers must implement fallbacks for the 32-bit architecture.

    In order to completely eliminate this extra effort in the future, JDK Enhancement Proposal 501 also marks the Linux 32-bit port as “deprecated for removal.”

    This port will also be removed in a future Java version.

    Other Changes in Java 24

    We won’t encounter all the features of the new Java in everyday programming. In this chapter, you will find changes that are only relevant for specific use cases. However, as an advanced Java developer, you should have at least heard of these changes.

    Class-File API – JEP 484

    With the Class-File API, Java 24 contains an official API for reading and writing compiled Java bytecode (i.e. .class files) from Java code.

    The Class-File API replaces the bytecode manipulation framework ASM, which has been widely used in the JDK. The reason for the in-house development is the fast JDK release cycle and the fact that ASM always lags behind the current Java version by at least one version, i.e. the ASM version contained in a current JDK can only handle .class files from the previous Java version at most.

    With the release of the Class-File API, this cyclical dependency no longer exists, and Java 24 can now also inspect and modify .class files created by Java 24.

    The Class File API was first introduced as a preview feature in Java 22 and sent into a second preview round in Java 23 with minor improvements.

    In Java 24, JDK Enhancement Proposal 484 finalizes the new API with minor improvements.

    Since most Java developers only work with the Class File API indirectly via tools and will never call it directly, I will not provide a detailed description of the interface here. If you are interested, you can find all the details in JEP 484.

    Prepare to Restrict the Use of JNI – JEP 472

    Any interaction between Java and native code is risky, as it can lead to undefined behavior and crashes (C code can write beyond the limits of an array, for example). This applies to both the Java Native Interface (JNI) and the Foreign Function & Memory API (FFM-API), which is intended to replace JNI in the long term.

    Status Quo

    In the FFM API, potentially dangerous methods were classified as “restricted” from the outset, and their use had to be explicitly permitted via the VM option --enable-native-access. Otherwise, an IllegalCallerException was triggered at run-time.

    That does not mean that using these methods is discouraged, but merely that one should be aware of the use of potentially dangerous functions – and that they must be explicitly permitted accordingly.

    Expansion to JNI in Java 24

    Due to JDK Enhancement Proposal 472, using corresponding JNI methods in Java 24 will lead to run-time warnings. These warnings can be prevented using the VM option --enable-native-access, as was previously the case with exceptions in the FFM API.

    How exactly does --enable-native-access work?

    You can either allow unrestricted access to native code for the entire application:

    java --enable-native-access=ALL-UNNAMED ...

    Or, better, you only allow native access to certain modules:

    java --enable-native-access=MODUL1,MODUL2,MODUL3,... ...

    Without further adjustment, without explicit access permission, JNI and FFM-API would now behave differently: JNI would issue a warning, and the FFM API would throw an IllegalCallerException.

    Adaptation of the FFM API

    For consistency reasons, the JDK developers decided to soften the behavior of the FFM-API for the time being and to have the FFM-API also issue warnings by default instead of triggering exceptions.

    Configuration

    This behavior can be adapted – uniformly for both APIs with the command line parameter --illegal-native-access. The parameter offers the following options:

    VM optionDescription
    --illegal-native-access=allowAll access to native code is permitted; no warnings are issued, and no exceptions are thrown.
    --illegal-native-access=warnAccess to native code is permitted, but warnings are issued if access has not been explicitly permitted with --enable-native-access. This is the default setting in Java 24.
    --illegal-native-access=denyAccess to native code leads to an IllegalCallerException unless access has been explicitly permitted with --enable-native-access.

    The deny mode will become the default setting in a future release; then, both JNI and FFM-API will throw an IllegalCallerException by default.

    In a later version, the --illegal-native-access parameter will be removed, and only the deny mode will remain.

    Quantum-Resistant Module-Lattice-Based Key Encapsulation Mechanism – JEP 496

    Future quantum computers threaten traditional cryptographic algorithms such as RSA and Diffie-Hellman. The use of ML-KEM (Module-Lattice-Based Key Encapsulation Mechanism – the link leads to the description of the mechanism on the website of the National Institute of Standards and Technology) should make it possible to exchange keys securely even in the age of quantum computers.

    The following example shows how …

    • the recipient generates an ML-KEM key pair,
    • the sender generates a secret session key by key encapsulation with the recipient’s public key and encapsulates it
    • and the recipient decapsulates the session key again.

    The sender and receiver can then exchange messages securely using the quantum-safe session key.

    void main() throws GeneralSecurityException {
      // Step 1 (Receiver): Create a ML-KEM public/private key pair:
      KeyPairGenerator generator = KeyPairGenerator.getInstance("ML-KEM");
      KeyPair keyPair = generator.generateKeyPair();
    
      PublicKey receiverPublicKey = keyPair.getPublic();
      PrivateKey receiverPrivateKey = keyPair.getPrivate();
    
      // Step 2 (Sender, has the receiver's public key):
      // Create a session key and encapsulate it:
      KEM kem = KEM.getInstance("ML-KEM");
      KEM.Encapsulator encapsulator = kem.newEncapsulator(receiverPublicKey);
      KEM.Encapsulated encapsulated = encapsulator.encapsulate();
    
      SecretKey sessionKey = encapsulated.key();
      System.out.println(HexFormat.of().formatHex(sessionKey.getEncoded()));
      
      byte[] keyEncapsulationMessage = encapsulated.encapsulation();
    
      // Step 3 (Receiver, has the sender's key encapsulation message):
      // Decapsulate the session key:
      KEM kr = KEM.getInstance("ML-KEM");
      KEM.Decapsulator decapsulator = kr.newDecapsulator(receiverPrivateKey);
      
      SecretKey decapsulatedSessionKey = decapsulator.decapsulate(keyEncapsulationMessage);
      System.out.println(HexFormat.of().formatHex(decapsulatedSessionKey.getEncoded()));
    
      // Now sender and receiver can exchange messages
      // using the securely transmitted session key.
      // . . .
    }Code language: Java (java)

    When I start the program, I get the following output, which proves that the encapsulated and decapsulated session keys match:

    7fac6ccf466d3ce0412cb8080280bb3c8cfb2fca630042aee2bf17a213ca82fe
    7fac6ccf466d3ce0412cb8080280bb3c8cfb2fca630042aee2bf17a213ca82feCode language: plaintext (plaintext)

    JDK Enhancement Proposal 496 describes the implementation of the quantum-safe ML-KEM method in the JDK. You will also find further examples there.

    Quantum-Resistant Module-Lattice-Based Digital Signature Algorithm – JEP 497

    Analogous to the ML-KEM method described in the previous section, the ML-DSA method (Module-Lattice-Based Digital Signature Algorithm – this link also leads to the National Institute of Standards and Technology), which is also quantum-safe, is added to the JDK.

    The following example shows how …

    • the sender generates an ML-DSA key pair,
    • the sender signs his message with their private key,
    • and the recipient verifies the signature with the sender’s public key.

    The recipient can thus ensure that the message actually from the sender and has not been modified en route.

    import java.security.Signature;
    
    void main() throws GeneralSecurityException {
      // Step 1 (Sender): Create a ML-KEM public/private key pair:
      KeyPairGenerator generator = KeyPairGenerator.getInstance("ML-DSA");
      KeyPair keyPair = generator.generateKeyPair();
    
      PublicKey senderPublicKey = keyPair.getPublic();
      PrivateKey senderPrivateKey = keyPair.getPrivate();
    
      // Step 2 (Sender): Sign a message using the private key:
      byte[] message = "Roses bloom nightly.".getBytes(StandardCharsets.UTF_8);
      Signature signer = Signature.getInstance("ML-DSA");
      signer.initSign(senderPrivateKey);
      signer.update(message);
      byte[] signature = signer.sign();
    
      // Step 3 (Receiver): Verify the message using the sender's public key:
      Signature signatureVerifier = Signature.getInstance("ML-DSA");
      signatureVerifier.initVerify(senderPublicKey);
      signatureVerifier.update(message);
      boolean verified = signatureVerifier.verify(signature);
      
      . . .
    }Code language: Java (java)

    JDK Enhancement Proposal 497 describes the implementation of the quantum-safe ML-DSA procedure in the JDK.

    Linking Run-Time Images without JMODs – JEP 493

    A JDK installation consists of two components:

    • a run-time image (the executable Java system)
    • and a set of Java module files in the jmod directory.

    However, the Java modules are also contained in the run-time image, in the lib/modules file.

    Why this duplication?

    The lib/modules file is used when running a Java application; the module files in the jmod directory are required by the jlink tool to generate a custom run-time image.

    JDK Enhancement Proposal 493 will enable distributors to build a JDK without jmod files; the jlink tool will then extract the module information from the run-time image.

    This will reduce the size of a JDK by around 25% – this is particularly relevant in the cloud environment, where increased memory requirements and higher traffic (due to the transfer of images) lead to higher costs.

    The new option is not activated by default; JDK providers must proactively opt for this option when generating their JDKs.

    In a future Java version, the option might be on by default.

    Late Barrier Expansion for G1 – JEP 475

    To understand this JEP, you first need to know what “barrier” and “expansion” mean.

    Garbage Collector Barrier

    In the context of garbage collection, a “barrier” refers to a piece of code that is executed before and/or after accessing Java objects.

    For example, write barriers are used to trace which references exist from objects in the old generation to objects in the young generation, so that the young generation can be cleaned up without having to scan the entire old generation each time.

    And, if the garbage collector has moved an object in the heap during a defragmentation phase, a read barrier ensures that the pointer to this object is updated when it is accessed.

    The JVM automatically inserts these barriers into the machine code when it loads a Java program.

    Bytecode Expansion

    When the Java compiler compiles a Java program, it produces platform-independent bytecode. When the JVM starts the Java application, it converts this bytecode into highly optimized machine code.

    For example, methods can be inlined, i.e., each method invocation gets replaced with a copy of the method’s code – this saves the overhead of calling the method. Also, loops can be unrolled, i.e., a loop is replaced by repeating the same machine code several times to eliminate the overhead of checking the terminal condition.

    Due to this and other optimizations, the machine code usually occupies more memory than the bytecode. This process is, therefore, also referred to as “bytecode expansion” or just “expansion.”

    Barrier Expansion – Status Quo

    G1 is currently working with an “Early Barrier Expansion”:

    The barrier code is provided in a platform-independent intermediate stage between bytecode and machine code, the so-called “Intermediate Representation” (IR).

    The application byte code is also first converted into the “Intermediate Representation” and then combined with the Barrier IR code.

    Then, over several stages, the combined IR code is optimized and translated into machine code:

    Early Barrier Expansion steps (JEP 475)

    This has two advantages:

    • Since the barrier code is available in the platform-independent intermediate representation, it can be used on all platforms without any adjustments.
    • The compiler can optimize the entire code, i.e., the barrier code can be optimized in the context of the application code.

    However, early expansion has two significant disadvantages:

    • The compiler must compile more IR code (application and barrier code).
    • The garbage collector developers cannot foresee how the compiler optimizes the barrier code and, therefore, can often not reproduce potential errors.

    The JDK developers decided that the disadvantages outweighed the advantages and, therefore, implemented “Late Barrier Expansion” via JDK Enhancement Proposal 475.

    Late Barrier Expansion

    With “Late Barrier Expansion,” the barrier code is not implemented as IR code but as an already optimized machine code. This optimized code is integrated into the application’s machine code after the application code has been compiled and optimized:

    Late Barrier Expansion steps (JEP 475)

    As the compiler now has to optimize less code, the JDK developers have measured that applications are about 10-20% faster!

    The Z Garbage Collector (ZGC), by the way, has been working with Late Barrier Expansion since its introduction in Java 15.

    Deprecate LockingMode Option, along with LM_LEGACY and LM_MONITOR

    In Java 21, a new, experimental “Lightweight Locking” mode was introduced for object monitor locking (the mechanism for locking a critical area for other threads). This mode could be activated via the VM option -XX:LockingMode=2, instead of the “Stack Locking” mode previously used by default.

    The following locking modes have since been selectable:

    • -XX:LockingMode=0 – Exclusively heavyweight monitor objects (LM_MONITOR)
    • -XX:LockingMode=1Stack Locking + monitor objects for contention (LM_LEGACY)
    • -XX:LockingMode=2Lightweight Locking + monitor objects for contention (LM_LIGHTWEIGHT)

    In Java 22, the experimental LM_LIGHTWEIGHT option was promoted to a productive option.

    Lightweight Locking then became the new default mode in Java 23.

    In Java 24, the VM option -XX:LockingMode and the selectable modes LM_MONITOR and LM_LEGACY, as well as the Stack Locking mechanism, are marked as “deprecated.”

    The “heavyweight monitor objects” mechanism itself is not “deprecated”, but should no longer be selected via -XX:LockingMode=0, but – as before Java 21 – via the VM option -XX:+UseHeavyMonitors.

    In Java 26, -XX:LockingMode should no longer have any effect, and in Java 27, the option will be completely removed.

    (No JDK Enhancement Proposal exists for this change; it is listed in the bug tracker under JDK-8334299).

    Support for Unicode 16.0

    Java 24 raises Unicode support to version 16.0.

    Why is this relevant?

    All character-processing classes, such as String and Character, must be able to handle the characters and code blocks introduced in the new Unicode version.

    You can find an example in the Unicode 10 section of the article on Java 11.

    (No JDK Enhancement Proposal exists for this change; it is listed in the bug tracker under JDK-8319993).

    Complete List of All Changes in Java 24

    In this article, I have presented all JDK Enhancement Proposals (JEPs) and a selection of other non-JEP changes implemented in Java 24. You can find a complete list of all changes in the Java 24 Release Notes.

    Conclusion

    Wow – what a comprehensive release!

    So that’s it, the 24 JDK Enhancement Proposals and two minor changes from the release notes. Here is a summary:

    • With the Stream Gatherers API, we can write our own intermediate stream operations.
    • We can now use synchronized around blocking calls without pinning a Virtual Thread to its carrier.
    • With Ahead-of-Time Class Loading & Linking, the logical evolution of Class Data Sharing, applications start up to 42% faster (according to the JDK developers).
    • With the Key Derivation Function API and quantum-safe encryption methods, Java has become even more secure.
    • The Gargabe Collectors Shenandoah and G1 have been optimized: Shenandoah now has a “Generational Mode,” and in G1, the “Early Barrier Expansion” has been turned into a “Late Barrier Expansion.” In ZGC, the deprecated “Non-Generational Mode” has been removed.
    • Compact Object Headers shorten the headers of each Java object by four bytes, thus significantly reducing the memory footprint of the entire application.
    • Primitive Type Patterns, Flexible Constructor Bodies, Structured Concurrency, and the Vector API have been resubmitted as preview or incubator features without changes.
    • Implicitly Declared Classes and Instance Main Methods has been renamed Simple Source Files and Instance Main Methods.
    • When using import module, we can now resolve ambiguities with a package import. Importing the java.se module now makes the classes exported by the java.base module available without explicit imports.
    • The convenience methods ScopedValues.runWhere() and callWhere() have been removed in the interests of a “Fluent API.”
    • The use of memory access methods in sun.misc.Unsafe leads to run-time warnings.
    • The Security Manager has been switched off.
    • The 32-bit Windows version of Java has been removed, and the 32-bit Linux version has been deprecated.
    • The finalized Class-File API replaces the byte code manipulation framework ASM.
    • Using potentially unsafe JNI methods leads to warnings unless they were explicitly permitted at the start of the application.
    • JDK images can now be provided without jmod files, which reduces their size by approximately 25%.
    • The VM option -XX:LockingMode has been deprecated.
    • Unicode support is upgraded to version 16.0.

    You can download Java 24 here. If you had previously installed a preview version: you need at least build 26 to be able to compile all the source code shown in this article.

    Which of the new Java 24 features do you find the most exciting? Which feature do you miss? Share your opinion in the comments!

  • Ahead-of-Time Class Loading & Linking – Turbo for Java Applications

    Ahead-of-Time Class Loading & Linking – Turbo for Java Applications

    In this article, you will learn:

    • Why do large Java applications take several seconds to start?
    • What is Ahead-of-Time Class Loading & Linking, and how can it improve startup time?
    • Step by step: How can Ahead-of-Time Class Loading & Linking accelerate the start of an application?
    • How does AoT Class Loading & Linking differ from (App)CDS?

    Why Do Java Applications Start So Slowly?

    Java applications are highly flexible at runtime, allowing classes to be dynamically loaded and unloaded. The dynamic compilation, optimization, and de-optimization make Java programs as fast as C code (or faster), and reflection makes frameworks like Jakarta EE, Spring Boot, Quarkus, Helidon, Micronaut, etc., possible in the first place.

    But these advantages come at a price:

    When starting an application, hundreds of .jar files must be unpacked, and thousands of .class files must be loaded into memory, analyzed, and linked. The static initialization code of classes must be executed, and frameworks like Jakarta EE and Spring must scan the code for annotations, instantiate beans, and execute configuration code.

    Large backend applications can thus take several seconds or even minutes to start.

    How Can Application Startup Be Accelerated?

    Many of the initialization tasks described in the previous section are the same for each application start.

    As part of Project Leyden, work is done to perform as many of these repetitive tasks as possible before starting an application.

    Through JDK Enhancement Proposal 483, the first fruits of this work will be released in Java 24: Classes can now (after reading, parsing, loading, and linking) be cached in a binary file – the AOT cache, making them available much faster in a loaded and linked state for future starts of the same application. The JDK developers have measured startup time reductions of up to 42%.

    In Java 25, JDK Enhancement Proposal 514, Ahead-of-Time Command-Line Ergonomics, simplified the generation of the AOT cache: instead of two steps, only one needs to be executed.

    Also in Java 25, JDK Enhancement Proposal 515, Ahead-of-Time Method Profiling, extended the AOT cache to include runtime statistics on method calls so that the JVM can start compiling hotspots immediately after startup. As a result, a further 19% reduction in start time was measured.

    How Does Ahead-Of-Time Class Loading Linking Work?

    To accelerate program startup through AoT Class Loading & Linking, we need to perform three steps:

    1. In the first step, the application is started in a so-called training run. During this, the JVM analyzes all loaded and linked classes and generates a configuration file with the relevant information about these classes – and from Java 25 onwards also about method call statistics.
    2. In the second step, the binary cache file is created using this configuration file.
    3. For each subsequent application start, you specify this cache file, and the application loads the classes in loaded and linked form directly from this cache – and from Java 25 onwards, it starts directly with the optimization of the most frequently called methods (“hotspots”).

    This procedure sounds more complicated than it is. In the following, I will guide you step by step through these steps using an example application up to the accelerated start of the application.

    Step-By-Step Instructions to Follow Along

    In this section, I will show you how to use Ahead-of-Time Class Loading Linking using a small application.

    Well use a simple demo program that just displays the current time.

    Here, we use a compact source file with an instance main method. This way, we don’t have to define a class and can simply write void main() instead of public static void main(String args[]).

    Download an Early-Access-Build of Java 24 (Ahead-of-Time Class Loading Linking is only available from Java 24 onwards).

    Download Java 24 or an early-access build of Java 25 (Ahead-of-Time Class Loading & Linking is available from Java 24; the -XX:AOTCacheOutput option, which allows us to combine the first two steps into one, is available from Java 25).

    Save the following source code in the file AotTest.java:

    void main() {
      var now = LocalDateTime.now();
      var nowString = now.format(DateTimeFormatter.ofLocalizedDateTime(FormatStyle.MEDIUM));
      System.out.println("Hello, it's " + nowString);
    }Code language: Java (java)

    Compile the code (in Java 24 you must include the --enable-preview --source 24 options, as the Compact Source Files and Instance Main Methods feature is still in the preview stage in Java 24):

    javac --enable-preview --source 24 AotTest.javaCode language: plaintext (plaintext)

    Create a JAR file:

    jar cvf AotTest.jar AotTest.classCode language: plaintext (plaintext)

    Then start the training run with the following call:

    java -XX:AOTMode=record -XX:AOTConfiguration=AotTest.conf \
        --enable-preview -cp AotTest.jar AotTestCode language: plaintext (plaintext)

    This creates the configuration file AotTest.conf. You can open this file with a text editor – it contains a long list of classes and data about these classes.

    Then, use the following command to create the class cache in the file AotTest.aot (this command does not execute the application again):

    java -XX:AOTMode=create -XX:AOTConfiguration=AotTest.conf -XX:AOTCache=AotTest.aot \
        --enable-preview -cp AotTest.jarCode language: plaintext (plaintext)

    In Java 25, you can perform the training run and cache generation (the last two steps before this info block) in one combined step. In addition, the --enable-preview option is no longer required, as Compact Source Files and Instance Main Methods have been finalized in Java 25:

    java -XX:AOTCacheOutput=AotTest.aot -cp AotTest.jar AotTest

    Finally, start the application specifying the cache file to use:

    java -XX:AOTCache=AotTest.aot --enable-preview -cp AotTest.jar AotTestCode language: plaintext (plaintext)

    Now, let’s compare the application’s startup time with and without cache.

    In the following, I use the Linux command time. On Windows, you can use the tool ptime, which you can install via the package manager Chocolatey using the command choco install ptime.

    First, a run without cache:

    time java --enable-preview -cp AotTest.jar AotTestCode language: plaintext (plaintext)

    With five runs, I got a median runtime of 0.137 seconds.

    And now a run with cache:

    time java -XX:AOTCache=AotTest.aot --enable-preview -cp AotTest.jar AotTestCode language: plaintext (plaintext)

    This time, I observed a median runtime of 0.086 seconds from five runs. That is an impressive performance increase of 37%, which comes close to the 42% measured by the feature’s developers.

    And What About AppCDS?

    The attentive reader might wonder: What’s the difference between Ahead-of-Time Class Loading & Linking and (Application) Class Data Sharing?

    Class Data Sharing (CDS) has existed since Java 5 and allows storing the JDK classes in a platform-specific binary format, from which the classes can then be loaded much faster than from .class files.

    In Java 10, Application Class Data Sharing (AppCDS) was added, which allows not only JDK classes but also application classes to be stored in this binary format.

    Ahead-of-Time Class Loading & Linking builds upon (App)CDS. If you looked at the file AotTest.conf earlier, you might have noticed that the header says it’s a “CDS archive dump.”

    While Class Data Sharing merely reads and parses the classes and then stores them in a binary format, with AoT Class Loading & Linking, the classes are additionally – as the name suggests – loaded into Class objects and linked.

    The Leyden developers have tested both mechanisms with the Spring PetClinic. AppCDS accelerated the application’s loading time by 33%, and AoT Class Loading & Linking by 42%. So, if you’re already using AppCDS, the startup time improvement through AoT Class Loading & Linking won’t be quite as significant.

    Conclusion

    Java is a very flexible and powerful language, but this flexibility can lead to startup times ranging from several seconds to minutes for larger applications. During startup, Java classes are read, parsed, loaded, and linked, among other things.

    With Ahead-of-Time Class Loading & Linking, we can perform these steps once before the application starts, thereby – according to the developers of this feature – accelerating the actual start of the application by up to 42%.

    Ahead-of-Time Method Profiling also saves statistics on method calls in the AOT cache so that frequently called methods (“hotspots”) can be optimized immediately after the application is started.

    If you try out this feature, please write about your experiences in the comments. I’m curious about your measurements and your opinion!

  • Primitive Types in Patterns, instanceof, and switch

    Primitive Types in Patterns, instanceof, and switch

    In this article, you will learn:

    • What is Pattern Matching?
    • How can we use primitive types in pattern matching with instanceof?
    • How can we use primitive types in pattern matching with switch?
    • What is the difference between pattern matching with primitive types and object types (“reference types”)?
    • What are dominating and dominated primitive types?

    We begin with a brief refresher on pattern matching in Java. If you’re already familiar with pattern matching in general, feel free to skip the introductory chapter and go directly to the second chapter, Changes in Java 23.

    What is Pattern Matching?

    Pattern Matching in Java was first released as a final feature in Java 16 with Pattern Matching for instanceof, and expanded in Java 21 with Pattern Matching for switch.

    The following code example uses pattern matching to determine if the variable obj is of type String, and if so, converts it to uppercase and prints it:

    Object obj = . . .
    if (obj instanceof String s) {
      System.out.println(s.toUpperCase());
    }Code language: Java (java)

    The pattern in this example is String s. The code first checks if the Object variable obj matches this pattern. It does if obj is of type String. If that’s the case, the content of obj is made available in the String variable s, converted to uppercase, and printed.

    The following example is a bit more complex and uses switch instead of instanceof to match the variable obj against different patterns and perform different actions depending on the type:

    switch (obj) {
      case String s when s.length() >= 5 -> System.out.println(s.toUpperCase());
      case Integer i                     -> System.out.println(i * i);
      case Number n                      -> System.out.println(n + " is a number");
      case null, default                 -> System.out.println(obj);
    }Code language: Java (java)

    The first pattern, String s when s.length() >= 5, is a so-called “guarded pattern,” a pattern with a restriction, and s.length() >= 5 is the “guard.” The variable obj matches this pattern if it is of type String and this string is at least five characters long.

    The second pattern, Integer i, matches if obj is of type Integer.

    The third pattern, Number n, matches if obj is of a type extending the abstract class Number, for example, Long or Double, but also AtomicInteger or BigDecimal. The pattern would also match variables of type Integer, but those are already “intercepted” in the previous line by the pattern Integer i.

    Changes in Java 23

    So far, pattern matching only works with reference types, such as String and Integer, but not with primitive types like int, long, and double.

    In Java 23, the preview feature “Primitive Types in Patterns, instanceof, and switch” was introduced through JDK Enhancement Proposal 455, and in Java 24, the feature is being re-proposed without changes through JEP 488.

    When you activate this feature with --enable-preview, you can:

    1. use primitive types in pattern matching,
    2. use constants of types long, float, double, and boolean in switch.

    I’ll describe the first change in detail in the upcoming section, Primitive Types in Pattern Matching. I’ll quickly explain the second change here:

    For a long time, we’ve been able to compare a variable with constants using switch, for example like this:

    int code = . . .
    switch (code) {
      case 200 -> System.out.println("OK");
      case 400 -> System.out.println("Bad Request");
      case 404 -> System.out.println("Not Found");
      . . .
    }Code language: Java (java)

    However, this has so far only worked with the types byte, short, char, and int. If you replace int in the first line with long, for example, you’ll get a compiler error:

    error: selector type long is not allowedCode language: plaintext (plaintext)

    If you activate “Primitive Types in Patterns, instanceof, and switch” with --enable-preview in Java 23 or 24, this error message disappears. You can then use any primitive type in switch.

    Primitive Types in Pattern Matching

    An object matches a pattern if the object can be assigned to a variable of the pattern’s type. As you saw in the previous section, for example, an Integer object matches the pattern Integer i – but it would also match the patterns Number n or Object o – and even Comparable c or Serializable s – because Integer extends Number and implements Comparable, among others, and Number extends Object and implements Serializable:

    Class diagram: Integer extends Number, Number extends Object

    However, with primitive types, there is no inheritance. Therefore, pattern matching with primitive types doesn’t work exactly like with reference types – but similarly.

    In the following section, I will explain how primitive types can be used in pattern matching with instanceof. In the subsequent section, I will then show you primitive types in pattern matching with switch.

    Primitive Type Patterns with instanceof

    Don’t be alarmed: I will start with a mathematically sounding formulation but then immediately explain with an example what I mean.

    Be a a variable of a primitive type (i.e., byte, short, int, long, float, double, char, or boolean) and B one of these primitive types. Then a instanceof B results in true if the precise value of a can be stored in a variable of type B.

    Example 1

    Here comes the example:

    int value = . . .
    if (value instanceof byte b) {
      System.out.println("b = " + b);
    }Code language: Java (java)

    The code is to be read as follows: If the value of the variable value can also be stored in a byte variable, then assign this value to the byte variable b and print it.

    For value = 5, this would be the case; for value = 1000, however, not, since a variable of type byte can only store values from -128 to 127.

    Example 2

    Here is a second example:

    double value = . . .
    if (value instanceof float f) {
      System.out.println("f = " + f);
    }Code language: Java (java)

    Here, we check whether the double value can also be represented as a float. This would be the case for value = 1.5 but not for value = Math.PI, since float is not precise enough to capture all digits of the double constant Math.PI.

    Example 3

    Let’s assign a specific value to value and check it against all numeric primitive types (a comparison of numeric types with boolean is not allowed and leads to a compiler error).

    Here is, instead of a code snippet, a complete, executable demo program:

    void main() {
      int value = 65;
      if (value instanceof byte b)   System.out.println(value + " instanceof byte:   " + b);
      if (value instanceof short s)  System.out.println(value + " instanceof short:  " + s);
      if (value instanceof int i)    System.out.println(value + " instanceof int:    " + i);
      if (value instanceof long l)   System.out.println(value + " instanceof long:   " + l);
      if (value instanceof float f)  System.out.println(value + " instanceof float:  " + f);
      if (value instanceof double d) System.out.println(value + " instanceof double: " + d);
      if (value instanceof char c)   System.out.println(value + " instanceof char:   " + c);
    }Code language: Java (java)

    If you save the program, for example, in the file Test.java, you can start it in Java 23 and 24 as follows:

    java --enable-preview Test.javaCode language: plaintext (plaintext)

    You will then see the following output:

    65 instanceof byte:   65
    65 instanceof short:  65
    65 instanceof int:    65
    65 instanceof long:   65
    65 instanceof float:  65.0
    65 instanceof double: 65.0
    65 instanceof char:   ACode language: plaintext (plaintext)

    The value 65 can, therefore, be stored in variables of all other primitive types (except boolean). You can see that as float and double, this value is displayed with one decimal place and as char as the character ‘A’ (whose ASCII code is 65).

    Example 4

    If we set value to 100,000, we get the following output:

    100000 instanceof int:    100000
    100000 instanceof long:   100000
    100000 instanceof float:  100000.0
    100000 instanceof double: 100000.0Code language: plaintext (plaintext)

    The value 100,000 can, therefore, be stored in variables of type int, long, float, and double but not in variables of type byte, short, and char. Their number range only goes up to 127, 32,767 and 65,535.

    Example 5

    For value = 16_777_217, things get interesting:

    16777217 instanceof int:    16777217
    16777217 instanceof long:   16777217
    16777217 instanceof double: 1.6777217E7Code language: plaintext (plaintext)

    So the number 16,777,217 can be stored in int, long, and double, but not in float?

    That is indeed the case! Run the following code:

    float f = 16_777_217;
    System.out.printf("f = %.1f%n", f);Code language: Java (java)

    The result is unexpected:

    f = 16777216.0Code language: plaintext (plaintext)

    The printed number ends in 6, not 7!

    That is because the floating point type float has limited accuracy and can store, for example, 16.777.216, 16.777.218, and 16.777.220, but not the values 16.777.217 and 16.777.219 in between.

    Example 6

    In the following example, value is a floating-point number of type float:

    void main() {
      float value = 3.5f;
      if (value instanceof byte b)   System.out.println(value + " instanceof byte:   " + b);
      if (value instanceof short s)  System.out.println(value + " instanceof short:  " + s);
      if (value instanceof int i)    System.out.println(value + " instanceof int:    " + i);
      if (value instanceof long l)   System.out.println(value + " instanceof long:   " + l);
      if (value instanceof float f)  System.out.println(value + " instanceof float:  " + f);
      if (value instanceof double d) System.out.println(value + " instanceof double: " + d);
      if (value instanceof char c)   System.out.println(value + " instanceof char:   " + c);
    }Code language: Java (java)

    Now, the program prints the following:

    3.5 instanceof float:  3.5
    3.5 instanceof double: 3.5Code language: plaintext (plaintext)

    Of course, a number with decimal places can only be displayed using float and double.

    Example 7

    However, if we set value to 100000.0f, the result is as follows:

    100000.0 instanceof int:    100000
    100000.0 instanceof long:   100000
    100000.0 instanceof float:  100000.0
    100000.0 instanceof double: 100000.0Code language: plaintext (plaintext)

    The floating point number 100,000.0 can also be stored in an int or a long as it has no decimal places.

    Pattern Matching with boolean

    boolean, by the way, can only be compared with boolean. Any comparison of boolean with another type or another type with boolean will lead to an “incompatible types” compiler error.

    Pattern matching with boolean isn’t very useful anyway because matching a boolean variable against the type boolean always results in true.

    Primitive Type Patterns with instanceof and &&

    Just like with reference types, you can also directly append further checks in the instanceof check with && for primitive types. The following code, for example, only prints positive byte values (i.e., 1 to 127):

    int a = . . .
    if (a instanceof byte b && b > 0) {
      System.out.println("b = " + b);
    }Code language: Java (java)

    Primitive Type Pattern with switch

    We can use primitive patterns not only with instanceof but also with switch:

    void main() {
      double value = 100000.0;
      switch (value) {
        case byte   b -> System.out.println(value + " instanceof byte:   " + b);
        case short  s -> System.out.println(value + " instanceof short:  " + s);
        case char   c -> System.out.println(value + " instanceof char:   " + c);
        case int    i -> System.out.println(value + " instanceof int:    " + i);
        case long   l -> System.out.println(value + " instanceof long:   " + l);
        case float  f -> System.out.println(value + " instanceof float:  " + f);
        case double d -> System.out.println(value + " instanceof double: " + d);
      }
    }Code language: Java (java)

    The program produces the following output:

    100000.0 instanceof int:    100000Code language: plaintext (plaintext)

    Here, we do not see all matching patterns, but only the first one, because only a single program path is executed through switch.

    Here are a few examples for value along with the type of the first matching pattern:

    valueFirst matching typeNumber range of the matching type
    0byte-128 to 127
    10,000short-32,768 to 32,767
    50,000char0 to 65,535
    1,000,000int-2,147,483,648 to 2,147,483,647
    1,000,000,000,000longapprox. minus to plus 9 trillion
    0.125floatSingle-precision floating-point numbers
    0.126doubleDouble-precision floating-point numbers

    Primitive Type Patterns with switch and when (“Guarded Pattern”)

    With primitive type patterns in switch, we can also use “guards,” i.e., narrow the pattern using when and a boolean expression. This can be helpful, for example, when we want to group by number ranges, such as HTTP status codes.

    Here is an example that was previously only possible with an if-else chain:

    private String getHttpStatusMessage(int code) {
      if (code == 200) return "OK";
      else if (code == 400) return "Bad request";
      else if (code == 404) return "Not found";
      else if (code == 500) return "Internal server error";
      else if (code > 100 && code < 200) return "Informational";
      else if (code > 200 && code < 300) return "Success";
      else if (code > 302 && code < 400) return "Redirection";
      else if (code > 400 && code < 500) return "Client error";
      else if (code > 502 && code < 600) return "Server error";
      else return "Unknown code";
    }Code language: Java (java)

    In the future, we can write this method – in my opinion, much more concisely – using switch as follows:

    private String getHttpStatusMessage(int code) {
      return switch (code) {
        case 200 -> "OK";
        case 400 -> "Bad request";
        case 404 -> "Not found";
        case 500 -> "Internal server error";
    
        case int i when i > 100 && i < 200 -> "Informational";
        case int i when i > 200 && i < 300 -> "Success";
        case int i when i > 302 && i < 400 -> "Redirection";
        case int i when i > 400 && i < 500 -> "Client error";
        case int i when i > 502 && i < 600 -> "Server error";
    
        default -> "Unknown code";
      };
    }Code language: Java (java)

    Dominant and Dominated Primitive Types

    For switch with primitive types, we must observe the principle of dominating and dominated types – just as with object types.

    A dominant type is one that can represent all values of a dominated type.

    For example, byte is dominated by int, as each byte value can also be stored as an int. Take a look at the following code.

    In the following examples, I have used the unnamed variable _ (underscore), finalized in Java 22.

    double value = . . .
    switch (value) {
      case int    _ -> System.out.println(value + " instanceof int");    // dominating type
      case byte   _ -> System.out.println(value + " instanceof byte");   // dominated type
      case double _ -> System.out.println(value + " instanceof double");
    }Code language: Java (java)

    The case byte label would never match here, as every byte is also an int and would, therefore, be intercepted by the case int label.

    If you were to try to compile this code, it would lead to the following compiler error:

     error: this case label is dominated by a preceding case label
        case byte   _ -> System.out.println(value + " instanceof byte");
             ^Code language: plaintext (plaintext)

    Generally, a dominated type must always be listed before a dominant type. So the following is OK:

    double value = . . .
    switch (value) {
      case byte   _ -> System.out.println(value + " instanceof byte");   // dominated type
      case int    _ -> System.out.println(value + " instanceof int");    // dominating type
      case double _ -> System.out.println(value + " instanceof double");
    }Code language: Java (java)

    Exhaustiveness Analysis for switch

    For all new switch features (i.e., all those added since Java 21), the switch must be exhaustive, meaning there must be a matching case label for every possible value of the selector expression (in the example, the variable value).

    That’s why the previous examples also included a case double label. The following would not be permitted:

    double value = . . .
    switch (value) {
      case byte   _ -> System.out.println(value + " instanceof byte");
      case int    _ -> System.out.println(value + " instanceof int");
    }Code language: Java (java)

    This switch is incomplete and therefore invalid; for example, no case label would match the value 3.5. The compiler would produce the following error:

    error: the switch statement does not cover all possible input values
      switch (value) {
      ^Code language: plaintext (plaintext)

    The following switch, on the other hand, is complete:

    short value = . . .
    switch (value) {
      case byte   _ -> System.out.println(value + " instanceof byte");
      case int    _ -> System.out.println(value + " instanceof int");
    }Code language: Java (java)

    Although there is no case short label here, there is a case int label, and every possible short value matches against it.

    Summary

    With the option --enable-preview, you can activate the feature “Primitive Types in Patterns, instanceof, and switch” in Java 23 and 24. This allows you to match against primitive type patterns like int i or double d with instanceof and switch.

    Since there is no inheritance for primitive types, primitive patterns work somewhat differently than patterns with reference types: a variable matches a primitive pattern if a variable of the target type can accommodate it without loss of precision.

  • Importing Modules in Java: Module Import Declarations

    Importing Modules in Java: Module Import Declarations

    In this article, you will learn:

    • How do you import entire Java modules using “import module”?
    • How to resolve ambiguities in module imports.
    • What are transitive module imports, and how do they work?
    • Which modules are imported by default?

    Let’s start with a very brief overview…

    Java Imports

    Since Java 1.0, we have been able to import individual classes (“single-type-import declaration”) or entire packages (“type-import-on-demand declaration”) using the import statement, e.g.:

    import java.util.*;
    import java.util.stream.Stream;Code language: Java (java)

    The classes of the java.lang package have always been imported automatically. Therefore, we do not need to specify import statements for classes like Object, String, Integer, Exception, etc.

    Module Import Declarations

    Starting with Java 25 (and in preview mode in Java 23 and Java 24), we can use import module to import entire modules. This allows us to directly use all classes that are part of a module and exported by it.

    In the following example, we import the module java.base and can, therefore, use the classes List, Map, Stream, and Collectors without having to import them individually or by package (String and Character are in the package java.lang and have always been imported automatically).

    import module java.base;
    
    public class ModuleImportTest {
    
      public static Map<Character, List<String>> groupByFirstLetter(String... values) {
        return Stream.of(values).collect(
            Collectors.groupingBy(s -> Character.toUpperCase(s.charAt(0))));
      }
    }Code language: Java (java)

    If you save this code example in the file ModuleImportTest.java, you can compile the class in Java 24 as follows (in Java 23, you must replace the parameter --source 24 with --source 23; in Java 25, you can omit both --enable-preview and –-source):

    javac --enable-preview --source 24 ModuleImport.javaCode language: plaintext (plaintext)

    To use import module, it is not necessary for the importing class itself to be in a module, as seen in the previous example.

    Compact Source Files (formerly known as “Implicitly declared classes” and “simple source files”) and JShell automatically import the java.base module, i.e., you can use classes like List and Map there without explicit imports.

    Ambiguous Class Names

    Sometimes, a class name is not unique. In the following example, there is a List class in both the imported module java.base (java.util.List) and the module java.desktop (java.awt.List):

    import module java.base;     // ← Contains java.util.List
    import module java.desktop;  // ← Contains java.awt.List
    
    public class Ambiguous {
      List list;                 // ← Ambiguous reference to List
    }Code language: Java (java)

    If you save the file as Ambiguous.java and then compile it with Java 24 as follows:

    javac --enable-preview --source 24 Ambiguous.javaCode language: plaintext (plaintext)

    … or with Java 23 as follows:

    javac --enable-preview --source 23 Ambiguous.javaCode language: plaintext (plaintext)

    … then the compiler will abort with the following error message:

    Ambiguous.java:5: error: reference to List is ambiguous
      List list;
      ^
      both class java.awt.List in java.awt and interface java.util.List in java.util matchCode language: plaintext (plaintext)

    This means that the compiler does not know which of the two List classes you mean.

    Resolving Ambiguous Class Names

    Let’s assume you want to use java.util.List (and not java.awt.List). Then you have two options to resolve this ambiguity:

    Option 1: You also import the class java.util.List directly:

    import module java.base;
    import module java.desktop;
    
    import java.util.List;  // ← Ambiguity resolved by single-type-import declaration
    
    public class Ambiguous {
      List list;
    }Code language: Java (java)

    Option 2: You also import the package java.util (in Java terminology, this is not called “package import” but “type import on demand declaration”):

    import module java.base;
    import module java.desktop;
    
    import java.util.*;  // ← Ambiguity resolved by type-import-on-demand declaration
    
    public class Ambiguous {
      List list;
    }Code language: Java (java)

    The second option has only been available since Java 24. Compiling the last example with Java 23 also results in the error message “reference to List is ambiguous.”

    By the way, ambiguous class names can also occur – although rarely – if you only import one module. For example, the module java.desktop contains both the interface javax.swing.text.Element and the class javax.swing.text.html.parser.Element.

    Transitive Module Imports

    When a module imported with import module transitively imports a third module, you can also use all classes of the exported packages of this third module without explicit imports.

    I want to explain this using an example with the modules java.sql and java.xml.

    • The module java.sql has a transitive dependency on the module java.xml.
    • The module java.sql exports the packages java.sql and javax.sql.
    • The module java.xml exports the packages javax.xml and org.w3c.dom, each with numerous sub-packages.

    The following graphic shows the modules, their dependencies, and the exported packages:

    java module import declarations

    The module declaration of the java.sql module looks like this:

    module java.sql {
      . . .
      requires transitive java.xml;
    
      exports java.sql;
      exports javax.sql;
      . . .
    }Code language: Java (java)

    And the module declaration of java.xml:

    module java.xml {
      exports javax.xml;
      exports javax.xml.parsers;
      . . .
    }Code language: Java (java)

    If we now write a program that imports the module java.sql, then we do not need explicit imports for the classes SAXParserFactory and SAXParser from the package javax.xml.parsers of the java.xml module – and also no explicit import of this module:

    import module java.sql;  // ← Transitively imports module java.xml
                             //   and its exported packages, e.g. javax.xml.parsers
    . . .
    SAXParserFactory factory = SAXParserFactory.newInstance();
    SAXParser saxParser = factory.newSAXParser();
    . . .Code language: Java (java)

    That’s because from the transitive dependency of module java.sql on module java.xml and the fact that java.xml exports the package javax.xml.parsers, it follows that the program can also access all classes of the package javax.xml.parsers without explicit imports.

    Note that in Java 23, importing the module java.se (an aggregator module with dependencies on all modules of the Java Standard Edition “Java SE”) does not make the classes of the java.base module available. This will change in Java 24.

    Automatic java.base Import in JShell

    Once Module Import Declarations become production-ready, JShell will automatically import the java.base module. Currently, you can already enable this with --enable-preview:

    $ jshell --enable-preview
    |  Welcome to JShell -- Version 24
    |  For an introduction type: /help intro
    
    jshell> /imports
    |    import java.baseCode language: plaintext (plaintext)

    If you currently start JShell without --enable-preview and enter the /imports command, you will see the following ten standard package imports instead:

    $ jshell --enable-preview
    |  Welcome to JShell -- Version 24
    |  For an introduction type: /help intro
    
    jshell> /imports
    |    import java.io.*
    |    import java.math.*
    |    import java.net.*
    |    import java.nio.file.*
    |    import java.util.*
    |    import java.util.concurrent.*
    |    import java.util.function.*
    |    import java.util.prefs.*
    |    import java.util.regex.*
    |    import java.util.stream.*Code language: plaintext (plaintext)

    Conclusion

    Module Import Declarations can make Java programs shorter and easier to maintain by allowing you to import entire modules rather than individual classes and packages. On the other hand, they can also further fuel the eternal discussion about whether to import classes individually or by package.

    In Compact Source Files (or Simple Source Files or Implicitly Declared Classes) and JShell, the java.base module is automatically imported so that all classes of this module can be used directly without imports.

    Module Import Declarations are still in the preview phase until Java 24 and must be activated with --enable-preview --source <Java version>. They are going to be finalized in Java 25.

  • Compressed Oops in Java

    Compressed Oops in Java

    In this article, you will learn how “Compressed Oops” is used on a 64-bit system to represent references to Java objects with only 32 bits instead of 64, and how this significantly reduces the memory requirements of a Java application.

    What is a 64-Bit System?

    A 64-bit system is characterized by the fact that pointers to addresses in memory are 64-bit long. This means we can address 264 bytes = 16 exabytes = 18,446,744,073,709,551,616 bytes.

    Nowadays, there are practically no programs that require this much memory. In ten years, we might smile at this statement ;-)

    Here is the graphical representation of such a 64-bit pointer:

    64-bit pointer

    Now you could consider dividing these 64 bits in half and storing not just one but two pointers with the same amount of memory:

    Two 32-bit pointers

    However, with 32 bits, we can address only 232 bytes = 4 GB. That is not enough for many applications.

    The JDK developers have, therefore, devised a clever trick (“Compressed Oops”) to address not just 4 GB but 32 GB using only 32 bits. And that, in turn, is sufficient for most applications today.

    How does Compressed Oops Work?

    Compressed Oops (OOP stands for “ordinary object pointer”) allows an address space of 235 = 32 gigabytes to be addressed using 32-bit pointers.

    How is that possible? To address 32 gigabytes, we would actually need 35 bits. But we cannot store 35 bits in a 32-bit int; for that, we would need the next largest data structure, a 64-bit long:

    35-bit pointer

    So we would have wasted 29 bits. Then we could have stuck with 64-bit pointers.

    It’s time to use a trick!

    First of all, we position all Java objects at memory addresses that are divisible by eight. Eight is equal to 23, which means that the last 3 bits of a pointer are always 0. Therefore, only the upper 32 bits contain relevant information:

    32 relevant bits in a 35-bit pointer

    Since we know that the last three bits are always 0, we do not need to store them every time. Therefore, the 35-bit memory address can be shifted right by three bits without any loss of information and thus stored in a 32-bit field:

    Compressed Oops in Java: 35-bit pointer compressed to 32 bits

    To access the uncompressed memory address again later, the 32 bits simply have to be shifted left by three bits.

    Compressed Oops are Enabled by Default

    On a 64-bit system with a maximum of 32 GB heap, Compressed OOPs are enabled by default. If the heap size is more than 32 GB, we cannot use Compressed Oops (because they can only address 32 GB).

    You can turn off Compressed Oops with the following VM option:

    -XX:-UseCompressedOops

    Why should one do that?

    Compressing and decompressing pointers costs time. Not much, as the required shift operation can usually be performed in a single CPU cycle. However, those who want to squeeze the last bit of performance out of their application and are willing to accept the increased memory requirement (all pointers occupy 64 instead of 32 bits) can consider this option.

    Until Java 14, the activation of Compressed Class Pointers was coupled with the activation of Compressed OOPs. If you deactivated Compressed OOPs, Compressed Class Pointers were automatically deactivated as well. Since there was no reason for this coupling, it was removed in Java 15.

    Conclusion

    Compressed Oops allows you to encode memory addresses with only 32 bits instead of 64 on a 64-bit system with a heap size of up to 32 GB. Since there is at least one pointer to every active Java object in an application, Compressed Oops significantly reduces the memory requirements of an application.

  • Java Object Headers and Compressed Class Pointers​

    Java Object Headers and Compressed Class Pointers​

    Every Java object in memory contains not only the actual data but also a so-called “Object Header” that precedes the data. This header includes, for example, the identity hash code of an object, information about the object’s age, and a reference to the class that was instantiated by this object.

    In this article, you will learn:

    • How is the object header structured?
    • What are the Mark Word and Class Word?
    • What is the Compressed Class Space?
    • How can Compressed Class Pointers be represented on a 64-bit system using only 32 bits?

    This article describes the structure of the object header as of Java 24, i.e. before it was further compressed to so-called “Compact Object Headers.” An experimental version of Compact Object Headers was introduced in Java 24 as part of Project Lilliput.

    Structure of the Java Object Header

    The Java Object Header comprises a “Mark Word” and a “Class Word.” On a 64-bit system with uncompressed pointers, the header occupies 128 bits – i.e., 16 bytes – and has the following structure:

    Java Object Header: 64-bit Mark Word and 64-bit Class Word, total: 128 bits

    With compressed pointers (I’ll explain what that means in the Compressed Class Pointers section), the class word is only 32 bits long – and thus, the entire object header is no longer 128 bits, but only 96 bits – i.e., 12 bytes:

    Java Object Header: 64-bit Mark Word and 32-bit compressed Class Word, total: 96 bits

    What data do Mark Word and Class Word contain, and how are they structured?

    Mark Word

    First, let’s look at the Mark Word (note that I changed the scale from the previous graphics to show the details better):

    Java Mark Word layout

    The Mark Word typically contains the following information:

    In the obsolete “Legacy Stack Locking,” the Mark Word could change.

    Legacy Stack Locking

    In “Legacy Stack Locking” (the standard locking mechanism until Java 22), when the object is locked (i.e. when a thread is within a synchronized block defined on this object), the first 62 bits of the Mark Word are replaced by a pointer to an additional data structure on the stack:

    Java Mark Word in locked state

    This data structure then contains the actual Mark Word as well as additional information about the lock, such as a list of threads that have been blocked and are waiting to be allowed to enter the synchronized block.

    The pointer to this separate data structure is one of two reasons for pinning in virtual threads: A virtual thread that calls blocking code within a synchronized block must not be unmounted from the carrier thread.

    If the virtual thread were later mounted on another carrier thread (whose stack would be located at a different address in memory), that pointer would no longer be valid.

    Since “Legacy Stack Locking” made it difficult to access the actual data of the Mark Word and was one reason for the aforementioned pinning, it was replaced by the more modern “Lightweight Locking.”

    Lightweight Locking

    Java 21 introduces so-called “Lightweight Locking,” which operates without modifying the Mark Word. Lightweight Locking has been the default mode since Java 23.

    With Lightweight Locking, if no other thread wants to enter the critical section, only the tag bits (the last two bits of the Mark Word) are changed from 0x01 (unlocked) to 0x00 (lightweight-locked). No additional data structure is created.

    Only when another thread attempts to enter the critical section is the lock “inflated”:

    • An additional data structure is created, which contains, among other things, a list of waiting threads.
    • The pointer to this data structure is stored in a separate hashtable and no longer in the Mark Word. The inflation of the lock is merely indicated there by changing the tag bits to 0x10.

    Lightweight locking is, therefore, a more efficient way to synchronize threads by making the mark word modification obsolete and reducing the overhead of unnecessary monitor objects in scenarios without thread contention.

    Class Word

    The Class Word (sometimes also spelled “Klass Word”) is quickly explained:

    It contains a pointer to the Class object that is returned for an object with getClass(). On a 64-bit system, this pointer is also 64 bits in size (unless it is compressed – we’ll get to that in a moment):

    It contains a pointer to the so-called Klass data structure in metaspace – a memory area outside the Java heap. This data structure contains all relevant information about the class of the object. All objects of the same class, e.g., all ArrayList objects, point to the same Klass data structure.

    On a 64-bit system, this pointer (unless it is compressed – more on that later) is also 64 bits in size:

    Java Class Word, uncompressed, 64 bits

    With these 64 bits, we can address 16 EB (16 Exabytes = 18,446,744,073,709,551,616 bytes). A Klass data structure is usually between half a kilobyte and one kilobyte in size. With 64 bits, we could, therefore, reference 264 / 768 = 24 quadrillion classes. This is a number that is likely to seem very large even in 30 years.

    Therefore, the so-called “Compressed Class Space” and “Compressed Class Pointers” were introduced, which I will describe in the following two sections.

    Compressed Class Space

    The “Compressed Class Space” is a contiguous memory block within the metaspace (a memory area outside the heap) where all Klass data structures are stored. This area is allocated when a Java program starts, and its size cannot change during runtime.

    Java memory layout: Heap, Metaspace, Compressed Class Space, C Heap, Thread Stack

    By default, the Compressed Class Space is 1 GB in size. You can change its size with the following VM option:

    -XX:CompressedClassSpaceSize=<size>

    Allowed values are between 1 MB and 4 GB.

    The name “Compressed Class Space” is misleading because it is not the Klass data structures themselves that are compressed but rather the pointers from the Class Word of the object header to these Klass data structures. More on that in the next section.

    Compressed Class Pointers

    As mentioned in the previous section, the Compressed Class Space can be a maximum of 4 GB in size. To address 4 GB, 32 bits (232 = 4,294,967,296) are sufficient.

    A Compressed Class Pointer is, therefore, a 32-bit value that defines the address of the Klass data structure as an offset within the Compressed Class Space:

    Java Class Word, 32 bits, with Compressed Class Pointer

    The actual address of the Klass data structure is obtained by adding the starting address of the Compressed Class Space and this offset.

    Compressed Class Pointers Are Enabled by Default

    On a 64-bit system, Compressed Class Pointers are enabled by default. You can disable them with the following option:

    -XX:-UseCompressedClassPointers

    However, there is no reason to do this unless you suspect a bug in the implementation of compressed class pointers as the cause of a problem in your application.

    However, there is no reason to do this, because compressed pointers can be used to address around 6 million classes – and even large Java applications rarely use more than 100,000 classes. For this reason, this option is marked as deprecated in Java 25.

    Until Java 14, the activation of Compressed Class Pointers was coupled to the activation of Compressed OOPs (compressed object pointers). If you disabled Compressed OOPs, Compressed Class Pointers were also automatically disabled. Since there was no reason for this coupling, it was removed in Java 15.

    Outlook: Compact Object Headers

    For several years, work has been underway within Project Lilliput to further reduce the size of object headers in Java – initially to 64 bits and later possibly even to 32 bits.

    The first milestone has been reached. In Java 25, Compact Object Headers were released, and the header size can thus be reduced to 64 bits.

  • Java 23 Features (With Examples)

    Java 23 Features (With Examples)

    Java 23 has been released on September 17, 2024. You can download it here.

    The highlights of Java 23:

    In addition, many other features introduced in Java 21 and Java 22 are entering a new preview round with or without minor changes.

    String templates, introduced in Java 21 and reintroduced in Java 22, are an exception: They are no longer included in Java 23. According to Gavin Bierman, there is agreement that the design needs to be revised, but there is disagreement as to how this should actually be done. The language developers have, therefore, decided to take more time to revise the design and present the feature in a completely revised form in a later Java version.

    As always, I use the original English titles for all JEPs and other changes.

    Markdown Documentation Comments JEP 467

    To format JavaDoc comments, we have always had to use HTML. This was undoubtedly a good choice in 1995, but nowadays, Markdown is much more popular than HTML for writing documentation.

    JDK Enhancement Proposal 467 allows us to write JavaDoc comments in Markdown from Java 23 onwards.

    The following example shows the documentation of the Math.ceilMod(...) method in the conventional notation:

    /**
     * Returns the ceiling modulus of the {@code long} and {@code int} arguments.
     * <p>
     * The ceiling modulus is {@code r = x – (ceilDiv(x, y) * y)},
     * has the opposite sign as the divisor {@code y} or is zero, and
     * is in the range of {@code -abs(y) < r < +abs(y)}.
     *
     * <p>
     * The relationship between {@code ceilDiv} and {@code ceilMod} is such that:
     * <ul>
     *   <li>{@code ceilDiv(x, y) * y + ceilMod(x, y) == x}</li>
     * </ul>
     * <p>
     * For examples, see {@link #ceilMod(int, int)}.
     *
     * @param x the dividend
     * @param y the divisor
     * @return the ceiling modulus {@code x – (ceilDiv(x, y) * y)}
     * @throws ArithmeticException if the divisor {@code y} is zero
     * @see #ceilDiv(long, int)
     * @since 18
     */Code language: Java (java)

    The example contains formatted code, paragraph marks, a bulleted list, a link, and JavaDoc-specific information such as @param and @return.

    To use Markdown, we need to start all lines of a JavaDoc comment with three slashes. The same comment in Markdown would look like this:

    /// Returns the ceiling modulus of the `long` and `int` arguments.
    ///
    /// The ceiling modulus is `r = x – (ceilDiv(x, y) * y)`,
    /// has the opposite sign as the divisor `y` or is zero, and
    /// is in the range of `-abs(y) < r < +abs(y)`.
    ///
    /// The relationship between `ceilDiv` and `ceilMod` is such that:
    ///
    /// – `ceilDiv(x, y) * y + ceilMod(x, y) == x`
    ///
    /// For examples, see [#ceilMod(int, int)].
    ///
    /// @param x the dividend
    /// @param y the divisor
    /// @return the ceiling modulus `x – (ceilDiv(x, y) * y)`
    /// @throws ArithmeticException if the divisor `y` is zero
    /// @see #ceilDiv(long, int)
    /// @since 18Code language: Java (java)

    This is both easier to write and easier to read.

    What has changed in detail?

    • Source code is marked with `...` instead of {@code ...}.
    • The HTML paragraph character <p> has been replaced by a blank line.
    • The enumeration items are introduced by hyphens.
    • Instead of {@link ...}, links are marked with [...].
    • The JavaDoc-specific details, such as @param and @return, remain unchanged.

    The following text formatting is supported:

    /// **This text is bold.**
    /// *This text is italic.*
    /// _This is also italic._
    /// `This is source code.`
    ///
    /// ```
    /// This is a block of source codex.
    /// ```
    ///
    ///     Indented text
    ///     is also rendered as a code block.
    ///
    /// ~~~
    /// This is also a block of source code
    /// ~~~Code language: Java (java)

    Enumerated lists and numbered lists are supported:

    /// This is a bulleted list:
    /// – One
    /// – Two
    /// – Three
    ///
    /// This is a numbered list:
    /// 1. One
    /// 1. Two
    /// 1. ThreeCode language: Java (java)

    You can also display simple tables:

    /// | Binary | Decimal |
    /// |--------|---------|
    /// |     00 |       0 |
    /// |     01 |       1 |
    /// |     10 |       2 |
    /// |     11 |       3 |Code language: Java (java)

    You can integrate links to other program elements as follows:

    /// Links:
    /// – ein Modul: [java.base/]
    /// – ein Paket: [java.lang]
    /// – eine Klasse: [Integer]
    /// – ein Feld: [Integer#MAX_VALUE]
    /// – eine Methode: [Integer#parseInt(String, int)]Code language: Java (java)

    If the link text and link target are to be different, you can place the link text in square brackets in front:

    /// Links:
    /// – [ein Modul][java.base/]
    /// – [ein Paket][java.lang]
    /// – [eine Klasse][Integer]
    /// – [ein Feld][Integer#MAX_VALUE]
    /// – [eine Methode][Integer#parseInt(String)]Code language: Java (java)

    Last but not least, JavaDoc tags, such as @param, @throws, etc., are not evaluated if used within code or code blocks.

    New Preview Features in Java 23

    Java 23 introduces two new preview features. You should not use these in production code, as they can still change (or, as in the case of string templates, can be removed again at short notice).

    You must explicitly enable preview features in the javac command via the VM options --enable-preview --source 23. For the java command, --enable-preview is sufficient.

    Module Import Declarations (Preview) – JEP 476

    Since Java 1.0, all classes of the java.lang package are automatically imported into every .java file. That’s why we can use classes like Object, String, Integer, Exception, Thread, etc. without import statements.

    We have also always been able to import complete packages. For example, importing java.util.* means that we do not have to import classes such as List, Set, Map, ArrayList, HashSet and HashMap individually.

    JDK Enhancement Proposal 476 now allows us to import complete modules – more precisely, all classes in the packages exported by the module.

    For example, we can import the complete java.base module as follows and use classes from this module (in the example List, Map, Collectors, Stream) without further imports:

    import module java.base;
    
    public static Map<Character, List<String>> groupByFirstLetter(String... values) {
      return Stream.of(values).collect(
          Collectors.groupingBy(s -> Character.toUpperCase(s.charAt(0))));
    }Code language: Java (java)

    To use import module, the importing class itself doesn’t need to be in a module.

    Ambiguous Class Names

    If there are two imported classes with the same name, such as Date in the following example, a compiler error occurs:

    import module java.base;
    import module java.sql;
    
    . . .
    Date date = new Date();  // Compiler error: "reference to Date is ambiguous"
    . . .Code language: Java (java)

    The solution is simple: we also have to import the desired Date class directly:

    import module java.base;
    import module java.sql;
    import java.util.Date;  // ⟵ This resolves the ambiguity
    
    . . .
    Date date = new Date();
    . . .Code language: Java (java)

    Transitive Imports

    If an imported module transitively imports another module, then we can also use all classes of the exported packages of the transitively imported module without explicit imports.

    For example, the java.sql module imports the java.xml module transitively:

    module java.sql {
      . . .
      requires transitive java.xml;
      . . .
    }Code language: Java (java)

    Therefore, in the following example, we do not need any explicit imports for SAXParserFactory and SAXParser or an explicit import of the java.xml module:

    import module java.sql;
    
    . . .
    SAXParserFactory factory = SAXParserFactory.newInstance();
    SAXParser saxParser = factory.newSAXParser();
    . . .Code language: Java (java)

    Automatic Module Import in JShell

    JShell automatically imports ten frequently used packages. This JEP will make JShell import the complete java.base module in the future.

    This can be demonstrated very nicely by calling up JShell once without and once with --enable-preview and then entering the /imports command:

    $ jshell
    |  Welcome to JShell -- Version 23-ea
    |  For an introduction type: /help intro
    
    jshell> /imports
    |    import java.io.*
    |    import java.math.*
    |    import java.net.*
    |    import java.nio.file.*
    |    import java.util.*
    |    import java.util.concurrent.*
    |    import java.util.function.*
    |    import java.util.prefs.*
    |    import java.util.regex.*
    |    import java.util.stream.*
    
    jshell> /exit
    |  Goodbye
    
    $ jshell --enable-preview
    |  Welcome to JShell -- Version 23-ea
    |  For an introduction type: /help intro
    
    jshell> /imports
    |    import java.baseCode language: plaintext (plaintext)

    When starting JShell without --enable-preview, you will see the ten imported packages; when starting it with --enable-preview, you will only see the import of the java.base module.

    Automatic Module Import in Implicitly Declared Classes

    Implicitly declared classes also automatically import the complete java.base module from Java 23 onwards.

    Primitive Types in Patterns, instanceof, and switch (Preview) – JEP 455

    With instanceof and switch, we can check whether an object is of a particular type, and if so, bind this object to a variable of this type, execute a specific program path, and use the new variable in this program path.

    The following code block, for example, which has been permitted since Java 16, checks whether an object is a string of at least five characters and, if so, prints it in upper case. If the object is an integer, the number is squared and printed. Otherwise, the object is printed as it is.

    if (obj instanceof String s && s.length() >= 5) {
      System.out.println(s.toUpperCase());
    } else if (obj instanceof Integer i) {
      System.out.println(i * i);
    } else {
      System.out.println(obj);
    }Code language: Java (java)

    Since Java 21, we can do the same much more clearly using switch:

    switch (obj) {
      case String s when s.length() >= 5 -> System.out.println(s.toUpperCase());
      case Integer i                     -> System.out.println(i * i);
      case null, default                 -> System.out.println(obj);
    }Code language: Java (java)

    So far, however, this only works with objects. instanceof cannot be used with primitive data types at all, switch only to the extent that it can match variables of the primitive types byte, short, char, and int against constants, e.g., like this:

    int x = ...
    switch (x) {
      case 1, 2, 3 -> System.out.println("Low");
      case 4, 5, 6 -> System.out.println("Medium");
      case 7, 8, 9 -> System.out.println("High");
    }Code language: Java (java)

    JDK Enhancement Proposal 455 introduces two changes in Java 23:

    • Firstly, all primitive types may now be used in switch expressions and statements, including long, float, double, and boolean.
    • Secondly, we can also use all primitive types in pattern matching – both for instanceof and switch.

    In both cases, i.e., for switch via long, float, double, and boolean as well as for pattern matching with primitive variables, the switch – as with all new switch features – must be exhaustive, i.e., cover all possible cases.

    From Java 23: Primitive Types in Pattern Matching

    With primitive patterns, the exact meaning is different than when using objects – because there is no inheritance with primitive types:

    Be a a variable of a primitive type (i.e., byte, short, int, long, float, double, char, or boolean) and B one of these primitive types. Then, a instanceof B results in true if the precise value of a can also be stored in a variable of type B.

    To help you better understand what is meant by this, here is a simple example:

    int a = ...
    if (a instanceof byte b) {
      System.out.println("b = " + b);
    }Code language: Java (java)

    The code should be read as follows: If the value of the variable a can also be stored in a byte variable, then assign this value to the byte variable b and print it.

    This would be the case for a = 5, for example, but not for a = 1000, as byte can only store values from -128 to 127.

    Just as with objects, for primitive types, you can also add further checks directly in the instanceof check using &&. The following code, for example, only prints positive byte values (i.e., 1 to 127):

    int a = ...
    if (a instanceof byte b && b > 0) {
      System.out.println("b = " + b);
    }Code language: Java (java)

    You can find numerous other examples and particularities in the main article Primitive Types in Patterns, instanceof, and switch.

    Primitive Type Pattern with switch

    We can use primitive patterns not only in instanceof but also in switch:

    double value = ...
    switch (value) {
      case byte   b -> System.out.println(value + " instanceof byte:   " + b);
      case short  s -> System.out.println(value + " instanceof short:  " + s);
      case char   c -> System.out.println(value + " instanceof char:   " + c);
      case int    i -> System.out.println(value + " instanceof int:    " + i);
      case long   l -> System.out.println(value + " instanceof long:   " + l);
      case float  f -> System.out.println(value + " instanceof float:  " + f);
      case double d -> System.out.println(value + " instanceof double: " + d);
    }Code language: Java (java)

    Here, just as with object types, we must observe the principle of dominant and dominated types and the exhaustiveness analysis. You can find out exactly what this means in the main article Primitive Types in Patterns, instanceof, and switch.

    Resubmitted Preview and Incubator Features

    Seven preview and incubator features are presented again in Java 23, three of them without changes compared to Java 22:

    Stream Gatherers (Second Preview) – JEP 473

    Since introducing the Stream API in Java 8, the Java community has complained about the limited scope of intermediate stream operations. Operations such as “window” or “fold” were sorely missed and repeatedly requested.

    Instead of bowing to pressure from the community and providing these functions, the JDK developers had a better idea: they implemented an API with which they and all other Java developers can implement intermediate stream operations themselves.

    This new API is called “Stream Gatherers.” It was first introduced in Java 22 by JDK Enhancement Proposal 461 and presented unchanged a second time as a preview in Java 23 by JDK Enhancement Proposal 473 in order to collect further feedback from the community.

    With the following code, we could, for example, implement and use the intermediate stream operation “map” as a stream gatherer:

    public <T, R> Gatherer<T, Void, R> mapping(Function<T, R> mapper) {
      return Gatherer.of(
          Integrator.ofGreedy(
              (state, element, downstream) -> {
                R mappedElement = mapper.apply(element);
                return downstream.push(mappedElement);
              }));
    }
    
    public List<Integer> toLengths(List<String> words) {
      return words.stream()
          .gather(mapping(String::length))
          .toList();
    }
    Code language: Java (java)

    You can find out exactly how Stream Gatherers work, what restrictions there are, and whether we will finally get the long-awaited “window” and “fold” operations in the main article about Stream Gatherers.

    Implicitly Declared Classes and Instance Main Methods (Third Preview) – JEP 477

    When Java developers write their first program, it usually looks like this (until now):

    public class HelloWorld {
      public static void main(String[] args) {
        System.out.println("Hello world!");
      }
    }Code language: Java (java)

    Java beginners are confronted with numerous new concepts at once:

    • with classes,
    • with the visibility modifier public,
    • with static methods,
    • with unused method arguments,
    • with System.out.

    Wouldn’t it be nice if we could do away with all that and concentrate on the essentials – like in the following screenshot?

    Screenshot for: Implicitly Declared Classes and Instance Main Methods

    This is precisely what “Implicitly Declared Classes and Instance Main Methods” make possible!

    As of Java 23, the following code is a valid and complete Java program:

    void main() {
      println("Hello world!");
    }Code language: Java (java)

    How is this made possible?

    1. Specifying a class is no longer mandatory. If the class specification is omitted, the compiler generates an implicit class.
    2. A main() method does not have to be public or static, nor does it have to have arguments.
    3. An implicit class automatically imports the new class java.io.IO, which contains the static methods print(...), println(...), and readln(...).

    For more details, examples, restrictions to be observed, and what happens if several main() methods are overloaded, see the main article on the Java main() method.

    The changes described here were first published in Java 21 under the name “Unnamed Classes and Instance Main Methods.” In Java 22, some overly complicated aspects of the feature were simplified, and the feature was renamed to its current name.

    In Java 23, JDK Enhancement Proposal 477 added the automatically imported java.io.IO class so that ultimately, System.out can also be omitted, which was not yet possible in the second preview in Java 22.

    In Java 24, the feature will be renamed again to “Simple Source Files and Instance Main Methods” – and in Java 25, it will be renamed to “Compact Source Files and Instance Main Methods.”

    Please note that the feature is still in the preview stage and must be activated with the VM option --enable-preview.

    Structured Concurrency (Third Preview) – JEP 480

    Structured concurrency is a modern approach, made possible by virtual threads, to divide tasks into subtasks to be executed in parallel.

    Structured concurrency provides a clear structure for the start and end of parallel tasks and orderly error handling. If the results of certain subtasks are no longer required, these subtasks can be canceled cleanly.

    An example of the use of structured concurrency is the implementation of a race() method that starts two tasks and returns the result of the task that completes, while the other task is automatically canceled:

    public static <R> R race(Callable<R> task1, Callable<R> task2)
        throws InterruptedException, ExecutionException {
      try (var scope = new StructuredTaskScope.ShutdownOnSuccess<R>()) {
        scope.fork(task1);
        scope.fork(task2);
        scope.join();
        return scope.result();
      }
    }Code language: Java (java)

    You can find a more detailed description, additional use cases, and numerous examples in the main article on structured concurrency.

    Structured concurrency was introduced as a preview feature in Java 21 and presented again in Java 22 without any changes. There were also no changes in Java 23 (specified by JDK Enhancement Proposal 480) – the JDK developers are hoping for further feedback before finalizing the feature.

    Scoped Values (Third Preview) – JEP 481

    Scoped values can be used to pass values to distant method calls without having to loop them through all methods of the call chain as parameters.

    The classic example is the user logged in to a web server for whom a specific use case is to be executed. Many methods called as part of such a use case require access to user information. With Scoped Values, we can set up a context within which all methods can access the user object without passing it as a parameter to all these methods.

    The following code creates a context using ScopedValue.where(...):

    public class Server {
      public final static ScopedValue<User> LOGGED_IN_USER = ScopedValue.newInstance();
      . . .
      private void serve(Request request) {
        . . .
        User loggedInUser = authenticateUser(request);
        ScopedValue.where(LOGGED_IN_USER, loggedInUser)
                   .run(() -> restAdapter.processRequest(request));
        . . .
      }
    }Code language: Java (java)

    Now the method called within the run(...) method – as well as all methods called directly or indirectly by it, e.g., a repository method called deep in the call stack – can access the user as follows:

    public class Repository {
      . . .
      public Data getData(UUID id) {
        Data data = findById(id);
        User loggedInUser = Server.LOGGED_IN_USER.get();
        if (loggedInUser.isAdmin()) {
          enrichDataWithAdminInfos(data);
        }
        return data;
      }
      . . .
    }Code language: Java (java)

    Anyone who has ever worked with ThreadLocal variables will recognize a similarity. However, Scoped Values have several advantages over ThreadLocals. You can find these advantages and a comprehensive introduction in the main article on Scoped Values.

    Scoped Values were introduced together with Structured Concurrency in Java 21 as a preview feature and sent to a second preview round in Java 22 without any changes.

    In Java 23, the following two static methods of the ScopedValue class were combined into one by JDK Enhancement Proposal 481:

    // Java 22:
    public static <T, R> R getWhere (ScopedValue<T> key, T value, Supplier<? extends R> op)
    public static <T, R> R callWhere(ScopedValue<T> key, T value, Callable<? extends R> op) Code language: Java (java)

    These methods only differ in that a Supplier is passed to getWhere(...) (a functional interface with a get() method that does not declare an exception) and a Callable is passed to callWhere(...) (a functional interface with a call() method that declares throws Exception).

    Let’s assume we want to call the following method in the context of the scoped value, where SpecificException is a checked exception:

    Result doSomethingSmart() throws SpecificException {
      . . .
    }Code language: Java (java)

    In Java 22, we had to call this method as follows:

    // Java 22:
    try {
      Result result = ScopedValue.callWhere(USER, loggedInUser, this::doSomethingSmart);
    } catch (Exception e) { // ⟵ Catching generic Exception
      . . .
    }Code language: Java (java)

    Since Callable.call() throws a generic Exception, we had to catch Exception, even if the called method threw a more specific exception.

    In Java 23, there is now only a callWhere(...) method:

    public static <T, R, X extends Throwable> R callWhere(
        ScopedValue<T> key, T value, ScopedValue.CallableOp<? extends R, X> op) throws XCode language: Java (java)

    Instead of a Supplier or a Callable, a ScopedValue.CallableOp is now passed to the method. This is a functional interface defined as follows:

    @FunctionalInterface
    public static interface ScopedValue.CallableOp<T, X extends Throwable> {
        T call() throws X
    }Code language: Java (java)

    This new interface contains a possibly thrown exception as type parameter X. This allows the compiler to recognize what kind of exception the call of callWhere(...) can throw – and we can directly handle SpecificException in the catch block:

    // Java 23:
    try {
      Result result = ScopedValue.callWhere(USER, loggedInUser, () -> doSomethingSmart());
    } catch (SpecificException e) { // ⟵ Catching SpecificException
      . . .
    }Code language: Java (java)

    And if doSomethingSmart() does not throw an exception or if it throws a RuntimeException, we can omit the catch block:

    // Java 23:
    Result result = callWhere(USER, loggedInUser, this::doSomethingSmart);Code language: Java (java)

    This change in Java 23 makes the code more expressive and less error-prone.

    Flexible Constructor Bodies (Second Preview) – JEP 482

    Let’s assume you have a class like the following:

    public class ConstructorTestParent {
      private final int a;
    
      public ConstructorTestParent(int a) {
        this.a = a;
        printMe();
      }
    
      void printMe() {
        System.out.println("a = " + a);
      }
    }Code language: Java (java)

    And let’s assume you have a second class that extends this class:

    public class ConstructorTestChild extends ConstructorTestParent {
      private final int b;
    
      public ConstructorTestChild(int a, int b) {
        super(a);
        this.b = b;
      }
    }Code language: Java (java)

    Now, you want to ensure that a and b are not negative in the ConstructorTestChild constructor before calling the super constructor.

    It was previously not permitted to place a corresponding check before the constructor. That’s why we had to make do with contortions like the following:

    public class ConstructorTestChild extends ConstructorTestParent {
      private final int b;
    
      public ConstructorTestChild(int a, int b) {
        super(verifyParamsAndReturnA(a, b));
        this.b = b;
      }
    
      private static int verifyParamsAndReturnA(int a, int b) {
        if (a < 0 || b < 0) throw new IllegalArgumentException();
        return a;
      }
    }Code language: Java (java)

    This is neither very elegant nor easy to read.

    Let’s also assume that you want to overwrite the printMe() method called in the constructor of the parent class to also print the fields of the derived class:

    public class ConstructorTestChild extends ConstructorTestParent {
      . . .
      @Override
      void printMe() {
        super.printMe();
        System.out.println("b = " + b);
      }
    }Code language: Java (java)

    What would this method print if you called new ConstructorTestChild(1, 2)?

    It would not print a = 1 and b = 2, but:

    a = 1
    b = 0Code language: plaintext (plaintext)

    This is because b has not yet been initialized at this point. It is only initialized after calling super(...), i.e., after the constructor, which, in turn, calls printMe().

    Both problems are a thing of the past with “Flexible Constructor Bodies.”

    In the future, before calling the super constructor with super(...) – and also before calling an alternative constructor with this(...) – we can execute any code that does not access the currently constructed instance, i.e., does not access its fields (this was already made possible in Java 22 by JDK Enhancement Proposal 447 ).

    In addition, we may initialize the fields of the instance just being constructed. This was made possible in Java 23 by JDK Enhancement Proposal 482.

    These changes now allow the code to be rewritten as follows:

    public class ConstructorTestChild extends ConstructorTestParent {
      private final int b;
    
      public ConstructorTestChild(int a, int b) {
        if (a < 0 || b < 0) throw new IllegalArgumentException();  // ⟵ Now allowed!
        this.b = b;                                                // ⟵ Now allowed!
        super(a);
      }
    
      @Override
      void printMe() {
        super.printMe();
        System.out.println("b = " + b);
      }
    }Code language: Java (java)

    A call to new ConstructorTestChild(1, 2) now results in the expected output:

    a = 1
    b = 2Code language: plaintext (plaintext)

    The new code is both easier to read and safer, as it reduces the risk of accessing an uninitialized field in overridden methods in derived classes.

    You can find more examples and restrictions to consider in the main article on Flexible Constructor Bodies.

    Class-File API (Second Preview) – JEP 466

    The Java Class-File API is an interface for reading and writing .class files, i.e., compiled Java bytecode. It is intended to replace the bytecode manipulation framework ASM, which is widely used in the JDK.

    The Class-File API was introduced as a preview feature in Java 22 and sent to a second preview round in Java 23 by JDK Enhancement Proposal 466 with some improvements.

    Since only a few Java developers will probably work directly with the Class-File API but usually indirectly through other tools, I will not describe the new interface in detail here, as in the Java 22 article.

    If the Class-File API interests you, you can find all the details in JDK Enhancement Proposal 466. Or write a comment under the article! If contrary to expectations, there is sufficient interest, I will be happy to write an article about the Class-File API.

    Vector API (Eighth Incubator) – JEP 469

    It has been three and a half years since the Vector API was first included as an incubator feature in the JDK. In Java 23, it will remain in the incubator stage without any changes, as specified by JDK Enhancement Proposal 469.

    The Vector API will make it possible to map vector calculations such as the following to special instructions of modern CPUs. This will enable such calculations to be carried out extremely quickly – up to a certain vector size in just a single CPU cycle!

    java vector addition
    Example of a vector addition

    I will describe the Vector API in detail as soon as it has reached the preview stage. This will presumably be the case when the Project Valhalla functions required for the Vector API are also available in the preview stage (which, according to statements made by the Valhalla developers about a year ago, should be the case “soon”).

    Deprecations and Deletions

    In this section, you will find an overview of features that have been marked as deprecated or completely removed from the JDK.

    Deprecate the Memory-Access Methods in sun.misc.Unsafe for Removal – JEP 471

    The sun.misc.Unsafe class was introduced in 2002 with Java 1.4. Most of its methods allow direct access to memory – both to the Java heap and to memory not controlled by the heap, i.e., native memory.

    As the class name suggests, most of these operations are unsafe. If they are not used correctly, they can lead to undefined behavior, performance degradation, or system crashes.

    Unsafe was originally only intended for internal JDK purposes, but in Java 1.4, there was no module system that could have hidden this class from us developers, and there were no alternatives if you wanted to implement certain operations as efficiently as possible (e.g., compare-and-swap) or access larger off-heap memory blocks than 2 GB (this is the limit of ByteBuffer).

    Today, however, there are alternatives:

    • Java 9 introduced VarHandles, which enable direct and optimized access to on-heap memory, can set various types of memory barriers, and provide atomic operations such as compare-and-swap.
    • In Java 22, the Foreign Function & Memory API was finalized. This API allows for invoking functions in native libraries and managing native, i.e., off-heap memory.

    Due to the availability of these stable, secure, and performant alternatives, the JDK developers decided in JDK Enhancement Proposal 471 to mark all Unsafe methods for accessing on-heap and off-heap memory as deprecated for removal in Java 23 and to remove them in a future Java version.

    The removal is carried out in four phases:

    • Phase 1: In Java 23, the methods are marked as deprecated for removal so that compiler warnings are issued when used.
    • Phase 2: Presumably, in Java 25, the use of these methods will also lead to runtime warnings.
    • Phase 3: Presumably, in Java 26, these methods will throw an UnsupportedOperationException.
    • Phase 4: The methods are removed. It has not yet been decided in which release this will take place.

    We can overwrite the default behavior in the respective phases using the VM option --sun-misc-unsafe-memory-access:

    • --sun-misc-unsafe-memory-access=allow – All unsafe methods may be used. Compiler warnings are displayed, but no warnings are issued at runtime (default setting in phase 1).
    • --sun-misc-unsafe-memory-access=warn – A warning is displayed at runtime when one of the affected methods is called for the first time (default setting in phase 2).
    • --sun-misc-unsafe-memory-access=debug – A warning and a stack trace are issued at runtime whenever one of the affected methods is called.
    • --sun-misc-unsafe-memory-access=deny – The affected methods throw an UnsupportedOperationException (default setting in phase 3).

    In phases 2 and 3, only the behavior of the previous phase can be activated, and in phase 4, this VM option will no longer have any effect.

    A complete list of all methods marked as deprecated with their respective replacements can be found in the sun.misc.Unsafe memory-access methods and their replacements section of the JEP.

    Thread.suspend/resume and ThreadGroup.suspend/resume are Removed

    The methods Thread.suspend(), Thread.resume(), ThreadGroup.suspend(), and ThreadGroup.resume(), which are susceptible to deadlocks, were already marked as deprecated in Java 1.2.

    In Java 14, these methods were then declared as deprecated for removal.

    Since Java 19, ThreadGroup.suspend() and resume() have thrown an UnsupportedOperationException – and since Java 20, so have Thread.suspend() and resume().

    In Java 23, all these methods were finally removed.

    There is no JEP for this change; it is registered in the bug tracker under JDK-8320532.

    ThreadGroup.stop is Removed

    Also, in Java 1.2, ThreadGroup.stop() was marked as deprecated because the concept of stopping a thread group was poorly implemented from the start.

    In Java 16, the method was declared as deprecated for removal.

    Since Java 19, ThreadGroup.stop() throws a UnsupportedOperationException.

    This method was finally removed in Java 23.

    There is no JEP for this change; it is registered in the bug tracker under JDK-8320786.

    Other Changes in Java 23

    In this section, you will find changes that most Java developers are not confronted with in their daily work. Of course, it is still good to know about these changes.

    ZGC: Generational Mode by Default – JEP 474

    Java 21 introduced the “Generational Mode” of the Z Garbage Collector (ZGC). In this mode, the ZGC uses the “weak generational hypothesis” and stores new and old objects in two separate areas: the “young generation” and the “old generation.” The young generation mainly contains short-lived objects and needs to be cleaned up more frequently, while the old generation contains long-lived objects and needs to be cleaned up less often.

    In Java 21, Generational Mode had to be activated using the VM option -XX:+UseZGC -XX:+ZGenerational.

    Since Generational Mode leads to considerable performance increases for most use cases, the mode is activated by default in Java 23, as specified by JDK Enhancement Proposal 474.

    This means that the VM option -XX:+UseZGC automatically activates ZGC in generational mode.

    You can deactivate Generational Mode with -XX:+UseZGC -XX:-ZGenerational.

    Annotation processing in javac disabled by default

    If you have updated a project using Lombok annotations to Java 23, the project may no longer compile without further ado.

    That is because annotation processing has been disabled by default in Java 23. The reason is that annotation processing could potentially execute malicious code.

    To re-enable annotation processing, you have the following two options:

    • Recommended: Use the javac options -processor, --processor-path, or --processor-module-path to specify the processor(s) to be enabled, e.g.:
      javac -processorpath …/m2repo/org/projectlombok/lombok/1.18.38/lombok-1.18.38.jar …
    • Not recommended for security reasons: You can enable annotation processing for all processors using the javac option -proc:full:
      javac -proc:full …

    In a Maven project, you can enable annotation processing for Lombok by adding the following entry to the pom.xml (requires maven-compiler-plugin 3.8.0 or higher):

    <plugin>
       <groupId>org.apache.maven.plugins</groupId>
       <artifactId>maven-compiler-plugin</artifactId>
       <version>...</version>
       <configuration>
          <annotationProcessorPaths>
             <path>
                <groupId>org.projectlombok</groupId>
                <artifactId>lombok</artifactId>
                <version>...</version>
             </path>
          </annotationProcessorPaths>
       </configuration>
    </plugin>Code language: HTML, XML (xml)

    For all processors, you can enable annotation processing by adding the following entry (not recommended, requires maven-compiler-plugin 3.13.0 or higher):

    <properties>
        <maven.compiler.proc>full</maven.compiler.proc>
    </properties>Code language: HTML, XML (xml)

    (There is no JEP for this change; it is registered in the bug tracker under JDK-8321314.)

    Removal of Module jdk.random

    This change is not sorted under “Deletions,” as nothing was actually deleted. All classes in the jdk.random module have been moved to the java.base module.

    If you are using the Java module system and have specified requires jdk.random somewhere, you can remove this statement in Java 23 (the java.base module is automatically included).

    (There is no JEP for this change; it is registered in the bug tracker under JDK-8330005.)

    Console Methods With Explicit Locale

    With the Console class introduced in Java 6, we can conveniently print text to the console and read user input from the console:

    Console console = System.console();
    
    var name = console.readLine("What's your name (by the way, π = %.4f)? ", Math.PI);
    var password = console.readPassword("Your password (by the way, e = %.4f)? ", Math.E);
    
    console.printf("Your name is %s%n", name); // `printf` and `format` do the same
    console.format("Your password starts with %c%n", password[0]);Code language: Java (java)

    These methods always use the default locale. Depending on the language setting, Pi was either printed as 3.1415 (with a dot) or 3,1415 (with a comma).

    As of Java 23, you can specify a Locale as an additional parameter for the methods printf(...), format(...), readLine(...), and readPassword(...):

    Console console = System.console();
    
    var name = console.readLine(Locale.US, "What's your name (π = %.4f)? ", Math.PI);
    var password = console.readPassword(Locale.US, "Your password (e = %.4f)? ", Math.E);
     
    console.printf(Locale.US, "Your name is %s%n", name);
    console.format(Locale.US, "Your password starts with %c%n", password[0]);Code language: Java (java)

    In this example, Pi is now always printed in US style, i.e., 3.1415.

    There is no JEP for this change; it is registered in the bug tracker under JDK-8330276.

    Support for Duration Until Another Instant

    To determine the duration between two Instant objects, you previously had to use Duration.between(...):

    Instant now = Instant.now();
    Instant later = Instant.now().plus(ThreadLocalRandom.current().nextInt(), SECONDS);
    Duration duration = Duration.between(now, later);Code language: Java (java)

    As this method is not easy to find, a new method, Instant.until(...), has been introduced that performs the same calculation:

    Instant now = Instant.now();
    Instant later = Instant.now().plus(ThreadLocalRandom.current().nextInt(), SECONDS);
    Duration duration = now.until(later);Code language: Java (java)

    (There is no JEP for this change; it is registered in the bug tracker under JDK-8331202.)

    Relax alignment of array elements

    On a 64-bit system, with a maximum heap of 32 GB, by default, the JVM works with compressed pointers, the so-called “Compressed Oops” (oop = ordinary object pointer) and “Compressed Class Pointers”. These compressed pointers are only 32 bits long instead of 64 bits. This saves 64 bits (= 8 bytes) for each object on the heap: 32 bits for the pointer to the object and another 32 bits for the pointer from the object to its class.

    With 32 bits, only 232 bytes = 4 GB can actually be addressed. But the JVM uses a trick: It shifts these 32 bits three places to the left so that they become 35 bits (the last three bits of which are always 0). These 35 bits can then be used to address 235 = 32 GB.

    Since, as just mentioned, the last three bits are always 0, such a pointer cannot point to any address in the memory, but only to addresses that are divisible by 23 = 8. This means that every Java object always starts at a memory address that is divisible by 8.

    For some unknown reason, this also used to apply to the start address of the array data within an array object. By default, both Compressed Oops and Compressed Class Pointers are activated, so that an array with, for example, three bytes (in the example: 0, 8, 15) is layed out as follows:

    Java array alignment with compressed oops and compressed class pointers

    We first see a 12-byte header, which consists of an 8-byte “mark word” (which contains information for the garbage collector and for synchronization, among other things) and a 4-byte compressed class pointer. This is followed by a 4-byte size field and the actual data of the array. At the end, there are five unused bytes (“padding”), as the total size is rounded up to a value divisible by eight for the reason mentioned above.

    So far, so good.

    However, if we deactivate Compressed Class Pointers, the following picture emerges:

    Java array alignment with uncompressed class pointers before Java 23

    As the start address of the array data (the blue area in the graphic) also had to be divisible by eight, we have both a loss of four bytes before the array data and a further loss of five bytes at the end of the object, i.e., a total of nine bytes.

    Since there is no reason to start the array data at an address divisible by eight (there are no compressed pointers there), the layout for uncompressed class pointers in Java 23 was changed as follows:

    Java array alignment with uncompressed class pointers as of Java 23

    The blue area now starts directly after the size field. The same array object now occupies eight bytes less, and only one byte is lost, no longer nine. In an application with many small arrays, this can lead to a noticeable reduction in memory requirements.

    (There is no JEP for this change; it is registered in the bug tracker under JDK-8139457.)

    Change LockingMode default from LM_LEGACY to LM_LIGHTWEIGHT

    Java 21 introduced a new, lightweight locking mechanism, which is intended to replace the previous stack locking in the medium term.

    In Java 22, this initially experimental option was promoted to a productive option.

    In Java 23, lightweight locking will become the standard locking mechanism.

    You can temporarily reactivate the previous default mode, stack locking, using the VM option -XX:LockingMode=1.

    Stack locking will be marked as “deprecated” in Java 24 and is expected to be removed in Java 27.

    (There is no JEP for this change; it is registered in the bug tracker under JDK-8319251.)

    Complete List of All Changes in Java 23

    In this article, you have learned about all Java 23 features resulting from JDK Enhancement Proposals (JEPs) and some other selected changes from the release notes. You can find a complete list of all changes in the Java 23 release notes.

    Conclusion

    Java 23 brings us three new features and a lot of updated preview features.

    • Writing and reading JavaDoc comments will be easier in the future, as we can now also use Markdown.
    • Instead of only classes and packages as before, we will also be able to import entire modules with import module, making the import block of a .java file much clearer.
    • Primitive type patterns extend Java’s pattern-matching capabilities with primitive types. However, I can’t imagine that we will use this kind of pattern matching much in our code (in contrast to the pattern-matching capabilities that Java has added in previous releases).
    • In implicitly declared classes, we can now write println(...) instead of System.out.println(...).
    • ScopedValue.callWhere(...) is now passed a typed CallableOp so that the compiler can automatically recognize whether the called operation can throw a checked exception – and if so, which one. This means that we no longer have to deal with the generic Exception but with the one actually thrown. And the separate ScopedValue.getWhere(...) method can be omitted as a result.
    • In constructors of derived classes, we can now initialize the derived class’s fields before calling super(...). This is helpful if the constructor of the parent class calls methods that are overwritten in the derived class and access these fields there.
    • Anyone using the Z Garbage Collector will automatically benefit from the new generational mode when upgrading to Java 23, making most applications noticeably more performant.
    • There has also been a major tidy-up: the methods Thread.suspend(), Thread.resume(), ThreadGroup.suspend(), ThreadGroup.resume(), and ThreadGroup.stop(), which have been marked as deprecated for ages, have finally been removed in Java 23. All Unsafe methods for memory access have been marked as deprecated for removal.

    Various other changes round off the release as usual. You can download the current Java 23 release here.

    Which of the new Java 23 features do you find most exciting? Which feature do you miss? Share your thoughts in the comments!

  • Java main() Method – With 2024/2025 Enhancements

    Java main() Method – With 2024/2025 Enhancements

    In this article, you will learn all about the main method in Java – the starting point of every Java program. The article also describes the simplifications released in Java 25.

    You will learn in detail:

    • What is a main() method, and what do we need it for?
    • How do you run the main() method?
    • What are the components of Java’s main() method, and what do they mean?
    • How can the main() method be written much more easily in new Java versions?

    What Is the main() Method in Java?

    To start a Java program, it requires a main method. This method is the entry point to the program. The JVM (Java Virtual Machine) calls this main method when a program is started and executes the Java code it contains.

    Example of a main() method in Java

    A simple Hello World Java program with a main method looks like this, for example:

    public class HelloWorld {
      public static void main(String[] args) {
        System.out.println("Hello world!");
      }
    }Code language: Java (java)

    To start this program, first, save the program code in a file named HelloWorld.java.

    Then enter the following command on the command line / in a terminal:

    java HelloWorld.javaCode language: plaintext (plaintext)

    You should now see the following output:

    Hello world!Code language: plaintext (plaintext)

    Congratulations! You have written and started your first Java program.

    But why was it so complicated?

    What do all the terms like public, class, static, void, etc. mean in the program code?

    The good news is that, as a beginner, you don’t need to know this at first. In modern Java versions, it is much easier!

    How? You will see this in the following section.

    (If you are still interested, you will find a detailed description of all components of the main method below in the section Java main() method syntax).

    Simplified main() Method

    The main method has been greatly simplified in Java 25 (the simplifications have been available as a preview feature from Java 21 to Java 24).

    In this section, I will show you what will change for you. You can find the technical details behind these changes in the Compact Source Files and Instance Main Methods section.

    Let’s go back to the Hello World example from the first section:

    public class HelloWorld {
      public static void main(String[] args) {
        System.out.println("Hello world!");
      }
    }Code language: Java (java)

    You had to write a lot of boilerplate code here – code that would be the same in every Java program. The only thing you want to say is: “Please print the text ‘Hello World!’.”

    In Java 25 (and in Java 21 to 24 with activated preview features), you can already write this much shorter:

    void main() {
      IO.println("Hello world!");
    }Code language: Java (java)

    The main method and the output command println are still there – but a lot of boilerplate code around them have been deleted, and System.out.println() has been shortened to IO.println().

    This means that as a Java beginner, you will no longer have to worry about public, class, static, etc., in the future. These terms can be introduced when they are needed.

    Please note that you must explicitly activate preview features prior to Java 25. If you use Java 24, then you must start the program as follows:

    java --enable-preview --source 24 HelloWorld.javaCode language: plaintext (plaintext)

    The following section explains the technical details behind the changes.

    Compact Source Files and Instance Main Methods

    (In Java 24, this feature was called: “Simple Source Files and Instance Main Methods”.
    Before Java 24, this feature was called: “Implicitly Declared Classes and Instance Main Methods”.)

    In the previous section, you learned that in the future, a Java main method can be written without a class, without public static, and without String[] args, – and that instead of using System.out.println(…) for output, the shorter IO.println(…) is sufficient.

    This makes the following code a valid and complete Java program in the future:

    void main() {
      IO.println("Hello world!");
    }Code language: Java (java)

    This section describes in detail the changes that have made this simplification possible.

    First of all, the history of the changes:

    In the following, I describe the four components of the new feature: compact source files, implicitly declared classes, instance-main methods, and the automatically imported java.lang.IO class.

    Compact Source Files

    A Java file without an explicit class declaration, i.e., without a public class HelloWorld, for example, is referred to as a “compact source file”.

    Implicitly Declared Classes

    From the code contained in a compact source file, the Java compiler generates a so-called “implicitly declared class” with a name defined by the compiler. As a rule, this is the file’s name without the .java extension.

    For example, if you compile the file HelloWorld.java, the compiler creates the file HelloWorld.class – and if you then decompile it, you will see that the class name is also HelloWorld.

    The following characteristics apply to implicitly declared classes:

    • An implicitly declared class is always in the unnamed package (just like any regular class without package definition).
    • An implicitly declared class is generally final, so it cannot be inherited.
    • An implicitly declared class cannot implement interfaces or extend other classes.
    • An implicitly declared class cannot be accessed via the name specified by the compiler, i.e., other classes cannot instantiate an implicitly declared class, and they cannot call any methods on it, not even static ones.

    However, an implicitly declared class can call methods on itself, i.e., methods that are defined in the same .java file, as in the following example:

    void main() {
      println(greeting());
    }
    
    String greeting() {
      return "Hello, World!";
    }Code language: Java (java)

    Since an implicitly declared class cannot be accessed from outside, it must always contain a main method.

    Instance Main Methods

    Instance main methods are non-static main methods, i.e., main methods without the static keyword. The following main methods will be permitted in the future:

    • non-static instance methods,
    • Methods with the visibility level public, protected, or package-private (without a modifier),
    • Methods with or without String[] parameters.

    Here are a few examples:

    • void main()
    • void main(String[] args)
    • public void main()
    • protected static void main(String[] args)

    Static and non-static methods with the same signature, as well as methods with different visibility modifiers with the same signature, are mutually exclusive and lead to a “method is already defined” compiler error.

    However, it is possible for a main method with a String[] parameter and a main method without parameters to exist simultaneously in the same .java file:

    void main(String[] args) {
      . . .
    }
    
    protected static void main() {
      . . .
    }Code language: Java (java)

    In this case, the JDK developers specified that the method with the String[] parameter has priority. In the example, the JVM would start void main(String[] args).

    Console Interaction With java.lang.IO

    In the third preview phase of the changes, introduced in Java 23, the IO class was added – with the following static methods:

    • void print(Object obj) – prints the passed text or the text representation of the passed object to the console – without a line break at the end.
    • void println(Object obj) – prints the passed text or the text representation of the passed object to the console – with a line break at the end.
    • String readln(String prompt) – displays the passed prompt, accepts a user input, and returns it.

    In Java 23 and Java 24, an implicitly declared class automatically imports all java.io.IO methods. This means you can call methods like println() without having to prefix them with the class name.

    In Java 25, the IO class was moved to the java.lang package, and the automatic import of IO methods is removed. That means from Java 25 onward, you’ll either have to write IO.println() – or statically import the println() method:

    import static java.lang.IO.*;Code language: Java (java)

    With this import declaration, you can once again call println() and other IO methods without prefixing them with the class name.

    Java main() Method Syntax

    This section describes the syntax of the main method before the simplifications introduced in Java 21. Previously, a main method had to be embedded in a class, and its syntax was rigid:

    public class MyMainMethodDemo
      public static void main(String[] args) {
        // code to execute
      }
      // possibly more code
    }Code language: Java (java)

    Only the name of the class, in the example MyMainMethodDemo, and the name of the parameter, in the example args, may be freely chosen.

    If a program consists of several classes, any number of these classes may contain a main() method. To start a program, you need to specify the name of the class whose main() method you want to run, as shown at the beginning of the article.

    What do the individual elements mean?

    public class MyMainMethodDemo

    This first line of code introduces a class in the sense of object-oriented programming. MyMainMethodDemo is the name of the class. Java code is always arranged within classes.

    With compact source files and instance main methods, an explicit class definition is no longer necessary.

    public static void main(String[] args)

    The second line, the so-called method signature, introduces a method. Methods contain the program code to be executed.

    public

    public is a so-called visibility modifier. A class and the main() method it contains must be public so that the JVM can call the main() method and thus execute the program code it contains.

    With compact source files and instance main methods, this is no longer necessary.

    static

    Object orientation differentiates between static methods and instance methods. Static methods can be called without having to create an instance of the class surrounding them – i.e., an object. Instance methods, on the other hand, can only be called on an object.

    The main() method in Java must be static so that it can be called without instantiating the class – i.e. without creating an object of this class.

    With compact source files and instance main methods, this is no longer necessary.

    void

    Methods can return values, e.g., Math.random() returns a random number. However, a main() method has no return value. And this is precisely what is indicated by the identifier void.

    String[] args

    This is a parameter of the method. String[] ist der Typ des Parameters: ein String-Array. And args is the name of the parameter. This name may be changed. When starting a program, so-called command line parameters can be passed, e.g., like this:

    java HelloWorld.java happy coders out thereCode language: plaintext (plaintext)

    These parameters are passed to the main() method as a string array and can be read and printed there, for example:

    public class HelloWorld {
      public static void main(String[] args) {
        System.out.print("Hello");
        for (String arg : args) {
          System.out.print(" " + arg);
        }
        System.out.println("!");
      }
    }Code language: Java (java)

    If you call this program as above, you will get the following output:

    Hello happy coders out there!Code language: plaintext (plaintext)

    Conclusion

    The main() method is the starting point of every Java program. Without this, no Java program can start. Until now, the syntax of main() methods was rigidly predefined:

    public class HelloWorld {
      public static void main(String[] args) {
        System.out.println("Hello world!");
      }
    }Code language: Java (java)

    In Java 25 (and in Java 21 to 24 with activated preview features) you can write the same main() method as follows:

    void main() {
      println("Hello world!");
    }Code language: Java (java)

    This makes it easier, particularly for Java beginners, to learn the language. Concepts that only become relevant for larger programs, such as classes, the distinction between static and instance methods, visibility modifiers such as public, protected, and private, as well as coarse-grained structures such as packages and modules, can be introduced when needed.

  • Array Length in Java

    Array Length in Java

    In this article, you will learn:

    • How to find out the length of an array in Java,
    • How to define the length of an array in Java,
    • How much memory space an array occupies on the heap,
    • And what the maximum size of an array is in Java.

    We consider both one-dimensional and 2D arrays.

    How to Find the Length of an Array in Java?

    Let’s assume we get a Java array as follows:

    String[] names = getNames();Code language: Java (java)

    Then we find out the length of this array, i.e., the number of entries in it, as follows:

    int numberOfCustomers = customers.length;Code language: Java (java)

    How to Get the Length of a 2D Array in Java?

    With a two-dimensional array, things get a little more complicated. In Java, a two-dimensional array is an array of arrays. A matrix of height two and width three would be represented like this:

    Java 2D array

    We can now determine the height and width as follows:

    int[][] intMatrix = getMatrix();
    int height = intMatrix.length;
    int width = intMatrix[0].length;Code language: Java (java)

    The height is the length of the array (i.e., the number of rows the matrix contains), and the width is the length of the first row.

    Please note, however, that with a two-dimensional array in Java, all sub-arrays do not necessarily have to be the same length. A 2D array could also look like this:

    Java 2D array with sub-arrays of different lengths

    Here, we could calculate statistics on the line lengths:

    int[][] twoDimensionalArray = {{2, 3, 6}, {4, 5, 1, 9, 7}};
    IntSummaryStatistics statistics = 
        Arrays.stream(twoDimensionalArray).mapToInt(row -> row.length).summaryStatistics();
    System.out.println(statistics);
    Code language: Java (java)

    The following result would be output for the example matrix shown above:

    IntSummaryStatistics{count=2, sum=8, min=3, average=4.000000, max=5}Code language: plaintext (plaintext)

    We have two lines, the sum of the lengths is 8 (that’s right: 5 plus 3), the minimum is 3, the average size is 4, and the maximum is 5.

    How to Set the Array Length in Java?

    The length of an array is defined when it is initialized. The following code, for example, creates a string array of size four:

    String[] fruits = {"jujube", "apple", "boysenberry", "cherry"};Code language: Java (java)

    We can also define a string array of the same size as follows:

    String[] fruits = new String[4];Code language: Java (java)

    However, this array does not yet contain any values; is initialized with null at each position. You can learn about initializing strings in the article How to Initialize Arrays in Java.

    After initialization, we can no longer change the array length.

    How To Set the Length of a 2D Array in Java?

    You can also define the length of a 2D array in the two ways shown above – i.e., with predefined values:

    int[][] twoDimensionalArray = {{2, 3, 6}, {4, 5, 1, 9, 7}}Code language: Java (java)

    This code creates the two-dimensional array shown above with sub-arrays of different lengths.

    And secondly, with default values (0 in the case of the type int):

    int[][] twoDimensionalArray = new int[2][3];Code language: Java (java)

    This code creates the following array:

    Java 2D array matrix with zeros

    You can learn more about initializing 2D arrays in the article How to Initialize Arrays in Java.

    How Much Memory Does a Java Array Take Up?

    In the following, we look at the memory layout for Compressed Class Pointers and Compressed OOPs, the standard setting on 64-bit machines as of Java 22 (before the header is further compressed by Project Lilliput).

    An array is an object in Java; therefore, like any other object, it has a 12-byte object header. This is followed by four bytes in which the length of the array is stored. This is followed by the actual elements of the array in sequential order.

    For example, the int array [6, 1, 1, 5, 7] is stored in the memory as follows:

    Java int array memory layout

    The last four bytes marked with “padding” are not really part of the array but cannot be used in any other way either, as objects in the Java heap are stored at memory addresses divisible by eight when using compressed oops. This is because, with 32 bits, we can address not just 232 bytes, i.e. 4 GB, but eight times as many, i.e. 32 GB.

    Elements in primitive arrays each occupy the following memory space:

    • boolean and byte: 1 byte each
    • short and char: 2 bytes each
    • int and float: 4 bytes each
    • long and double: 8 bytes each

    With short instead of int values, the array would have the following layout:

    java short array memory layout

    And with byte elements, it would have the following layout:

    java byte array memory layout

    We can calculate the total size of an array as follows:

    Total size = align(12 bytes + 4 bytes + number of elements × size of element type in bytes)

    The align function rounds the result up to the next value divisible by eight so that the result contains the “wasted” space.

    This results in the following size for the int array with five elements:

    Total size = align(12 bytes + 4 bytes + 5 × 4 bytes)
    = align(36 bytes)
    = 40 bytes

    If we were to store the same five elements in a long array, it would have the following size:

    Total size = align(12 bytes + 4 bytes + 5 × 8 bytes)
    = align(56 bytes)
    = 56 bytes

    With object arrays, it is not the objects themselves that are stored in the array but the references to the objects. The following graphic shows the memory layout of the string array shown above:

    Java string array memory layout

    I have not shown the object layout of the strings themselves here, as this article is primarily about arrays, not strings. The strings also have a header, several fields, and a reference to a byte array, which in turn contains a header, a length field, and the actual characters of the string.

    How Much Memory Does a 2D Array Take up in Java?

    As you have seen above, a two-dimensional array is actually an array of arrays. Therefore, we must add the memory space of the outer array and that of all the inner arrays.

    The array from the example shown above has the following memory layout:

    Java 2D array memory layout

    We can calculate the total size of this 2D array as follows:

    Total size = align(12 bytes + 4 bytes + number of lines × 4 bytes)
    + number of rows × align(12 bytes + 4 bytes + number of columns × size of element type in bytes)

    For the example matrix with two rows and three columns, the following results:

    Total size = align(12 bytes + 4 bytes + 2 x 4 bytes) + 2 × align(12 bytes + 4 bytes + 3 × 4 bytes)
    = align(24 bytes) + 2 × align(28 bytes)
    = 24 bytes + 2 × 32 bytes
    = 88 bytes

    Max Array Size in Java

    Java arrays use an int for the index, meaning the theoretical upper limit is Integer.MAX_VALUE, i.e., 2,147,483,647 elements.

    According to the formula above, an int array of this size would occupy just over 8 GB. That shouldn’t be a problem for most modern computers.

    When I try to create an array of this size – no matter which primitive type I use – I get the following error:

    Exception in thread “main” java.lang.OutOfMemoryError: Requested array size exceeds VM limit

    Only when I reduce the size by two to 2,147,483,645, does it work – and again with all primitive data types, even with long. The limit, therefore, has nothing to do with the available memory but is determined by the VM.

    The following table shows the maximum array size for all primitive types – both in terms of the number of elements and the heap memory occupied on my VM:

    TypesMaximum elementsMaximum size in the heap
    boolean, byteInteger.MAX_VALUE – 22,147,483,664 bytes (~ 2 GB)
    short, charInteger.MAX_VALUE – 24,294,967,312 bytes (~ 4 GB)
    int, floatInteger.MAX_VALUE – 28,589,934,600 bytes (~ 8 GB)
    long, doubleInteger.MAX_VALUE – 217,179,869,176 bytes (~ 16 GB)

    Max Size of a 2D Array in Java

    The upper limit described in the previous chapter applies to each array dimension. Theoretically, the following sizes would, therefore, be possible with two-dimensional arrays:

    TypesMaximum elementsMaximum size in the heap
    boolean, byte(Integer.MAX_VALUE – 2)²~ 4 exabytes (= 4 million terabytes)
    short, char(Integer.MAX_VALUE – 2)²~ 8 exabytes (= 8 million terabytes)
    int, float(Integer.MAX_VALUE – 2)²~ 16 exabytes (= 16 million terabytes)
    long, double(Integer.MAX_VALUE – 2)²~ 32 exabytes (= 32 million terabytes)

    In this case, the size is not limited by the VM but by the available memory or the memory that the garbage collector can manage (e.g., 16 TB for the ZGC).

    Conclusion

    We can find the length of an array using array.length. We can only set the length of an array when it is created; we cannot change it afterward.

    With compressed pointers, arrays have a 12-byte object header and a 4-byte length field, followed by the actual data (1 byte per byte/boolean, 2 bytes per short/char, 4 bytes per int/float or object reference, and 8 bytes per long/double).

    An array can contain a maximum of Integer.MAX_VALUE - 2 elements (on most VMs), regardless of the type of array elements.

  • How to Initialize Arrays in Java

    How to Initialize Arrays in Java

    In this article, you will learn about various options,

    • how to declare and initialize arrays in Java,
    • how to fill them with values,
    • how to copy them,
    • and how to convert collections and streams into arrays.

    You will also learn about the unique features of multidimensional arrays in Java.

    Declaring and Initializing Arrays in Java

    We start with the most common operations, the array declaration and array initialization.

    How to Declare an Array in Java

    Declaring a variable is the time we make the variable and its type known to the compiler. The following two lines show the declaration of an int array and a string array:

    int[] intArray;
    String[] stringArray;Code language: Java (java)

    We do not yet specify the size of the array in the declaration. The array variables (in the example intArray and stringArray) do not contain the array itself but a reference to an array, which is ultimately an object on the Java heap. Only when we create the actual array object, we must define its size.

    In the array declaration, the square brackets can also be placed after the variable name:

    int intArray[];
    String stringArray[];Code language: Java (java)

    This style was adopted from the C programming language. However, all Java style guides prefer the style shown first, i.e., with the brackets after the type and before the name.

    How to Initialize a Java Array With Values

    We can also initialize an array with values when declaring it. The following line of code shows how we can initialize an int array:

    int[] winningNumbers = new int[]{14, 17, 29, 32, 45, 1, 2};Code language: Java (java)

    And this is how we can initialize a string array, for example:

    String[] fruits = new String[]{"cherry", "papaya", "huckleberry"};Code language: Java (java)

    As the variable type (int or String) is repeated in the assignment in the previous two examples, we can also replace the preceding type with var:

    var winningNumbers = new int[]{14, 17, 29, 32, 45, 1, 2};
    var fruits = new String[]{"cherry", "papaya", "huckleberry"};Code language: Java (java)

    Alternatively, we can also omit the new keyword and the second type specification, but then the first type specification must remain and must not be replaced by var:

    int[] winningNumbers = {14, 17, 29, 32, 45, 1, 2};
    String[] fruits = {"cherry", "papaya", "huckleberry"};Code language: Java (java)

    The square brackets may also be placed after the variable name in C style for the combined declaration and initialization:

    int winningNumbers[] = {14, 17, 29, 32, 45, 1, 2};
    String fruits[] = {"cherry", "papaya", "huckleberry"};Code language: Java (java)

    Separate Array Declaration and Initialization

    You can also create an array with given array elements after the declaration:

    int[] winningNumbers;
    // . . .
    winningNumbers = new int[]{14, 17, 29, 32, 45, 1, 2};
    
    String[] fruits;
    // . . .
    fruits = new String[]{"cherry", "papaya", "huckleberry"};Code language: Java (java)

    However, this is only possible with the new keyword. The variant without new is only permitted for the combined declaration and initialization shown in the previous section.

    How to Initialize an Empty Array in Java

    In all previous examples, we specified concrete values the array should contain.

    Instead of defining an array with specific values, we can also initialize an array by specifying a size (see also the article Array Length in Java), e.g., an array with ten int elements:

    int[] intArray = new int[10];Code language: Java (java)

    The instruction new int[10] creates a new int array with 10 elements. All elements are set to the default value 0. The command has the same effect as the following:

    int[] intArray = {0, 0, 0, 0, 0, 0, 0, 0, 0, 0};Code language: Java (java)

    We could also separate this type of initialization from the declaration:

    int[] intArray;
    // . . .
    intArray = new int[10];Code language: Java (java)

    The various array types have the following default values:

    • The default value for the integers byte, short, int, and long is 0.
    • The default value for the floating point numbers float and double is 0.0.
    • For char, the default value is the Unicode character “NULL” (U+0000).
    • For all object arrays, the default is null.

    Filling an Array With Values

    Once we have created an array (in any of the ways shown above), we can fill it with values in various ways.

    Setting Individual Array Elements

    For example, if we have created an int array, we can fill it element by element, e.g., with the square of the respective index:

    int[] intArray = new int[11];
    for (int i = 0; i < intArray.length; i++) {
      intArray[i] = i * i;
    }Code language: Java (java)

    This array then has the following content:

    [0, 1, 4, 9, 16, 25, 36, 49, 64, 81, 100]Code language: plaintext (plaintext)

    Setting All Array Elements to the Same Value: Arrays.fill()

    We can fill an array with uniform values using the Arrays.fill() method. The following code sets each element of the array to 99:

    int[] intArray = new int[10];
    Arrays.fill(intArray, 99);Code language: Java (java)

    This array then looks as follows:

    [99, 99, 99, 99, 99, 99, 99, 99, 99, 99]Code language: plaintext (plaintext)

    There is a second, overloaded fill() method with additional parameters that we can use to define the area to be filled. The following code, for example, fills the first five fields with 11 and the last five fields with 77:

    int[] intArray = new int[10];
    Arrays.fill(intArray, 0, 5, 11);
    Arrays.fill(intArray, 5, 10, 77);Code language: Java (java)

    This array then looks as follows:

    [11, 11, 11, 11, 11, 77, 77, 77, 77, 77]Code language: plaintext (plaintext)

    Filling an Array With Calculated Values: Arrays.setAll()

    In the “Setting individual array elements” section, I showed you code that fills an array with square numbers using a loop.

    We can also program this more simply using the Arrays.setAll() method. We pass the array and a lambda function to this method, which calculates the value of a field based on its index:

    int[] intArray = new int[11];
    Arrays.setAll(intArray, i -> i * i);Code language: Java (java)

    The use of setAll() makes it particularly easy to parallelize processing. All we have to do is replace setAll() with parallelSetAll():

    int[] intArray = new int[11];
    Arrays.parallelSetAll(intArray, i -> i * i);Code language: Java (java)

    Internally, the method uses a parallel stream and, therefore, the common ForkJoinPool. As the calculation method is stateless, the performance can scale almost linearly with the number of CPU cores.

    How to Copy a Java Array

    There are various methods in Java for copying an existing array.

    Copying Primitive Arrays With clone()

    The simplest way to copy an array is the clone() method:

    int[] intArray = {6, 11, 5, 7, 44, 7, 4};
    int[] copy = intArray.clone();Code language: Java (java)

    This code creates a second array that can be changed independently of the first array. We can now change values in both arrays:

    intArray[1] = 999;
    copy[2] = 88;Code language: Java (java)

    The consequence is that both arrays have different contents:

    intArray: [6, 999, 5, 7, 44, 7, 4]
    copy:     [6, 11, 88, 7, 44, 7, 4]Code language: plaintext (plaintext)

    Graphically, you can imagine this as follows (this is merely a symbolic representation that only reflects the content of the arrays – arrays also have an internal object header and a field that stores their size):

    Java array

    The situation is different with object arrays, as we will see in the next section.

    Copying Object Arrays With clone()

    When working with an object array, we must note that only the references to the objects are copied, not the objects themselves.

    In the following example, we copy an array of StringBuilder objects, then change the values of a StringBuilder object in the first array and output both arrays:

    StringBuilder[] fruits = {
        new StringBuilder("cherry"),
        new StringBuilder("papaya"),
        new StringBuilder("huckleberry")
    };
    
    StringBuilder[] copy = fruits.clone();
    
    fruits[1].reverse();
    
    System.out.println("fruits: " + Arrays.toString(fruits));
    System.out.println("copy:   " + Arrays.toString(copy));Code language: Java (java)

    In the output, you will see the reversed word “ayapap” in the middle position in both arrays. That is because not the StringBuilder object has been copied but only a pointer. That means that both arrays contain a pointer to the same StringBuilder object:

    Java array

    If you want to change an object in just one array, you must replace it by assigning a new object, e.g., a new StringBuilder. Let’s append the following lines to the code from above:

    copy[2] = new StringBuilder("tomato");
    
    System.out.println("fruits: " + Arrays.toString(fruits));
    System.out.println("copy:   " + Arrays.toString(copy));
    Code language: Java (java)

    You will then see the following output – tomato is now located exclusively in the cloned array:

    fruits: [cherry, ayapap, huckleberry]
    copy:   [cherry, ayapap, tomato]Code language: plaintext (plaintext)

    Graphically, you can imagine this as follows:

    Java array

    The StringBuilder with the contents “cherry” and “ayapap” are referenced by both arrays, the StringBuilder with the content “huckleberry” is only referenced by the fruits array, and the StringBuilder with the content “tomato” is only referenced by the copy array.

    System.arraycopy()

    Sometimes, we do not want to copy the entire array, but only a part of it. We can use the low-level method System.arraycopy() to help us with this.

    Let’s assume we want to copy the middle three winning numbers into another array. Then, we first create a target array of size three:

    int[] winningNumbers = {14, 17, 29, 32, 45, 1, 2};
    int[] middleThree = new int[3];Code language: Java (java)

    Then we call up System.arraycopy() as follows and print the result:

    System.arraycopy(winningNumbers, 2, middleThree, 0, 3);Code language: Java (java)

    The method has the following parameters:

    1. Source array
    2. Start position in the source array
    3. Target array
    4. Start position in the target array
    5. Number of elements to copy

    The following graphic shows the meanings of the parameters once again:

    Java System.arraycopy()

    We can now print the result of the copying process:

    System.out.println("middleThree: " + Arrays.toString(middleThree));Code language: Java (java)

    And we should see the following output, matching the graphic above:

    middleThree: [29, 32, 45]Code language: plaintext (plaintext)

    Arrays.copyOf()

    Dealing with System.arraycopy() is tedious. For this reason, the class java.util.Arrays contains some auxiliary methods that make copying easier.

    We can use the Arrays.copyOf() method to copy the entire array or parts of the array. The following code copies the complete array:

    int[] winningNumbers = {14, 17, 29, 32, 45, 1, 2};
    int[] copy = Arrays.copyOf(winningNumbers, winningNumbers.length);
    System.out.println("copy = " + Arrays.toString(copy));
    Code language: Java (java)

    The second parameter specifies the desired length of the target array. If you look at the source code of the method Arrays.copyOf(), you will see that it simply invokes clone() if the second parameter is equal to the length of the source array.

    If you specify a shorter length as the second parameter, the copy is correspondingly shorter than the original:

    int[] firstThree = Arrays.copyOf(winningNumbers, 3);
    System.out.println("firstThree = " + Arrays.toString(firstThree));
    Code language: Java (java)

    This code prints the following – the target array thus contains the first three numbers of the source array:

    firstThree = [14, 17, 29]Code language: plaintext (plaintext)

    In the source code of Arrays.copyOf(), you will see that in this case, a new array of the desired size is first created, and then the desired elements are copied from the source array into the target array using System.arraycopy().

    You can also specify a value that is greater than the length of the source array:

    int[] longerArray = Arrays.copyOf(winningNumbers, 10);
    System.out.println("longerArray = " + Arrays.toString(longerArray));
    Code language: Java (java)

    In this case, the remaining fields of the target array will be filled with default values (i.e., zeros), and you will get the following result:

    longerArray = [14, 17, 29, 32, 45, 1, 2, 0, 0, 0]Code language: plaintext (plaintext)

    Arrays.copyOfRange()

    To copy a part further back from the array, we can use Arrays.copyOfRange(). The following code copies the middle three elements, as we did above with System.arraycopy():

    int[] winningNumbers = {14, 17, 29, 32, 45, 1, 2};
    int[] middleThree = Arrays.copyOfRange(winningNumbers, 2, 5);
    System.out.println("middleThree = " + Arrays.toString(middleThree));Code language: Java (java)

    In addition to the source array, enter the start and end position (not the length!) of the range to be copied as parameters.

    If you look at the source code of copyOfRange(), you will see that this method also uses clone() and System.arraycopy().

    Creating Arrays From Other Data Structures

    If you have data in a collection, such as a list or a set, you can copy it into an array using the toArray() method.

    How to Convert a List to an Array: List.toArray()

    The following example shows four ways in which you can convert a string list into a string array:

    List<String> fruits = List.of("honeydew", "dragonfruit", "boysenberry");
    Object[] array1 = fruits.toArray();
    String[] array2 = fruits.toArray(new String[fruits.size()]);
    String[] array3 = fruits.toArray(new String[0]);
    String[] array4 = fruits.toArray(String[]::new);
    Code language: Java (java)

    In the first variant without parameters, the return value is an Object array. That is because collections such as lists and sets do not contain any type information at runtime due to so-called type erasure and can, therefore, contain any objects from the JVM’s point of view.

    In the second variant, we pass a new array of the desired type with the required size. The toArray() method then copies the list elements into this array.

    In the third variant, we pass a new array of the desired type with a length of 0. The toArray() method then creates a new array of the required size and copies the elements into this array.

    In the fourth method, we pass a reference to the array constructor. The Collection.toArray() method calls this constructor with the parameter 0, i.e., creates an array of length 0 and then invokes the third method.

    Aleksey Shipilёv compared the performance of the different variants of Collection.toArray() on his blog and concluded that the first variant, i.e., the one that returns an Object array, is the fastest. Of the variants that return an array of the target type, variants three and four are the fastest. This is counter-intuitive, as two arrays are created (first one of length 0, then one of the required length). You can read why passing an array of length 0 is nevertheless faster than passing an array of the appropriate size in the article linked above.

    The second variant can also lead to a race condition: With a thread-safe collection, if another thread changes its size after calling size() and before calling toArray(), toArray() would return an array with the old length instead of the new one – the array would thus be truncated or padded with zeros.

    I always recommend using the fourth variant, i.e., the one with the constructor parameter, as this could be optimized in the future.

    How to Convert a Set to an Array: Set.toArray()

    You can use the toArray() calls shown above unchanged to convert a Set into an array:

    Set<String> fruits = Set.of("honeydew", "dragonfruit", "boysenberry");
    Object[] array1 = fruits.toArray();
    String[] array2 = fruits.toArray(new String[fruits.size()]);
    String[] array3 = fruits.toArray(new String[0]);
    String[] array4 = fruits.toArray(String[]::new);
    Code language: Java (java)

    If the set has a defined iteration sequence (such as a TreeSet), then the Set.toArray() methods guarantee that the elements are copied into the array in iteration sequence.

    Here, too, my recommendation is always to use the fourth variant.

    Creating an Array From an Object Stream

    Not only collections but also streams have toArray() methods. We start, analogous to the collections, with the generic object streams. The following code shows two variants of converting a string stream into an array. Note that a stream can only be consumed once, meaning it can also only be transformed into an array once – therefore, for this example, we have to create two streams:

    Stream<String> stream1 = Stream.of("mango", "tomato", "coconut");
    Object[] objects = stream1.toArray();
    
    Stream<String> stream2 = Stream.of("cherry", "date", "raspberry");
    String[] strings = stream2.toArray(String[]::new);
    Code language: Java (java)

    There are only two variants here, namely those that we have already seen in the collections as variant 1 and variant 4:

    • a variant without type specification that returns only an object array,
    • and a variant with a constructor reference for the desired array type.

    A variant to which we can pass an array of the desired type does not exist for streams. That aligns with my recommendation not to use variants 2 and 3 for collections. So why are these variants available for collections? For historical reasons: When the Collections Framework was introduced in Java 1.2 in 1998, there were no method references as required for passing the constructor in variant 4.

    Creating an Array From a Primitive Stream

    In contrast to collections, there are also primitive variants of streams, namely IntStream, LongStream, and DoubleStream. Primitive streams only offer a single toArray() method. As the type is always known here, it is unnecessary to specify it.

    The following code creates an int array with the values 1 to 10, a long array with a sequence of numbers that starts at 1 and doubles as long as the value remains below 2,000, and a double array with a sequence of numbers that starts at 1.0 and is halved until a total of eight elements have been created:

    int[] intArray = IntStream.rangeClosed(1, 10).toArray();
    long[] longArray = LongStream.iterate(1, x -> x < 2000, x -> x * 2).toArray();
    double[] doubleArray = DoubleStream.iterate(1.0, x -> x / 2.0).limit(8).toArray();
    
    System.out.println("intArray = " + Arrays.toString(intArray));
    System.out.println("longArray = " + Arrays.toString(longArray));
    System.out.println("doubleArray = " + Arrays.toString(doubleArray));
    Code language: Java (java)

    The code prints the following arrays:

    intArray = [1, 2, 3, 4, 5, 6, 7, 8, 9, 10]
    longArray = [1, 2, 4, 8, 16, 32, 64, 128, 256, 512, 1024]
    doubleArray = [1.0, 0.5, 0.25, 0.125, 0.0625, 0.03125, 0.015625, 0.0078125]Code language: plaintext (plaintext)

    Declaring and Initializing 2D Arrays in Java

    Multidimensional arrays in Java are not really multidimensional but arrays of arrays. In the following sections, I will show you precisely what this means and how these arrays are declared and initialized using the example of two-dimensional arrays.

    How to Declare a 2D Array in Java

    You declare a two-dimensional array as follows:

    int[][] intMatrix;
    String[][] stringMatrix;
    Code language: Java (java)

    Just as with one-dimensional arrays, we do not specify a size in the declaration. Also, with multidimensional arrays, we can write the brackets in C style after the variable name:

    int intMatrix[][];
    String stringMatrix[][];Code language: Java (java)

    As with one-dimensional arrays, all Java style guides prefer the first variant.

    How to Initialize a 2D Array in Java

    A two-dimensional array can be initialized directly in the declaration – with new followed by the type and two pairs of square brackets:

    int[][] intMatrix = new int[][]{{2, 3, 6}, {4, 5, 1}};Code language: Java (java)

    If we use new, we may also write var at the beginning:

    var intMatrix = new int[][]{{2, 3, 6}, {4, 5, 1}};Code language: Java (java)

    Or we leave out new and the second type specification, and then we are not allowed to use var. This is the shortest option:

    int[][] intMatrix = {{2, 3, 6}, {4, 5, 1}};Code language: Java (java)

    Of course, we can also split the declaration and initialization into two lines, but then we have to specify the type in both lines explicitly:

    int[][] intMatrix;
    intMatrix = new int[][]{{2, 3, 6}, {4, 5, 1}};
    Code language: Java (java)

    We can also create an empty array (more precisely, one that contains only zeros) and then fill the fields in a second step:

    int[][] intMatrix = new int[2][3];
    intMatrix[0][0] = 2;
    intMatrix[0][1] = 3;
    intMatrix[0][2] = 6;
    intMatrix[1][0] = 4;
    intMatrix[1][1] = 5;
    intMatrix[1][2] = 1;Code language: Java (java)

    It is important to know that in Java, a two-dimensional array is actually an array of arrays. The example arrays that we have created in this section are stored in memory as follows (the illustration again dispenses with the object header and the length field):

    Java 2D array - representation in memory

    Each row of the matrix is a separate array. You can also access these arrays, e.g., print them as follows:

    int[] row0 = intMatrix[0];
    int[] row1 = intMatrix[1];
    System.out.println("row0 = " + Arrays.toString(row0));
    System.out.println("row1 = " + Arrays.toString(row1));
    Code language: Java (java)

    We could also create the intMatrix array as follows:

    int[][] intMatrix = new int[2][3];
    intMatrix[0] = new int[]{2, 3, 6};
    intMatrix[1] = new int[]{4, 5, 1};
    Code language: Java (java)

    The sub-arrays intMatrix[0] and intMatrix[1] are initially set to {0, 0, 0} in the first line and then overwritten by new arrays in the second and third lines.

    We can also omit the size specification for the second dimension in the first line:

    int[][] intMatrix = new int[2][]; // ⟵ without second dimension length
    intMatrix[0] = new int[]{2, 3, 6};
    intMatrix[1] = new int[]{4, 5, 1};
    Code language: Java (java)

    In this case, intMatrix[0] and intMatrix[1] are each initially null.

    Incidentally, it is not mandatory for all sub-arrays to be the same length. The following is also permitted:

    int[][] intMatrix = new int[2][];
    intMatrix[0] = new int[]{2, 3, 6};
    intMatrix[1] = new int[]{4, 5, 1, 9, 7};Code language: Java (java)

    And we can write that too:

    int[][] intMatrix = {{2, 3, 6}, {4, 5, 1, 9, 7}};Code language: Java (java)

    The 2D arrays created in the last two examples can be visualized as follows:

    Java 2D array with different row lengths - representation in memory

    The methods discussed in the previous sections – Arrays.fill(), Arrays.setAll(), clone(), System.arraycopy(), Arrays.copyOf(), and Arrays.copyOfRange() – can be applied to both levels of such a nested array.

    The following code, for example, generates a matrix with the products of the multiplication tables:

    int[][] products = new int[11][11];
    for (int i = 0; i < 11; i++) {
      int finalI = i; // ⟵ we need an effectively final variable for the lambda
      Arrays.setAll(products[i], j -> finalI * j);
    }Code language: Java (java)

    The following code sets all rows of a two-dimensional matrix to an array with the values one to four:

    int[][] matrix = new int[3][];
    Arrays.fill(matrix, new int[]{1, 2, 3, 4});Code language: Java (java)

    Note, however, that we have only created this inner array once and that all rows refer to the same inner array:

    Java 2D array with split inner array

    If you execute the following code, you will see that the supposed change to a single field in the matrix has changed an entire column:

    matrix[1][1] = 99;
    System.out.println("matrix = " + Arrays.deepToString(matrix));Code language: Java (java)

    To create a separate array for each line, you can use Arrays.setAll(), as the lambda passed in the second parameter is called for each line:

    Arrays.setAll(matrix, ignored -> new int[]{1, 2, 3, 4});Code language: Java (java)

    It is good to know these unique features of multidimensional arrays in Java.

    Conclusion

    In this article, you have learned about various methods for creating arrays in Java – from initialization with static values or default values to filling an array with Arrays.fill() or Arrays.setAll() and copying arrays with clone(), System.arrayCopy() and Arrays.copyOf() through to conversion from existing data structures such as lists, sets and streams.

    You are now also familiar with the characteristics of multidimensional arrays in Java and know what to look out for when using them.

  • Java 22 Features (with Examples)

    Java 22 Features (with Examples)

    Java 22 has been released on March 19, 2024. You can download Java 22 here.

    The highlights of Java 22:

    In addition, the features Structured Concurrency, Scoped Values, and String Templates introduced as previews in Java 21 are going into a second preview round without any changes. And “Unnamed Classes and Instance Main Methods,” which were also introduced as a preview in Java 21, have been revised once again and renamed Implicitly Declared Classes and Instance Main Methods.

    Unnamed Variables & Patterns – JEP 456

    We often have to define variables that we don’t even need. Common examples include exceptions, lambda parameters, and patterns.

    In the following example, we do not use the exception variable e:

    try {
      int number = Integer.parseInt(string);
    } catch (NumberFormatException e) {
      System.err.println("Not a number");
    }Code language: Java (java)

    We do not use the lambda parameter k here:

    map.computeIfAbsent(key, k -> new ArrayList<>()).add(value);Code language: Java (java)

    And in the following record pattern, we do not use the pattern variable position2:

    if (object instanceof Path(Position(int x1, int y1), Position position2)) {
      System.out.printf("object is a path starting at x = %d, y = %d%n", x1, y1));
    }Code language: Java (java)

    All three code examples can be formulated more concisely in Java 22 with unnamed variables and unnamed patterns by replacing the names of the variables or the complete pattern with an underscore (_):

    We can replace the exception variable e with _:

    try {
      int number = Integer.parseInt(string);
    } catch (NumberFormatException _) {
      System.err.println("Not a number");
    }Code language: Java (java)

    We can replace the lambda parameter k with _:

    map.computeIfAbsent(key, _ -> new ArrayList<>()).add(value);Code language: Java (java)

    And we can replace the complete sub-pattern Position position2 with _:

    if (object instanceof Path(Position(int x1, int y1), _)) {
      System.out.printf("object is a path starting at x = %d, y = %d%n", x1, y1));
    }Code language: Java (java)

    Unnamed Variables & Patterns was released in Java 21 as a preview feature under the name “Unnamed Patterns and Variables” and will be finalized in Java 22 by JDK Enhancement Proposal 456 without any changes.

    You can find a more detailed description in the main article on Unnamed Variables and Patterns.

    Launch Multi-File Source-Code Programs – JEP 458

    Since Java 11, we can execute Java programs consisting of just one file directly without compiling them first.

    For example, save the following Java code once in the Hello.java file:

    public class Hello {
      public static void main(String[] args) {
        System.out.printf("Hello %s!%n", args[0]);
      }
    }Code language: Java (java)

    You do not need to compile this program with javac first, as was the case before Java 11, but you can run it directly:

    $ java Hello.java World
    Hello World!Code language: plaintext (plaintext)

    We can also define multiple classes in the Hello.java file. However, as our program grows, this quickly becomes confusing; the other classes should be defined in separate files and organized in a sensible package structure.

    However, as soon as we add further Java files, the so-called “launch single-file source code” mechanism from Java 11 no longer works.

    Let’s extract the calculation of the greeting to another class and save it in the Greetings.java file:

    public class Greetings {
      public static String greet(String name) {
        return "Hello %s!%n".formatted(name);
      }
    }Code language: Java (java)

    We let the Hello class use the Greetings class as follows:

    public class Hello {
      public static void main(String[] args) {
        System.out.println(Greetings.greet(args[0]));
      }
    }Code language: Java (java)

    If we now want to start the program directly with java, the following happens – at least until Java 21:

    $ java Hello.java World 
    Hello.java:5: error: cannot find symbol
        System.out.println(Greetings.greet(args[0]));
                           ^
      symbol:   variable Greetings
      location: class Hello
    1 error
    error: compilation failedCode language: plaintext (plaintext)

    The Greetings class was not found.

    Let’s try again with Java 22:

    $ java Hello.java World 
    Hello World!Code language: plaintext (plaintext)

    The “Launch Single-File Source Code” feature became a “Launch Multi-File Source Code Programs” feature in Java 22. We can now structure the code in any number of Java files.

    Please note the following specifics:

    • If the Greetings class were defined not only in the Greetings.java file but also in the Hello.java file, then the java command would use the class defined in the Hello.java file. It would not even search for the Greetings.java file and, therefore, would not display an error message that the class is defined twice.
    • If the Hello.java file is located in a package, for example, in eu.happycoders.java22, then it must also be located in the corresponding directory eu.happycoders.java22, and you must call the java command in the root directory as follows:
      java eu/happycoders/java22/Hello.java World
    • If you want to use code from JAR files, you can place them in a libs directory, for example, and then call the java command with the VM option --class-path 'libs/*' option.

    This feature is defined in JDK Enhancement Proposal 458. The JEP also explains how the feature works when using modules and how some exceptional cases that could theoretically occur are handled. However, for most applications, what is described here should be sufficient.

    Foreign Function & Memory API – JEP 454

    After many years of development in Project Panama and after a total of eight incubator and preview versions, the Foreign Function & Memory API in Java 22 is finally being finalized by JDK Enhancement Proposal 454.

    The Foreign Function & Memory API (or FFM API for short) makes it possible to access code outside the JVM (e.g., functions in libraries implemented in other programming languages) and native memory (i.e., memory not managed by the JVM in the heap) from Java.

    The FFM API is intended to replace the highly complicated, error-prone, and slow Java Native Interface (JNI). It promises 90% less implementation effort and four to five times the performance in a direct comparison.

    I’ll show you how the API works using a simple example – you can find a more comprehensive introduction to the topic in the main article on the Foreign Function & Memory API.

    The following code calls the strlen() function of the standard C library to determine the length of the string “Happy Coding!”:

    public class FFMTest22 {
      public static void main(String[] args) throws Throwable {
        // 1. Get a lookup object for commonly used libraries
        SymbolLookup stdlib = Linker.nativeLinker().defaultLookup();
    
        // 2. Get a handle to the "strlen" function in the C standard library
        MethodHandle strlen =
            Linker.nativeLinker()
                .downcallHandle(
                    stdlib.find("strlen").orElseThrow(),
                    FunctionDescriptor.of(ValueLayout.JAVA_LONG, ValueLayout.ADDRESS));
    
        // 3. Get a confined memory area (one that we can close explicitly)
        try (Arena offHeap = Arena.ofConfined()) {
    
          // 4. Convert the Java String to a C string and store it in off-heap memory
          MemorySegment str = offHeap.allocateFrom("Happy Coding!");
    
          // 5. Invoke the foreign function
          long len = (long) strlen.invoke(str);
          System.out.println("len = " + len);
        }
        // 6. Off-heap memory is deallocated at end of try-with-resources
      }
    }Code language: Java (java)

    The individual steps of the procedure are described by comments directly in the source code.

    The code differs from the version presented in the Java 21 article in only one detail: The Arena.allocateFrom(...) method was previously called allocateUtf8String(...).

    You can start the program with Java 22 as follows:

    $ java --enable-native-access=ALL-UNNAMED FFMTest22.java
    len = 13Code language: plaintext (plaintext)

    I don’t want to go into the details of the FFM API here. You can find a detailed description of the API and all its components in the main article on the FFM API.

    Locale-Dependent List Patterns

    With the new ListFormat (← link to Javadoc) class, lists can be formatted as enumerations, just as we would formulate them in continuous text.

    Here is an example:

    List<String> list = List.of("Earth", "Wind", "Fire");
    ListFormat formatter = ListFormat.getInstance(Locale.US, Type.STANDARD, Style.FULL);
    System.out.println(formatter.format(list));Code language: Java (java)

    The code prints the following:

    Earth, Wind, and FireCode language: plaintext (plaintext)

    If we change the locale parameter to Locale.GERMANY, we get the following result:

    Earth, Wind und FireCode language: plaintext (plaintext)

    And the setting Locale.FRANCE results in:

    Earth, Wind et FireCode language: plaintext (plaintext)

    In addition to locale, the ListFormat.getInstance(...) method has two other parameters:

    type – the type of enumeration – there are three variants here:

    • STANDARD for a listing with “and”
    • OR for a listing with “or”
    • UNIT for a list of units; this corresponds to a list with “and” or a list with only commas, depending on the locale.

    style – the style of the enumeration – here, we also have three variants:

    • FULL – the connective words such as “and” and “or” are written out in full.
    • SHORT – the connective words are written out in full or abbreviated depending on the locale.
    • NARROW – Depending on the locale, the connective words are written out or omitted; commas may also be omitted.

    The following table shows all combinations for Locale.US:

    FULLSHORTNARROW
    STANDARDEarth, Wind, and FireEarth, Wind, & FireEarth, Wind, Fire
    OREarth, Wind, or FireEarth, Wind, or FireEarth, Wind, or Fire
    UNITEarth, Wind, FireEarth, Wind, FireEarth Wind Fire

    There are several differences here: With the UNIT type, no connecting word is inserted before the last element, and the “and” becomes “&” with the SHORT style and is entirely omitted with the NARROW style.

    Let’s take a look at the Locale.GERMANY format:

    FULLSHORTNARROW
    STANDARDEarth, Wind und FireEarth, Wind und FireEarth, Wind und Fire
    OREarth, Wind oder FireEarth, Wind oder FireEarth, Wind oder Fire
    UNITEarth, Wind und FireEarth, Wind und FireEarth, Wind und Fire

    As you can see, there is no difference in German between the STANDARD and UNIT types, and the style doesn’t matter at all.

    The parameterless method ListFormat.getInstance() provides a list format for the standard locale, the type STANDARD, and the style FULL.

    No JEP exists for this change; you can find it in the bug tracker under JDK-8041488.

    New Preview Features in Java 22

    Java 22 presents three new features in the preview stage. Since preview features can still change, you should not use them in production code. You must explicitly enable them in both the javac and java commands via the VM options --enable-preview --source 22.

    Statements Before Super(…) (Preview) – JEP 447

    Have you ever been annoyed that you are not allowed to call any other code before calling a super constructor with super(...) or before calling an alternative constructor with this(...)?

    Have you ever had to write a monster like the following just to calculate or validate the argument for a super constructor?

    public class Square extends Rectangle {
      public Square(Color color, int area) {
        this(color, Math.sqrt(validateArea(area)));
      }
    
      private static double validateArea(int area) {
        if (area < 0) throw new IllegalArgumentException();
        return area;
      }
    
      private Square(Color color, double sideLength) {
        super(color, sideLength, sideLength);
      }
    }Code language: Java (java)

    It is not easy to recognize what this code does and why it does it in such a complicated way.

    Wouldn’t it be much nicer if you could just write the following?

    public class Square extends Rectangle
      public Square(Color color, int area) {
        if (area < 0) throw new IllegalArgumentException();
        double sideLength = Math.sqrt(area);
        super(color, sideLength, sideLength);
      }
    }Code language: Java (java)

    Here, you can immediately see what the constructor does (even without knowing the Rectangle parent class):

    1. It validates that area is not negative.
    2. He calculates the square’s side length as the square root of the area.
    3. It invokes the Rectangle super constructor and passes the square’s side length as the width and height.

    But until now, this has not been possible. Previously, the call to super(...) had to be the first statement in a constructor. Code for the validation of parameters and the calculation of arguments for the super(...) method had to be extracted in a complicated way to separate methods or alternative constructors, as in the first code example.

    With Java 22 (with activated preview features), you can now write the code as in the second example: with validation and calculation logic before calling super(...)!

    The preview feature “Statements before super(…)” is defined in JDK Enhancement Proposal 447.

    For a more in-depth look and specifics to consider when writing code before super(...) or this(...), see the main article on Flexible Constructor Bodies (as the feature is called as of Java 23).

    Stream Gatherers (Preview) – JEP 461

    The limited number of intermediate stream operations in the Java Stream API has been criticized for years. In addition to the existing operations filter, map, flatMap, mapMulti, distinct, sorted, peak, limit, skip, takeWhile, and dropWhile, the Java community would like to see methods such as window, fold, and many more.

    But instead of integrating all these methods into the JDK, the JDK developers decided to develop an API that allows both JDK developers and the Java community to write any intermediate stream operations.

    The new API is called “Stream Gatherers” and will be initially published as a preview feature in Java 22 via JDK Enhancement Proposal 461 .

    Together with the API, a whole series of predefined gatherers are supplied, such as the requested window and fold operations.

    With the “fixed window” operation, for example, you can group stream elements in lists of predefined sizes:

    List<String> words = List.of("the", "be", "two", "of", "and", "a", "in", "that");
    
    List<List<String>> fixedWindows = words.stream()
        .gather(Gatherers.windowFixed(3))
        .toList();
    
    System.out.println(fixedWindows);
    Code language: Java (java)

    This little demo program prints the following:

    [[the, be, two], [of, and, a], [in, that]]Code language: plaintext (plaintext)

    You can also group stream elements with the “Sliding Window” operation, but the lists created overlap and are each shifted by one element:

    List<Integer> numbers = List.of(1, 2, 3, 4, 5);
    
    List<List<Integer>> slidingWindows = numbers.stream()
        .gather(Gatherers.windowSliding(3))
        .toList();
    
    System.out.println(slidingWindows);Code language: Java (java)

    This program prints:

    [[1, 2, 3], [2, 3, 4], [3, 4, 5]]Code language: plaintext (plaintext)

    You can find out which other predefined stream gatherers Java 22 provides and how to implement such a gatherer yourself in the main article on Stream Gatherers.

    Class-File API (Preview) – JEP 457

    The Java Class-File API is an interface for reading and writing .class files, i.e., compiled Java bytecode. The new API is intended to replace the bytecode manipulation framework ASM, which is used intensively in the JDK.

    The reason for developing a custom API is that the JDK needs a library that can keep up with its six-month release cycle and that is not always one version behind. ASM can only be adapted to a new JDK version once that version has been released – but the new ASM version can then only be used in the next JDK version.

    As most Java programmers will probably never come into direct contact with the Class File API, I will not describe it in detail here.

    If the Class File API interests you, you can find all the details in JDK Enhancement Proposal 457.

    Resubmitted Preview and Incubator Features

    Five preview and incubator features are presented again in Java 22, three of them without changes compared to Java 21:

    Structured Concurrency (Second Preview) – JEP 462

    Structured concurrency enables simple coordination of concurrent tasks. It introduces a control structure with StructuredTaskScope that clearly defines the start and end of concurrent tasks, enables clean error handling, and can cancel subtasks whose results are no longer required in an orderly manner.

    For example, it is very easy to implement a race() method that starts two tasks, returns the result of the task that was completed first, and cancels the second task:

    public static <R> R race(Callable<R> task1, Callable<R> task2)
        throws InterruptedException, ExecutionException {
      try (var scope = new StructuredTaskScope.ShutdownOnSuccess<R>()) {
        scope.fork(task1);
        scope.fork(task2);
        scope.join();
        return scope.result();
      }
    }Code language: Java (java)

    Structured concurrency was introduced as a preview feature in Java 21. You can find a more detailed description and numerous other examples in the main article on Structured Concurrency.

    With JDK Enhancement Proposal 462, this feature will enter a second preview phase in Java 22 without changes to give the Java community further opportunity to test and submit feedback.

    Scoped Values (Second Preview) – JEP 464

    Scoped values allow one or more values to be passed to one or more methods without defining them as explicit parameters and passing them from one method to the next.

    The following example shows how a web server defines the logged-in user as a scoped value and processes the request in its scope:

    public class Server {
      public final static ScopedValue<User> LOGGED_IN_USER = ScopedValue.newInstance();
      . . .
      private void serve(Request request) {
        . . .
        User loggedInUser = authenticateUser(request);
        ScopedValue.where(LOGGED_IN_USER, loggedInUser)
                   .run(() -> restAdapter.processRequest(request));
        . . .
      }
    }Code language: Java (java)

    Let’s assume that the REST adapter called by the server calls a service, and this service, in turn, calls a repository. In this repository, we could then access the logged-in user as follows, for example:

    public class Repository {
      . . .
      public Data getData(UUID id) {
        Data data = findById(id);
        User loggedInUser = Server.LOGGED_IN_USER.get();
        if (loggedInUser.isAdmin()) {
          enrichDataWithAdminInfos(data);
        }
        return data;
      }
      . . .
    }Code language: Java (java)

    Scoped values were introduced together with structured concurrency in Java 21 as a preview feature. You will find a detailed introduction and a comparison with ThreadLocal variables in the main article on Scoped Values.

    Scoped values also enter a second preview round in Java 22 without any changes, as specified in JDK Enhancement Proposal 464.

    String Templates (Second Preview) – JEP 459

    Breaking News: On April 5, 2024, Gavin Bierman announced that String Templates will not be released in the form described here. There is agreement that the design needs to be changed, but there is no consensus on how it should be changed. The language developers now want to take time to revise the design. Therefore, String Templates will not be included in Java 23, not even with --enable-preview.

    With string templates, you can assemble strings at runtime using so-called string interpolation with variables and calculated values:

    int a = ...;
    int b = ...;
    
    String interpolated = STR."\{a} times \{b} = \{Math.multiplyExact(a, b)}";Code language: Java (java)

    The following replacements are made here at runtime:

    • \{a} is replaced by the value of the variable a.
    • \{b} is replaced by the value of the variable b.
    • \{Math.multiplyExact(a, b)} is replaced by the result of the call to the Math.multiplyExact(a, b) method.

    String templates were introduced as a preview feature in Java 21. You can find a more detailed description in the main article on String Templates.

    String templates will also enter a second preview round – specified by JDK Enhancement Proposal 459 – in Java 22 without any changes.

    Implicitly Declared Classes and Instance Main Methods (Second Preview) – JEP 463

    Java beginners often start with elementary programs, such as the following:

    public class HelloWorld {
      public static void main(String[] args) {
        System.out.println("Hello world!");
      }
    }Code language: Java (java)

    Despite its simplicity, this example can be highly confusing for Java newcomers, as they are generally still getting familiar with concepts such as visibility modifiers, class structures, and static methods. The unused args parameter and the heavyweight System.out.println(...) do the rest.

    Wouldn’t it be much easier if you could remove all these superfluous elements? For example like this:

    java 22 implicitly declared classes and instance main methods

    JDK Enhancement Proposal 463 makes this possible. The following code remaining after the deletion is, therefore, a valid and complete Java program:

    void main() {
      System.out.println("Hello world!");
    }Code language: Java (java)

    That allows beginners to be introduced to the language more slowly than before. Concepts that become relevant for larger programs, such as classes, the distinction between static and instance methods, visibility modifiers such as public, protected, and private, and coarse-grained structures such as packages and modules, can be taught gradually.

    Please note that this feature is still in preview mode in Java 22. If you save the program under HelloWorld.java, you can start it as follows:

    $ java --enable-preview --source 22 HelloWorld.java
    Note: Hello.java uses preview features of Java SE 22.
    Note: Recompile with -Xlint:preview for details.
    Hello world!Code language: plaintext (plaintext)

    You can read more details about the components of this feature – simple source files, implicitly declared classes and instance main methods – in the Compact Source Files and Instance Main Methods section (that is what the feature will be called from Java 25) of the article on the Java main method.

    Review

    The feature was previously introduced in Java 21 under the name Unnamed Classes and Instance Main Methods. The concept of unnamed classes has been changed for Java 22 to the much simpler concept of implicitly declared classes, and the launch protocol of the main method has been simplified.

    Vector API (Seventh Incubator) – JEP 460

    The new Vector API, which has been under development for over three years now, is entering its seventh incubator round with JDK Enhancement Proposal 460.

    The Vector API makes it possible to perform vector operations, such as the following vector addition:

    java vector addition
    Example of a vector addition

    The remarkable thing about this is that the JVM maps these calculations to the vector operations of modern CPUs in the most efficient way possible so that such calculations (up to a certain vector size) can be executed in a single CPU cycle.

    As the feature is still in the incubator stage, i.e., significant changes cannot be ruled out, I will not go into any further details in this article. I will present the new API in detail as soon as it reaches the preview stage.

    Deprecations and Deletions

    In Java 22, some methods were marked as “deprecated,” or methods previously marked as “deprecated for removal” were removed from the JDK.

    Thread.countStackFrames Has Been Removed

    The method Thread.countStackFrames() was already marked as “deprecated” in Java 1.2 in 1998. In Java 9, it was marked as “deprecated for removal,” and since Java 14, it throws an UnsupportedOperationException.

    The method has been removed in Java 22.

    The StackWalker API was introduced in Java 9 as an alternative for examining the current stack.

    No JEP exists for this change; you can find it in the bug tracker under JDK-8309196.

    The Old Core Reflection Implementation Has Been Removed

    In Java 18, the core reflection mechanism was re-implemented based on method handles. However, the old functionality was still available and could be activated via the VM option -Djdk.reflect.useDirectMethodHandle=false.

    In Java 22, the old functionality is completely removed, and the VM option mentioned above is ignored.

    No JEP exists for this change; it is registered in the bug tracker under JDK-8305104.

    Deprecations and Deletions in sun.misc.Unsafe

    This class sun.misc.Unsafe provides low-level functionalities that should only be used by the Java core library and not by other Java programs. However, this has not stopped many Java developers from using Unsafe anyway.

    Over time, public APIs have been made available in the JDK for many methods in Unsafe. These methods are first marked as “deprecated,” then as “deprecated for removal,” and finally, they are removed completely.

    In Java 22, the following methods are affected by the cleanup action:

    • Unsafe.park() and unpark() were replaced by java.util.concurrent.LockSupport.park() and unpark() in Java 5 and are marked as “deprecated for removal” in Java 22.
    • Unsafe.getLoadAverage() was replaced by java.lang.management.OperatingSystemMXBean.getSystemLoadAverage() in Java 6 and is now also marked as “deprecated for removal.”
    • Unsafe.loadFence(), storeFence(), and fullFence() have been replaced in Java 9 by methods of the same name in java.lang.invoke.VarHandle and are also marked as “deprecated for removal.”
    • Unsafe.shouldBeInitialized() and ensureClassInitialized() were replaced by java.lang.invoke.MethodHandles.Lookup.ensureInitialized() in Java 15 and marked as “deprecated for removal” in the same Java version. The methods are removed in Java 22.

    No JEPs exist for these changes; you can find them in the bug tracker under JDK-8315938 and JDK-8316160.

    Other Changes in Java 22

    In this section, you will find some changes you will unlikely encounter in your day-to-day work with Java 22. Nevertheless, it is good to know about these changes.

    Region Pinning for G1 – JEP 423

    When working with JNI (which is to be replaced in the long term by the Foreign Function & Memory API finalized in Java 22), you may use methods that return pointers to the memory address of a Java object and later release them again. One example is the GetStringCritical and ReleaseStringCritical functions.

    As long as such a pointer has not yet been released by the corresponding release method, the garbage collector must not move the object in memory, as this would invalidate the pointer.

    If a garbage collector supports so-called “pinning,” the JVM can instruct it to pin such an object, which means that the garbage collector must not move it.

    However, if the garbage collector does not support pinning, the JVM has no choice but to pause the garbage collection entirely as soon as any Get*Critical method has been called and only reactivate it once all the corresponding Release*Critical methods have been called. Depending on the behavior of an application, this can have drastic consequences for memory consumption and performance.

    The G1 garbage collector has not yet supported pinning. JDK Enhancement Proposal 423 adds the pinning functionality, i.e., as of Java 22, the garbage collector no longer needs to be paused.

    Support for Unicode 15.1

    In Java 22, Unicode support is raised to Unicode version 15.1, which increases the size of the character set by 627 mainly Chinese symbols to a total of 149,813 characters.

    This is relevant for classes such as String and Character, which must be able to handle the new characters. You can find an example of this in the article on Java 11.

    (No JEP exists this change, it is registered in the bug tracker under JDK-8296246.)

    Make LockingMode a product flag

    The VM option -XX:LockingMode introduced in Java 21 is promoted from an experimental to a productive option, i.e., it no longer needs to be combined with -XX:+UnlockExperimentalVMOptions.

    (No JEP exists this change, it is registered in the bug tracker under JDK-8315061.)

    Complete List of Changes in Java 22

    In this article, you have learned about all JDK Enhancement Proposals that have been implemented in Java 22, as well as a selection of other changes from the bug tracker. You can find all other changes in the official Java 22 Release Notes.

    Conclusion

    We can still hear the fanfare of the Java 21 launch, but Java 22 is already coming up with impressive features:

    Unnamed Variables and Patterns and Statements before super (the latter still in the preview phase) will make Java code even more expressive in the future.

    With Stream Gatherers, we can finally write any intermediate stream operations, just as we have always been able to write terminal operations with collectors.

    With Launch Multi-File Source-Code Programs, we can finally extend programs that consist of only one file without giving up the comfort of starting it without explicit compilation.

    The Foreign Function & Memory API has finally been finalized and is ready for productive use.

    Structured Concurrency, Scoped Values, String Templates, and Unnamed Classes and Instance Main Methods enter a second preview round.

    As always, various other changes round off the release. You can download the latest Java 22 release here.

    Which Java 22 feature are you most looking forward to? Which feature do you miss? Let me know via the comment function!

  • Java Foreign Function & Memory API (FFM API)

    Java Foreign Function & Memory API (FFM API)

    After many years of development as part of Project Panama, the final version of the “Foreign Function & Memory API” was released with Java 22 in March 2024.

    In this article, you will find out:

    • What is the Foreign Function & Memory API?
    • What is the difference between FFM API and JNI?
    • How do I call external code with the FFM API?
    • How do you write and read external memory with the FFM API?
    • What do the terms Arena, Memory Segment, Memory Layout and Function Descriptor mean?

    You can find the source code for the article in this GitHub repository.

    What is the Foreign Function & Memory API?

    The Foreign Function & Memory API (FFM API for short) enables Java developers to easily call functions from libraries written in other programming languages (e.g., the standard C library) from within Java.

    The FFM API also makes it possible to securely access memory from Java not managed by the JVM, i.e., memory outside the Java heap.

    I will show you how this works in the next but one section. First, you should know why the FFM API was developed in the first place.

    Difference Between the FFM API and JNI

    To access foreign code – i.e., code outside the JVM – Java developers had to use the Java Native Interface (JNI), which has existed since Java 1.1. Anyone who has ever done this knows that it is not a pleasant task:

    • JNI is cumbersome to use: You have to write a lot of Java and C boilerplate code and synchronize it with changes in the native code. Tools have been provided for this, but they only make the task marginally easier.
    • JNI is error-prone: Errors when accessing native memory can easily cause the JVM to crash.
    • JNI is extremely slow.

    The FFM API, on the other hand, is:

    • Easy to use, as you will see in the following section. According to the Panama developers, the implementation effort has been reduced by 90% compared to JNI with the modern FFM API.
    • Secure: Access to native memory is managed by so-called arenas, which ensure that memory addresses are valid and throw an exception otherwise (instead of crashing the JVM).
    • Fast: The FFM API is said to be four to five times faster than JNI.

    With the finalization of the FFM API by JDK Enhancement Proposal 454, there is no longer any reason to use JNI.

    Now we come to the exciting question: How does the FFM API work?

    Foreign Function & Memory API – Examples

    The new API is best explained using examples. I will first show you a simple example that calls the strlen() function of the standard C library. Next comes a more complex example that calls C’s qsort() function, which in turn calls a Java callback function to compare any two elements.

    I will then explain the components of the Foreign Function & Memory API in more detail.

    Example 1: strlen() Function of the Standard C Library

    Let’s start with a simple example (you can find it in the FFMTestStrlen class in the GitHub repository). The following code uses the standard C library’s strlen() method to calculate the length of the string “Happy Coding!”

    Let’s take a look at the definition of this C function:

    size_t strlen( const char* str );Code language: C++ (cpp)

    The method has one parameter:

    • str – pointer to the null-terminated string to be examined

    The return type, size_t, stands for an unsigned integer.

    I will first show you the program for calling this method. You can find a short explanation of the individual steps in the comments and a more detailed explanation below the program code.

    public class FFMTestStrlen {
      public static void main(String[] args) throws Throwable {
        // 1. Get a linker – the central element for accessing foreign functions
        Linker linker = Linker.nativeLinker();
    
        // 2. Get a lookup object for commonly used libraries
        SymbolLookup stdlib = linker.defaultLookup();
    
        // 3. Get the address of the "strlen" function in the C standard library
        MemorySegment strlenAddress = stdlib.find("strlen").orElseThrow();
    
        // 4. Define the input and output parameters of the "strlen" function
        FunctionDescriptor descriptor =
            FunctionDescriptor.of(ValueLayout.JAVA_LONG, ValueLayout.ADDRESS);
    
        // 5. Get a handle to the "strlen" function
        MethodHandle strlen = linker.downcallHandle(strlenAddress, descriptor);
    
        // 6. Get a confined memory area (one that we can close explicitly)
        try (Arena offHeap = Arena.ofConfined()) {
    
          // 7. Convert the Java String to a C string and store it in off-heap memory
          MemorySegment str = offHeap.allocateFrom("Happy Coding!");
    
          // 8. Invoke the "strlen" function
          long len = (long) strlen.invoke(str);
          System.out.println("len = " + len);
        }
        // 9. Off-heap memory is deallocated at end of try-with-resources
      }
    }
    Code language: Java (java)

    What exactly happens in this code? (The following numbering refers to the corresponding comments in the source code).

    1. Using the static method Linker.nativeLinker(), we get a linker – the central component that orchestrates access to external functions.
    2. We use Linker.defaultLookup() to obtain a SymbolLookup object, which we can use to retrieve the memory addresses of frequently used library methods. Which libraries these are depends on the operating system and CPU.
    3. Using SymbolLookup.find(...), we ask for the memory address of the “strlib” function. The method returns an Optional<MemorySegment>, which is empty if the method does not exist.
    4. We use a so-called function descriptor to specify the strlib() method’s input and output parameters. The first argument, ValueLayout.JAVA_LONG, defines the return type of the method. The second argument, ValueLayout.ADDRESS, defines the type of the first (and only) method parameter as a memory address (that of the string whose length we want to determine). When calling the native function, the function descriptor will ensure that Java types are properly converted to C types and vice versa.
    5. The method Linker.downcallHandle(...) provides us with a MethodHandle for the method at the specified memory address and the previously defined function descriptor. Method handles are nothing new – they have been around since Java 7.
    6. Arena.ofConfined() provides us with a so-called arena – an object that manages access to native memory – more on this later.
    7. Arena.allocateFrom(...) reserves a native memory block and stores in it the character sequence “Happy Coding!” in UTF-8 format.
    8. With MethodHandle.invoke(...), we call the C strlen() method; we cast the result to a long (the function descriptor defined in step 3 ensures that we can do this).
    9. At the end of the try-with-resources block, Arena.close() is called, and all memory blocks managed by this arena are released.

    The Foreign Function & Memory API elements shown here – memory segment, arena, value layout, and function descriptor – are described in more detail in the chapter FFM API Components.

    Starting the Sample Program

    If you save the source code in the FFMTestStrlen.java file, you can execute it as follows:

    $ java FFMTestStrlen.java 
    WARNING: A restricted method in java.lang.foreign.Linker has been called
    WARNING: java.lang.foreign.Linker::downcallHandle has been called by eu.happycoders.java22.ffm.FFMTestStrlen in an unnamed module
    WARNING: Use --enable-native-access=ALL-UNNAMED to avoid a warning for callers in this module
    WARNING: Restricted methods will be blocked in a future release unless native access is enabled
    
    len = 13Code language: plaintext (plaintext)

    To suppress the warning, you must start the program as follows:

    $ java --enable-native-access=ALL-UNNAMED FFMTestStrlen.java
    len = 13Code language: plaintext (plaintext)

    The string length has been computed correctly!

    Example 2: qsort() Function of the Standard C Library

    Next, let’s try a more complex example. We want to use the qsort() function to sort an array of integers. To do this, we first need to take a look at the definition of this function:

    void qsort( void *ptr, size_t count, size_t size,
                int (*comp)(const void *, const void *) );Code language: C++ (cpp)

    The method uses the following parameters:

    • ptr – pointer to the array to be sorted
    • count – number of elements in the array
    • size – size of the individual elements of the array in bytes
    • comp – comparison function that returns a negative integer value if the first argument is smaller than the second, a positive integer value if the first argument is larger than the second, and zero if the arguments are equal

    Signature of the comparison function:

    int cmp(const void *a, const void *b);Code language: C++ (cpp)

    Again, I will first show you the complete program code with comments. I will then explain the new components of this example in more detail.

    public class FFMTestQsort {
      public static void main(String[] args) throws Throwable {
        // 1. Get a linker - the central element for accessing foreign functions
        Linker linker = Linker.nativeLinker();
    
        // 2. Get a lookup object for commonly used libraries
        SymbolLookup stdlib = linker.defaultLookup();
    
        // 3. Get the address of the "qsort" function in the C standard library
        MemorySegment qsortAddress = stdlib.find("qsort").orElseThrow();
    
        // 4. Define the input and output parameters of the "qsort" function:
        FunctionDescriptor qsortDescriptor =
            FunctionDescriptor.ofVoid(
                ValueLayout.ADDRESS, 
                ValueLayout.JAVA_LONG,
                ValueLayout.JAVA_LONG,
                ValueLayout.ADDRESS);
    
        // 5. Get a method handle to the "qsort" function
        MethodHandle qsortHandle = linker.downcallHandle(qsortAddress, qsortDescriptor);
    
        // 6. Define the input and output parameters of the "compare" function:
        FunctionDescriptor compareDescriptor =
            FunctionDescriptor.of(
                ValueLayout.JAVA_INT,
                ValueLayout.ADDRESS.withTargetLayout(ValueLayout.JAVA_INT),
                ValueLayout.ADDRESS.withTargetLayout(ValueLayout.JAVA_INT));
    
        // 7. Get a handle to the "compare" function
        MethodHandle compareHandle =
            MethodHandles.lookup()
                .findStatic(FFMTestQsort.class, "compare", compareDescriptor.toMethodType());
    
        // 8. Get a confined memory area (one that we can close explicitly)
        try (Arena offHeap = Arena.ofConfined()) {
          // 9. Allocate off-heap memory and store unsorted array in it
          int[] unsorted = createUnsortedArray();
          MemorySegment arrayAddress = offHeap.allocateFrom(ValueLayout.JAVA_INT, unsorted);
    
          // 10. Allocate off-head memory for an "upcall stub" to the comparison function
          MemorySegment compareAddress =
              linker.upcallStub(compareHandle, compareDescriptor, offHeap);
    
          // 11. Invoke the qsort function
          qsortHandle.invoke(
              arrayAddress, 
              unsorted.length, 
              ValueLayout.JAVA_INT.byteSize(), 
              compareAddress);
    
          // 12. Read array from off-heap memory
          int[] sorted = arrayAddress.toArray(ValueLayout.JAVA_INT);
          System.out.println("sorted   = " + Arrays.toString(sorted));
        }
        // 13. Off-heap memory is deallocated at end of try-with-resources
      }
    
      private static int compare(MemorySegment aAddr, MemorySegment bAddr) {
        int a = aAddr.get(ValueLayout.JAVA_INT, 0);
        int b = bAddr.get(ValueLayout.JAVA_INT, 0);
        return Integer.compare(a, b);
      }
    
      private static int[] createUnsortedArray() {
        ThreadLocalRandom random = ThreadLocalRandom.current();
        int[] unsorted = IntStream.generate(() -> random.nextInt(1000)).limit(10).toArray();
        System.out.println("unsorted = " + Arrays.toString(unsorted));
        return unsorted;
      }
    }
    Code language: C++ (cpp)

    The specifics of this program compared to the previous one:

    • Step 4: For the function descriptor, we use the FunctionDescriptor.ofVoid(…) method since qsort(…) has no return value. We specify the following arguments:
      • ValueLayout.ADDRESS – for the pointer to the array to be sorted
      • ValueLayout.JAVA_LONG – for the number of elements in the array
      • ValueLayout.JAVA_LONG – for the size of the individual array elements
      • ValueLayout.ADDRESS – for the address of the comparison function
    • Step 6: Here, we define a function descriptor for the comparison function: the first argument, ValueLayout.JAVA_INT, specifies the return type; the second and third arguments, ValueLayout.ADDRESS.withTargetLayout(ValueLayout.JAVA_INT) respectively, stands for the memory addresses of two array elements to be compared.
    • Step 7: Here, we generate a method handle for the comparison function.
    • Step 9: Using the Arena.allocateFrom(…) method, we allocate off-heap memory for an integer array and store the passed array in it.
    • Step 10: With Linker.upcallStub(…), we allocate off-heap memory for a so-called “upcall stub” for the comparison function. The C function can later use this stub to call the Java callback method compare(…).
    • Step 11: We specify the address of this stub as the fourth argument when calling the qsort(…) method.

    You can find the complete program code in the FFMTestQsort class in the GitHub repository.

    Starting the Sample Program

    We start the program as follows:

    $ java --enable-native-access=ALL-UNNAMED FFMTestQsort.java
    unsorted = [696, 788, 659, 413, 933, 143, 93, 200, 736, 300]
    sorted   = [93, 143, 200, 300, 413, 659, 696, 736, 788, 933]Code language: plaintext (plaintext)

    Our program has successfully sorted ten numbers with qsort().

    FFM API Components

    Based on the examples, you have become familiar with the essential components of the Foreign Function & Memory API – arena, memory segment, function descriptor, and value layout. In this chapter, I will go into these components in more detail.

    Arena

    An arena manages access to native memory and ensures that allocated memory blocks are released again and that we do not access memory that has already been released.

    There are four types of arenas that we can create using static factory methods of the Arena class:

    • the global arena,
    • automatic arenas, managed by the garbage collector,
    • confined arenas, and
    • shared arenas.

    In the following sections, you will learn about the differences between the various types.

    Global Arena

    There is only one instance of the global arena, which is shared by all application threads. Memory segments allocated in the global arena are only released when the JVM is closed.

    You can get the global arena as follows:

    Arena arena = Arena.global();Code language: Java (java)

    You can’t close the global arena. A call to Arena.global().close() results in an UnsupportedOperationException.

    Automatic Arena

    Memory segments allocated in an automatic arena are released by the garbage collector as soon as there are no more references to the corresponding MemorySegment objects.

    An automatic arena can also be used by all application threads. You create them as follows:

    Arena arena = Arena.ofAuto();Code language: Java (java)

    Please note that each call to Arena.ofAuto() creates a new automatic arena.

    An automatic arena is closed when there are no more references to the arena itself and all memory segments allocated via it. A manual call to Arena.global().close() leads to an UnsupportedOperationException.

    Confined Arena

    An automatic arena has the disadvantage that the deallocation of the memory segments is not deterministic. It only happens when the garbage collector runs and detects that there are no more references to them.

    There are use cases in which we want to decide for ourselves when the memory allocated via an arena is released. There are so-called “confined” arenas for this purpose, as we have also used in the example application.

    The memory segments allocated by a confined arena are released when the arena is closed by calling close(). Since the Arena class is auto-closeable, we should create the arena in a try-with-resources block:

    try (Arena arena = Arena.ofConfined()) {
      . . .
    }Code language: Java (java)

    All memory segments allocated within this block are released at the end of the block by an implicit call to arena.close().

    Attempting to use an already closed arena leads to an IllegalStateException.

    A confined arena may only be used by the thread that created it.

    Shared Arena

    A shared arena combines the advantages of the confined arena (deterministic lifetime of the memory segments) with the possibility of being used from multiple threads. You create a shared arena as follows:

    Arena arena = Arena.ofShared()Code language: Java (java)

    A shared arena is closed when any thread calls its close() method. If another thread then attempts to use the arena, an IllegalStateException will be thrown.

    MemorySegment

    A MemorySegment is an object that describes a contiguous memory area. A memory segment can be allocated in various ways. The Arena class offers the following methods, among others:

    • Arena.allocateFrom(String str)
      allocates a memory segment and stores the given string in it as a UTF-8-encoded byte sequence. We have used this method in the example above.
    • allocate(long byteSize)
      allocates a memory segment of the specified size.
    • allocate(MemoryLayout elementLayout)
      allocate(MemoryLayout elementLayout, long count)
      allocate a memory segment whose size is precisely matched to a certain number (1 in the first variant, count in the second variant) of objects of a particular type (defined by elementLayout). I will describe the MemoryLayout class in the next section.

    You can find a complete overview of all methods for allocating memory segments in the JavaDoc documentation of Arena and SegmentAllocator.

    MemoryLayout

    A MemoryLayout defines the memory structure of a specific type, whereby this type can also be a combination of other types (e.g., an array or struct).

    ValueLayout

    ValueLayout is a subclass of MemoryLayout that defines how basic data types such as int, long, and double are stored in memory.

    In the example, we have used ValueLayout.JAVA_LONG to describe the primitive Java type long and ValueLayout.ADDRESS to describe a memory address of the underlying hardware.

    SequenceLayout

    A SequenceLayout, also a subclass of MemoryLayout, describes an array of a specific type, whereby this type is, in turn, described by a MemoryLayout. For example, the following code defines an array with ten Java doubles:

    MemoryLayout.sequenceLayout(10, ValueLayout.JAVA_DOUBLE);Code language: Java (java)

    And the following code defines the memory layout for an array consisting of three arrays of ten integer arrays each:

    MemoryLayout.sequenceLayout(3, 
        MemoryLayout.sequenceLayout(10, ValueLayout.JAVA_INT));

    StructLayout

    A StructLayout, also a subclass of MemoryLayout, describes the memory layout of a struct, i.e., a memory area in which different data types are stored one after the other. The elements of the structs have a name and, in turn, a MemoryLayout. The name is not stored, but it is used to access the struct’s elements.

    The following code describes the memory layout for a struct that contains a year, a month, and a day:

    MemoryLayout.structLayout(
        ValueLayout.JAVA_SHORT.withName("year"),
        ValueLayout.JAVA_SHORT.withName("month"), 
        ValueLayout.JAVA_SHORT.withName("day"));Code language: Java (java)

    A struct can also contain arrays or structs.

    FunctionDescriptor

    We use FunctionDescriptor to describe the input and output parameters of a native function. When calling a native function via a method handle, the function descriptor ensures that the transferred Java types are converted to the correct C types, and the return value is converted from a C type to the desired Java return type.

    The FunctionDescriptor class has two static methods:

    • of(MemoryLayout resLayout, MemoryLayout... argLayouts)
      creates a function descriptor with the return type defined by resLayout and the input types defined by argLayouts.
    • ofVoid(MemoryLayout... argLayouts)
      creates a function descriptor without a return type and with the input types defined by argLayouts.

    You have now familiarized yourself with the basic elements of the Foreign Function & Memory API. The following chapter explains how these elements work together to write and read memory areas.

    Writing and Reading Memory Segments

    In this chapter, you will learn how to write and read the memory area managed by MemorySegment.

    We start with a simple example with a ValueLayout, move on to a complicated example with a SequenceLayout, and finally arrive at a very complex example with a combination of SequenceLayout and StructLayout.

    MemorySegment and ValueLayout

    The following program (class FFMTestInts in the GitHub repo) creates a MemorySegment with 100 Java integers in the global arena, fills it with random numbers using MemorySegment.setAtIndex(...), and then reads out all 100 numbers with MemorySegment.getAtIndex(...):

    public class FFMTestInts {
      private static final int COUNT = 100;
    
      public static void main(String[] args) {
        MemorySegment numbers = Arena.global().allocate(ValueLayout.JAVA_INT, COUNT);
    
        ThreadLocalRandom random = ThreadLocalRandom.current();
        for (int i = 0; i < COUNT; i++) {
          numbers.setAtIndex(ValueLayout.JAVA_INT, i, random.nextInt());
        }
    
        for (int i = 0; i < COUNT; i++) {
          int number = numbers.getAtIndex(ValueLayout.JAVA_INT, i);
          System.out.println(number);
        }
      }
    }Code language: Java (java)

    Now, let’s move on to a slightly more complicated example…

    MemorySegment and SequenceLayout

    The following code (class FFMTestMultipleArrays) defines a MemoryLayout for an array of integers and allocates four such arrays.

    To write the elements of the array, a VarHandle is defined for arrayLayout. The argument PathElement.sequenceElement() indicates that we want to specify the index of the respective element for accessing the array via VarHandle. Finally, we write the array elements with VarHandle.set(...) and specify the segment, the offset (the size of the array layout multiplied by the index of the array we are writing), the index within the array, and the value to be written as arguments.

    We could read the values using an analog VarHandle.get(...) method, but I would like to show you another variant: We use MemorySegment.elements(...) to create a stream of memory segments, each of which contains an array. We load the respective array from the memory segment via MemorySegment.toArray(...).

    public class FFMTestMultipleArrays {
      private static final int ARRAY_LENGTH = 8;
      private static final int NUMBER_OF_ARRAYS = 4;
    
      public static void main(String[] args) {
        SequenceLayout arrayLayout = MemoryLayout.sequenceLayout(ARRAY_LENGTH, JAVA_INT);
        VarHandle arrayHandle = arrayLayout.varHandle(PathElement.sequenceElement());
    
        MemorySegment segment = Arena.global().allocate(arrayLayout, NUMBER_OF_ARRAYS);
    
        ThreadLocalRandom random = ThreadLocalRandom.current();
        for (int i = 0; i < NUMBER_OF_ARRAYS; i++) {
          long offset = i * arrayLayout.byteSize();
          for (int j = 0; j < ARRAY_LENGTH; j++) {
            arrayHandle.set(segment, offset, j, random.nextInt(0, 1000));
          }
        }
    
        segment
            .elements(arrayLayout)
            .forEach(
                arraySegment -> {
                  int[] array = arraySegment.toArray(JAVA_INT);
                  System.out.println(Arrays.toString(array));
                });
      }
    }
    Code language: Java (java)

    Finally, we come to a particularly complicated example…

    MemorySegment and StructLayout

    The last example (class FFMTestArrayOfStructs) defines a StructLayout, which consists of the components year, month, and day, each of type short.

    It also defines a SequenceLayout for an array of date structs.

    We then define VarHandles for the Struct elements within the array. We have to specify two path elements in each case: first, the array index and then the respective element name of the structs.

    We write the structs via VarHandle.set(...) and specify the segment, the offset 0 (as the memory segment only contains one element, namely the array of structs), the array index, and the value to be written as arguments.

    As in the previous example, we want to read the structs via MemorySegment.elements(...). This method provides a stream of memory segments, each of which contains a struct. Finally, we load the elements of the structs via three additional VarHandles for the struct (the previously created VarHandles were for structs within an array and won’t work here).

    public class FFMTestArrayOfStructs {
      private static final int ARRAY_LENGTH = 8;
    
      public static void main(String[] args) {
        StructLayout dateLayout =
            MemoryLayout.structLayout(
                ValueLayout.JAVA_SHORT.withName("year"),
                ValueLayout.JAVA_SHORT.withName("month"),
                ValueLayout.JAVA_SHORT.withName("day"));
    
        SequenceLayout positionArrayLayout = 
            MemoryLayout.sequenceLayout(ARRAY_LENGTH, dateLayout);
    
        MemorySegment segment = Arena.global().allocate(positionArrayLayout);
        writeToSegment(segment, positionArrayLayout);
        readFromSegment(segment, dateLayout);
      }
    
      private static void writeToSegment(
          MemorySegment segment, SequenceLayout positionArrayLayout) {
        VarHandle yearInArrayHandle =
            positionArrayLayout.varHandle(
                PathElement.sequenceElement(), PathElement.groupElement("year"));
        VarHandle monthInArrayHandle =
            positionArrayLayout.varHandle(
                PathElement.sequenceElement(), PathElement.groupElement("month"));
        VarHandle dayInArrayHandle =
            positionArrayLayout.varHandle(
                PathElement.sequenceElement(), PathElement.groupElement("day"));
    
        ThreadLocalRandom random = ThreadLocalRandom.current();
        for (int i = 0; i < ARRAY_LENGTH; i++) {
          yearInArrayHandle.set(segment, 0, i, (short) random.nextInt(1900, 2100));
          monthInArrayHandle.set(segment, 0, i, (short) random.nextInt(1, 13));
          dayInArrayHandle.set(segment, 0, i, (short) random.nextInt(1, 31));
        }
      }
    
      private static void readFromSegment(MemorySegment segment, StructLayout dateLayout) {
        VarHandle yearHandle = dateLayout.varHandle(PathElement.groupElement("year"));
        VarHandle monthHandle = dateLayout.varHandle(PathElement.groupElement("month"));
        VarHandle dayHandle = dateLayout.varHandle(PathElement.groupElement("day"));
    
        segment
            .elements(dateLayout)
            .forEach(
                positionSegment -> {
                  int year = (int) yearHandle.get(positionSegment, 0);
                  int month = (int) monthHandle.get(positionSegment, 0);
                  int day = (int) dayHandle.get(positionSegment, 0);
                  System.out.printf("%04d-%02d-%02d\n", year, month, day);
                });
      }
    }
    Code language: Java (java)

    VarHandle.get(…) actually has a return value of type Object, but is annotated with @MethodHandle.PolymorphicSignature. This means that the get(…) method in the example above does not first return an Integer object, which is then unboxed to an int primitive, but an int primitive directly.

    In the GitHub repository, you will find another example, FFMTestArrayOfArrays, which I do not include here as it does not introduce any new concepts.

    You have now acquired a solid basic knowledge of arenas, memory segments, memory layouts, and function descriptors. You should now be ready for your first forays into the world of native functions and native memory.

    A Brief History of the Foreign Function & Memory API

    Finally, in this section, you will find a brief review of the development steps of the FFM API.

    The so-called “Foreign Memory Access API” was presented in the incubator stage back in March 2020 in Java 14 (JEP 370).

    One year later, the “Foreign Linker API” was introduced in the incubator stage in Java 16 (JEP 389).

    In Java 17, the two APIs were merged into the “Foreign Function & Memory API,” and this unified API was presented once again as an incubator version (JEP 412).

    In Java 19, the FFM API was promoted to the preview stage (JEP 424).

    In Java 22, the API was declared ready for production and finalized in March 2024 after a long development and maturation period (JEP 454).

    Conclusion

    Most Java developers will rarely need to access native memory or execute native code. Nevertheless, it is helpful to know that this option exists, e.g., to invoke AI libraries written in other languages from Java.

    In this article, you have learned the basics. If you want to delve deeper into the matter, I recommend you study JDK Enhancement Proposal 454 and the Project Panama website.

    Are you already planning to integrate your first native library? If so, which one? Let me know via the comment function!

  • Stream Gatherers – Write Your Own Stream Operations!

    Stream Gatherers – Write Your Own Stream Operations!

    The Java Stream API was released with Java 8 in March 2014 and has given us a fundamentally new tool for processing data streams.

    However, the limited set of intermediate operations – filter, map, flatMap, mapMulti, distinct, sorted, peak, limit, skip, takeWhile, and dropWhile – means that more complex data transformations cannot be expressed by the Stream API.

    For example, common intermediate operations such as window and fold and many more are missing if you look at the feature requests of the Java community.

    Instead of implementing all these operations in the Stream interface, the JDK developers decided to develop an API that can be used in the JDK itself to implement much sought-after intermediate operations and that developers can use to build their own operations.

    This new API is called “Stream Gatherers” and was released as a preview feature via JDK Enhancement Proposal 461 in Java 22 in March 2024, precisely ten years after the introduction of the Stream API, and will be finalized by JEP 485 in Java 24.

    In this article, you will find out

    • what a gatherer is,
    • how the new Stream Gatherers API works,
    • how to implement any intermediate stream operations with it,
    • which gatherers the JDK team has already implemented and how to create these gatherers.

    Let’s start with a summary of how the Stream API works.

    Stages of the Stream API

    Java streams consist of three stages:

    1. Stream source – the source generates a stream, e.g., via IntStream.of() or Collection.stream().
    2. Intermediate operations – these transform the elements contained in the stream, e.g., the Stream methods map(), filter(), and limit().
    3. Terminal operations – these collect the elements in a list using toList(), for example, or in a map using collect(Collectors.toMap()) or count the elements using count().

    Here is a simple example – a method that counts how many words of a certain length are contained in a list of words:

    public long countLongWords(List<String> words, int minLength) {
      return words.stream()                       // ⟵ Source
          .map(String::length)                    // ⟵ Intermediate operation
          .filter(length -> length >= minLength)  // ⟵ Intermediate operation
          .count();                               // ⟵ Terminal operation
    }Code language: Java (java)

    Terminal Operation: Stream Collector

    And here is an example that converts the words into capital letters and saves them grouped by length in a map:

    public Map<Integer, List<String>> groupByLength(List<String> words) {
      return words.stream()                                 // ⟵ Source
          .map(String::toUpperCase)                         // ⟵ Intermediate operation
          .collect(Collectors.groupingBy(String::length));  // ⟵ Terminal operation
    }Code language: Java (java)

    In this second example, a so-called “collector” is passed to the terminal operation collect(). A collector is an object of a class that implements the Collector interface and defines what should happen to the stream’s elements when the stream terminates. In this case, they should be grouped by length and saved in a map.

    Intermediate Operation: Stream Gatherer

    Similarly, the Stream Gatherers API defines the Stream.gather() method and a Gatherer interface. The following code example uses the intermediate operation “Fixed Window,” which groups the words in lists into three words each:

    public List<List<String>> groupsOfThree(List<String> words) {
      return words.stream()                  // ⟵ Source
          .gather(Gatherers.windowFixed(3))  // ⟵ Intermediate operation
          .toList();                         // ⟵ Terminal operation
    }Code language: Java (java)

    For example, if we call this method as follows:

    List<String> words = List.of("the", "be", "two", "of", "and", "a", "in", "that");
    List<List<String>> groups = groupsOfThree(words);
    System.out.println(groups);Code language: Java (java)

    Then the output is:

    [[the, be, two], [of, and, a], [in, that]]Code language: plaintext (plaintext)

    (Since the stream source has provided a number of elements not divisible by three without remainder, the last group contains only two words).

    You can find out exactly how a stream gatherer is structured and how it works in the next chapter.

    Structure of a Stream Gatherer

    Before we look at the structure of a stream gatherer, it is essential to know two properties of a gatherer:

    • They can have a status so that they can transform elements differently depending on what happened before (I’ll show you why this is relevant with an example in a moment).
    • You can terminate the stream prematurely, as limit() and takeWhile() do, for example.

    Gatherers are made up of up to four components:

    • An optional Initializer” that initializes the status mentioned above.
    • An “integrator” that processes each stream element (taking the current status into account if necessary), updates the status if necessary, forwards elements to the next stage of the stream pipeline, and terminates the stream prematurely if necessary.
    • An optional “finisher” that is called after the last element has been processed in order to emit further elements to the next stage of the stream pipeline based on the status.
    • And an optional combiner,” which is used in the parallel processing of a stream to combine the statuses of transformations executed in parallel.

    In the following sections, we look at the components one by one and with many examples.

    Integrator

    The integrator is the only component that is absolutely necessary. With just one integrator, we can already develop a simple, stateless gatherer.

    In the following, I will show you how to implement the Stream.map() function with a gatherer.

    The interfaces shown have additional static or default methods that are unimportant for a basic understanding. I, therefore, omit them and write three dots in place of the omitted methods.

    Integrator is a functional interface with an integrate() method:

    @FunctionalInterface
    public interface Integrator<A, T, R> {
      boolean integrate(A state, T element, Downstream<? super R> downstream);
      . . .
    }Code language: Java (java)

    We pass three parameters to the integrate() method:

    • the (optional) state of type A,
    • the element of type T – this is the element that the previous stage of the stream pipeline sends to this stage,
    • a downstream via which the integrate() method sends elements of type R to the next stage of the stream pipeline, if necessary.

    Downstream is a functional interface with a push() method:

    @FunctionalInterface
    public interface Downstream<T> {
      boolean push(T element);
      . . .
    }Code language: Java (java)

    push() returns a boolean that indicates whether the downstream wants to have further elements sent afterwards or not. If there is a limit() somewhere in the downstream, for example, it would return false if the limit is reached.

    Integrator.integrate() also returns a boolean. In this way, this stage of the stream pipeline indicates to the previous stage whether this stage wants to process further elements. If not, the integrate() method returns false and thus sends a stop signal to the stream source, so to speak.

    We can write an integrator that calls a mapping function and emits the result of the mapping function downstream (i.e., forwards it to the next processing stage of the stream) as a lambda function as follows. As we do not need a state here, we use Void as the type for the state variable:

    Function<T, R> mapper = . . .
    
    Integrator<Void, T, R> integrator = 
        (state, element, downstream) -> {
          R mappedElement = mapper.apply(element);
          return downstream.push(mappedElement);
        };Code language: Java (java)

    In the first line of the integrator, the mapping function is applied to the incoming element from the upstream. In the second line, the result element of the mapping function is emitted downstream and the response from the downstream is returned.

    Since the integrator shown above never returns false on its own, but only when this comes from the downstream, the integrator is referred to as “greedy.” To indicate this to the stream pipeline and thus enable optimizations, we should therefore wrap the integrator with Integrator.ofGreedy().

    Integrator<Void, T, R> integrator =
        Integrator.ofGreedy(
            (state, element, downstream) -> {
              R mappedElement = mapper.apply(element);
              return downstream.push(mappedElement);
            });Code language: Java (java)

    To ultimately turn the integrator into a gatherer, we use the static Gatherer.of() method:

    Gatherer<T, Void, R> gatherer = Gatherer.of(integrator);Code language: Java (java)

    Here is a complete example with a method that creates a gatherer for a specific mapping function and a method that uses such a gatherer to map a list of strings to their lengths:

    public <T, R> Gatherer<T, Void, R> mapping(Function<T, R> mapper) {
      return Gatherer.of(
          Integrator.ofGreedy(
              (state, element, downstream) -> {
                R mappedElement = mapper.apply(element);
                return downstream.push(mappedElement);
              }));
    }
    
    public List<Integer> toLengths(List<String> words) {
      return words.stream()
          .gather(mapping(String::length))
          .toList();
    }Code language: Java (java)

    That explains the basic concept of a Gatherer.

    Initializer

    The gatherer of the previous section was stateless, i.e., the transformation of an element was independent of everything that happened before.

    In this section, I will show you how to implement the Stream.limit() function with a gatherer. To do this, the gatherer must count the processed elements and terminate the stream prematurely once the required number of elements has been reached.

    To count, we need a status, a counter. The initializer is of the type Supplier and returns the initial status. An AtomicInteger, for example, is a suitable status for counting:

    Supplier<AtomicInteger> initializer = AtomicInteger::new;Code language: Java (java)

    We implement the limiting integrator as follows:

    int maxSize = . . .
    
    Integrator<AtomicInteger, T, T> integrator = 
        (state, element, downstream) -> {
          if (state.get() < maxSize) {
            boolean result = downstream.push(element);
            state.incrementAndGet();
            return result;
          } else {
            return false;
          }
        };Code language: Java (java)

    As long as our status, the element counter, is less than maxSize, we emit the stream elements downstream, increase the counter by one and return the downstream’s response boolean. As soon as the desired number of elements is reached, we return false to indicate that the stream should be terminated.

    Incidentally, we could also write state.getAndIncrement() instead of state.get() in the if statement and omit the state.incrementAndGet(). But that would have been a little more complicated to explain.

    Note that we do not wrap this integrator with Integrator.ofGreedy(), as this integrator can also return false on its own (i.e., not only when this value comes from the downstream).

    To turn the initializer and the integrator into a gatherer, we use the Gatherer.ofSequential() method. The name of this method indicates that the returned gatherer cannot work in parallel. That is because it has a status, but no combiner (more on that later).

    Gatherer<T, AtomicInteger, T> gatherer = Gatherer.ofSequential(initializer, integrator);Code language: Java (java)

    The following listing shows a method that creates a limiting gatherer from the previously shown building blocks – though this time using state.getAndIncrement(), and a method that uses this gatherer to return the first three words of the word list:

    public <T> Gatherer<T, AtomicInteger, T> limiting(int maxSize) {
      return Gatherer.ofSequential(
          // Initializer
          AtomicInteger::new,
     
          // Integrator
          (state, element, downstream) -> {
            if (state.getAndIncrement() < maxSize) {
              return downstream.push(element);
            } else {
              return false;
            }
          });
    }
    
    public List<String> firstThreeWords(List<String> words) {
      return words.stream()
          .gather(limiting(3))
          .toList();
    }Code language: Java (java)

    Stream Gatherers are so powerful that not only map() and limit() but every existing intermediate operation of the Stream API can also be implemented as a Gatherer.

    Finisher

    To explain what we need a finisher for, in this section, I will show you how to implement the “Fixed Window” gatherer demonstrated in the introductory chapter.

    As a reminder, this gatherer should turn a stream of elements into a stream of lists, each of which contains a certain number of elements.

    Let’s start with the implementation. At some point, we’ll realize that we’re not getting anywhere  and that’s when I’ll introduce the finisher.

    First of all, our gatherer needs a status. Since we want to group elements in lists, it makes sense to use such a list as a status. We implement the initializer accordingly:

    Supplier<List<T>> initializer = ArrayList::new;Code language: Java (java)

    We implement the integrator as follows:

    Integrator<List<T>, T, List<T>> integrator =
        (state, element, downstream) -> {
          state.add(element);
          if (state.size() == windowSize) {
            boolean result = downstream.push(List.copyOf(state));
            state.clear();
            return result;
          } else {
            return true;
          }
        };Code language: Java (java)

    We append the incoming element to the status list. As soon as the list has reached the desired size, we send a copy of the list downstream and empty the list.

    However, this only works if the number of elements is a multiple of the window size. For example, if we have eight elements and a window size of three, then two lists of three elements each would be sent downstream for the first six elements. The seventh and eighth elements would also be in a list, but as this list has not yet reached the desired size, it is not emitted downstream by the integrator.

    This is where the finisher comes into play. The finisher receives the status after processing all stream elements and the downstream as input and can then emit further elements into the downstream depending on the status.

    For the fixed window operation, the finisher would look as follows:

    BiConsumer<List<T>, Downstream<List<T>>> finisher =
        (state, downstream) -> {
          if (!state.isEmpty()) {
            downstream.push(List.copyOf(state));
          }
        };Code language: Java (java)

    If the list contains elements, it is sent downstream.

    We combine the initializer, integrator, and finisher into a gatherer as follows:

    Gatherer<T, List<T>, List<T>> gatherer =
        Gatherer.ofSequential(initializer, integrator, finisher);Code language: Java (java)

    The following listing shows a method that generates a window gatherer from the components shown above, as well as a method that uses this gatherer:

    public <T> Gatherer<T, List<T>, List<T>> windowing(int windowSize) {
      return Gatherer.ofSequential(
          // Initializer
          ArrayList::new,
    
          // Gatherer
          (state, element, downstream) -> {
            state.add(element);
            if (state.size() == windowSize) {
              boolean result = downstream.push(List.copyOf(state));
              state.clear();
              return result;
            } else {
              return true;
            }
          },
    
          // Finisher
          (state, downstream) -> {
            if (!state.isEmpty()) {
              downstream.push(List.copyOf(state));
            }
          });
    }
    
    public List<List<String>> groupWords(List<String> words, int groupSize) {
      return words.stream()
          .gather(windowing(groupSize))
          .toList();
    }Code language: Java (java)

    For simplicity, in the previous example, I used an ArrayList as the state object. However, creating copies and clearing the list represents a significant overhead.

    The following solution uses a wrapper object as the state, which contains a list that is directly pushed into the downstream and then recreated. This variant is about 20% faster:

    public <T> Gatherer<T, ?, List<T>> windowing(int windowSize) {
      return Gatherer.ofSequential(
          // Initializer
          () -> new Object() { ArrayList<T> list = new ArrayList<>(); },
    
          // Gatherer
          (state, element, downstream) -> {
            state.list.add(element);
            if (state.list.size() == windowSize) {
              boolean result = downstream.push(state.list);
              state.list = new ArrayList<>();
              return result;
            } else {
              return true;
            }
          },
    
          // Finisher
          (state, downstream) -> {
            if (!state.list.isEmpty()) {
              downstream.push(List.copyOf(state.list));
            }
          });
    }Code language: Java (java)

    The state object new Object() { ArrayList<T> list = new ArrayList<>(); } is a so-called “non-denotable type” – a type that exists (which is why we can access state.list) but has no name. If we want to assign this object to a variable, this only works if we declare the variable with var:

    var state = new Object() { ArrayList<String> list = new ArrayList<>(); };
    state.list.add("element");

    If you were to replace var with Object in this code, a compiler error would occur.

    In the next section, we come to the last stream gatherer component, the combiner.

    Combiner

    Executing a stateful gatherer in parallel requires a combiner function. A combiner combines two statuses into one in the join phase of parallel stream processing:

    Processing a stream gatherer in parallel: split and join phases

    In this section, we want to implement a gatherer that emits the largest of all incoming elements, according to a given comparator, downstream.

    As status, we use an AtomicReference, which either contains no element or the largest element currently found:

    Supplier<AtomicReference<T>> initializer = AtomicReference::new;Code language: Java (java)

    The integrator saves the incoming element in the status if the status is empty or if the incoming element is larger than the element saved in the status. As the integrator always returns true, we mark it as “greedy”:

    Integrator<AtomicReference<T>, T, T> integrator =
        Integrator.ofGreedy(
            (state, element, downstream) -> {
              T bestElement = state.get();
              if (bestElement == null || comparator.compare(element, bestElement) > 0) {
                state.set(element);
              }
              return true;
            });
    Code language: Java (java)

    The finisher sends the element, if the status contains one, to the downstream:

    BiConsumer<AtomicReference<T>, Downstream<T>> finisher =
        (state, downstream) -> {
          T bestElement = state.get();
          if (bestElement != null) {
            downstream.push(bestElement);
          }
        };
    Code language: Java (java)

    And the combiner combines two statuses into one:

    • If a status is empty, it returns the other status.
    • If both statuses contain an element, it returns the status with the larger element.

    If the input stream is empty, the combiner is never called, i.e., the case in which both statuses are empty cannot occur.

    BinaryOperator<AtomicReference<T>> combiner =
        (state1, state2) -> {
          T bestElement1 = state1.get();
          T bestElement2 = state2.get();
    
          if (bestElement1 == null) {
            return state2;
          } else if (bestElement2 == null) {
            return state1;
          } else if (comparator.compare(bestElement1, bestElement2) > 0) {
            return state1;
          } else {
            return state2;
          }
        };Code language: Java (java)

    We combine the initializer, integrator, combiner, and finisher with Gatherer.of() to form a Gatherer:

    Gatherer<T, AtomicReference<T>, T> gatherer =
        Gatherer.of(initializer, integrator, combiner, finisher);Code language: Java (java)

    The following listing shows a method that generates a maximum gatherer from the building blocks shown above, as well as a method that uses this gatherer in a parallel stream to find the longest word in a list:

    public <T> Gatherer<T, AtomicReference<T>, T> maximumBy(Comparator<T> comparator) {
      return Gatherer.of(
          // Initializer
          AtomicReference::new,
    
          // Integrator
          Integrator.ofGreedy(
              (state, element, downstream) -> {
                T bestElement = state.get();
                if (bestElement == null || comparator.compare(element, bestElement) > 0) {
                  state.set(element);
                }
                return true;
              }),
    
          // Combiner
          (state1, state2) -> {
            T bestElement1 = state1.get();
            T bestElement2 = state2.get();
    
            if (bestElement1 == null) {
              return state2;
            } else if (bestElement2 == null) {
              return state1;
            } else if (comparator.compare(bestElement1, bestElement2) > 0) {
              return state1;
            } else {
              return state2;
            }
          },
    
          // Finisher
          (state, downstream) -> {
            T bestElement = state.get();
            if (bestElement != null) {
              downstream.push(bestElement);
            }
          });
    }
    
    public Optional<String> getLongest(List<String> words) {
      return words.parallelStream()
          .gather(maximumBy(Comparator.comparing(String::length)))
          .findFirst();
    }Code language: Java (java)

    We now have all the components of a stream gatherer together. However, we do not need to implement a custom gatherer for every purpose. The JDK developers have already done this for us for frequently requested intermediate transformations.

    You can find out which gatherers are already available in the next chapter.

    Stream Gatherers Available in the JDK

    You can create the predefined gatherers in the JDK using the corresponding factory methods of the Gatherers class. You already got to know one gatherer in the introductory chapter: the “Fixed Window” gatherer.

    Below, you will find an overview of the most important predefined gatherers:

    • Gatherers.fold(Supplier initial, BiFunction folder)
      combines all stream elements into a single element, similar to a collector. This is useful if a terminal operation is to be called on an element combined from the stream elements.
    • Gatherers.mapConcurrent(int maxConcurrency, Function mapper)
      executes the specified mapping function in the specified number of virtual threads simultaneously.
    • Gatherers.peek(Consumer effect)
      Gatherers.peekOrdered(Consumer effect)

      send each stream element to the Consumer before it is forwarded to the next stage of the stream pipeline. peekOrdered() ensures that a parallel stream is processed in the correct order.
    • Gatherers.scan(Supplier initial, BiFunction scanner)
      performs a so-called prefix scan.
    • Gatherers.windowFixed(int windowSize)
      Gatherers.windowSliding(int windowSize)

      group the stream elements into lists of the specified size. With the sliding variant, the lists overlap and are each shifted by one element, e.g., Stream.of(1, 2, 3, 4, 5).gather(Gatherers.windowSliding(3)).toList() generates the following list of lists: [[1, 2, 3], [2, 3, 4], [3, 4, 5]].

    Combine Gatherers

    Just as you can link several filter() and map() operations in succession, for example, you can also call up several gatherers in succession, e.g., like this:

    var result = source
        .gather(a)
        .gather(b)
        .gather(c)
        .collect();Code language: Java (java)

    If you regularly need a particular sequence of gatherers, you can also combine them into a single gatherer – in the spirit of DRY (don’t repeat yourself) – like this, for example:

    Gatherer abc = a.andThen(b).andThen(c);
    
    var result = source
        .gather(abc)
        .collect();Code language: Java (java)

    That allows you to apply a transformation sequence of any length to different streams without redundancy.

    Limitations of Stream Gatherers

    Stream Gatherers, while powerful tools, do have two significant limitations:

    • Like collectors, they are unavailable for the primitive streams IntStream, LongStream, and DoubleStream.
    • Just like collectors, they do not have access to the stream characteristics (the ones defined in the Spliterator interface). This means that they cannot be optimized based on these characteristics (e.g., the fact that the size is known or that the stream only contains distinct elements).

    Conclusion

    With stream gatherers, we can implement any intermediate stream operations, just as we have always been able to write any terminal operations with collectors. That allows us to write much more meaningful stream pipelines than before.

    Using the Gatherers class, we can retrieve ready-made gatherers various intermediate operations.

    Which is the first of the prefabricated gatherers that you will use? What functionality are you planning to implement yourself as a Gatherer? Write me a comment!

  • Flexible Constructor Bodies in Java: Executing Code Before super()

    Flexible Constructor Bodies in Java: Executing Code Before super()

    In this article, you will learn:

    • how to execute code in constructors before calling super(...) or this(...) as of Java 25 (as of Java 22 as a preview feature),
    • what restrictions exist,
    • what the prologue and epilogue of a constructor are,
    • and whether the new features also apply to records and enums.

    Let’s take a step back: Why would you want to execute code before super(...) or this(...)?

    Code in Constructors – Status Quo Before Java 25

    The following examples show workarounds that were previously required to validate or compute parameters before calling super() or this() – and also what could go wrong if the constructor of the parent class calls a method that is overwritten in the child class.

    Use Case 1: Parameter Validation

    An everyday use case is the validation of parameters of a child class. In the following example, the constructor of Rectangle first calls the constructor of the parent class, Shape, and then validates and sets the width and height:

    public class Shape {
      private final Color color;
    
      public Shape(Color color) {
        this.color = color;
      }
    }
    
    public class Rectangle extends Shape {
      private final double width;
      private final double height;
    
      public Rectangle(Color color, double width, double height) {
        super(color);
        if (width < 0 || height < 0) throw new IllegalArgumentException();
        this.width = width;
        this.height = height;
      }
    }Code language: Java (java)

    However, validating the parameters before the super constructor is called would be much more efficient. Yet, this is currently only possible with the following extremely unappealing workaround:

    public Rectangle(Color color, int width, int height) {
      super(validateParams(color, width, height));
      this.width = width;
      this.height = height;
    }
    
    private static Color validateParams(Color color, int width, int height) {
      if (width < 0 || height < 0) throw new IllegalArgumentException();
      return color;
    }Code language: Java (java)

    Use Case 2: Calculation of an Argument That Is Passed To Several Parameters

    Another use case is the calculation of values that are to be passed on to more than one superclass constructor parameter. In the following example, we want to create a square with a given area (we will ignore the fact that a static factory method with a meaningful name would be more suitable than a constructor):

    public class Square extends Rectangle {
      public Square(Color color, int area) {
        super(color, Math.sqrt(area), Math.sqrt(area));
      }
    }Code language: Java (java)

    To avoid calculating the square root of the area twice, we would have to introduce an auxiliary constructor:

    public class Square extends Rectangle {
      public Square(Color color, int area) {
        this(color, Math.sqrt(area));
      }
    
      private Square(Color color, double sideLength) {
        super(color, sideLength, sideLength);
      }
    }Code language: Java (java)

    However, this is only possible here because area is of the type int. If area were like sideLength of type double, this would not work, as we would then have two constructors with identical signatures.

    And if we wanted to make sure that area is not negative beforehand, we would have to introduce a third method, as we are not allowed to execute any other code before this(...):

    public class Square extends Rectangle {
      public Square(Color color, int area) {
        this(color, Math.sqrt(validateArea(area)));
      }
    
      private static double validateArea(int area) {
        if (area < 0) throw new IllegalArgumentException();
        return area;
      }
    
      private Square(Color color, double sideLength) {
        super(color, sideLength, sideLength);
      }
    }Code language: Java (java)

    It is hard to see what this code does.

    Use Case 3: Calling an Overridden Method in the Super Constructor

    We stay with the Shape/Rectangle example and add a printMe() method, which is called in the constructor of Shape and overwritten in Rectangle:

    public class Shape {
      private final Color color;
    
      public Shape(Color color) {
        this.color = color;
        printMe();
      }
    
      void printMe() {
        System.out.println("color = " + color);
      }
    }
    
    public class Rectangle extends Shape {
      private final double width;
      private final double height;
    
      public Rectangle(Color color, double width, double height) {
        super(color);
        if (width < 0 || height < 0) throw new IllegalArgumentException();
        this.width = width;
        this.height = height;
      }
    
      @Override
      void printMe() {
        super.printMe();
        System.out.println("width = " + width + ", height = " + height);
      }
    }Code language: Java (java)

    If we now call new Rectangle(Color.RED, 29.7, 21.0), the output is not color = RED and width = 29.7, height = 21.0, but:

    color = RED
    width = 0.0, height = 0.0Code language: plaintext (plaintext)

    The reason for this is that printMe() is called by the Shape constructor before width and height have been initialized in the Rectangle constructor. printMe() therefore still sees the default values of width and height, i.e., 0.0.

    Java Code Before super(…) and this(…)

    With JDK Enhancement Proposal 447, Java 22 introduces – for the time being as a preview feature and under the name “Statements before super(…)” – the possibility of executing code before calling super(...) or this(...).

    That means that we can now validate the area before calling this(...):

    public class Square extends Rectangle {
      public Square(Color color, int area) {
        if (area < 0) throw new IllegalArgumentException(); // ⟵ Validation before `this`
        this(color, Math.sqrt(area));
      }
    
      private Square(Color color, double sideLength) {
        super(color, sideLength, sideLength);
      }
    }Code language: Java (java)

    And we no longer need the auxiliary constructor either. We can now accommodate the parameter validation and the calculation of the side length directly in the constructor:

    public Square(Color color, int area) {
      if (area < 0) throw new IllegalArgumentException(); // ⟵ Validation before `super`
      double sideLength = Math.sqrt(area);                // ⟵ Calculation before `super`
      super(color, sideLength, sideLength);
    }Code language: Java (java)

    With this constructor, you can see at a glance what the code does.

    In Java 23, JDK Enhancement Proposal 482 introduced the possiblity to initialize fields before calling super(...). This allows us to write the Rectangle class in the following way:

    public class Rectangle extends Shape {
      private final double width;
      private final double height;
    
      public Rectangle(Color color, double width, double height) {
        this.width = width;    // ⟵ Field initialization before `super`
        this.height = height;  // ⟵ Field initialization before `super`
        super(color);
      }
    
      . . .
    }Code language: Java (java)

    When calling new Rectangle(Color.RED, 29.7, 21.0), the printMe() method invoked by the constructor now prints the expected result:

    color = RED
    width = 29.7, height = 21.0Code language: plaintext (plaintext)

    Through JDK Enhancement Proposal 513, Flexible Constructor Bodies were finalized in Java 25.

    Constructor Prologue and Epilogue

    The block before super(...) or this(...) is called the “prologue”.

    Code after calling super(...) or this(...) or code in a constructor without calling super(...) or this(...) is called the “epilogue”.

    Restrictions

    In the prologue, the code may initialize fields but must not read any fields of the class and must not call any non-static methods of the class. It must also not create instances of non-static inner classes, as these would then have a reference to the potentially uninitialized parent object.

    The prologue of the constructor of an inner class, on the other hand, can access fields and methods of the outer class without restriction.

    Records and Enums

    Records and enums cannot have a parent class, but their constructors can call alternative constructors with this(...).

    Code that complies with the abovementioned restrictions may now also be executed before that.

    Conclusion

    Calling code before super(...) or this(...) allows fields to be initialized and parameters to be validated or calculated before the super constructor or an alternative constructor is called. That makes the code safer and enables much more expressive code than the workarounds we had to construct in the past.

    Flexible Constructor Bodies are still in preview stage in Java 24 and must be activated as follows:

    --enable-preview --source 24

    Flexible Constructor Bodies were finalized in Java 25.

    Have you also had to implement complicated workarounds, and what do you think of the new feature? Let me know via the comment function!

  • String Templates in Java

    String Templates in Java

    Breaking News: On April 5, 2024, Gavin Bierman announced that String Templates will not be released in the form described here. There is agreement that the design needs to be changed, but there is no consensus on how it should be changed. The language developers now want to take time to revise the design. Therefore, String Templates will not be included in Java 23, not even with --enable-preview.

    In this article, you will find out:

    • How do string templates simplify the composition of strings from text, variables, and computed values?
    • What is a template processor?
    • Which template processors are available?

    String templates were introduced as a preview feature in Java 21 as part of Project Amber. In Java 22, they were sent to a second preview round without any changes.

    Status Quo of Java String Concatenation

    We have several ways to compose strings at runtime using variables and calculated values. The most common ones are the following:

    int a = ...;
    int b = ...;
    
    String concatenated = a + " times " + b + " = " + a * b;
    String format       = String.format("%d times %d = %d", a, b, a * b);
    String formatted    = "%d times %d = %d".formatted(a, b, a * b);Code language: Java (java)

    Often we also use a StringBuilder, less often MessageFormat. None of the available variants is particularly good to read.

    String Interpolation With String Templates

    Almost every modern programming language offers the possibility of string interpolation, i.e., the possibility of evaluating placeholders in a string and replacing them with the result of this evaluation.

    Precisely this (and even more, see below) is enabled by “string templates” introduced by JDK Enhancement Proposal 430.

    With string templates, we can rewrite the example from above as follows:

    int a = ...;
    int b = ...;
    
    String interpolated = STR."\{a} times \{b} = \{a * b}";Code language: Java (java)

    The placeholders may not only contain variables and arithmetic expressions, but they may also contain any Java expression, e.g., a static method call:

    String interpolated = STR."\{a} times \{b} = \{Math.multiplyExact(a, b)}";Code language: Java (java)

    The placeholder may also contain quotes, and for the sake of clarity, you can split it over multiple lines and add comments (at this point, I need to turn off the WordPress syntax highlighting plugin, as the following code will overwhelm it):

    String dateMessage = STR."Today's date: \{
            LocalDate.now().format(
                      // We could also use DateTimeFormatter.ISO_DATE
                      DateTimeFormatter.ofPattern("yyyy-MM-dd")
            )}";Code language: plaintext (plaintext)

    We can use string templates also with multi-line strings:

    int    httpStatus   = ...;
    String errorMessage = ...;
    
    String json = STR."""
        {
          "httpStatus": \{httpStatus},
          "errorMessage": "\{errorMessage}"
        }""";Code language: plaintext (plaintext)

    In case you were wondering what STR. means in front of the strings, you’ll find the answer in the next section.

    String Template Processor

    STR is the name of a so-called template processor (more precisely: a constant of type StringTemplate.Processor automatically imported into every Java file). A template processor defines how template text and placeholders are combined. In the case of the STR template processor – as described above – the Java expressions in the placeholders are resolved, and the placeholders are replaced by the resulting values.

    FMT Template Processor

    Another template processor is FMT. It evaluates formatting information that precedes the placeholders – as we know it from String.format().

    Here again, our multiplication example with floating point numbers rounded to two decimal places using the FMT template processor:

    double a = ...;
    double b = ...;
    
    String interpolated = FMT."%.2f\{a} times %.2f\{b} = %.2f\{a * b}";Code language: Java (java)

    SQL Template Processor

    A template processor does not necessarily have to return a String. For example, one could implement a template processor that compiles SQL commands and returns an SQL statement – and at the same time protects against injection attacks:

    String searchQuery = ...
    Statement statement = SQL."""
        SELECT * FROM User u
        WHERE u.userName LIKE '%\{searchQuery}%'""";Code language: Java (java)

    If you want to go deeper into the matter, I recommend reading the JDK Enhancement Proposal. It will also teach you how to write your own template processor and that a template processor does not always have to return a string.

  • Unnamed Variables and Patterns in Java

    Unnamed Variables and Patterns in Java

    In this article, you will learn:

    • What is an unnamed variable, and what purpose does it serve?
    • What are unnamed patterns and unnamed pattern variables, and what purpose do they serve?
    • How can you write switch expressions more concisely with unnamed pattern variables?

    Unnamed variables and patterns were introduced as a preview feature in Java 21 as part of Project Amber. They were finalized in Java 22.

    Unnamed Variables

    It often happens that we have to define a variable that we don’t need later. Here are two examples that probably most of you know:

    Example 1: Exceptions – here, we don’t use e:

    try {
      int number = Integer.parseInt(string);
    } catch (NumberFormatException e) {
      System.err.println("Not a number");
    }Code language: Java (java)

    Example 2: Map.computeIfAbsent() – this time, we don’t use k:

    map.computeIfAbsent(key, k -> new ArrayList<>()).add(value);Code language: Java (java)

    As of Java 21, we no longer have to name such variables but may (as has long been common in other programming languages) use the underscore (_) instead:

    Here is the exception example with an unnamed variable:

    try {
      int number = Integer.parseInt(string);
    } catch (NumberFormatException _) {
      System.err.println("Not a number");
    }Code language: Java (java)

    And the computeIfAbsent() example:

    map.computeIfAbsent(key, _ -> new ArrayList<>()).add(value);Code language: Java (java)

    With an exception, one may argue about the pros and cons of an unnamed variable. We are used to naming an exception with “e” or letting our IDE do that automatically.

    With computeIfAbsent(), on the other hand, I was always worried about how to name the variable I didn’t need. Sometimes it became a k (for “key”), sometimes an ignored, and sometimes a __ (double underscore²). This is where the unnamed variable is a big help.

    ² The single underscore is no longer allowed since Java 9 in preparation for this very feature.

    Unnamed Patterns and Pattern Variables

    By the way, the feature is not called “Unnamed Variables,” but “Unnamed Patterns and Variables” and thus has a lot more to offer – namely in combination with the features Record Patterns and Pattern Matching for Switch, which have been finalized in this Java version.

    In the following, I have slightly modified the example from the “Record Patterns” section. The variable y is no longer used in this variant:

    if (object instanceof Position(int x, int y)) {
      System.out.println("object is a position, x = " + x);
    }Code language: Java (java)

    Again, we can replace y with an underscore:

    if (object instanceof Position(int x, int _)) {
      System.out.println("object is a position, x = " + x);
    }Code language: Java (java)

    This is called an “unnamed pattern variable.”

    We can even go one step further and replace the entire partial pattern int y with an underscore:

    if (object instanceof Position(int x, _)) {
      System.out.println("object is a position, x = " + x);
    }Code language: Java (java)

    This is called an “unnamed pattern.”

    In the previous example, this doesn’t have much effect; however, using nested patterns, it can save a lot of space. Here is a modified example from the “Record Patterns” section. Here we use only the variables x1 and y1, while x2 and y2 are unused:

    if (object instanceof Path(Position(int x1, int y1), Position(int x2, int y2))) {
      System.out.printf("object is a path starting at x = %d, y = %d%n", x1, y1));
    }Code language: Java (java)

    Here we can replace the complete second Position pattern with the underscore:

    if (object instanceof Path(Position(int x1, int y1), _)) {
      System.out.printf("object is a path starting at x = %d, y = %d%n", x1, y1));
    }Code language: Java (java)

    That, after all, represents a significant improvement.

    Unnamed Pattern Variables and Pattern Matching for Switch

    Here is an example with unused variables in Pattern Matching for Switch:

    switch (obj) {
      case Byte    b -> System.out.println("Integer number");
      case Short   s -> System.out.println("Integer number");
      case Integer i -> System.out.println("Integer number");
      case Long    l -> System.out.println("Integer number");
    
      case Float  f -> System.out.println("Floating point number");
      case Double d -> System.out.println("Floating point number");
    
      default -> System.out.println("Not a number");
    }Code language: Java (java)

    Again, we may replace all variable names with underscores:

    switch (obj) {
      case Byte    _ -> System.out.println("Integer number");
      case Short   _ -> System.out.println("Integer number");
      case Integer _ -> System.out.println("Integer number");
      case Long    _ -> System.out.println("Integer number");
    
      case Float  _ -> System.out.println("Floating point number");
      case Double _ -> System.out.println("Floating point number");
    
      default -> System.out.println("Not a number");
    }Code language: Java (java)

    We can even go one step further and combine all cases with the same actions:

    switch (obj) {
      case Byte _, Short _, Integer _, Long _ -> System.out.println("Integer number");
      case Float _, Double _                  -> System.out.println("Floating point number");
    
      default -> System.out.println("Not a number");
    }Code language: Java (java)

    And this is – besides the more concise notation – another significant advantage of the unnamed variable! With named variables, this would not have been possible. The following code is not valid:

    switch (obj) {
      // Not allowed!          
      case Byte b, Short s, Integer i, Long l -> System.out.println("Integer number");
      case Float f, Double d                  -> System.out.println("Floating point number");
    
      default -> System.out.println("Not a number");
    }Code language: Java (java)

    This code results in the following compiler error:

    error: illegal fall-through from a pattern
      case Byte b, Short s, Integer i, Long l -> System.out.println("Integer number");
                   ^Code language: plaintext (plaintext)

    The crucial difference is that named variables can be accessed from subsequent code, while unnamed variables may not be accessed. Since the compiler does not know which pattern will match at runtime, it also does not know which of the variables b, s, i, and l may be accessed. Therefore, it allows only one named variable per case but any number of unnamed variables.

    Unnamed Patterns and Variables are defined in JDK Enhancement Proposal 456. In the JEP, you can find some more examples of using unnamed variables.

  • Structured Concurrency in Java with StructuredTaskScope

    Structured Concurrency in Java with StructuredTaskScope

    Structured Concurrency was developed in Project Loom, along with Virtual Threads and Scoped Values. Structured Concurrency has been included in the JDK as an incubator feature since since Java 19 and as a preview feature since Java 21.

    In Java 25, the StructuredTaskScope API will be fundamentally revised by JDK Enhancement Proposal 505. Since Java 25 has not yet been released and you may want to try out Structured Concurrency with an older version of Java, I have provided two versions of all code examples: one for Java 21–24 and one for Java 25.

    In this article, you will learn:

    • Why do we need Structured Concurrency?
    • What is Structured Concurrency?
    • How is StructuredTaskScope used?
    • What is a policy? What policies are there, and how can we write our own policy?
    • What is the advantage of Structured Concurrency?

    You can find a companion demo application (with Java 21 and Java 25 code) in this GitHub repository.

    Let’s start by looking at how we have implemented concurrent subtasks so far.

    Why Do We Need Structured Concurrency?

    Suppose a task consists of various – mainly blocking – subtasks that can be done concurrently (e.g., accessing data from a database or calling a remote API).

    We could implement this using the Java executable framework, which could look like this, for example (InvoiceGenerator3_ThreadPool class in the demo application):

    Invoice createInvoice(int orderId, int customerId, String language)
        throws InterruptedException, ExecutionException {
      Future<Order> orderFuture = 
          executor.submit(() -> orderService.getOrder(orderId));
    
      Future<Customer> customerFuture =
          executor.submit(() -> customerService.getCustomer(customerId));
    
      Future<InvoiceTemplate> invoiceTemplateFuture =
          executor.submit(() -> invoiceTemplateService.getTemplate(language));
    
      Order order = orderFuture.get();
      Customer customer = customerFuture.get();
      InvoiceTemplate invoiceTemplate = invoiceTemplateFuture.get();
    
      return Invoice.generate(order, customer, invoiceTemplate);
    }Code language: Java (java)

    We pass the three subtasks to the Executor and wait for the partial results. The happy path is quickly implemented. But how do we handle exceptions?

    • If an error occurs in one subtask – how can we cancel the others? In the example above, if loadOrderFromOrderService(…) fails, then orderFuture.get() throws an exception, the createInvoice(…) method ends, and we may have two orphan threads still running.
    • How can we abort the subtasks when the parent task (“create invoice”) is cancelled – or when the complete application is shut down?
    • How can we – in an alternative use case – cancel the remaining subtasks when only the result of a single subtask is needed?

    Everything is doable but requires exceptionally complex, hard-to-maintain code (you can find two examples in the GitHub repository: InvoiceGenerator2b_CompletableFutureCancelling and InvoiceGenerator4b_NewVirtualThreadPerTaskCancelling).

    And what if we want to debug code of this kind? A thread dump, for example, would give us a bunch of threads named “pool-X-thread-Y” – but we wouldn’t know which pool thread belongs to which calling threads since all calling threads share the executor’s thread pool.

    What is Unstructured Concurrency?

    “Unstructured concurrency” means that our tasks run in a web of tangled threads whose start and end is hard to see in the code. Clean error handling is usually not present, and orphaned threads often occur when a control structure (in the example above: the createInvoice(…) method) ends:

    Unstructured Concurrency
    Unstructured Concurrency

    What is Structured Concurrency?

    Introduced in Java 19 as an incubator feature and in Java 21 as a preview feature – and revised again in Java 25 – Structured Concurrency is a concept that significantly improves the implementation, readability, and maintainability of code for dividing a task into subtasks and processing them concurrently.

    For this purpose, it introduces a new control structure – the StructuredTaskScope class – that

    • defines a clear scope at the beginning of which the subtasks’ threads start and at the end of which the subtasks’ threads end,
    • that allows clean error handling,
    • and that allows a clean cancellation of subtasks whose results are no longer needed.

    I will show you in the following sections, using several examples, what this means exactly.

    StructuredTaskScope Example

    We can implement Structured Concurrency using the StructuredTaskScope class. Using this class, we can rewrite the example as follows.

    StructuredTaskScope Example – Java 21–24

    Class InvoiceGenerator5_StructuredTaskScope in the java-21 branch of the demo application:

    Invoice createInvoice(int orderId, int customerId, String language)
        throws InterruptedException {
      try (var scope = new StructuredTaskScope<>()) {
        Subtask<Order> orderSubtask = 
            scope.fork(() -> orderService.getOrder(orderId));
    
        Subtask<Customer> customerSubtask = 
            scope.fork(() -> customerService.getCustomer(customerId));
    
        Subtask<InvoiceTemplate> invoiceTemplateSubtask =
            scope.fork(() -> invoiceTemplateService.getTemplate(language));
    
        scope.join();
    
        Order order = orderSubtask.get();
        Customer customer = customerSubtask.get();
        InvoiceTemplate template = invoiceTemplateSubtask.get();
    
        return Invoice.generate(order, customer, template);
      }
    }Code language: Java (java)

    A common explanation for all Java versions follows below the Java 25 example.

    StructuredTaskScope Example – Java 25

    Class InvoiceGenerator5_StructuredTaskScope in the main branch of the demo application:

    Invoice createInvoice(int orderId, int customerId, String language)
        throws InterruptedException {
      try (var scope = StructuredTaskScope.open()) {
        Subtask<Order> orderSubtask = 
            scope.fork(() -> orderService.getOrder(orderId));
    
        Subtask<Customer> customerSubtask = 
            scope.fork(() -> customerService.getCustomer(customerId));
    
        Subtask<InvoiceTemplate> invoiceTemplateSubtask =
            scope.fork(() -> invoiceTemplateService.getTemplate(language));
    
        scope.join();
    
        Order order = orderSubtask.get();
        Customer customer = customerSubtask.get();
        InvoiceTemplate template = invoiceTemplateSubtask.get();
    
        return Invoice.generate(order, customer, template);
      }
    }Code language: Java (java)

    In this simple example, the only difference is how we open a StructuredTaskScope: before Java 25 with new StructuredTaskScope<>() and from Java 25 onwards with StructuredTaskScope.open().

    Explanations for all Java Versions

    Compared to the unstructured concurrency example, we replace the ExecutorService in the scope of the class with a StructuredTaskScope located in the method’s scope – and executor.submit() with scope.fork().

    Using scope.join(), we wait for all tasks to be completed. This eliminates the risk of orphaned threads.

    After that, we can read the results of the three tasks via Subtask.get().

    StructuredTaskScope Error Handling – Java 21–24

    If an exception occurred in one of the tasks, Subtask.get() throws an IllegalStateException. Therefore it is better to query the state of a subtask with state() before calling get():

    Order order;
    if (orderSubtask.state() == Subtask.State.SUCCESS) {
      order = orderSubtask.get();
    } else {
      // Handle error
    }Code language: Java (java)

    StructuredTaskScope Error Handling – Java 25

    If an exception occurs in one of the subtasks in Java 25, that exception will be thrown by scope.join() – wrapped in a StructuredTaskScope.FailedException. It is therefore not necessary to check the subtask status after calling scope.join().

    Running the Example Code

    If you want to try the example yourself: you must explicitly enable preview features, with --enable-preview --source <used Java version>. You can find detailed instructions in the README of the demo application.

    StructuredTaskScope Policies

    A so-called policy defines what happens when a subtask is completed or throws an exception. A policy can also define a return value for scope.join() – more on this later.

    Policies in Java 21–24

    Before Java 25, a scope opened by new StructuredTaskScope() had the policy of waiting for all subtasks to be completed successfully or with an exception.

    However, if an exception occurs in one of the tasks in our example, we cannot do anything with the results of the other two tasks – so why wait for them?

    Java 21–24: “Shutdown on Failure” Policy

    Using the “Shutdown on Failure” policy in Java 21–24, we can specify that the occurrence of an exception in one task will cause all other tasks to be terminated.

    We can use the “Shutdown on Failure” policy as follows (you can find the code in the InvoiceGenerator6_ShutdownOnFailure class in the java-21 branch of the GitHub repo):

    Invoice createInvoice(int orderId, int customerId, String language)
        throws InterruptedException, ExecutionException {
      try (var scope = new StructuredTaskScope.ShutdownOnFailure()) {
        Subtask<Order> orderSubtask = 
            scope.fork(() -> orderService.getOrder(orderId));
    
        Subtask<Customer> customerSubtask = 
            scope.fork(() -> customerService.getCustomer(customerId));
    
        Subtask<InvoiceTemplate> invoiceTemplateSubtask =
            scope.fork(() -> invoiceTemplateService.getTemplate(language));
    
        scope.join();
        scope.throwIfFailed();
    
        Order order = orderSubtask.get();
        Customer customer = customerSubtask.get();
        InvoiceTemplate template = invoiceTemplateSubtask.get();
    
        return Invoice.generate(order, customer, template);
      }
    }Code language: Java (java)

    Compared to the previous example, I had to change only two things:

    • I replaced new StructuredTaskScope<>() with new StructuredTaskScope.ShutdownOnFailure() in the third line.
    • I added the command scope.throwIfFailed() after scope.join().

    Now, if an exception occurs in any of the three tasks, all other subtasks are immediately interrupted, scope.join() returns, and scope.throwIfFailed() throws the failed subtask’s exception embedded in an ExecutionException.

    In the sample code, the three subtasks throw an exception with some probability. If you run the program a few times, you will see how an exception in one task leads to an interruption in the other tasks and a termination of the program:

    $ java -cp target/classes --enable-preview eu.happycoders.structuredconcurrency/demo1_invoice/InvoiceGenerator6_ShutdownOnFailure
    [Thread[#1,main,5,main]] Forking tasks
    [Thread[#1,main,5,main]] Waiting for all tasks to finish or one to fail
    [VirtualThread[#31]/runnable@ForkJoinPool-1-worker-2] Loading customer
    [VirtualThread[#29]/runnable@ForkJoinPool-1-worker-3] Loading order
    [VirtualThread[#35]/runnable@ForkJoinPool-1-worker-1] Loading template
    [VirtualThread[#31]/runnable@ForkJoinPool-1-worker-1] Finished loading customer
    [VirtualThread[#29]/runnable@ForkJoinPool-1-worker-2] Error loading order
    [VirtualThread[#35]/runnable@ForkJoinPool-1-worker-1] Template loading was interrupted
    Exception in thread "main" java.util.concurrent.ExecutionException: java.lang.RuntimeException: Error loading order
            [...]Code language: plaintext (plaintext)

    By the way, you can also see from this output that all tasks are executed in virtual threads.

    Policies in Java 25

    A scope opened in Java 25 with StructuredTaskScope.open() has the policy of immediately canceling all other subtasks when an exception occurs in one of the subtasks and throwing a FailedException via scope.join() with the exception that occurred in the subtask as the “cause”.

    So “Shutdown on Failure” by default.

    A call to scope.throwIfFailed() as in Java 21–24 is not necessary – the throwIfFailed() method no longer exists in Java 25.

    In Java 25, the program output when an error occurs looks like this, for example:

    [Thread[#3,main,5,main]] Forking tasks
    [VirtualThread[#37]/runnable@ForkJoinPool-1-worker-1] Loading order
    [VirtualThread[#39]/runnable@ForkJoinPool-1-worker-4] Loading customer
    [Thread[#3,main,5,main]] Waiting for all tasks to finish
    [VirtualThread[#44]/runnable@ForkJoinPool-1-worker-3] Loading template
    [VirtualThread[#39]/runnable@ForkJoinPool-1-worker-3] Error loading customer
    [VirtualThread[#37]/runnable@ForkJoinPool-1-worker-1] Order loading was interrupted
    [VirtualThread[#44]/runnable@ForkJoinPool-1-worker-1] Template loading was interrupted
    Exception in thread "main" java.util.concurrent.StructuredTaskScope$FailedException: java.lang.RuntimeException: Error loading customerCode language: plaintext (plaintext)

    As you can see, instead of a generic ExecutionException as in Java 21-24, we get a StructuredTaskScope-specific FailedException from Java 25 onwards.

    Java 21–24: “Shutdown on Success” Policy

    An alternative policy is “Shutdown on Success”. With this policy, the scope is shut down as soon as a subtask is successful. The other subtasks are then canceled.

    In Java 21–24, you create a scope with the “Shutdown on Success” policy using new StructuredTaskScope.ShutdownOnSuccess(). You can read the result of the one successful subtask with scope.result().

    Here’s an example of this – with a different use case: We want to verify a customer address using multiple external APIs at the same time, and we only want to use the first result (you can find the code in the AddressVerification2_ShutdownOnSuccess class in the java-21 branch of the GitHub repo):

    AddressVerificationResponse verifyAddress(Address address)
        throws InterruptedException, ExecutionException {
      try (var scope = new ShutdownOnSuccess<AddressVerificationResponse>()) {
        scope.fork(() -> verificationService.verifyViaServiceA(address));
        scope.fork(() -> verificationService.verifyViaServiceB(address));
        scope.fork(() -> verificationService.verifyViaServiceC(address));
    
        scope.join();
    
        return scope.result();
      }
    }Code language: Java (java)

    Here scope.join() waits for the first subtask to be successfully completed – then scope.result() returns its result. If, contrary to expectations, all three invocations of the verifyViaServiceX() method threw an exception, scope.result() will rethrow the first of them, embedded in an ExecutionException.

    If you run the sample code, you will see how the first successful subtask produces a result, and the other tasks get aborted:

    $ java -cp target/classes --enable-preview eu.happycoders.structuredconcurrency/demo2_address/AddressVerification2_ShutdownOnSuccess
    [Thread[#1,main,5,main]] Forking tasks
    [Thread[#1,main,5,main]] Waiting for one task to finish
    [VirtualThread[#31]/runnable@ForkJoinPool-1-worker-2] Verifying address via service B
    [VirtualThread[#29]/runnable@ForkJoinPool-1-worker-3] Verifying address via service A
    [VirtualThread[#34]/runnable@ForkJoinPool-1-worker-1] Verifying address via service C
    [VirtualThread[#34]/runnable@ForkJoinPool-1-worker-1] Finished loading address via service C
    [Thread[#1,main,5,main]] Retrieving result
    [VirtualThread[#31]/runnable@ForkJoinPool-1-worker-3] Verifying address via service B was interrupted
    [VirtualThread[#29]/runnable@ForkJoinPool-1-worker-2] Verifying address via service A was interruptedCode language: plaintext (plaintext)

    Note that the result() method is only available on ShutdownOnSuccess, and the throwIfFailed() method is only available on ShutdownOnFailure.

    Java 25: “Any Successful Result”-Policy

    In Java 25, the corresponding policy is called Any Successful Result”. With this policy, the scope is also closed as soon as the first subtask was successful. The other subtasks are terminated.

    In Java 25, a policy is no longer implemented by extending the StructuredTaskScope class, as was the case in Java 21–24. From Java 25 onwards, policies are implemented using so-called joiners.

    A joiner for the “Any Successful Result” policy is created via the static factory method Joiner.anySuccessfulResultOrThrow().

    The following code shows how the address verification example is implemented with Java 25 (AddressVerification2_AnySuccessfulResult class in the main branch of the GitHub repo):

    AddressVerificationResponse verifyAddress(Address address) throws InterruptedException {
      try (var scope =
          StructuredTaskScope.open(
              Joiner.<AddressVerificationResponse>anySuccessfulResultOrThrow())) {
        log("Forking tasks");
    
        scope.fork(() -> verificationService.verifyViaServiceA(address));
        scope.fork(() -> verificationService.verifyViaServiceB(address));
        scope.fork(() -> verificationService.verifyViaServiceC(address));
    
        log("Waiting for one task to finish");
    
        return scope.join();
      }
    }Code language: Java (java)

    Changes compared to Java 21–24:

    • The scope is opened with StructuredTaskScope.open(Joiner.anySuccessfulResultOrThrow())) – no longer with new StructuredTaskScope.ShutdownOnSuccess().
    • The scope.result() method was removed – instead, scope.join() returns the result.
      If all three subtasks fail, scope.join() throws a FailedException instead of an ExecutionException.

    Java 25: All Policies

    In Java 21–24 there are only the “Shutdown on Failure” and “Shutdown on Success” policies shown above.

    There are significantly more policies to choose from in Java 25:

    JoinerDescription
    without a joiner

    or

    Joiner.awaitAllSuccessfulOrThrow()
    An exception in a subtask immediately leads to the scope being closed; scope.join() throws the exception wrapped in a FailedException.

    If all subtasks are successfully completed, scope.join() ends without an exception and returns null. The results of the subtasks must be read from the Subtask objects returned by scope.fork().

    Corresponds to the “Shutdown on Failure” policy in Java 21–24.
    Joiner.awaitAll()scope.join() waits for all subtasks to be completed – whether successful or not.

    scope.join() always returns null; the results of the subtasks must be read from the Subtask objects returned by scope.fork().

    Corresponds to the standard behavior in Java 21–24.
    Joiner.anySuccessfulResultOrThrow()scope.join() returns the result of the first successful subtask; other subtasks are canceled. If all subtasks fail, scope.join() throws the exception of the first failed subtask wrapped in a FailedException.

    Corresponds to the “Shutdown on Success” policy in Java 21–24.
    Joiner.allSuccessfulOrThrow()Corresponds to the basic functionality without joiner or with Joiner.awaitAllSuccessfulOrThrow() – with the difference that scope.join() returns a stream of all subtasks if successful.

    An exception in a subtask immediately leads to the scope being closed; scope.join() throws the exception wrapped in a FailedException.

    If all subtasks are successfully completed, scope.join() ends without an exception and returns a stream of all subtasks.
    Joiner.allUntil(Predicate isDone)scope.join() waits for either all subtasks to be finished – whether successful or not – or for the passed predicate to match at least one finished subtask.

    Returns a stream of subtasks like Joiner.allSuccessfulOrThrow().

    How to Write a Custom StructuredTaskScope Policy

    If none of the predefined policies are suitable for your application, you can write your own policy with relatively little effort.

    Suppose we want to check the availability of a product from multiple suppliers, and we don’t want to use the first result, but the one with the fastest availability. We want to propagate failed requests only if the requests failed for all suppliers.

    That is surprisingly simple to realize – and in a way that makes it reusable for other deployment scenarios.

    Custom Policies in Java 21–24

    Here is the policy for Java 21–24 (BestResultScope class in the java-21 branch of the GitHub repo). This class takes a Comparator as a constructor parameter, which we will use later to define the best result as the fastest availability:

    BestResultScope also extends the StructuredTaskScope class, overwrites its handleComplete(…) method and adds a resultOrElseThrow() method:

    public class BestResultScope<T> extends StructuredTaskScope<T> {
    
      private final Comparator<T> comparator;
    
      private T bestResult;
      private final List<Throwable> exceptions = 
          Collections.synchronizedList(new ArrayList<>());
    
      public BestResultScope(Comparator<T> comparator) {
        this.comparator = comparator;
      }
    
      @Override
      protected void handleComplete(Subtask<? extends T> subtask) {
        switch (subtask.state()) {
          case UNAVAILABLE -> {
            // Ignore
          }
          case SUCCESS -> {
            T result = subtask.get();
            synchronized (this) {
              if (bestResult == null || comparator.compare(result, bestResult) > 0) {
                bestResult = result;
              }
            }
          }
          case FAILED -> exceptions.add(subtask.exception());
        }
      }
    
      public <X extends Throwable> T resultOrElseThrow(
          Supplier<? extends X> exceptionSupplier) throws X {
        ensureOwnerAndJoined();
        if (bestResult != null) {
          return bestResult;
        } else {
          X exception = exceptionSupplier.get();
          exceptions.forEach(exception::addSuppressed);
          throw exception;
        }
      }
    }
    Code language: Java (java)

    The handleComplete(…) method is called for each terminated subtask – both successful ones and those that threw an exception. We check which case has occurred with subtask.state().

    If successful, we fetch the result with subtask.get() and write it – if it is better than the best result so far – in a thread-safe way into the bestResult field.

    In case of an exception, we collect them in a thread-safe list.

    The resultOrElseThrow() method first ensures by calling ensureOwnerAndJoined() that it has been called from the same thread that created the StructuredTaskScope and that this thread has previously called join() or joinUntil(…).

    resultOrElseThrow() then checks if a successful result is available and, if yes, returns it. Otherwise it throws the specified exception to which it appends the collected exceptions as “suppressed exceptions.”

    We can use the custom policy as follows (SupplierDeliveryTimeCheck2_StructuredTaskScope class in java-21 branch of the GitHub repo):

    SupplierDeliveryTime getSupplierDeliveryTime(String productId, List<String> supplierIds)
        throws SupplierDeliveryTimeCheckException, InterruptedException {
      try (var scope =
          new BestResultScope<>(
              Comparator.comparing(SupplierDeliveryTime::deliveryTimeHours).reversed())) {
        for (String supplierId : supplierIds) {
          scope.fork(() -> service.getDeliveryTime(productId, supplierId));
        }
    
        scope.join();
        return scope.resultOrElseThrow(SupplierDeliveryTimeCheckException::new);
      }
    }Code language: Java (java)

    The output of the sample program could look like this, for example:

    $ java -cp target/classes --enable-preview eu.happycoders.structuredconcurrency/demo3_suppliers/SupplierDeliveryTimeCheck2_StructuredTaskScope
    [VirtualThread[#31]/runnable@ForkJoinPool-1-worker-2] Retrieving delivery time from supplier B
    [VirtualThread[#33]/runnable@ForkJoinPool-1-worker-4] Retrieving delivery time from supplier D
    [VirtualThread[#34]/runnable@ForkJoinPool-1-worker-3] Retrieving delivery time from supplier E
    [VirtualThread[#32]/runnable@ForkJoinPool-1-worker-5] Retrieving delivery time from supplier C
    [VirtualThread[#29]/runnable@ForkJoinPool-1-worker-3] Retrieving delivery time from supplier A
    [VirtualThread[#31]/runnable@ForkJoinPool-1-worker-3] Error retrieving delivery time from supplier B
    [VirtualThread[#29]/runnable@ForkJoinPool-1-worker-5] Finished retrieving delivery time from supplier A: 110 hours
    [VirtualThread[#32]/runnable@ForkJoinPool-1-worker-3] Finished retrieving delivery time from supplier C: 104 hours
    [VirtualThread[#34]/runnable@ForkJoinPool-1-worker-3] Error retrieving delivery time from supplier E
    [VirtualThread[#33]/runnable@ForkJoinPool-1-worker-3] Finished retrieving delivery time from supplier D: 51 hours
    [Thread[#1,main,5,main]] Response: SupplierDeliveryTime[supplier=D, deliveryTimeHours=51]Code language: plaintext (plaintext)

    You can see how although the call for suppliers B and E failed, the remaining suppliers delivered results and in the end, the best result – supplier D with 51 hours delivery time – is returned.

    Custom Policy in Java 25

    In Java 25, we defined a custom policy not by extending StructuredTaskScope, but by implementing the Joiner interface.

    Here is the corresponding code for the joiner (BestResultJoiner class in the main branch of the GitHub repo):

    public class BestResultJoiner<T> implements Joiner<T, T> {
    
      private final Comparator<T> comparator;
    
      private T bestResult;
      private final List<Throwable> exceptions = 
          Collections.synchronizedList(new ArrayList<>());
    
      public BestResultJoiner(Comparator<T> comparator) {
        this.comparator = comparator;
      }
    
      @Override
      public boolean onComplete(Subtask<? extends T> subtask) {
        switch (subtask.state()) {
          case UNAVAILABLE -> {
            // Ignore
          }
          case SUCCESS -> {
            T result = subtask.get();
            synchronized (this) {
              if (bestResult == null || comparator.compare(result, bestResult) > 0) {
                bestResult = result;
              }
            }
          }
          case FAILED -> exceptions.add(subtask.exception());
        }
    
        return false; // Don't cancel the scope
      }
    
      @Override
      public T result() throws SupplierDeliveryTimeCheckException {
        if (bestResult != null) {
          return bestResult;
        } else {
          SupplierDeliveryTimeCheckException exception = 
              new SupplierDeliveryTimeCheckException();
          exceptions.forEach(exception::addSuppressed);
          throw exception;
        }
      }
    }Code language: Java (java)

    The onComplete() method is largely the same as the previous handleComplete() method. The only difference: onComplete() returns a boolean with which the method can specify whether the scope should be canceled (true stands for cancel).

    The result() method largely corresponds to the previous resultOrElseThrow() method, but the result() method is not passed an exception supplier and must decide for itself which exception it throws. If you want to make the exception type variable, as in the example for Java 21–24, you could pass the corresponding supplier to the joiner’s constructor.

    Nested StructuredTaskScopes

    If we want to query not only the suppliers for one product at a time, but the suppliers for multiple products, we can easily solve this as follows:

    Here is the code for Java 21–24 (class SupplierDeliveryTimeCheck3_NestedStructuredTaskScope in the java-21 branch of the GitHub repo):

    List<SupplierDeliveryTime> getSupplierDeliveryTimes(
        List<String> productIds, List<String> supplierIds) throws InterruptedException {
      try (var scope = new StructuredTaskScope<SupplierDeliveryTime>()) {
        List<Subtask<SupplierDeliveryTime>> subtasks =
            productIds.stream()
                .map(productId -> 
                    scope.fork(() -> getSupplierDeliveryTime(productId, supplierIds)))
                .toList();
    
        scope.join();
    
        return subtasks.stream()
            .filter(subtask -> subtask.state() == State.SUCCESS)
            .map(Subtask::get)
            .toList();
      }
    }Code language: Java (java)

    And here is the corresponding code for Java 25 (class SupplierDeliveryTimeCheck3_NestedStructuredTaskScope in the main branch of the GitHub repo). This time I use Joiner.allSuccessfulOrThrow() to get a stream of the subtasks directly from scope.join() – so I don’t have to remember the subtasks beforehand.

    List<SupplierDeliveryTime> getSupplierDeliveryTimes(
        List<String> productIds, List<String> supplierIds) throws InterruptedException {
      try (var scope =
          StructuredTaskScope.open(Joiner.<SupplierDeliveryTime>allSuccessfulOrThrow())) {
        productIds.forEach(
            productId -> scope.fork(() -> getSupplierDeliveryTime(productId, supplierIds)));
    
        return scope.join().map(Subtask::get).toList();
      }
    }Code language: Java (java)

    In both examples, we create a StructuredTaskScope – and within this scope, we fork subtasks, which in turn call the getSupplierDeliveryTime(…) method shown in the previous section, which thus open nested scopes within the scope of getSupplierDeliveryTimes(…).

    The following image shows these scopes as dashed lines:

    Nested StructuredTaskScopes
    Nested StructuredTaskScopes

    Advantages of Structured Concurrency

    Structured Concurrency is characterized by start and end points of concurrent subtasks clearly visible in the code. Errors in the subtasks are propagated to the parent scope. This makes the code easier to read and maintain and ensures that all started threads are finished at the end of a scope.

    The following figure shows a comparison of unstructured and structured concurrency:

    Unstructured Concurrency vs. Structured Concurrency
    Unstructured Concurrency vs. Structured Concurrency

    Advantages of StructuredTaskScope

    With StructuredTaskScope we have a Java language construct for structured concurrency:

    • Task and subtasks form a self-contained unit in the code – there is no ExecutorService in a higher scope. The threads do not come from a thread pool; instead, each subtask is executed in a new virtual thread.
    • The scope spanned by the try-with-resources block results in clear start and end points of all threads.
    • At the end of the scope, all threads are finished.
    • Errors within the subtasks are propagated cleanly to the parent scope.
    • Depending on the policy, the remaining subtasks are aborted if a subtask was successful or if an error occurred in a subtask.
    • When the calling thread is canceled, the subtasks are also canceled.
    • The call hierarchy between the calling thread and the subtask-executing threads is visible in the thread dump.

    In addition, StructuredTaskScope helps with debugging: If we create a thread dump in the new JSON format (jcmd <pid> Thread.dump_to_file -format=json <file>), then it will reflect the call hierarchy between parent and child threads.

    StructuredTaskScope and Scoped Values

    Scoped Values, introduced in Java 20 as an incubator feature, in Java 21 as a preview feature, and finalized in Java 25, are automatically inherited by all child threads created by StructuredTaskScope.fork(…) when StructuredTaskScope is used within the scope of a Scoped Value.

    I’ll show you exactly how this works with the following code example (SupplierDeliveryTimeCheck4_NestedStructuredTaskScopeUsingScopedValue in the java-21 branch; SupplierDeliveryTimeCheck4_NestedStructuredTaskScopeUsingScopedValue in the main branch).

    We create a ScopedValue – in the example, for an API key, bind it to the API key, and then call the getSupplierDeliveryTimes(…) method shown in the section “Nested StructuredTaskScopes” within the scope via call():

    public static final ScopedValue<String> API_KEY = ScopedValue.newInstance();
    
    List<SupplierDeliveryTime> getSupplierDeliveryTimes(
        List<String> productIds, List<String> supplierIds, String apiKey) throws Exception {
      return ScopedValue.where(API_KEY, apiKey)
          .call(() -> getSupplierDeliveryTimes(productIds, supplierIds));
    }Code language: Java (java)

    Due to the inheritance of the scoped value API_KEY, it can also be accessed within the SupplierDeliveryTimeService.getDeliveryTime(…) method without having to pass it through method arguments to this method – even if the methods are not executed in the thread that calls ScopedValue.where(…) but in the child or, in this example, even grandchild threads created by StructuredTaskScope.fork(…).

    Summary

    Structured Concurrency – building on virtual threads – will significantly simplify the management of tasks split into concurrent subtasks. Policies allow us to influence the behavior of StructuredTaskScope, e.g., to abort all tasks should one of them fail.

    The API has been fundamentally revised in Java 25: StructuredTaskScope and join strategy have been decoupled, resulting in more clearly structured, more comprehensible and more robust code (composition over inheritance).

    Please note that Structured Concurrency is still in the preview stage and may therefore still be subject to changes.

  • Java 21 Features (with Examples)

    Java 21 Features (with Examples)

    On September 19, 2023, major launch events celebrated the release of Java 21, the latest long-term support (LTS) version (after Java 17). Oracle will provide free upgrades for at least five years, until September 2028 – and extended paid support until September 2031.

    The highlights of Java 21:

    Virtual Threads – JEP 444

    When scaling server applications, threads are often a bottleneck. Their number is limited, and they often have to wait for events, such as the response of a database query or a remote call, or they are blocked by locks.

    Previous approaches, such as CompletableFuture or reactive frameworks, result in code that is extremely difficult to read and maintain.

    For several years, clever developers have been working on a better solution within the scope of Project Loom. In Java 19, the time had finally come: Virtual threads were introduced as a preview feature.

    In Java 21, virtual threads are finalized via JDK Enhancement Proposal 444 and are thus ready for production use.

    What Are Virtual Threads?

    Unlike reactive code, virtual threads allow programming in the familiar, sequential thread-per-request style.

    Sequential code is not only easier to write and read but also easier to debug since we can use a debugger to trace the program flow step by step, and stack traces reflect the expected call stack. Anyone who has ever tried debugging a reactive application will understand what I mean.

    Writing scalable applications with sequential code is made possible by allowing many virtual threads to share a platform thread (the name given to the conventional threads provided by the operating system). When a virtual thread has to wait or is blocked, the platform thread will execute another virtual thread.

    That allows us to run several million (!) virtual threads with just a few operating system threads.

    The best part is that we don’t have to change existing Java code. We simply tell our application framework to use virtual threads instead of platform threads.

    If you want to know precisely how virtual threads work, their limitations, and what happens behind the scenes, you can read all about them in the main article on virtual threads.

    Changes From the Preview Version

    In the preview versions, it was possible to configure a virtual thread so that it cannot have ThreadLocal variables (since these can be very expensive, virtual threads should instead use Scoped Values, also delivered in Java 21 as a preview feature). This possibility was removed again so that as much existing code as possible can run in virtual threads without changes.

    Sequenced Collections – JEP 431

    What is the easiest way to access the last element of a list? Unless you use additional libraries or helper methods, in Java – so far – it is the following:

    var last = list.get(list.size() - 1);Code language: Java (java)

    In Java 21, we can finally replace this behemoth with a short and concise call:

    var last = list.getLast();Code language: Java (java)

    Perhaps you’ve also needed to access the first element of a LinkedHashSet? Until now, this required the following detour:

    var first = linkedHashSet.iterator().next();Code language: Java (java)

    In Java 21, that’s easier, too:

    var first = linkedHashSet.getFirst();Code language: Java (java)

    To access the last element of a LinkedHashSet, you even had to iterate over the complete set! This can now also be done easily with getLast().

    Let’s get into a bit of detail…

    SequencedCollection Interface

    In order to enable new, uniform methods for accessing the elements of a collection with a stable iteration order, Java 21 introduced the interface SequencedCollection. This defines, among others, the two methods getFirst() and getLast() presented above and is inherited or implemented by those interfaces whose elements have the above-mentioned stable iteration order:

    • List (e.g., ArrayList, LinkedList)
    • SortedSet and its extension NavigableSet (e.g., TreeSet)
    • LinkedHashSet

    In addition to the above methods, SequencedCollection also defines the following methods:

    • void addFirst(E) – inserts an element at the beginning of the collection
    • void addLast(E) – appends an element to the end of the collection
    • E removeFirst() – removes the first element and returns it
    • E removeLast() – removes the last element and returns it

    For immutable collections, all four methods throw an UnsupportedOperationException.

    One more method is:

    • SequencedCollection reversed();

    This method returns a view on the collection in reverse order. We can use this view to iterate backward over the collection. “View” means that changes to the original collection are visible in the view and vice versa.

    SequencedSet Interface

    The new interface SequencedSet inherits from Set and SequencedCollection. It provides no additional methods but overrides the reversed() method to replace the SequencedCollection return type with SequencedSet.

    Furthermore, addFirst(E) and addLast(E) have a special meaning in SequencedSet: if the element to be added is already in the set, it will be moved to the beginning or end of the set, respectively.

    The following figure shows how SequencedCollection and SequencedSet have been inserted into the existing class hierarchy (for clarity, only a selection¹ of classes is shown):

    SequencedCollection and SequencedSet in the Java 21 class hierarchy
    SequencedCollection and SequencedSet in the Java 21 class hierarchy

    ¹ The selection is limited to those classes that are used at least 100 times in the JDK source code.

    SequencedMap Interface

    In Java, collections (e.g., List, Set) and maps (e.g., HashMap) represent two separate class hierarchies. For ordered maps (i.e., those whose elements have a defined order), another new interface, SequencedMap, offers easy access to the first and last element of such a map.

    Analogous to SequencedCollection, SequencedMap offers the following methods:

    • Entry<K, V> firstEntry() – returns the first key-value pair of the map
    • Entry<K, V> lastEntry() – returns the last key-value pair of the map
    • Entry<K, V> pollFirstEntry() – removes the first key-value pair and returns it
    • Entry<K, V> pollLastEntry() – removes the last key-value pair and returns it
    • V putFirst(K, V) – inserts a key-value pair at the beginning of the map
    • V putLast(K, V) – appends a key-value pair to the end of the map
    • SequencedMap<K, V> reversed() – returns a view on the map in reverse order

    Furthermore, there are three other methods:

    • SequencedSet sequencedKeySet() – returns the keys of the map
    • SequencedCollection<V> sequencedValues() – returns the values of the map
    • SequencedSet<Entry<K,V>> sequencedEntrySet() – returns all entries of the map

    Here you can see how the new interface was inserted into the existing class hierarchy (this time with all implementing classes):

    SequencedMap in the Java 21 class hierarchy
    SequencedMap in the Java 21 class hierarchy

    SequencedCollection, SequencedSet, and SequencedMap are defined in JDK Enhancement Proposal 431.

    New Collections Methods

    The Collections utility class has been extended with some static utility methods, specifically for sequenced collections:

    • newSequencedSetFromMap(SequencedMap map) – analogous to Collections.setFromMap(…), this method returns a SequencedSet with the properties of the underlying map.
    • unmodifiableSequencedCollection(SequencedCollection c) – analogous to Collections.unmodifiableCollection(…) returns an unmodifiable view of the underlying SequencedCollection.
      • Immutable means that calls to modifying methods, such as add(…) or remove(…) throw an UnsupportedOperationException.
      • Visible means that changes to the underlying collection are visible in the collection returned by unmodifiableSequencedCollection(…).
    • Collections.unmodifiableSequencedMap(SequencedMap m) – returns an unmodifiable view of the underlying SequencedMap, analogous to Collections.unmodifiableMap(…).
    • Collections.unmodifiableSequencedSet(SequencedSet s) – returns an unmodifiable view of the underlying SequencedSet, analogous to Collections.unmodifiableSet(…).

    Record Patterns – JEP 440

    “Record Patterns” were first introduced in Java 19 as a preview feature. They can be combined with Pattern Matching for instanceof and Pattern Matching for switch to access the fields of a record without explicit casts and without using access methods.

    This sounds more complicated than it is. The best way to explain record patterns is with an example:

    We’ll start with a simple record (if you’re unfamiliar with records, you can find an introduction to Java records here).

    public record Position(int x, int y) {}Code language: Java (java)

    Now let’s assume we have an arbitrary object and want to perform a particular action with it depending on its class – for instance, print something on the console.

    Record Patterns and Pattern Matching for instanceof

    We could do that using Pattern Matching for instanceof, introduced in Java 16, as follows:

    public void print(Object o) {
      if (o instanceof Position p) {
        System.out.printf("o is a position: %d/%d%n", p.x(), p.y());
      } else if (object instanceof String s) {
        System.out.printf("o is a string: %s%n", s);
      } else {
        System.out.printf("o is something else: %s%n", o);
      }
    }Code language: Java (java)

    Instead of the pattern Position p, we can now also match a so-called record pattern – namely Position(int x, int y) – and then access the variables x and y directly in the following code instead of using p.x() and p.y():

    public void print(Object o) {
      if (o instanceof Position(int x, int y)) {
        System.out.printf("o is a position: %d/%d%n", x, y);
      } else if (o instanceof String s) {
        System.out.printf("o is a string: %s%n", s);
      } else {
        System.out.printf("o is something else: %s%n", o);
      }
    }Code language: Java (java)

    Record Patterns and Pattern Matching for switch

    We can also write the first example (the one without a record pattern) using Pattern Matching for switch, which is also finalized in Java 21:

    public void print(Object o) {
      switch (o) {
        case Position p -> System.out.printf("o is a position: %d/%d%n", p.x(), p.y());
        case String s   -> System.out.printf("o is a string: %s%n", s);
        default         -> System.out.printf("o is something else: %s%n", o);
      }
    }
    Code language: Java (java)

    We can also write the switch statement with a record pattern:

    public void print(Object o) {
      switch (o) {
        case Position(int x, int y) -> System.out.printf("o is a position: %d/%d%n", x, y);
        case String s               -> System.out.printf("o is a string: %s%n", s);
        default                     -> System.out.printf("o is something else: %s%n", o);
      }
    }
    Code language: Java (java)

    Nested Record Patterns

    We can not only match to a record whose fields are objects or primitives. We can also match on a record whose fields are also records.

    As an example, let’s add the following record, Path, with a start position and an end position:

    public record Path(Position from, Position to) {}Code language: Java (java)

    We want the print() method from the previous examples now also be able to print a Path – here is the implementation without a record pattern:

    public void print(Object o) {
      switch (o) {
        case Path p ->
                System.out.printf("o is a path: %d/%d -> %d/%d%n", 
                        p.from().x(), p.from().y(), p.to().x(), p.to().y()); 
        // other cases
      }
    }Code language: Java (java)

    With a record pattern we could, for one, match on Path(Position from, Position to):

    public void print(Object o) {
      switch (o) {
        case Path(Position from, Position to) ->
                System.out.printf("o is a path: %d/%d -> %d/%d%n", 
                        from.x(), from.y(), to.x(), to.y());
        // other cases
      }
    }Code language: Java (java)

    Secondly, we can also use a nested record pattern as follows:

    public void print(Object o) {
      switch (o) {
        case Path(Position(int x1, int y1), Position(int x2, int y2)) ->
                System.out.printf("o is a path: %d/%d -> %d/%d%n", x1, y1, x2, y2);
        // other cases
      }
    }Code language: Java (java)

    In the examples so far, the notation with record patterns does not bring a considerable advantage. Record patterns can show their true strength when used with records whose elements can have different types.

    The Real Power of Record Patterns

    Let’s change our records a bit. Position becomes an interface implemented by Position2D and Position3D. And Path is adjusted so that both parameters must be of the same type:

    public sealed interface Position permits Position2D, Position3D {}
    
    public record Position2D(int x, int y) implements Position {}
    
    public record Position3D(int x, int y, int z) implements Position {}
    
    public record Path<P extends Position>(P from, P to) {}
    Code language: Java (java)

    We modify the print() method to display something different for a 3D path than for a 2D path. That is pretty easy to accomplish:

    public void print(Object o) {
      switch (o) {
        case Path(Position2D from, Position2D to) ->
                System.out.printf("o is a 2D path: %d/%d -> %d/%d%n",
                        from.x(), from.y(), to.x(), to.y());
        case Path(Position3D from, Position3D to) ->
                System.out.printf("o is a 3D path: %d/%d/%d -> %d/%d/%d%n",
                        from.x(), from.y(), from.z(), to.x(), to.y(), to.z());
        // other cases
      }
    }Code language: Java (java)

    However, it was only that easy because we started with the variant with record patterns!

    Without record patterns, we would have to write the following code:

    public void print(Object o) {
      switch (o) {
        case Path p when p.from() instanceof Position2D from 
                      && p.to() instanceof Position2D to ->
                System.out.printf("o is a 2D path: %d/%d -> %d/%d%n",
                        from.x(), from.y(), to.x(), to.y());
        case Path p when p.from() instanceof Position3D from 
                      && p.to() instanceof Position3D to ->
                System.out.printf("o is a 3D path: %d/%d/%d -> %d/%d/%d%n",
                        from.x(), from.y(), from.z(), to.x(), to.y(), to.z());
        // other cases
      }
    }Code language: Java (java)

    This time the variant with record patterns is much more concise! And the deeper the nesting, the greater the advantage of using record patterns.

    Record Patterns have been finalized with JDK Enhancement Proposal 440 – with one change from the last preview version:

    Java 20 introduced the ability to use record patterns in for loops as well, as in the following example:

    List<Position> positions = ...
    
    for (Position(int x, int y) : positions) {
      System.out.printf("(%d, %d)%n", x, y);
    }Code language: Java (java)

    This option was removed in the final version of the feature, with the prospect of reintroducing it in a future Java release.

    Pattern Matching for switch – JEP 441

    “Pattern Matching for switch” was first introduced in Java 17 as a preview feature and, in combination with Record Patterns, allows switch statements and expressions to be formulated over any object. Here is an example:

    Object obj = getObject();
    
    switch (obj) {
      case String s when s.length() > 5 -> System.out.println(s.toUpperCase());
      case String s                     -> System.out.println(s.toLowerCase());
      case Integer i                    -> System.out.println(i * i);
      case Position(int x, int y)       -> System.out.println(x + "/" + y);
      default                           -> {}
    }Code language: Java (java)

    Without Pattern Matching for switch, we would have to write the following less expressive code instead (thanks to Pattern Matching for instanceof, introduced in Java 16, it is reasonably readable without the need for an explicit cast):

    Object obj = getObject();
    
    if (obj instanceof String s && s.length() > 5)  System.out.println(s.toUpperCase());
    else if (obj instanceof String s)               System.out.println(s.toLowerCase());
    else if (obj instanceof Integer i)              System.out.println(i * i);
    else if (obj instanceof Position(int x, int y)) System.out.println(x + "/" + y);Code language: Java (java)

    In addition, the compiler performs an “analysis of exhaustiveness” for Pattern Matching for switch. That means the switch statement or expression must cover all possible cases – or contain a default branch. Since the Object class in the example above is arbitrarily extensible, a default branch is mandatory.

    In contrast, a default branch is not necessary if the switch covers all possibilities of a sealed class hierarchy, as in the following example:

    public sealed interface Shape permits Rectangle, Circle {}
    
    public record Rectangle(Position topLeft, Position bottomRight) implements Shape {}
    
    public record Circle(Position center, int radius) implements Shape {}
    
    public class ShapeDebugger {
      public static void debug(Shape shape) {
        switch (shape) {
          case Rectangle r -> System.out.printf(
            "Rectangle: top left = %s; bottom right = %s%n", r.topLeft(), r.bottomRight());
    
          case Circle c -> System.out.printf(
            "Circle: center = %s; radius = %s%n", c.center(), c.radius());
        }
      }
    }Code language: Java (java)

    Since sealing ensures that only two Shape implementations exist – namely Rectangle and Circle – a default branch would be superfluous here (but not forbidden; see below).

    If we were to extend Shape at some point, e.g., by a third record called Oval, the compiler would recognize the switch expression as incomplete and respond with the error message ‘switch’ statement does not cover all possible input values:

    Java 21 - Pattern Matching for switch - 'switch' statement does not cover all possible input values

    This way, we can ensure that if we extend the interface, we will also have to adapt all switch expressions. Alternatively, we could include a default branch in advance. Then the switch statement would continue to compile and execute the default branch for Oval.

    With JDK Enhancement Proposal 441, Pattern Matching for switch was finalized with two changes compared to the last preview version:

    “Parenthesized Patterns” Were Removed

    Until Java 20, it was possible to put patterns in parentheses like this:

    Object obj = getObject();
    
    switch (obj) {
      case (String s) when s.length() > 5 -> System.out.println(s.toUpperCase());
      case (String s)                     -> System.out.println(s.toLowerCase());
      case (Integer i)                    -> System.out.println(i * i);
      case (Position(int x, int y))       -> System.out.println(x + "/" + y);
      default                             -> {}
    }Code language: Java (java)

    Since the parentheses served no purpose, this option was removed in the final version of the feature.

    Qualified Enum Constants

    Until now, we could only implement a switch expression over enum constants using a “guarded pattern” – i.e., a pattern combined with when.

    I’ll show you what this means with an example. Here are two enums that implement a sealed interface:

    public sealed interface Direction permits CompassDirection, VerticalDirection {}
    
    public enum CompassDirection implements Direction { NORTH, SOUTH, EAST, WEST }
    
    public enum VerticalDirection implements Direction { UP, DOWN }Code language: Java (java)

    Until Java 20, we had to implement a switch over all possible directions as follows:

    void flyJava20(Direction direction) {
      switch (direction) {
        case CompassDirection  d when d == CompassDirection.NORTH -> System.out.println("Flying north");
        case CompassDirection  d when d == CompassDirection.SOUTH -> System.out.println("Flying south");
        case CompassDirection  d when d == CompassDirection.EAST  -> System.out.println("Flying east");
        case CompassDirection  d when d == CompassDirection.WEST  -> System.out.println("Flying west");
        case VerticalDirection d when d == VerticalDirection.UP   -> System.out.println("Gaining altitude");
        case VerticalDirection d when d == VerticalDirection.DOWN -> System.out.println("Losing altitude");
        default -> throw new IllegalArgumentException("Unknown direction: " + direction);
      }
    }Code language: Java (java)

    Not only is this notation confusing, but the exhaustion analysis does not kick in here, i.e., even though we have implemented all possible cases, a default branch is necessary. Otherwise, a compiler error occurs.

    In Java 21, we can now formulate the same logic much more concisely:

    void flyJava21(Direction direction) {
      switch (direction) {
        case CompassDirection.NORTH -> System.out.println("Flying north");
        case CompassDirection.SOUTH -> System.out.println("Flying south");
        case CompassDirection.EAST  -> System.out.println("Flying east");
        case CompassDirection.WEST  -> System.out.println("Flying west");
        case VerticalDirection.UP   -> System.out.println("Gaining altitude");
        case VerticalDirection.DOWN -> System.out.println("Losing altitude");
      }
    }Code language: Java (java)

    The compiler also recognizes that all cases are covered and no longer requires a default branch.

    New Methods in String, StringBuilder, StringBuffer, Character, and Math

    Not all changes can be found in the JEPs or release notes. For example, some new methods in String, StringBuilder, StringBuffer, Character, and Math can only be found in the API documentation. Conveniently there is the Java Version Almanac, with which one can compare different API versions comfortably.

    New String Methods

    The String class has been extended by the following methods:

    • String.indexOf(String str, int beginIndex, int endIndex) – searches the specified substring in a subrange of the string.
    • String.indexOf(char ch, int beginIndex, int endIndex) – searches the specified character in a subrange of the string.
    • String.splitWithDelimiters(String regex, int limit) – splits the string at substrings matched by the regular expression and returns an array of all parts and splitting strings. The string is split at most limit-1 times, i.e., the last element of the array could be further divisible.

    Here is an example of splitWithDelimiters(…):

    String string = "the red brown fox jumps over the lazy dog";
    String[] parts = string.splitWithDelimiters(" ", 5);
    System.out.println(Arrays.stream(parts).collect(Collectors.joining("', '", "'", "'")));Code language: Java (java)

    These lines of code print the following:

    'the', ' ', 'red', ' ', 'brown', ' ', 'fox', ' ', 'jumps over the lazy dog'Code language: plaintext (plaintext)

    New StringBuilder and StringBuffer Methods

    Both StringBuilder and StringBuffer have been extended by the following two methods:

    • repeat(CharSequence cs, int count) – appends to the StringBuilder or StringBuffer the string cscount times.
    • repeat(int codePoint, int count) – appends the specified Unicode code point to the StringBuilder or StringBuffercount times. A variable or constant of type char can also be passed as code point.

    Here is an example that calls repeat(…) once with a string, once with a code point and once with a character:

    StringBuilder sb = new StringBuilder();
    sb.repeat("Hello ", 2);
    sb.repeat(0x1f600, 5);
    sb.repeat('!', 3);
    System.out.println(sb);
    Code language: Java (java)

    This code prints the following:

    output with smileys

    New Character Methods

    Speaking of emojis… the following new methods are provided by the Character class:

    • isEmoji(int codePoint)
    • isEmojiComponent(int codePoint)
    • isEmojiModifier(int codePoint)
    • isEmojiModifierBase(int codePoint)
    • isEmojiPresentation(int codePoint)
    • isExtendedPictographic(int codePoint)

    These methods check whether the passed Unicode code point stands for an emoji or a variant of it. You can read exactly what these variants mean in Appendix A of the Unicode Emoji Specification.

    New Math Methods

    How many times have we written the following piece of code to ensure that a number is in a given numeric range, or otherwise pushed in?

    if (value < min) {
      value = min;
    } else if (value > max) {
      value = max;
    }Code language: Java (java)

    From now on, we can use Math.clamp(...) for exactly this purpose. The method comes in the following four flavors:

    • int clamp(long value, int min, int max)
    • long clamp(long value, long min, long max)
    • double clamp(double value, double min, double max)
    • float clamp(float value, float min, float max)

    These methods check whether value is in the range min to max. If value is less than min, they return min; if value is greater than max, they return max.

    Preview and Incubator Features

    Even though Java 21 is a Long-Term Support release, it contains new and resubmitted preview features. Preview features must be explicitly enabled with the VM option --enable-preview and are usually slightly revised in subsequent Java versions.

    String Templates (Preview) – JEP 430

    Breaking News: On April 5, 2024, Gavin Bierman announced that String Templates will not be released in the form described here. There is agreement that the design needs to be changed, but there is no consensus on how it should be changed. The language developers now want to take time to revise the design. Therefore, String Templates will not be included in Java 23, not even with --enable-preview.

    String templates offer a dynamic way of generating strings by replacing placeholders with variable values and computed results at runtime. This process, known as string interpolation, makes it possible to compose complex strings efficiently:

    int a = ...;
    int b = ...;
    
    String result = STR."\{a} times \{b} = \{Math.multiplyExact(a, b)}";Code language: Java (java)

    The following replacements are made during execution:

    • \{a} is dynamically replaced by the current value of a.
    • \{b} is replaced by the value of b.
    • \{Math.multiplyExact(a, b)} is replaced by the result of the method call Math.multiplyExact(a, b).

    String templates were introduced in Java 21 as a preview feature through JDK Enhancement Proposal 430. You can find a more detailed description in the main article on string templates.

    Unnamed Patterns and Variables (Preview) – JEP 443

    Often we encounter the need to declare variables that ultimately go unused. Typical examples include Exceptions, lambda parameters, and pattern variables.

    Consider an example where the Exception variable e remains unused:

    try {
      int number = Integer.parseInt(string);
    } catch (NumberFormatException e) {
      System.err.println("Not a number");
    }Code language: Java (java)

    In this instance, the lambda parameter k is unused:

    map.computeIfAbsent(key, k -> new ArrayList<>()).add(value);Code language: Java (java)

    And in this Record pattern, the pattern variable position2 is unused:

    if (object instanceof Path(Position(int x1, int y1), Position position2)) {
      System.out.printf("object is a path starting at x = %d, y = %d%n", x1, y1));
    }Code language: Java (java)

    In Java 22, unnamed variables and patterns provide a more elegant solution, allowing the replacement of the names of unused variables or even the entire pattern with an underscore (_):

    Instead of the Exception variable e, we can use _:

    try {
      int number = Integer.parseInt(string);
    } catch (NumberFormatException _) {
      System.err.println("Not a number");
    }Code language: Java (java)

    Instead of the Lambda parameter k, we use _:

    map.computeIfAbsent(key, _ -> new ArrayList<>()).add(value);Code language: Java (java)

    And the partial pattern Position position2 can also be replaced with _:

    if (object instanceof Path(Position(int x1, int y1), _)) {
      System.out.printf("object is a path starting at x = %d, y = %d%n", x1, y1));
    }Code language: Java (java)

    Unnamed patterns and variables are defined in JDK Enhancement Proposal 443. In the JEP, you can find some more examples of using unnamed variables. You can find further details and a deeper examination of these features in the main article about unnamed variables and patterns.

    Unnamed Classes and Instance Main Methods (Preview) – JEP 445

    When novice programmers write their first Java program, it usually looks like this:

    public class HelloWorld {
      public static void main(String[] args) {
        System.out.println("Hello world!");
      }
    }Code language: Java (java)

    And that is only if the class is in the “unnamed package.” Otherwise, a package declaration is also required.

    Experienced Java developers will recognize the elements of this program at first glance. But beginners are overwhelmed by visibility modifiers, complex concepts like classes and static methods, unused method arguments, and a “System.out”.

    Wouldn’t it be nice if most of this could be eliminated? Like this:

    Java 21 - Unnamed Classes and Instance Main Methods

    Exactly that is possible in Java 21, thanks to JDK Enhancement Proposal 445! The following code is a valid, complete Java program as of now:

    void main() {
      System.out.println("Hello world!");
    }Code language: Java (java)

    Since the feature is still in the preview stage, you need to compile and run the code as follows:

    $ javac --enable-preview --source 21 HelloWorld.java
    $ java --enable-preview HelloWorld
    Hello world!Code language: plaintext (plaintext)

    Alternatively, you can run the program without explicitly compiling it:

    $ java --enable-preview --source 21 HelloWorld.java
    Hello world!Code language: plaintext (plaintext)

    You can find the latest version of this feature in the Compact Source Files and Instance Main Methods section (that is what the feature will be called from Java 25) of the article on the Java main method.

    The “Unnamed Class”

    In Java 22, the concept of the “unnamed class” was changed to an “implicitly declared class”.

    By the way, the main() method still is in a class: the so-called “unnamed class.” This is not an entirely new concept. There was already the “unnamed package” (a class without a package declaration) and the “unnamed module” (a Java source code directory without a “module-info.java” file).

    Just as named modules cannot access code in the unnamed module, and just as code from named packages cannot access unnamed packages, code from named classes cannot access unnamed classes.

    The unnamed class may also have fields and other methods. The following is also a valid and complete Java program:

    final String HELLO_TEMPLATE = "Hello %s!";
    
    void main() {
      System.out.println(hello("world"));
    }
    
    String hello(String name) {
      return HELLO_TEMPLATE.formatted(name);
    }Code language: Java (java)

    Launch Protocol

    In Java 22, the start launch protocol has been simplified, as many of the variations of the main() method shown here are mutually exclusive anyway.

    The main() method may, of course, still be marked as public static and contain the String[] argument. It may also be only public or only static. Or protected. Theoretically, a class can also contain two main() methods – for example, the following would also be allowed:

    protected static void main() {
      // ...
    }
    
    public void main(String[] args) {
      // ...
    }Code language: Java (java)

    In such a case, the so-called “launch protocol” decides which of the main() methods to start. The launch protocol searches in the following order; the visibility modifier is irrelevant (only private is not allowed):

    1. static void main(String[] args)
    2. static void main()
    3. void main(String[] args) – this method may also be inherited from a superclass (but this only works in a named class)
    4. void main() – also, this method may be inherited from a superclass

    So in the example above, the JVM would start the static method with no parameters (launch priority 2).

    Scoped Values (Preview) – JEP 446

    Scoped Values are a modern alternative to ThreadLocal variables that can be used well in the context of virtual threads.

    Scoped values have the following advantage over ThreadLocal variables:

    • They are only valid for a defined period (“scope”).
    • They are immutable.
    • And therefore, they can be inherited without having to be copied (as is the case with InheritableThreadLocal).

    The first two points also lead to cleaner and, thus, less error-prone program code.

    Scoped Values were introduced in Java 20 as an incubator project. In Java 21, JDK Enhancement Proposal 446 upgrades them to a preview project without further changes.

    You can learn how scoped values work in the main article about scoped values.

    Structured Concurrency (Preview) – JEP 453

    To divide a task into several subtasks to be processed in parallel, Java has so far provided two high-level constructs:

    • Parallel streams to perform the same operation in parallel on multiple elements
    • ExecutorService to perform different tasks in parallel

    ExecutorService is very powerful, quickly driving up the implementation effort for simple parallel tasks. For example, it is pretty complicated (and thus error-prone) to detect when a subtask has thrown an exception and immediately and cleanly abort all other subtasks still running.

    Structured concurrency provides a new, easy-to-implement mechanism for splitting a task into subtasks to be processed in parallel, merging the results of the subtasks, and terminating subtasks if their results are no longer needed.

    You can learn how this works in the main article about Structured Concurrency.

    Structured concurrency was first introduced in Java 19 in the incubator stage and extended in Java 20 to allow subtasks to inherit the parent thread’s scoped values described in the previous section.

    In Java 21, JDK Enhancement Proposal 453 changed the return type of StructuredTaskScope.fork(…) – the method that starts subtasks – from Future to Subtask. This should emphasize the difference between structured concurrency and the ExecutorService API.

    For example, Future.get() waits for a result, while Subtask.get() must only be called once a subtask is finished – otherwise the method throws an IllegalStateException. And Subtask.state() returns a state specific to structured concurrency, while Future.isDone() and isCancelled() do not.

    Foreign Function & Memory API (Third Preview) – JEP 442

    Until now, anyone who wanted to access code outside the JVM (e.g., functions in C libraries) or memory not managed by the JVM had to use the Java Native Interface (JNI). Anyone who has ever done this knows how cumbersome, error-prone, and slow JNI is.

    A replacement for JNI has been in the works since Java 14, initially in incubator projects. In Java 19, a united “Foreign Function & Memory API” was introduced as a first preview version.

    I will demonstrate what this API facilitates with a simple example.

    The following code shows how to obtain a handle to the strlen() method of the standard C library, place the string “Happy Coding!” in native memory (i.e., outside the Java heap), and then execute the strlen() method on that string:

    public class FFMTest21 {
      public static void main(String[] args) throws Throwable {
        // 1. Get a lookup object for commonly used libraries
        SymbolLookup stdlib = Linker.nativeLinker().defaultLookup();
    
        // 2. Get a handle to the "strlen" function in the C standard library
        MethodHandle strlen = Linker.nativeLinker().downcallHandle(
            stdlib.find("strlen").orElseThrow(),
            FunctionDescriptor.of(JAVA_LONG, ADDRESS));
    
        // 3. Convert Java String to C string and store it in off-heap memory
        try (Arena offHeap = Arena.ofConfined()) {
          MemorySegment str = offHeap.allocateUtf8String("Happy Coding!");
    
          // 4. Invoke the foreign function
          long len = (long) strlen.invoke(str);
    
          System.out.println("len = " + len);
        }
        // 5. Off-heap memory is deallocated at end of try-with-resources
      }
    }Code language: Java (java)

    The code differs from the Java 20 variant only in one detail: The Arena.ofConfined() method was previously called openConfined().

    You can compile and execute the small example program as follows:

    $ javac --enable-preview --source 21 FFMTest21.java 
    Note: FFMTest21.java uses preview features of Java SE 21.
    Note: Recompile with -Xlint:preview for details.
    
    $ java --enable-preview --enable-native-access=ALL-UNNAMED FFMTest21 
    len = 13Code language: plaintext (plaintext)

    Of course, you can also combine both steps into one:

    $ java --enable-preview --source 21 --enable-native-access=ALL-UNNAMED FFMTest21.java 
    Note: FFMTest21.java uses preview features of Java SE 21.
    Note: Recompile with -Xlint:preview for details.
    len = 13Code language: plaintext (plaintext)

    Accessing native memory and calling native code is a rather specialized area. Very few programmers will come into direct contact with it. Therefore, I will not go into further detail at this point. You can find details about the current state of the FFM API in JDK Enhancement Proposal 442.

    Vector API (Sixth Incubator) – JEP 448

    In Java 21, the new Vector API is submitted as an incubator feature for the sixth consecutive release through JDK Enhancement Proposal 448.

    The Vector API will make it possible to perform mathematical vector operations efficiently. A vector operation is, for example, a vector addition, as you may remember from math classes:

    Java vector addition
    Vector addition example

    Modern CPUs can perform such operations up to a particular vector size in a single CPU cycle. The vector API will enable the JVM to map such operations to the most efficient instructions of the underlying CPU architecture.

    I will introduce the vector API in detail as soon as it has outgrown the incubator stage and is available in the first preview version.

    Other Changes in Java 21

    Let’s move on to the changes we won’t usually be confronted with on a daily basis. At least not directly. Unless, for example, we are responsible for selecting the garbage collector and its optimization. Then the two following JEPs should be interesting:

    Generational ZGC – JEP 439

    In Java 15, the Z Garbage Collector, ZGC for short, was introduced. ZGC promises pause times of less than ten milliseconds – which is up to a factor of 10 less than the pause times of the standard G1GC garbage collector.

    Until now, ZGC made no distinction between “old” and “new” objects. However, according to the “Weak Generational Hypothesis,” precisely this difference can have a significant impact on the performance of an application.

    According to this hypothesis, most objects die shortly after their creation, whereas objects that have survived a few GC cycles tend to stay alive even longer.

    A so-called “generational garbage collector” takes advantage of this by dividing the heap into two logical areas: a “young generation,” in which new objects are created, and an “old generation,” into which objects that have reached a certain age are moved. Since objects in the old generation are likely to become even older, an application’s performance can be improved by having the garbage collector scan the old generation less frequently.

    However, implementing a garbage collector with multiple generations is significantly more complex than implementing a non-generational garbage collector because of the potential inter-generation references.

    Therefore, we had to wait until Java 21 for JDK Enhancement Proposal 439 to make the Z Garbage Collector a generational one.

    For a transition period, both variants of the ZGC will be available. The VM option -XX:+UseZGC still activates the old non-generational variant. To activate the new generational variant, you must specify the following VM options:

    -XX:+UseZGC -XX:+ZGenerational

    In one of the future Java versions, the generational variant will become the default. You must then explicitly switch to the non-generational variant using -XX:-ZGenerational. Later still, the variant without generations and the ZGenerational parameter are to be removed again.

    You can read about how exactly Generational ZGC works in JEP 439.

    Generational Shenandoah (Experimental) – JEP 404

    Not only the Z Garbage Collector was made generational, but also the “Shenandoah Garbage Collector,” also introduced in Java 15.

    However, the new Shenandoah version is still in the experimental stage. You can activate it with the following VM options:

    -XX:+UnlockExperimentalVMOptions -XX:ShenandoahGCMode=generational

    The changes are described in JDK Enhancement Proposal 404 – but quite superficially. If you are interested in how a generational garbage collector works, I recommend reading the detailed JEP 439 (Generational ZGC, from the previous section).

    Deprecate the Windows 32-bit x86 Port for Removal – JEP 449

    The 32-bit version of Windows 10 is hardly used anymore, support ends in October 2025, and Windows 11 – on the market since October 2021 – has never been offered in a 32-bit version.

    Accordingly, there is hardly any need for a 32-bit Windows version of the JDK.

    To speed up the development of the JDK, virtual threads have not been implemented for 32-bit Windows. Anyone who tries to start a virtual thread on 32-bit Windows will get a platform thread instead.

    JDK Enhancement Proposal 449 marks the 32-bit Windows port as “deprecated for removal.” It is to be removed entirely in a future release.

    Prepare to Disallow the Dynamic Loading of Agents – JEP 451

    If you have ever used a Java profiler, you probably started the application to be analyzed with a parameter like -agentpath:<path-to-agent-library>. This loads a so-called “agent” into the application, which modifies it at runtime to perform the necessary measurements and either write the results to a file or send them to the profiler’s front end.

    If the application was started without this parameter, the agent can also be “injected” into the JVM afterward using the so-called “Attach API.”

    This so-called “dynamic loading” is activated by default and thus represents a considerable security risk.

    In a future Java version, dynamic loading will be disabled by default and can only be explicitly enabled via the VM option -XX:+EnableDynamicAgentLoading.

    Since such a change cannot be made overnight, dynamic loading is still allowed in Java 21 but can be disabled with -XX:-EnableDynamicAgentLoading. In addition, warnings are now displayed when an agent is loaded via the Attach API.

    This change is defined in JDK Enhancement Proposal 451. There you will also find a comprehensive list of security risks.

    Key Encapsulation Mechanism API – JEP 452

    Key Encapsulation Mechanism (KEM) is a modern encryption technology that enables the exchange of symmetric keys via an asymmetric encryption process. KEMs are so secure that they are even expected to withstand future quantum attacks.

    Through JDK Enhancement Proposal 452, the JDK provides an API for KEM.

    Very few of us are directly confronted with implementing encryption and decryption on a low level. Generally, we use it only indirectly, for example, by using SSH or accessing an HTTPS API.

    For this reason, I will not go into more detail about this JEP.

    Thread.sleep(millis, nanos) Is Now Able to Perform Sub-Millisecond Sleeps

    When calling Thread.sleep(millis, nanos), the nanos value was virtually ignored until now. It was only when nanos was greater than 500,000 (i.e., half a millisecond) that the millis value was incremented by one, and then Thread.sleep(millis) was called.

    As of Java 21, at least on Linux and macOS, the wait time is passed to the operating system (or to the “unparker” in the case of a virtual thread) at nanosecond granularity. The actual waiting time still depends on the precision of the system clock and the scheduler.

    (No JEP exists this change, it is registered in the bug tracker under JDK-8305092.)

    Last Resort G1 Full GC Moves Humongous Objects

    When using the G1 garbage collector (G1GC), the available heap memory is divided into up to 2,048 regions. Objects larger than half of such a region are called “humongous objects.”

    Humongous objects have never been moved in memory. Thus, an OutOfMemoryError could occur if the heap was heavily fragmented, even if there was still enough memory available overall – just not in a contiguous region.

    Starting from Java 21, also humongous objects are relocated – however, only if, after a full GC, there’s still insufficient contiguous memory available. This process can take quite long (up to several seconds) depending on the size of the heap.

    (No JEP exists this change, it is registered in the bug tracker under JDK-8191565.)

    Implement Alternative Fast-Locking Scheme

    When a thread enters a synchronized block on an object, the JVM must store this information somewhere to prevent another thread from entering the critical section.

    Until now, this has been done using a mechanism called “stack locking”. Here, the object header’s Mark Word is replaced by a pointer to a data structure on the stack, which in turn contains the Mark Word and further information about the lock state.

    Firstly, this mechanism makes it more difficult to access the actual data of the Mark Word. Secondly, the pointer to the stack is one reason for the so-called pinning of virtual threads.

    In Java 21, an alternative locking mechanism is offered, called “lightweight locking”. Here, only the two “tag bits” in the Mark Word are changed; additional lock data structures are referenced from a hash table and a thread-local cache. The Mark Word can thus always be accessed directly.

    Lightweight locking can be activated using the VM option described in the next section.

    (No JEP exists this change, it is registered in the bug tracker under JDK-8291555.)

    Add Experimental -XX:LockingMode Flag

    Locking usually occurs in two steps:

    1. When a thread enters a critical section, only the information that the section is locked is stored in the monitor object (the object that is specified in parentheses behind synchronized) – further information is not necessary at this time.
    2. Only when another thread tries to enter the critical section, a list of waiting threads must be created, among other things. For this purpose, an additional data structure is created, the so-called “heavyweight monitor”.

    Step 1 was previously performed by the so-called “stack locking”. Using the VM option -XX:+UseHeavyMonitors, step 1 could be skipped and the “heavyweight monitor” created directly.

    To activate the new locking mechanism described in the previous section, Java 21 introduces the new VM option -XX:LockingMode, with the following options:

    VM OptionNameDescription
    -XX:LockingMode=0LM_MONITOROnly heavyweight monitor objects (step 1 is skipped); corresponds to the previous option -XX:+UseHeavyMonitors
    -XX:LockingMode=1LM_LEGACYStack locking + monitor objects in case of contention; corresponds to the previous default behavior
    -XX:LockingMode=2LM_LIGHTWEIGHTLightweight locking + monitor objects in case of contention; this is the new mode described in the previous section.

    Since the feature is currently still in the experimental stage, you must also specify the VM option -XX:+UnlockExperimentalVMOptions.

    In Java 23, the new lightweight locking will become the default mode.

    In Java 24, the VM option -XX:LockingMode will be marked as “deprecated”, in Java 26, it will be disabled, and in Java 27, it will be removed again.

    (No JEP exists this change, it is registered in the bug tracker under JDK-8305999.)

    Complete List of All Changes in Java 21

    In this article, you have learned about all JDK Enhancement Proposals delivered in Java 21. You can find additional minor changes in the official Java 21 Release Notes.

    Summary

    The new LTS release Java 21 brings one of the most significant changes in Java history with the finalization of virtual threads, which will significantly simplify the implementation of highly scalable server applications.

    Record Patterns, Pattern Matching for switch, Sequenced Collections, String Templates, and Unnamed Patterns and Variables (the last two are still in the preview stage) make the language more expressive and robust.

    Unnamed Classes and Instance Main Methods (also in the preview stage) make it easier for programmers to get started with the language without having to understand complex constructs like classes and static methods right at the beginning.

    Various other changes complement the release as usual. You can download the latest Java 21 version here (OpenJDK) and here (Oracle).

    Which Java 21 feature are you most looking forward to? Which feature do you miss? Let me know via the comment function!

  • How to Change Java Versions in Windows (updated for Java 25)

    How to Change Java Versions in Windows (updated for Java 25)

    In this article, I will show you how to install multiple Java versions on Windows and how to change the Java version on the command line and in PowerShell:

    Multiple Java versions on Windows

    To enable these Java version change commands on your system as well, follow this step-by-step guide.

    Let’s go…

    Step 1: Installing Multiple Java Versions

    Installing multiple Java versions in parallel is incredibly easy in Windows. You can download and run the installer for each version, which automatically installs the versions in separate directories.

    Download Sources

    • Java SE 1.1 – You can no longer install this version on 64-bit Windows.
    • Java SE 1.2 – Installed to C:\jdk1.2.2\ and C:\Program Files (x86)\JavaSoft\JRE\1.2\ by default – I recommend changing this to C:\Program Files (x86)\Java\jdk1.2.2\ and C:\Program Files (x86)\Java\jre1.2.2\ for the sake of clarity.
    • Java SE 1.3 – Installed to C:\jdk1.3.1_28\ by default – I recommend changing this to C:\Program Files (x86)\Java\jdk1.3.1_28\.
    • Java SE 1.4 – Installed to C:\j2sdk1.4.2_19\ by default – I recommend changing this to C:\Program Files (x86)\Java\jdk1.4.2_19\.

    Starting with the following versions, you don’t need to change the default installation directories:

    Attention – you may use the following Oracle distributions only for private purposes and development:

    The following version is currently an early access build. You should use it only for testing purposes:

    Step 2: Define Java Environment Variables

    The following two environment variables decide which Java version an application uses:

    • JAVA_HOME – many start scripts use this variable.
    • Path – is used when running a Java binary (such as java and javac) from the console.

    These variables should always point to the same Java installation to avoid inconsistencies. Some programs, such as Eclipse, define the Java version in a separate configuration file (for Eclipse, for example, this is the entry “-vm” in the eclipse.ini file).

    Manually Setting the Java Environment Variables

    The Java installers create various environment variables, which you need to clean up first (see below). The fastest way to change the environment variables is to press the Windows key and type “env” – Windows then offers “Edit the system environment variables” as a search result:

    Opening Windows environment variables
    Opening Windows environment variables

    At this point, you can press “Enter” to open the system properties:

    Windows System Properties
    Windows System Properties

    Click on “Environment Variables…” and the following window opens:

    Windows environment variables Java 24
    Windows environment variables Java 24

    As the default version, I recommend the current release version, Java 24. Accordingly, you should make the following settings:

    • The top list (“User variables”) should not contain any Java-related entries.
    • The lower list (“System variables”) should contain an entry “JAVA_HOME = C:\Program Files\Java\jdk-24”. If this entry does not exist, you can add it with “New…”. If it exists but points to another directory, you can change it with “Edit…”.
    • Delete the following entries under “Path” (if they exist):
      • C:\ProgramData\Oracle\Java\javapath
      • C:\Program Files (x86)\Common Files\Oracle\Java\javapath
    • Insert the following entry instead:
      • %JAVA_HOME%\bin

    The entry should then look like the following (the other entries in the list will probably look different for you since you have other applications installed than I do):

    Adding "%JAVA_HOME%\bin" to the "Path" system variable
    Adding “%JAVA_HOME%\bin” to the “Path” system variable

    The last entry ensures that Path and JAVA_HOME are automatically consistent.

    Attention: this only works for the default setting configured here. If you change JAVA_HOME via the command line, you have to adjust Path accordingly. But don’t worry – the scripts you can download in the next step will do that automatically.

    How to Check Your Java Version on Windows

    Now open a command line to check the settings with the following commands:

    echo %JAVA_HOME%
    java -versionCode language: plaintext (plaintext)

    Here’s what you should see:

    Check your Java version with "cmd"
    Check your Java version with “cmd”

    Step 3: Install the Scripts to Change the Java Version

    To change the Java version on the command line, I have prepared some batch files that you can copy to your system. Here is the link: scripts-up-to-java25.zip

    The ZIP file contains scripts named

    • java25.bat, java24.bat, java23.bat, etc., for all Java versions,
    • the corresponding files java25.ps1, java24.ps1, etc. for PowerShell,
    • plus two common scripts javaX.bat and javaX.ps1.

    I suggest you unpack the scripts to C:\Program Files\Java\scripts.

    The scripts look like this:

    java25.bat:

    @echo off
    call javaX "Java 25" %1Code language: DOS .bat (dos)

    java25.ps1

    javaX "Java 25" $args[0]
    Code language: PowerShell (powershell)

    javaX.bat:

    @echo off
    
    if %1 == "Java 1.2" set JAVA_HOME=C:\Program Files (x86)\Java\jdk1.2.2
    if %1 == "Java 1.3" set JAVA_HOME=C:\Program Files (x86)\Java\jdk1.3.1_28
    ...
    if %1 == "Java 23" set JAVA_HOME=C:\Program Files\Java\jdk-23
    if %1 == "Java 24" set JAVA_HOME=C:\Program Files\Java\jdk-24
    if %1 == "Java 25" set JAVA_HOME=C:\Program Files\Java\jdk-25
    
    if "%~2" == "perm" (
      setx JAVA_HOME "%JAVA_HOME%" /M
    )
    
    set Path=%JAVA_HOME%\bin;%Path%
    
    echo %~1 activated.Code language: DOS .bat (dos)

    javaX.ps1:

    param ($javaVersion, $perm)
    
    switch ($javaVersion) {
      "Java 1.2" { $env:JAVA_HOME = "C:\Program Files (x86)\Java\jdk1.2.2" }
      "Java 1.3" { $env:JAVA_HOME = "C:\Program Files (x86)\Java\jdk1.3.1_28" }
      ...
      "Java 23" { $env:JAVA_HOME = "C:\Program Files\Java\jdk-23" }
      "Java 24" { $env:JAVA_HOME = "C:\Program Files\Java\jdk-24" }
      "Java 25" { $env:JAVA_HOME = "C:\Program Files\Java\jdk-25" }
    }
    
    if ($perm -eq "perm") {
      [Environment]::SetEnvironmentVariable("JAVA_HOME", $env:JAVA_HOME, [System.EnvironmentVariableTarget]::Machine)
    }
    
    $env:Path = $env:JAVA_HOME + '\bin;' + $env:Path
    
    Write-Output "$javaVersion activated."Code language: PowerShell (powershell)

    In the files javaX.bat and javaX.ps1, you probably have to adjust some paths to the installed Java versions.

    The scripts update the JAVA_HOME environment variable and insert the bin directory at the beginning of the Path variable. That makes it the first directory to be searched for the corresponding executable when you run Java commands such as java or javac.

    (The Path variable gets longer with each change. Do not worry about it. This only affects the currently opened command line.)

    Step 4: Add the Script Directory to the Path

    To be able to call the scripts from anywhere, you have to add the directory to the “Path” environment variable (just like you did with “%JAVA_HOME%\bin” in the second step):

    Adding "C:\Program Files\Java\scripts" to the "Path" system variable
    Adding “C:\Program Files\Java\scripts” to the “Path” system variable

    If you have installed the latest releases of all Java versions, you can use the scripts without any further adjustments. Open a new command line or PowerShell and enter, for instance, the following commands:

    Changing the Java version in PowerShell
    Changing the Java version in PowerShell

    If one of the commands does not activate the expected Java version, please check if the path in the javaX.bat and javaX.ps1 files corresponds to the installation path of the Java version you want to activate.

    Temporary and Permanent Java Version Changes

    The commands presented up to this point only affect the currently opened command line or PowerShell. As soon as you open another command line, the default version defined in step 2 is active again (Java 24, if you have not changed anything).

    If you want to change the Java version permanently, just add the parameter “perm” to the corresponding command, e.g.

    java24 perm

    Attention: To set the Java version permanently, you must open the command line or PowerShell as an administrator. Otherwise, you will get the error message “ERROR: Access to the registry path is denied.

    What You Should Do Next…

    I hope you were able to follow the instructions well and that the commands work for you.

    Now I would like to hear from you:

    Were you able to follow the steps well – or do you have unanswered questions?

    Either way, let me know by leaving a comment below.

  • Java 20 Features (with Examples)

    Java 20 Features (with Examples)

    Java 20 has been released on March 21, 2023. You can download Java 20 here.

    After we were able to look at one of the most significant enhancements in Java history, virtual threads, in Java 19, the Java 20 release is somewhat smaller again.

    The most exciting innovation is called “Scoped Values” and is intended to widely replace thread-local variables, which have various disadvantages.

    The remaining five of the six JEPs released in Java 20 are resubmissions of already known Incubator and Preview features.

    Preview and Incubator Features

    All six JDK Enhancement Proposals (JEPs) that made it into the Java 20 release are incubator or preview features. These are features that still need to be completed and must be explicitly activated (with --enable-preview in the java and javac commands) in order to be able to test them.

    Scoped Values (Incubator) – JEP 429

    Like virtual threads developed in Project Loom, scoped values are a modern alternative to thread locals that can be combined well with virtual threads. They allow storing a value for a limited time in such a way that only the thread that wrote the value can read it.

    JDK Enhancement Proposal 429 introduces scoped values in Java 20 in the incubator stage.

    To learn precisely how scoped values work and why they are preferable to thread locals, see the main article on scoped values.

    Record Patterns (Second Preview) – JEP 432

    Record patterns were first introduced in Java 19. A record pattern can be used with instanceof or switch to access the fields of a record without casting and calling accessor methods.

    Here is a simple sample record:

    public record Position(int x, int y) {}Code language: Java (java)

    Using a record pattern, we can now write an instanceof expression as follows:

    Object object = ...
    
    if (object instanceof Position(int x, int y)) {
      System.out.println("object is a position, x = " + x + ", y = " + y);
    } Code language: Java (java)

    We can then – provided object is of type Position – directly access its x and y values.

    The same can be done in a switch expression:

    Object object = ...
    
    switch (object) {
      case Position(int x, int y) 
          -> System.out.println("object is a position, x = " + x + ", y = " + y);
    
      // other cases ...
    }Code language: Java (java)

    The following changes were made in Java 20 with JDK Enhancement Proposal 432:

    Inference of Type Arguments of Generic Record Patterns

    To explain this change, we need a more complex example.

    Given are a generic interface Multi<T> and two implementing records, Tuple<T> and Triple<T>, which contain two and three values of type T, respectively:

    interface Multi<T> {}
    
    record Tuple<T>(T t1, T t2) implements Multi<T> {}
    
    record Triple<T>(T t1, T t2, T t3) implements Multi<T> {}Code language: Java (java)

    With the following code, we can check which concrete implementation a given Multi object is:

    Multi<String> multi = ...
    
    if (multi instanceof Tuple<String>(var s1, var s2)) {
      System.out.println("Tuple: " + s1 + ", " + s2);
    } else if (multi instanceof Triple<String>(var s1, var s2, var s3)) {
      System.out.println("Triple: " + s1 + ", " + s2 + ", " + s3);
    }Code language: Java (java)

    So far, we had to specify the type parameter (String in this case) with each instanceof check.

    As of Java 20, the compiler can infer the type so that we can omit it from the instanceof checks:

    if (multi instanceof Tuple(var s1, var s2)) {
      System.out.println("Tuple: " + s1 + ", " + s2);
    } else if (multi instanceof Triple(var s1, var s2, var s3)) {
      System.out.println("Triple: " + s1 + ", " + s2 + ", " + s3);
    }Code language: Java (java)

    I don’t particularly like the so-called “raw types” syntax used here. Raw types typically cause the compiler to ignore any type information. But that is not the case here.

    I would therefore consider it more consistent to use the diamond operator, as follows:

    if (multi instanceof Tuple<>(var s1, var s2)) {
      System.out.println("Tuple: " + s1 + ", " + s2);
    } else if (multi instanceof Triple<>(var s1, var s2, var s3)) {
      System.out.println("Triple: " + s1 + ", " + s2 + ", " + s3);
    }Code language: Java (java)

    The type parameter can also be omitted from switch statements as of Java 20.

    Record Patterns in for Loops

    Let’s say we have a list of positions and want to print them to the console. So far, we could do it like this:

    List<Position> positions = ...
    
    for (Position p : positions) {
      System.out.printf("(%d, %d)%n", p.x(), p.y());
    }Code language: Java (java)

    Starting with Java 20, we can also specify a record pattern in the for loop and then access x and y directly (just like with instanceof and switch):

    for (Position(int x, int y) : positions) {
      System.out.printf("(%d, %d)%n", x, y);
    }Code language: Java (java)

    Removal of Support for Named Record Patterns

    Up to now, there were the following three ways to perform pattern matching on a record:

    Object object =  new Position(4, 3);
    
    // 1. Pattern Matching for instanceof
    if (object instanceof Position p) {
      System.out.println("object is a position, p.x = " + p.x() + ", p.y = " + p.y());
    }
    
    // 2. Record Pattern
    if (object instanceof Position(int x, int y)) {
      System.out.println("object is a position, x = " + x + ", y = " + y);
    }
    
    // 3. Named Record Pattern
    if (object instanceof Position(int x, int y) p) {
      System.out.println("object is a position, p.x = " + p.x() + ", p.y = " + p.y() 
                                             + ", x = " + x + ", y = " + y);
    }Code language: Java (java)

    In the third variant (“named record pattern”), there are two ways to access the fields of the record – either via the x and y variables – or via p.x() and p.y().

    This variant was decided to be superfluous and removed again in Java 20.

    Pattern Matching for switch (Fourth Preview) – JEP 433

    The next feature already has three preview rounds behind it. “Pattern Matching for Switch” was first introduced in Java 17 and allows us to write a switch statement like the following:

    Object obj = getObject();
    
    switch (obj) {
      case String s when s.length() > 5 -> System.out.println(s.toUpperCase());
      case String s                     -> System.out.println(s.toLowerCase());
      case Integer i                    -> System.out.println(i * i);
      case Pos(int x, int y)            -> System.out.println(x + "/" + y);
      default                           -> {}
    }Code language: Java (java)

    This way, we can use a switch statement to check whether an object is of a specific class (and, if necessary, satisfies additional conditions) and cast this object simultaneously and implicitly to the target class. We can also combine the switch statement with record patterns to access the record fields directly.

    With JDK Enhancement Proposal 433, the following changes were made in Java 20:

    MatchException for Exhausting Switch

    An exhaustive switch (i.e., a switch that includes all possible values) throws a MatchException (rather than an IncompatibleClassChangeError) if it is determined at runtime that no switch label matches.

    That can happen if we subsequently extend the code but only recompile the changed classes. The best way to show this is with an example:

    Using the Position record from the “Record Patterns” chapter, we define a sealed interface Shape with the implementations Rectangle and Circle:

    public sealed interface Shape permits Rectangle, Circle {}
    
    public record Rectangle(Position topLeft, Position bottomRight) implements Shape {}
    
    public record Circle(Position center, int radius) implements Shape {}Code language: Java (java)

    In addition, we write a ShapeDebugger that prints different debug information depending on the Shape implementation:

    public class ShapeDebugger {
      public static void debug(Shape shape) {
        switch (shape) {
          case Rectangle r -> System.out.println(
            "Rectangle: top left = " + r.topLeft() + "; bottom right = " + r.bottomRight());
    
          case Circle c -> System.out.println(
            "Circle: center = " + c.center() + "; radius = " + c.radius());
        }
      }
    }Code language: Java (java)

    Since the compiler knows all possible implementations of the sealed Shape interface, it can ensure that this switch expression is exhaustive.

    We call the ShapeDebugger with the following program:

    public class Main {
      public static void main(String[] args) {
        var rectangle = new Rectangle(new Position(10, 10), new Position(50, 50));
        ShapeDebugger.debug(rectangle);
    
        var circle = new Circle(new Position(30, 30), 10);
        ShapeDebugger.debug(circle);
      }
    }Code language: Java (java)

    We compile the code as follows and run the Main class:

    $ javac --enable-preview --source 20 *.java
    $ java --enable-preview Main
    
    Rectangle: top left = Position[x=10, y=10]; bottom right = Position[x=50, y=50]
    Circle: center = Position[x=30, y=30]; radius = 10Code language: plaintext (plaintext)

    Then we add another shape Oval, add it to the permits list of the Shape interface, and extend the main program:

    public sealed interface Shape permits Rectangle, Circle, Oval {}
    
    public record Oval(Position center, int width, int height) implements Shape {}
    
    public class Main {
      public static void main(String[] args) {
        var rectangle = new Rectangle(new Position(10, 10), new Position(50, 50));
        ShapeDebugger.debug(rectangle);
    
        var circle = new Circle(new Position(30, 30), 10);
        ShapeDebugger.debug(circle);
    
        var oval = new Oval(new Position(60, 60), 20, 10);
        ShapeDebugger.debug(oval);
      }
    }Code language: Java (java)

    If we do this in an IDE, it will immediately tell us that the switch statement in the ShapeDebugger does not cover all possible values:

    Java 20, JEP 433: IDE error message on exhausting switch statement

    However, if we work without an IDE, recompile only the changed classes and then start the main program, the following happens:

    $ javac --enable-preview --source 20 Shape.java Oval.java Main.java
    $ java --enable-preview Main
    
    Rectangle: top left = Position[x=10, y=10]; bottom right = Position[x=50, y=50]
    Circle: center = Position[x=30, y=30]; radius = 10
    Exception in thread "main" java.lang.MatchException
            at ShapeDebugger.debug(ShapeDebugger.java:3)
            at Main.main(Main.java:10)Code language: plaintext (plaintext)

    The Java Runtime Environment throws a MatchException because the switch statement in the ShapeDebugger has no label for the Oval class.

    The same can happen with an exhaustive switch expression over the values of an enum if we subsequently extend the enum.

    Inference of Type Arguments for Generic Record Patterns

    As with the previously discussed record patterns with instanceof, the compiler can now also infer the type arguments of generic records in switch statements.

    Previously, we had to write a switch statement (based on the example classes from the “Record Patterns” chapter) as follows:

    Multi<String> multi = ...
    
    switch(multi) {
      case Tuple<String>(var s1, var s2) ->  System.out.println(
              "Tuple: " + s1 + ", " + s2);
    
      case Triple<String>(var s1, var s2, var s3) ->  System.out.println(
              "Triple: " + s1 + ", " + s2 + ", " + s3);
    
      ...
    }Code language: Java (java)

    Starting with Java 20, we can omit the <String> type arguments inside the switch statement:

    switch(multi) {
      case Tuple(var s1, var s2) ->  System.out.println(
              "Tuple: " + s1 + ", " + s2);
    
      case Triple(var s1, var s2, var s3) ->  System.out.println(
              "Triple: " + s1 + ", " + s2 + ", " + s3);
    
      ...
    }Code language: Java (java)

    Foreign Function & Memory API (Second Preview) – JEP 434

    The “Foreign Function & Memory API” developed in Project Panama has been worked on since Java 14 – at that time, still in two separate JEPs “Foreign Memory Access API” and “Foreign Linker API.”

    Since Java 19, the unified API has been in the preview stage. Its goal is to replace the cumbersome, error-prone, and slow Java Native Interface (JNI).

    The API allows access to native memory (i.e., memory outside the Java heap) and to execute native code (e.g., from C libraries) from Java.

    With JDK Enhancement Proposal 434, some changes were made to the API – more than usual during the preview phase. Since I did not explain the Foreign Function & Memory API in detail in the Java 19 article, I will not go into the individual changes here either.

    Instead, I repeat the example from the Java 19 article, adapted to the changes made in Java 20. The example program stores a string in off-heap memory, calls the “strlen” function of the C standard library on it, and prints the result to the console:

    public class FFMTest20 {
      public static void main(String[] args) throws Throwable {
        // 1. Get a lookup object for commonly used libraries
        SymbolLookup stdlib = Linker.nativeLinker().defaultLookup();
    
        // 2. Get a handle to the "strlen" function in the C standard library
        MethodHandle strlen = Linker.nativeLinker().downcallHandle(
            stdlib.find("strlen").orElseThrow(),
            FunctionDescriptor.of(JAVA_LONG, ADDRESS));
    
        // 3. Convert Java String to C string and store it in off-heap memory
        try (Arena offHeap = Arena.openConfined()) {
          MemorySegment str = offHeap.allocateUtf8String("Happy Coding!");
    
          // 4. Invoke the foreign function
          long len = (long) strlen.invoke(str);
    
          System.out.println("len = " + len);
        }
        // 5. Off-heap memory is deallocated at end of try-with-resources
      }
    }Code language: Java (java)

    To compile and run the program with Java 20, you must include the following parameters:

    $ javac --enable-preview --source 20 FFMTest20.java
    $ java --enable-preview --enable-native-access=ALL-UNNAMED FFMTest20 
    
    len = 13Code language: plaintext (plaintext)

    Since most Java developers will rarely come into contact with the Foreign Function & Memory API, I will not delve deeper into the matter here. Those interested can find more details in JEP 434 and on the Project Panama homepage.

    Virtual Threads (Second Preview) – JEP 436

    Virtual threads were first introduced as an incubator feature in Java 19. Virtual threads are lightweight threads that do not block operating system threads when they have to wait for locks, blocking data structures, or responses from external systems, for example.

    You can learn everything about virtual threads in the main article on virtual threads.

    JDK Enhancement Proposal 436 resubmits virtual threads for further feedback collection without changes in a second preview phase.

    A few changes from the first preview that were not specific to virtual threads and were already finalized in Java 19 were no longer explicitly listed in the current JEP:

    • New methods in Thread: join(Duration), sleep(Duration), and threadId().
    • New methods in Future: resultNow(), exceptionNow(), and state().
    • ExecutorService extends the AutoCloseable interface.
    • The decommissioning of numerous ThreadGroup methods.

    Structured Concurrency (Second Incubator) – JEP 437

    Like virtual threads, “structured concurrency” was first introduced in Java 19 and reintroduced in Java 20 with JDK Enhancement Proposal 437.

    When a task consists of multiple subtasks that can be processed in parallel, structured concurrency allows us to implement this in a particularly readable and maintainable way.

    You can read exactly how this works in the main article about structured concurrency.

    In the second incubator phase, StructuredTaskScope is extended to automatically inherit “scoped values” (also introduced in Java 20) to all child threads.

    You can read how this works in the article’s StructuredTaskScope and Scoped Values section.

    Deprecations and Deletions

    In Java 20, some methods were marked as “deprecated” or completely disabled.

    java.net.URL constructors are deprecated

    The constructors of java.net.URL have been marked as “deprecated.” Instead, we should use the URI.create(…) and URI.toURL() methods. Here is an example:

    Old code:

    URL url = new URL("https://www.janice.happycoders.eu");Code language: Java (java)

    New code:

    URL url = URI.create("https://www.janice.happycoders.eu").toURL();Code language: Java (java)

    There is no JDK enhancement proposal for this change.

    Thread.suspend/resume changed to throw UnsupportedOperationException

    Thread.suspend() and resume() were already marked as “deprecated” in Java 1.2 because the methods are prone to deadlocks. In Java 14, the methods were marked as “deprecated for removal.”

    As of Java 20, both methods throw an UnsupportedOperationException.

    There is no JDK enhancement proposal for this change.

    Thread.stop changed to throw UnsupportedOperationException

    The inherently unsafe Thread.stop(), which can lead to unpredictable behavior, was marked as “deprecated” in Java 1.2 and as “deprecated for removal” in Java 18.

    This method now also throws an UnsupportedOperationException.

    There is no JDK Enhancement Proposal for this change.

    Other Changes in Java 20

    In this section, you will find selected minor changes in Java 20 for which there are no JDK Enhancements Proposals.

    Javac Warns about Type Casts in Compound Assignments with Possible Lossy Conversions

    It is essential to mention this seemingly small change prominently here as many Java developers don’t know a particularity of the so-called “compound assignment operators” (+=, *=, etc.). This can lead to unexpected errors.

    What is the difference between the following operations?

    a += b;
    a = a + b;Code language: Java (java)

    Most Java developers will say: there is none.

    But this is wrong.

    For example, if a is a short and b is an int, then the second line will result in a compiler error:

    java: incompatible types: possible lossy conversion from int to shortCode language: plaintext (plaintext)

    That’s because a + b results in an int, which cannot be assigned to the short variable a without an explicit cast.

    The first line, on the other hand, is allowed because the compiler inserts an implicit cast in a compound assignment. If a is a short, then a += b is equivalent to:

    a = (short) (a + b);Code language: Java (java)

    When casting from int to short, the left 16 bits are truncated. That means information is lost, as the following example shows:

    short a = 30_000;
    int b = 50_000;
    a += b;
    System.out.println("a = " + a);Code language: Java (java)

    The program does not print 80000 (hexadecimal 0x13880), but 14464 (hexadecimal 0x3880).

    To warn developers about this potentially undesirable behavior, Java 20 (finally!) introduced a corresponding compiler warning.

    There is no JDK enhancement proposal for this change.

    Idle Connection Timeouts for HTTP/2

    The jdk.httpclient.keepalive.timeout system property can be used to set how long inactive HTTP/1.1 connections are kept open.

    As of Java 20, this property also applies to HTTP/2 connections.

    Furthermore, the system property jdk.httpclient.keepalive.timeout.h2 has been added, which can be used to override this value specifically for HTTP/2 connections.

    HttpClient Default Keep Alive Time is 30 Seconds

    If the just mentioned system property jdk.httpclient.keepalive.timeout is not defined, a default value of 1,200 seconds was applied until Java 19. In Java 20, the default value was reduced to 30 seconds.

    IdentityHashMap’s Remove and Replace Methods Use Object Identity

    IdentityHashMap is a special map implementation that does not consider keys to be equal if the equals() method returns true, but if the key objects are identical, i.e., the comparison using the == operator returns true.

    However, when the default methods remove(Object key, Object value) and replace(K key, V oldValue, V newValue) were added to the Map interface in Java 8, these methods were forgotten to be overridden in IdentityHashMap to use == instead of equals().

    This bug has now been corrected – after eight and a half years. The fact that the bug has not been noticed for so long indicates that IdentityHashMap is generally little used (and possibly contains other bugs).

    Support Unicode 15.0

    Unicode support has been raised to version 15.0 in Java 20. This is relevant, among other things, for the String and Character classes, which must be able to handle the new characters, code blocks, and scripts.

    Complete List of All Changes in Java 20

    In addition to the JEPs and other changes listed above, Java 20 also contains numerous minor changes beyond this article’s scope. For a complete list, see the Java 20 release notes.

    Summary

    With “scoped values,” we get a very useful construct in Java 20 to provide a thread and possibly a group of child threads with a read-only, thread-specific value during their lifetime.

    All other JEPs are minimally (or not at all) modified resubmissions of previous JEPs.

    You can download the latest version here.

  • Scoped Values in Java – What They Are and How to Use Them

    Scoped Values in Java – What They Are and How to Use Them

    Scoped Values were developed – together with Virtual Threads and Structured Concurrency – in Project Loom. They have been included in the JDK since Java 20 as an incubator feature and since Java 21 as a preview feature. They have been finalized in Java 25 without any changes.

    In this article, you will learn:

    • What is a Scoped Value?
    • How to use the ScopedValue class?
    • How are Scoped Values inherited?
    • What is the difference between ScopedValue and ThreadLocal?

    What is a Scoped Value?

    Scoped Values are a form of implicit method parameters that allow one or more values (i.e., arbitrary objects) to be passed to one or more remote methods without having to add them as explicit parameters to each method in the call chain.

    Scoped Values are usually created as public static fields, so they can be retrieved from any method.

    If multiple threads use the same ScopedValue field, then it may contain a different value from the point of view of each thread.

    If you are familiar with ThreadLocal variables, this will sound familiar. In fact, Scoped Values are a modern alternative for thread locals.

    I can best explain Scoped Values with an example.

    ScopedValue Example

    A classic usage scenario is a web framework that authenticates the user on an incoming request and makes the logged-in user’s data available to the code that processes the request.

    That can be done, for example, using a method argument.

    Now, in complex applications, the processing of a request can extend over hundreds of methods – but the information about the logged-in user may only be required in a few methods. Nevertheless, we would have to pass the user through all methods that eventually lead to invoking a method for which the logged-in user is relevant.

    In the following example, the logged-in user is passed from the Server through the RestAdapter and UseCase to the Repository, where it is eventually evaluated:

    class Server {
      private void serve(Request request) {
        // ...
        User user = authenticateUser(request);
        restAdapter.processRequest(request, user);
        // ...
      }
    }
    
    class RestAdapter {
      public void processRequest(Request request, User loggedInUser) { 
        // ...
        UUID id = extractId(request);
        useCase.invoke(id, loggedInUser);
        // ...
      }
    }
    
    class UseCase {
      public void invoke(UUID id, User loggedInUser) {
        // ...
        Data data = repository.getData(id, loggedInUser);
        // ...
      }
    }
    
    class Repository {
      public Data getData(UUID id, User loggedInUser) {
        Data data = findById(id);
        if (loggedInUser.isAdmin()) {
          enrichDataWithAdminInfos(data);
        }
      }
    }Code language: Java (java)

    The additional loggedInUser parameter makes our code noisy quite quickly. Most of the methods do not need the user at all – and there might even be methods that should not be able to access the user at all for security reasons.

    And what if, at some point deep in the call stack, we also needed the user’s IP address? Then we would have to pass another argument through countless methods.

    The alternative is to store the user in a Scoped Value that can be accessed from anywhere.

    This works as follows:

    We create a static field of type ScopedValue in a publicly accessible place. With ScopedValue.where(), we bind the Scoped Value to the concrete user object; and to the run() method, we supply – in the form of a Runnable – the code for whose call duration the Scoped Value should be valid:

    class Server {
      public final static ScopedValue<User> LOGGED_IN_USER = ScopedValue.newInstance();
     
      private void serve(Request request) {
        // ...
        User loggedInUser = authenticateUser(request);
        ScopedValue.where(LOGGED_IN_USER, loggedInUser)
                   .run(() -> restAdapter.processRequest(request));
        // ...
      }
    }Code language: Java (java)

    Up to and including Java 23, we can alternatively use the convenience method runWhere() and pass the Runnable to this method as a third parameter:

    ScopedValue.runWhere(
      LOGGED_IN_USER,
      loggedInUser,
      () -> restAdapter.processRequest(request) // ⟵ the Runnable as 3rd parameter
    );


    This variant was removed in Java 24 to make the ScopedValue interface completely “fluent”.

    We can then remove the loggedInUser parameter from all method signatures:

    class RestAdapter {
      public void processRequest(Request request) { 
        // ...
        UUID id = extractId(request);
        useCase.invoke(id);
        // ...
      }
    }
    
    class UseCase {
      public void invoke(UUID id) {
        // ...
        Data data = repository.getData(id);
        // ...
      }
    }Code language: Java (java)

    And where we need the logged-in user, we can read it with ScopedValue.get():

    class Repository {
      public Data getData(UUID id) {
        Data data = findById(id);
        User loggedInUser = Server.LOGGED_IN_USER.get();
        if (loggedInUser.isAdmin()) {
          enrichDataWithAdminInfos(data);
        }
      }
    }Code language: Java (java)

    That makes the code much more readable and maintainable, as we no longer have to pass the logged-in user from one method to the next but can access it exactly where we need it.

    Calling a Method with a Return Value

    If the called code has a return value, you can call the method call(CallableOp op) after ScopedValue.where() instead of run(Runnable op).

    CallableOp is a functional, generic interface defined as follows:

    @FunctionalInterface
    public static interface CallableOp<T, X extends Throwable> {
        T call() throws X
    }Code language: Java (java)

    The interface includes both the return value and a potentially thrown exception as type parameters. Thus, the compiler can recognize what kind of exception the invocation of call(...) can throw.

    So, if we want to call, for example, the following method in the context of a Scoped Value:

    Result doSomethingSmart() throws SpecificException {
      . . .
    }Code language: Java (java)

    Then the compiler recognizes that call() can only throw a SpecificException as well, and we can catch it as follows:

    try {
      Result result = ScopedValue.where(USER, loggedInUser).call(() -> doSomethingSmart());
    } catch (SpecificException e) {  // ⟵ Catching SpecificException
      . . .
    }Code language: Java (java)

    And if the called method does not throw an exception, we don’t need to catch any.

    In Java 21 and 22, the CallableOp interface did not yet exist. Instead, a Callable was used. However, the call() method of the Callable interface throws a generic Exception:

    @FunctionalInterface
    public interface Callable {
      V call() throws Exception;
    }


    And thus, in Java 21 and 22, when calling ScopedValue.call(), we always had to catch Exception – even if the called method could only throw a specific exception or none at all.

    Until Java 23, we could alternatively use the convenience method callWhere(). This method was removed in Java 24 along with runWhere() (see above).

    Enabling Preview Features before Java 25

    If you want to use Scoped Values before Java 25, you need to explicitly enable preview features. To do this, you must call the java and javac commands with the following VM options:

    $ javac --enable-preview --source <Java version> <.java file to compile>
    $ java --enable-preview <.java file or compiled class to execute>Code language: plaintext (plaintext)

    Rebinding Scoped Values

    ScopedValue has no set(...) method to change the stored value. This is intentional because the immutability of a value makes complex code much more readable and maintainable.

    Instead, you can rebind the value for the invocation of a limited code section (e.g., for the invocation of a sub-method). That means that, for this limited code section, another value is visible … and as soon as that section is terminated, the original value is visible again.

    For example, our RestAdapter method might want to hide the information about the logged-in user from the extractId method. To do this, we can call ScopedValue.where(...) again and set the logged-in user to null during the sub-method call:

    class RestAdapter {
      public void processRequest(Request request) { 
        // ...
        UUID id = ScopedValue.where(LOGGED_IN_USER, null)
                             .call(() -> extractId(request));
        useCase.invoke(id);
        // ...
      }
    }Code language: Java (java)

    Here you can also see how we use call(...) instead of run(...) and pass a Callable (i.e., a method with a return value) instead of a Runnable.

    Inheriting Scoped Values

    Scoped Values are automatically inherited by all child threads created via a Structured Task Scope.

    Using StructuredTaskScope, our use case could, for example, call an external service in parallel to the repository method:

    class UseCase {
      public void invoke(UUID id) {
        // ...
        try (var scope = new StructuredTaskScope.ShutdownOnFailure()) {
          Future<Data>    dataFuture    = scope.fork(() -> repository.getData(id));
          Future<ExtData> extDataFuture = scope.fork(() -> remoteService.getExtData(id));
     
          scope.join();
          scope.throwIfFailed();
    
          Data    data    = dataFuture.resultNow();
          ExtData extData = extDataFuture.resultNow();
          // ...
        }
      }
    }Code language: Java (java)

    This way, we can also access the logged-in user from the child threads created via fork(...) using LOGGED_IN_USER.get().

    Since the StructuredTaskScope is not completed until all child threads are finished, it fits very well into the concept of Scoped Values.

    What Is the Difference Between ScopedValue and ThreadLocal?

    Those who have solved the requirements of these examples so far with thread locals may now wonder: Why do we need Scoped Values? What can they do that thread locals can’t?

    Scoped Values have the following advantages:

    • They are only valid during the lifetime of the Runnable passed to the run(...) method, and they are released for garbage collection immediately afterward (unless further references to them exist). A thread-local value, on the other hand, remains in memory until either the thread is terminated (which may never be the case when using a thread pool) or it is explicitly deleted with ThreadLocal.remove(). Since many developers forget to do this (or don’t do it because the program is so complex that it’s not obvious when a thread-local value is no longer needed), memory leaks are often the result.
    • A Scoped Value is immutable – it can only be reset for a new scope by rebinding, as mentioned above. This improves the understandability and maintainability of the code considerably compared to thread locals, which can be changed at any time using set().
    • The child threads created by StructuredTaskScope have access to the Scoped Value of the parent thread. If, on the other hand, we use InheritableThreadLocal, its value is copied to each child thread so that a child thread cannot change the thread local value of the parent thread. This can significantly increase the memory footprint.

    Like thread locals, Scoped Values are available for both platform and virtual threads. Especially when there are thousands to millions of virtual child threads, the memory savings from accessing the Scoped Value of the parent thread (instead of creating a copy) can be significant.

    Summary

    With Scoped Values, we get a handy construct to provide a thread (and, if needed, a group of child threads) with a read-only, thread-specific value during their lifetime.

    Please note that until Java 24, Scoped Values are in the preview stage and need to be explicitly enabled using --enable-preview --source <Java version>.

  • Java 19 Features (with Examples)

    Java 19 Features (with Examples)

    Java 19 has been released on September 20, 2022. You can download Java 19 here.

    The most exciting new feature for me is virtual threads, which have been under development for several years within Project Loom and are now finally included as a preview in the JDK.

    Virtual threads are a prerequisite for Structured Concurrency, another exciting new incubator feature in Java 19.

    For those who need to access non-Java code (e.g., the C standard library), there is also good news: The Foreign Function & Memory API has reached the preview stage after five incubator rounds.

    New Methods to Create Preallocated HashMaps

    If we want to create an ArrayList for a known number of elements (e.g., 120), we can do it as follows since ever:

    List<String> list = new ArrayList<>(120);Code language: Java (java)

    Thus the array underlying the ArrayList is allocated directly for 120 elements and does not have to be enlarged several times (i.e., newly created and copied) to insert the 120 elements.

    Similarly, we have always been able to generate a HashMap as follows:

    Map<String, Integer> map = new HashMap<>(120);Code language: Java (java)

    Intuitively, one would think that this HashMap offers space for 120 mappings.

    However, this is not the case!

    This is because the HashMap is initialized with a default load factor of 0.75. This means that as soon as the HashMap is 75% full, it is rebuilt (“rehashed”) with double the size. This ensures that the elements are distributed as evenly as possible across the HashMap‘s buckets and that as few buckets as possible contain more than one element.

    Thus, the HashMap initialized with a capacity of 120 can only hold 120 × 0.75 = 90 mappings.

    To create a HashMap for 120 mappings, you had to calculate the capacity by dividing the number of mappings by the load factor: 120 ÷ 0.75 = 160.

    So a HashMap for 120 mappings had to be created as follows:

    // for 120 mappings: 120 / 0.75 = 160
    Map<String, Integer> map = new HashMap<>(160); 
    Code language: Java (java)

    Java 19 makes it easier for us – we can now write the following instead:

    Map<String, Integer> map = HashMap.newHashMap(120);Code language: Java (java)

    If we look at the source code of the new methods, we see that they do the same as we did before:

    public static <K, V> HashMap<K, V> newHashMap(int numMappings) {
        return new HashMap<>(calculateHashMapCapacity(numMappings));
    }
    
    static final float DEFAULT_LOAD_FACTOR = 0.75f;
    
    static int calculateHashMapCapacity(int numMappings) {
        return (int) Math.ceil(numMappings / (double) DEFAULT_LOAD_FACTOR);
    }Code language: Java (java)

    The newHashMap() method has also been added to LinkedHashMap and WeakHashMap.

    There is no JDK enhancement proposal for this extension.

    Preview- und Incubator-Features

    Java 19 provides us with six preview and incubator features, i.e., features that have not yet been completed but can already be tested by the developer community. The feedback from the community is usually incorporated into the further development and completion of these features.

    Pattern Matching for switch (Third Preview) – JEP 427

    Let’s start with a feature that has already gone through two rounds of previews. First introduced in Java 17, “Pattern Matching for switch” allowed us to write code like the following:

    switch (obj) {
      case String s && s.length() > 5 -> System.out.println(s.toUpperCase());
      case String s                   -> System.out.println(s.toLowerCase());
    
      case Integer i                  -> System.out.println(i * i);
    
      default -> {}
    }Code language: Java (java)

    We can check within a switch statement if an object is of a particular class and if it has additional characteristics (like in the example: longer than five characters).

    In Java 19, JDK Enhancement Proposal 427 changed the syntax of the so-called “Guarded Pattern” (in the example above “String s && s.length() > 5“). Instead of &&, we now have to use the new keyword when.

    The example from above is notated in Java 19 as follows:

    switch (obj) {
      case String s when s.length() > 5 -> System.out.println(s.toUpperCase());
      case String s                     -> System.out.println(s.toLowerCase());
    
      case Integer i                    -> System.out.println(i * i);
    
      default -> {}
    }Code language: Java (java)

    when is a so-called “contextual keyword” and therefore only has a meaning within a case label. If you have variables or methods with the name “when” in your code, you don’t need to change them.

    Record Patterns (Preview) – JEP 405

    We stay with the topic “pattern matching” and come to “record patterns”. If the subject “records” is new to you, I recommend reading the article “Records in Java” first.

    I’ll best explain what a record pattern is with an example. Let’s assume we have defined the following record:

    public record Position(int x, int y) {}Code language: Java (java)

    We also have a print() method that can print any object, including positions:

    private void print(Object object) {
      if (object instanceof Position position) {
        System.out.println("object is a position, x = " + position.x() 
                                             + ", y = " + position.y());
      }
      // else ...
    }
    Code language: Java (java)

    If you stumble over the notation used – it was introduced in Java 16 as “Pattern Matching for instanceof”.

    Record Pattern with instanceof

    As of Java 19, JDK Enhancement Proposal 405 allows us to use a so-called “record pattern”. This allows us to write the code as follows:

    private void print(Object object) {
      if (object instanceof Position(int x, int y)) {
        System.out.println("object is a position, x = " + x + ", y = " + y);
      } 
      // else ...
    }Code language: Java (java)

    Instead of matching on “Position position” and accessing position in the following code, we now match on “Position(int x, int y)” and can then access x and y directly.

    Record Pattern with switch

    Since Java 17, we can also write the original example as a switch statement:

    private void print(Object object) {
      switch (object) {
        case Position position
            -> System.out.println("object is a position, x = " + position.x() 
                                                    + ", y = " + position.y());
        // other cases ...
      }
    }Code language: Java (java)

    We can now also use a record pattern in the switch statement:

    private void print(Object object) {
      switch (object) {
        case Position(int x, int y) 
            -> System.out.println("object is a position, x = " + x + ", y = " + y);
    
        // other cases ...
      }
    }Code language: Java (java)

    Nested Record Patterns

    It is also possible to match nested records – let me demonstrate this with another example.

    We first define a second record, Path, with a start position and a destination position:

    public record Path(Position from, Position to) {}Code language: Java (java)

    Our print() method can now use a record pattern to print all the path’s X and Y coordinates easily:

    private void print(Object object) {
      if (object instanceof Path(Position(int x1, int y1), Position(int x2, int y2))) {
        System.out.println("object is a path, x1 = " + x1 + ", y1 = " + y1 
                                         + ", x2 = " + x2 + ", y2 = " + y2);
      }
      // else ...
    }Code language: Java (java)

    We can also write this alternatively as a switch statement:

    private void print(Object object) {
      switch (object) {
        case Path(Position(int x1, int y1), Position(int x2, int y2))
            -> System.out.println("object is a path, x1 = " + x1 + ", y1 = " + y1 
                                                + ", x2 = " + x2 + ", y2 = " + y2);
        // other cases ...
      }
    }Code language: Java (java)

    Record patterns thus provide us with an elegant way to access the record’s elements after a type check.

    Virtual Threads (Preview) – JEP 425

    The most exciting innovation in Java 19 for me is “Virtual Threads”. Virtual threads have been developed in Project Loom for several years and could only be tested with a self-compiled JDK so far.

    With JDK Enhancement Proposal 425, virtual threads finally make their way into the official JDK – and they do so directly in the preview stage, so no more significant changes to the API are expected.

    To find out why we need virtual threads, what they are, how they work, and how to use them, check out the main article on virtual threads. You definitely shouldn’t miss it.

    Structured Concurrency (Incubator) – JEP 428

    Also developed in Project Loom and initially released as an incubator feature in Java 19 with JDK Enhancement Proposal 428 is the so-called “Structured Concurrency.”

    When a task consists of several subtasks that can be processed in parallel, Structured Concurrency allows us to implement this in a particularly readable and maintainable way.

    You can learn more about how this works in the main article about Structured Concurrency.

    Foreign Function & Memory API (Preview) – JEP 424

    In Project Panama, a replacement for the cumbersome, error-prone, and slow Java Native Interface (JNI) has been in the works for a long time.

    The “Foreign Memory Access API” and the “Foreign Linker API” were already introduced in Java 14 and Java 16 – both initially individually in the incubator stage. In Java 17, these APIs were combined to form the “Foreign Function & Memory API” (FFM API), which remained in the incubator stage until Java 18.

    In Java 19, JDK Enhancement Proposal 424 finally promoted the new API to the preview stage, which means that only minor changes and bug fixes will be made. So it’s time to introduce the new API!

    The Foreign Function & Memory API enables access to native memory (i.e., memory outside the Java heap) and access to native code (e.g., C libraries) directly from Java.

    I will show how this works with an example. However, I won’t go too deep into the topic here since most Java developers rarely (or never) need to access native memory and code.

    Here is a simple example that stores a string in off-heap memory and calls the “strlen” function of the C standard library on it:

    public class FFMTest {
      public static void main(String[] args) throws Throwable {
        // 1. Get a lookup object for commonly used libraries
        SymbolLookup stdlib = Linker.nativeLinker().defaultLookup();
    
        // 2. Get a handle to the "strlen" function in the C standard library
        MethodHandle strlen = Linker.nativeLinker().downcallHandle(
            stdlib.lookup("strlen").orElseThrow(), 
            FunctionDescriptor.of(JAVA_LONG, ADDRESS));
    
        // 3. Convert Java String to C string and store it in off-heap memory
        MemorySegment str = implicitAllocator().allocateUtf8String("Happy Coding!");
    
        // 4. Invoke the foreign function
        long len = (long) strlen.invoke(str);
    
        System.out.println("len = " + len);
      }
    }
    Code language: Java (java)

    Interesting is the FunctionDescriptor in line 9: it expects as the first parameter the return type of the function and as additional parameters the function’s arguments. The FunctionDescriptor ensures that all Java types are adequately converted to C types and vice versa.

    Since the FFM API is still in the preview stage, we must specify a few additional parameters to compile and start it:

    $ javac --enable-preview --source 19 FFMTest.java
    $ java --enable-preview FFMTestCode language: plaintext (plaintext)

    Anyone who has worked with JNI – and remembers how much Java and C boilerplate code you had to write and keep in sync – will realize that the effort required to call the native function has been reduced by orders of magnitude.

    If you want to delve deeper into the matter: you can find more complex examples in the JEP.

    Vector API (Fourth Incubator) – JEP 426

    The new Vector API has nothing to do with the java.util.Vector class. In fact, it is about a new API for mathematical vector computation and its mapping to modern SIMD (Single-Instruction-Multiple-Data) CPUs.

    The Vector API has been part of the JDK since Java 16 as an incubator and was further developed in Java 17 and Java 18.

    With JDK Enhancement Proposal 426, Java 19 delivers the fourth iteration in which the API has been extended to include new vector operations – as well as the ability to store vectors in and read them from memory segments (a feature of the Foreign Function & Memory API).

    Incubator features may still be subject to significant changes, so that I won’t present the API in detail here. I will do that as soon as the Vector API has moved to the preview stage.

    Deprecations and Deletions

    In Java 19, some functions have been marked as “deprecated” or made inoperable.

    Deprecation of Locale class constructors

    In Java 19, the public constructors of the Locale class were marked as “deprecated”.

    Instead, we should use the new static factory method Locale.of(). This ensures that there is only one instance per Locale configuration.

    The following example shows the use of the factory method compared to the constructor:

    Locale german1 = new Locale("de"); // deprecated
    Locale germany1 = new Locale("de", "DE"); // deprecated
    
    Locale german2 = Locale.of("de");
    Locale germany2 = Locale.of("de", "DE");
    
    System.out.println("german1  == Locale.GERMAN  = " + (german1 == Locale.GERMAN));
    System.out.println("germany1 == Locale.GERMANY = " + (germany1 == Locale.GERMANY));
    System.out.println("german2  == Locale.GERMAN  = " + (german2 == Locale.GERMAN));
    System.out.println("germany2 == Locale.GERMANY = " + (germany2 == Locale.GERMANY));
    Code language: Java (java)

    When you run this code, you will see that the objects supplied via the factory method are identical to the Locale constants – those created via constructs logically are not.

    java.lang.ThreadGroup is degraded

    In Java 14 and Java 16, several Thread and ThreadGroup methods were marked as “deprecated for removal”. The reasons are explained in the linked sections.

    The following of these methods have been decommissioned in Java 19:

    • ThreadGroup.destroy() – invocations of this method will be ignored.
    • ThreadGroup.isDestroyed() – always returns false.
    • ThreadGroup.setDaemon() – sets the daemon flag, but this has no effect anymore.
    • ThreadGroup.getDaemon() – returns the value of the unused daemon flags.
    • ThreadGroup.suspend(), resume(), and stop() throw an UnsupportedOperationException.

    Other Changes in Java 19

    In this section, you will find changes/enhancements that might not be relevant for all Java developers.

    Automatic Generation of the CDS Archive

    Application Class Data Sharing (short: “ ”Application CDS” or “AppCDS”) was introduced in Java 10, the configuration was significantly simplified in Java 13.

    Application CDS makes it possible to load the classes of an application into the memory once when operating several JVMs on one machine and to share this memory area with all JVMs. This saves memory and time for loading the .jar and .class files and converting them into a platform-specific binary format.

    With Java 19, the configuration of AppCDS has been simplified once again. You can now specify the following VM parameter to automatically create or update a CDS archive.

    The application from the examples in the Java 10 and 13 articles linked above can now be started as follows:

    java -XX:+AutoCreateSharedArchive -XX:SharedArchiveFile=helloworld.jsa \
        -cp target/helloworld.jar eu.happycoders.appcds.Main
    Code language: plaintext (plaintext)

    The shared archive will now be created if it does not exist or if it was created by an older Java version.

    Linux/RISC-V Port – JEP 422

    Due to the increasing use of RISC-V hardware, a port for the corresponding architecture was made available with JEP 422.

    Additional Date-Time Formats

    We can use the DateTimeFormatter.ofLocalizedDate(…), ofLocalizedTime(…), and ofLocalizedDateTime(…) methods and the subsequent call to withLocale(…) to generate a date/time formatter. We control the exact format using the FormatStyle enum, which can take the values FULL, LONG, MEDIUM, and SHORT.

    In Java 19, the method ofLocalizedPattern(String requestedTemplate) was added, with which we can also define flexible formats. Here is an example:

    LocalDate now = LocalDate.now();
    DateTimeFormatter formatter = DateTimeFormatter.ofLocalizedPattern("yMMM");
    System.out.println("US:      " + formatter.withLocale(Locale.US).format(now));
    System.out.println("Germany: " + formatter.withLocale(Locale.GERMANY).format(now));
    System.out.println("Japan:   " + formatter.withLocale(Locale.JAPAN).format(now));Code language: Java (java)

    The code outputs the following:

    US:      Jan 2024
    Germany: Jan. 2024
    Japan:   2024年1月
    Code language: plaintext (plaintext)

    There is no JDK Enhancement Proposal for this change. You can find it in the JDK 19 Release Notes.

    New System Properties for System.out and System.err

    Since version 18, Java automatically uses the character encoding of the console or terminal for printing to System.out and System.err. On Linux, this is usually UTF-8 and on Windows, code page 437.

    Save the following program in the file Test.java:

    public class Test {
      public static void main(String[] args) {
        System.out.println("Á é ö ß € ¼");
      }
    }Code language: Java (java)

    If you start this on Linux, all characters will probably be displayed correctly:

    $ java Test.java
    Á é ö ß € ¼Code language: plaintext (plaintext)

    However, if you run the program on Windows, you will most likely see the following output (a question mark instead of the Á and € characters):

    C:\...>java Test.java
    ? é ö ß ? ¼Code language: plaintext (plaintext)

    This is because Windows has the character encoding “code page 437” activated by default, which does not contain the corresponding characters.

    You can switch the Windows console to UTF-8 as follows:

    C:\...>chcp 65001
    Active code page: 65001Code language: plaintext (plaintext)

    When you start the program again, you will now see all characters correctly.

    If the automatic character set recognition does not work, you can set it to UTF-8, for example, using the following VM options from Java 19 onwards:

    -Dstdout.encoding=utf8 -Dstderr.encoding=utf8

    If you don’t want to do this every time you start the program, you can also set these settings globally by defining the following environment variable (yes, it begins with an underscore):

    _JAVA_OPTIONS="-Dstdout.encoding=utf8 -Dstderr.encoding=utf8"

    There is no JDK Enhancement Proposal for this change. You can find it in the JDK 19 release notes.

    Complete List of All Changes in Java 19

    In addition to the JDK Enhancement Proposals (JEPs) and class library changes presented in this article, there are numerous smaller changes that are beyond the scope of this article. You can find a complete list in the JDK 19 Release Notes.

    Summary

    In Java 19, the long-awaited virtual threads developed in Project Loom have finally found their way into the JDK (albeit in preview stage for now). I hope you are as excited as I am and can’t wait to use virtual threads in your projects!

    Structured Concurrency (still in the incubator stage) will build on this to greatly simplify the management of tasks that are split into parallel subtasks.

    The pattern matching capabilities in instanceof and switch, which have been gradually enhanced in recent JDK versions, have been extended to include record patterns.

    The preview and incubator features “Pattern Matching for switch”, “Foreign Function & Memory API”, and “Vector API” were sent to the next preview and incubator rounds.

    Various other changes round off the release as usual. You can download Java 19 here.

  • Virtual Threads in Java – Deep Dive with Examples

    Virtual Threads in Java – Deep Dive with Examples

    Virtual threads are one of the most important innovations in Java for a long time. They were developed in Project Loom and have been included in the JDK since Java 19 as a preview feature and since Java 21 as a final version (JEP 444).

    In this article, you will learn:

    • Why do we need virtual threads?
    • What are virtual threads, and how do they work?
    • How to use virtual threads?
    • How do you create virtual threads, and how many virtual threads can be started?
    • How to use virtual threads in Spring and Jakarta EE?
    • What are the advantages of virtual threads?
    • What are virtual threads not, and what are their limitations?

    Let’s start with the challenge that led to the development of virtual threads.

    Why Do We Need Virtual Threads?

    Anyone who has ever maintained a backend application under heavy load knows that threads are often the bottleneck. For every incoming request, a thread is needed to process the request. One Java thread corresponds to one operating system thread, and those are resource-hungry:

    • An OS thread reserves 1 MB for the stack and commits 32 or 64 KB of it upfront, depending on the operating system.
    • It takes about 1ms to start an OS thread.
    • Context switches take place in kernel space and are quite CPU-intensive.

    You should not start more than a few thousand; otherwise, you risk the stability of the entire system.

    However, a few thousand are not always enough – especially if it takes longer to process a request because of the need to wait for blocking data structures, such as queues, locks, or external services like databases, microservices, or cloud APIs.

    For example, if a request takes two seconds and we limit the thread pool to 1,000 threads, then a maximum of 500 requests per second could be answered. However, the CPU would be far from being utilized since it would spend most of its time waiting for responses from the external services, even if several threads are served per CPU core.

    So far, we have only been able to overcome this problem with asynchronous programming – for example, with CompletableFuture or reactive frameworks like RxJava and Project Reactor.

    However, anyone who has had to maintain code like the following knows that reactive code is many times more complex than sequential code – and absolutely no fun.

    public CompletionStage<Response> getProduct(String productId) {
      return productService
          .getProductAsync(productId)
          .thenCompose(
              product -> {
                if (product.isEmpty()) {
                  return CompletableFuture.completedFuture(
                      Response.status(Status.NOT_FOUND).build());
                }
    
                return warehouseService
                    .isAvailableAsync(productId)
                    .thenCompose(
                        available ->
                            available
                                ? CompletableFuture.completedFuture(0)
                                : supplierService.getDeliveryTimeAsync(
                                    product.get().supplier(), productId))
                    .thenApply(
                        daysUntilShippable ->
                            Response.ok(
                                    new ProductPageResponse(
                                        product.get(), daysUntilShippable))
                                .build());
              });
    }Code language: Java (java)

    Not only is this code hard to read and maintain, but it is also extremely difficult to debug. For example, it would make no sense to set a breakpoint here because the code only defines the asynchronous flow but does not execute it. The business code will be executed in a separate thread pool at a later time.

    In addition, the database drivers and drivers for other external services must also support the asynchronous, non-blocking model.

    What Are Virtual Threads?

    Virtual threads solve the problem in a way that again allows us to write easily readable and maintainable code. Virtual threads feel like normal threads from a Java code perspective, but they are not mapped 1:1 to operating system threads.

    Instead, there is a pool of so-called carrier threads onto which a virtual thread is temporarily mapped (“mounted”). As soon as the virtual thread encounters a blocking operation, the virtual thread is removed (“unmounted”) from the carrier thread, and the carrier thread can execute another virtual thread (a new one or a previously blocked one).

    The following figure depicts this M:N mapping from virtual threads to carrier threads and thus to operating system threads:

    Mapping from virtual threads to carrier threads to operating system threads
    Mapping from virtual threads to carrier threads to operating system threads

    The carrier thread pool is a ForkJoinPool – that is, a pool where each thread has its own queue and “steals” tasks from other threads’ queues should its own queue be empty. Its size is set by default to Runtime.getRuntime().availableProcessors() and can be adjusted with the VM option jdk.virtualThreadScheduler.parallelism.

    Over the course of time, the CPU activity of three tasks, for example, each executing code four times and blocking three times for a relatively long period in between, could be mapped to a single carrier thread as follows:

    Mapping three virtual threads to one carrier thread
    Mapping three virtual threads to one carrier thread

    Blocking operations thus no longer block the executing carrier thread, and we can process a large number of requests concurrently using a small pool of carrier threads.

    We could then implement the example use case from above quite simply like this:

    public ProductPageResponse getProduct(String productId) {
      Product product = productService.getProduct(productId)
          .orElseThrow(NotFoundException::new);
    
      boolean available = warehouseService.isAvailable(productId);
    
      int shipsInDays =
         available ? 0 : supplierService.getDeliveryTime(product.supplier(), productId);
    
      return new ProductPageResponse(product, shipsInDays);
    }
    Code language: Java (java)

    This code is not only easier to write and read but also – like any sequential code – to debug by conventional means.

    If your code already looks like this – i.e., you never switched to asynchronous programming, then I have good news: you can continue to use your code unchanged with virtual threads.

    Virtual Threads – Example

    We can also demonstrate the power of virtual threads without a backend framework. To do this, we simulate a scenario similar to the one described above: we start 1,000 tasks, each of which waits one second (to simulate access to an external API) and then returns a result (a random number in the example).

    First, we implement the task:

    public class Task implements Callable<Integer> {
    
      private final int number;
    
      public Task(int number) {
        this.number = number;
      }
    
      @Override
      public Integer call() {
        System.out.printf(
            "Thread %s - Task %d waiting...%n", Thread.currentThread().getName(), number);
    
        try {
          Thread.sleep(1000);
        } catch (InterruptedException e) {
          System.out.printf(
              "Thread %s - Task %d canceled.%n", Thread.currentThread().getName(), number);
          return -1;
        }
    
        System.out.printf(
            "Thread %s - Task %d finished.%n", Thread.currentThread().getName(), number);
        return ThreadLocalRandom.current().nextInt(100);
      }
    }Code language: Java (java)

    Now we measure how long it takes a pool of 100 platform threads (which is how non-virtual threads are referred to) to process all 1,000 tasks:

    try (ExecutorService executor = Executors.newFixedThreadPool(100)) {
      List<Task> tasks = new ArrayList<>();
      for (int i = 0; i < 1_000; i++) {
        tasks.add(new Task(i));
      }
    
      long time = System.currentTimeMillis();
    
      List<Future<Integer>> futures = executor.invokeAll(tasks);
    
      long sum = 0;
      for (Future<Integer> future : futures) {
        sum += future.get();
      }
    
      time = System.currentTimeMillis() - time;
    
      System.out.println("sum = " + sum + "; time = " + time + " ms");
    }Code language: Java (java)

    ExecutorService is auto-closeable since Java 19, i.e. it can be surrounded with a try-with-resources block. At the end of the block, ExecutorService.close() is called, which in turn calls shutdown() and awaitTermination() – and possibly shutdownNow() should the thread be interrupted during awaitTermination().

    The program runs for a little over 10 seconds. That was to be expected:

    1,000 tasks divided by 100 threads = 10 tasks per thread

    Each platform thread had to process ten tasks sequentially, each lasting about one second.

    Next, we test the whole thing with virtual threads. Therefore, we only need to replace the statement

    Executors.newFixedThreadPool(100)Code language: Java (java)

    by:

    Executors.newVirtualThreadPerTaskExecutor()Code language: Java (java)

    This executor does not use a thread pool but creates a new virtual thread for each task.

    After that, the program no longer needs 10 seconds but only just over one second. It can hardly be faster because every task waits one second.

    Impressive: even 10,000 tasks can be processed by our little program in just over a second.

    Only at 100,000 tasks does the throughput drop noticeably: my laptop needs about four seconds for this – which is still blazingly fast compared to the thread pool, which would need almost 17 minutes for this.

    How to Create Virtual Threads?

    We have already learned about one way to create virtual threads: An executor service that we create with Executors.newVirtualThreadPerTaskExecutor() creates one new virtual thread per task.

    Using Thread.startVirtualThread() or Thread.ofVirtual().start(), we can also explicitly start virtual threads:

    Thread.startVirtualThread(() -> {
      // code to run in thread
    });
    
    Thread.ofVirtual().start(() -> {
      // code to run in thread
    });
    Code language: Java (java)

    In the second variant, Thread.ofVirtual() returns a VirtualThreadBuilder whose start() method starts a virtual thread. The alternative method Thread.ofPlatform() returns a PlatformThreadBuilder via which we can start a platform thread.

    Both builders implement the Thread.Builder interface. This allows us to write flexible code that decides at runtime whether it should run in a virtual or in a platform thread:

    Thread.Builder threadBuilder = createThreadBuilder();
    threadBuilder.start(() -> {
      // code to run in thread
    });
    Code language: Java (java)

    By the way, you can find out if code is running in a virtual thread with Thread.currentThread().isVirtual().

    How Many Virtual Threads Can Be Started?

    In this GitHub repository you can find several demo programs that demonstrate the capabilities of virtual threads.

    With the class HowManyVirtualThreadsDoingSomething you can test how many virtual threads you can run on your system. The application starts more and more threads and performs Thread.sleep() operations in these threads in an infinite loop to simulate waiting for a response from a database or an external API. Try to give the program as much heap memory as possible with the VM option -Xmx.

    On my 64 GB machine, 20,000,000 virtual threads could be started without any problems – and with a little patience, even 30,000,000. From then on, the garbage collector tried to perform full GCs non-stop – because the stack of virtual threads is “parked” on the heap, in so-called StackChunk objects, as soon as a virtual thread blocks. Shortly after, the application terminated with an OutOfMemoryError.

    With the class HowManyPlatformThreadsDoingSomething you can also test how many platform threads your system supports. But be warned: Most of the time the program ends with an OutOfMemoryError at some point (between 80,000 and 90,000 threads for me) – but it can also crash your computer.

    How to Use Virtual Threads With Jakarta EE?

    The example method from the beginning of this article would look like the following as a Jakarta RESTful Webservices Controller – first without virtual threads:

    @GET
    @Path("/product/{productId}")
    public ProductPageResponse getProduct(@PathParam("productId") String productId) {
      Product product = productService.getProduct(productId)
          .orElseThrow(NotFoundException::new);
    
      boolean available = warehouseService.isAvailable(productId);
    
      int shipsInDays =
         available ? 0 : supplierService.getDeliveryTime(product.supplier(), productId);
    
      return new ProductPageResponse(product, shipsInDays);
    }Code language: Java (java)

    Now, to run this controller on a virtual thread, we just need to add a single line, with the annotation @RunOnVirtualThread:

    @GET
    @Path("/product/{productId}")
    @RunOnVirtualThread
    public ProductPageResponse getProduct(@PathParam("productId") String productId) {
      Product product = productService.getProduct(productId)
          .orElseThrow(NotFoundException::new);
    
      boolean available = warehouseService.isAvailable(productId);
    
      int shipsInDays =
         available ? 0 : supplierService.getDeliveryTime(product.supplier(), productId);
    
      return new ProductPageResponse(product, shipsInDays);
    }Code language: Java (java)

    We did not have to change a single character in the method body.

    @RunOnVirtualThread is defined in Jakarta EE 11, which is scheduled for release in the first quarter of 2024.

    How to Use Virtual Threads With Quarkus?

    Quarkus already supports the @RunOnVirtualThread annotation defined in Jakarta EE 11 since version 2.10 – i.e. since June 2022. So with a current Quarkus version, you can already use the code shown above.

    In this GitHub repository you will find a sample Quarkus application with the controller shown above – one with platform threads, one with virtual threads and also an asynchronous variant with CompletableFuture. The README explains how to start the application and how to invoke the three controllers.

    How to Use Virtual Threads With Spring?

    In Spring, the controller would look like this:

    @GetMapping("/stage1-seq/product/{productId}")
    public ProductPageResponse getProduct(@PathVariable("productId") String productId) {
      Product product =
          productService
              .getProduct(productId)
              .orElseThrow(() -> new ResponseStatusException(NOT_FOUND));
    
      boolean available = warehouseService.isAvailable(productId);
    
      int shipsInDays =
          available ? 0 : supplierService.getDeliveryTime(product.supplier(), productId);
    
      return new ProductPageResponse(product, shipsInDays);
    }Code language: Java (java)

    However, to switch to virtual threads, you need to do things a little differently. According to the Spring documentation, you have to define the following two beans:

    @Bean(TaskExecutionAutoConfiguration.APPLICATION_TASK_EXECUTOR_BEAN_NAME)
    public AsyncTaskExecutor asyncTaskExecutor() {
      return new TaskExecutorAdapter(Executors.newVirtualThreadPerTaskExecutor());
    }
    
    @Bean
    public TomcatProtocolHandlerCustomizer<?> protocolHandlerVirtualThreadExecutorCustomizer() {
      return protocolHandler -> {
        protocolHandler.setExecutor(Executors.newVirtualThreadPerTaskExecutor());
      };
    }Code language: Java (java)

    However, this results in all controllers running on virtual threads, which may be fine for most use cases, but not for CPU-heavy tasks – those should always run on platform threads.

    In this GitHub repository you can find a sample Spring application with the controller shown above. The README explains how to start the application and how to switch the controller from platform threads to virtual threads.

    Advantages of Virtual Threads

    Virtual threads offer impressive advantages:

    First, they are inexpensive:

    • They can be created much faster than platform threads: it takes about 1 ms to create a platform thread, and less than 1 µs to create a virtual thread.
    • They require less memory: a platform thread reserves 1 MB for the stack and commits 32 to 64 KB up front, depending on the operating system. A virtual thread starts with about one KB. However, this is true only for flat call stacks. A call stack the size of a half megabyte requires that half megabyte in both thread variants.
    • Blocking virtual threads is cheap because a blocked virtual thread does not block an OS thread. However, it’s not free as its stack needs to be copied to the heap.
    • Context switches are fast because they are performed in user space, not kernel space, and numerous optimizations have been made in the JVM to make them faster.

    Second, we can use virtual threads in a familiar way:

    • Only minimal changes have been made to the Thread and ExecutorService APIs.
    • Instead of writing asynchronous code with callbacks, we can write code in the traditional blocking thread-per-request style.
    • We can debug, observe, and profile virtual threads with existing tools.

    What Are Virtual Threads Not?

    Virtual threads don’t have only advantages, of course. Let’s first look at what virtual threads are not, and what we cannot or should not do with them:

    • Virtual threads are not faster threads – they cannot execute more CPU instructions than a platform thread in the same amount of time. If a task does not block, it will even – due to the overhead of mounting/unmounting – run slower on a virtual thread than on an existing platform thread from an ExecutorService.
    • They are not preemptive: while a virtual thread is executing a CPU-intensive task, it is not unmounted from the carrier thread. So if you have 20 carrier threads and 20 virtual threads that occupy the CPU without blocking, no other virtual thread will be executed.
    • They do not provide a higher level of abstraction than platform threads. You need to be aware of all the subtle things that you also need to be aware of when using regular threads. That is, if a virtual thread accesses shared data, you have to take care of visibility issues, you have to synchronize atomic operations, and so on.

    What Are the Limitations of Virtual Threads?

    You should know about the following limitations. Many of them will be removed in future Java versions:

    1. Unsupported Blocking Operations

    Although the vast majority of blocking operations in the JDK have been rewritten to support virtual threads, there are still operations that do not unmount a virtual thread from the carrier thread:

    • File I/O – this will also be adapted in the near future
    • Object.wait()

    In these two cases, a blocked virtual thread will also block the carrier thread. To compensate for this, both operations temporarily increase the number of carrier threads – up to a maximum of 256 threads, which can be changed via the VM option jdk.virtualThreadScheduler.maxPoolSize.

    2. Pinning

    Pinning means that a blocking operation that would normally unmount a virtual thread from its carrier thread does not do so because the virtual thread has been “pinned” to its carrier thread – meaning that it is not allowed to change the carrier thread. This happens in two cases:

    • inside a synchronized block (solved in Java 24)
    • if the call stack contains calls to native code

    There are two primary reasons for pinning:

    Reason 1: Pointers to Memory Addresses on the Stack

    In both cases, there may be pointers to memory addresses on the stack. In the case of a synchronized block and when using “legacy stack locking” (the standard locking mechanism up to and including Java 21), the so-called “mark word” in the object header points to a separate lock data structure on the stack.

    And we cannot control what happens within native code.

    If the stack gets parked on the heap when unmounted and moved back onto the stack when mounted, it could end up at a different memory address. And that would invalidate those pointers.

    Starting with Java 23, the new “lightweight locking” became the standard locking mechanism. This does not require pointers on the stack.

    Reason 2: Tracking of the Platform Thread

    In addition, the JVM tracks which platform thread currently holds which object monitor when using synchronized. If a virtual thread now enters a synchronized block, is blocked and unmounted from the carrier thread, and then another virtual thread is mounted on this carrier thread, then this other virtual thread could also enter the synchronized block.

    This mechanism will be changed in Java 24.

    Detecting and Preventing Pinning

    Using the VM option -Djdk.tracePinnedThread=full/short you can get a full/short stack trace when a virtual thread blocks while pinned.

    You can replace a synchronized block around blocking operation with a ReentrantLock.

    3. No Locks in Thread Dumps

    Thread dumps currently do not contain data about locks held by or blocking virtual threads. Accordingly, they do not show deadlocks between virtual threads or between a virtual thread and a platform thread.

    Thread Dumps With Virtual Threads

    The conventional thread dumps printed via jcmd <pid> Thread.print do not contain virtual threads. The reason for that is that this command stops the VM to create a snapshot of the running threads. This is feasible for a few hundred or even a few thousand threads, but not for millions of them.

    Therefore, a new variant of thread dump has been implemented that does not stop the VM (accordingly, the thread dump may not be consistent in itself) but which includes virtual threads in return. This new thread dump can be created with one of these two commands:

    • jcmd <pid> Thread.dump_to_file -format=plain <file>
    • jcmd <pid> Thread.dump_to_file -format=json <file>

    The first command generates a thread dump similar to the traditional one, with thread names, IDs and stack traces. The second command generates a file in JSON format that also contains information about thread containers, parent containers, and owner threads.

    When Should You Use Virtual Threads?

    You should use virtual threads if you have many tasks to be processed concurrently, which primarily contain blocking operations.

    This is true for most server applications. However, if your server application handles CPU-intensive tasks, you should use platform threads for them.

    What Else Is Important to Consider?

    Here are a few tips on using and migrating to virtual threads:

    • Virtual threads are new, and we don’t have much experience with them yet, compared to asynchronous or reactive frameworks. So you should test applications with virtual threads intensively before deploying them in production.
    • Even though many articles about virtual threads would have us believe this: they do not inherently use less memory than a platform thread. This is only the case if the call stack is shallow. With deep call stacks, both types of threads consume the same amount of memory. So the same applies here: test intensively!
    • Virtual threads do not need to be pooled. A pool is used to share expensive resources. Virtual threads, on the other hand, are so cheap that it is better to create one when you need it and let it terminate when you no longer need it.
    • If you need to limit access to a resource, such as how many threads can access a database or API at the same time, use a semaphore instead of a thread pool.
    • Much of the virtual thread code is written in Java. Accordingly, you must warm up the JVM before running performance tests so that all bytecode is compiled and optimized before the measurement begins.

    Summary

    Virtual threads deliver what they promise: they allow us to write readable and maintainable sequential code that does not block operating system threads when waiting for locks, blocking data structures, or responses from the file system or external services.

    Virtual threads can be created in the order of millions.

    Common backend frameworks such as Spring and Quarkus can already handle virtual threads. Nevertheless, you should test applications intensively when you flip the switch to virtual threads. Make sure that you do not, for example, execute CPU-intensive computing tasks on them, that they are not pooled by the framework, and that no ThreadLocals are stored in them (see also Scoped Value).

    I hope you’re as excited as I am and can’t wait to use virtual threads in your projects!

    If you still have questions, please ask them via the comment function.

  • Java 18 Features (with Examples)

    Java 18 Features (with Examples)

    Java 18, released on March 22, 2022, is the first “interim” release after the last Long-Term-Support (LTS) release, Java 17.

    With nine implemented JEPs, the scope of changes in Java 18 has decreased significantly compared to the previous releases. After the LTS release of Java 17, the JDK developers should take a little breather ;-)

    UTF-8 by Default

    For a long time, we Java developers have had to deal with the fact that the standard Java character set varies depending on the operating system and language settings.

    This changes with Java 18 :-)

    The Problem

    The Java standard character set determines how Strings are converted to bytes and vice versa in numerous methods of the JDK class library (e.g., when writing and reading a text file). These include, for example:

    • the constructors of FileReader, FileWriter, InputStreamReader, OutputStreamWriter,
    • the constructors of Formatter and Scanner,
    • the static methods URLEncoder.encode() and URLDecoder.decode().

    This can lead to unpredictable behavior when an application is developed and tested in one environment – and then run in another (where Java chooses a different default character set).

    For example, let’s run the following code on Linux or macOS (the Japanese text is “Happy Coding!” according to Google Translate):

    try (FileWriter fw = new FileWriter("happy-coding.txt");
        BufferedWriter bw = new BufferedWriter(fw)) {
      bw.write("ハッピーコーディング!");
    }Code language: Java (java)

    And then, we load this file with the following code on Windows:

    try (FileReader fr = new FileReader("happy-coding.txt");
        BufferedReader br = new BufferedReader(fr)) {
      String line = br.readLine();
      System.out.println(line);
    }Code language: Java (java)

    Then the following is displayed:

    �ッピーコーディング�Code language: plaintext (plaintext)

    That is because Linux and macOS store the file in UTF-8 format, and Windows tries to read it in Windows-1252 format.

    The Problem – Stage Two

    It becomes even more chaotic because newer class library methods do not respect the default character set but always use UTF-8 if no character set is specified. These methods include, for example, Files.writeString(), Files.readString(), Files.newBufferedWriter(), and Files.newBufferedReader().

    Let’s start the following program, which writes the Japanese text via FileWriter and reads it directly afterward via Files.readString():

    try (FileWriter fw = new FileWriter("happy-coding.txt");
        BufferedWriter bw = new BufferedWriter(fw)) {
      bw.write("ハッピーコーディング!");
    }
    
    String text = Files.readString(Path.of("happy-coding.txt"));
    System.out.println(text);Code language: Java (java)

    Linux and macOS display the correct Japanese text. On Windows, however, we see only question marks:

    ???????????Code language: plaintext (plaintext)

    That is because, on Windows, FileWriter writes the file using the standard Java character set Windows-1252, but Files.readString() reads the file back in as UTF-8 – regardless of the standard character set.

    Possible Solutions to Date

    For protecting an application against such errors, there have been two possibilities so far:

    1. Specify the character set when calling all methods that convert strings to bytes and vice versa.
    2. Set the default character set via system property “file.encoding”.

    The first option leads to a lot of code duplication and is thus messy and error-prone:

    FileWriter fw = new FileWriter("happy-coding.txt", StandardCharsets.UTF_8);
    // ...
    FileReader fr = new FileReader("happy-coding.txt", StandardCharsets.UTF_8);
    // ...
    Files.readString(Path.of("happy-coding.txt"), StandardCharsets.UTF_8);Code language: Java (java)

    Specifying the character set parameters also prevents us from using method references, as in the following example:

    Stream<String> encodedParams = ...
    Stream<String> decodedParams = encodedParams.map(URLDecoder::decode);Code language: Java (java)

    Instead, we would have to write:

    Stream<String> encodedParams = ...
    Stream<String> decodedParams =
        encodedParams.map(s -> URLDecoder.decode(s, StandardCharsets.UTF_8));Code language: Java (java)

    The second possibility (system property “file.encoding”) was firstly not officially documented up to and including Java 17 (see system properties documentation).

    Secondly, as explained above, the character set specified is not used for all API methods. So the variant is also error-prone, as we can show with the example from above:

    public class Jep400Example {
      public static void main(String[] args) throws IOException {
        try (FileWriter fw = new FileWriter("happy-coding.txt");
            BufferedWriter bw = new BufferedWriter(fw)) {
          bw.write("ハッピーコーディング!");
        }
    
        String text = Files.readString(Path.of("happy-coding.txt"));
        System.out.println(text);
      }
    }Code language: Java (java)

    Let’s run the program once with standard encoding US-ASCII:

    $ java -Dfile.encoding=US-ASCII Jep400Example.java
    ?????????????????????????????????Code language: plaintext (plaintext)

    The result is garbage because FileWriter takes the default encoding into account, but Files.readString() ignores it and always uses UTF-8. So this variant only works reliably if you use UTF-8 uniformly:

    $ java -Dfile.encoding=UTF-8 Jep400Example.java
    ハッピーコーディング!Code language: plaintext (plaintext)

    JEP 400 to the Rescue

    With JDK Enhancement Proposal 400, the problems mentioned above will – at least for the most part – be a thing of the past as of Java 18.

    The default encoding will always be UTF-8 regardless of the operating system, locale, and language settings.

    Also, the system property “file.encoding” will be documented – and we can use it legitimately. However, we should do this with caution. The fact that the Files methods ignore the configured default encoding will not be changed by JEP 400.

    According to the documentation, only the values “UTF-8” and “COMPAT” should be used anyway, with UTF-8 providing consistent encoding and COMPAT simulating pre-Java 18 behavior. All other values lead to unspecified behavior.

    Quite possibly, “file.encoding” will be deprecated in the future and later removed to eliminate the remaining potential source of errors (methods that respect the default encoding vs. those that do not).

    The best way is always to set “-Dfile.encoding” to UTF-8 or omit it altogether.

    Reading the Encodings at Runtime

    The current default encoding can be read at runtime via Charset.defaultCharset() or the system property “file.encoding”. Since Java 17, the system property “native.encoding” can be used to read the encoding, which – before Java 18 – would be the default encoding if none is specified:

    System.out.println("Default charset : " + Charset.defaultCharset());
    System.out.println("file.encoding   : " + System.getProperty("file.encoding"));
    System.out.println("native.encoding : " + System.getProperty("native.encoding"));Code language: Java (java)

    Without specifying -Dfile.encoding, the program prints the following on Linux and macOS with Java 17 and Java 18:

    Default charset : UTF-8
    file.encoding   : UTF-8
    native.encoding : UTF-8Code language: plaintext (plaintext)

    On Windows and Java 17, the output is as follows:

    Default charset : windows-1252
    file.encoding   : Cp1252
    native.encoding : Cp1252Code language: plaintext (plaintext)

    And on Windows and Java 18:

    Default charset : UTF-8
    file.encoding   : UTF-8
    native.encoding : Cp1252Code language: plaintext (plaintext)

    So the native encoding on Windows remains the same, but the default encoding changes to UTF-8 according to this JEP.

    The Previous “Default” Character Set

    If we run the little program from above on Linux or macOS and Java 17 with the -Dfile.encoding=default parameter, we get the following output:

    Default charset : US-ASCII
    file.encoding   : default
    native.encoding : UTF-8Code language: plaintext (plaintext)

    This is because the name “default” was previously recognized as an alias for the encoding “US-ASCII”.

    In Java 18, this is changed: “default” is no longer recognized; the output looks like this:

    Default charset : UTF-8
    file.encoding   : default
    native.encoding : UTF-8Code language: plaintext (plaintext)

    The system property “file.encoding” is still “default” – but at this point, we would also see any other invalid input. The default character set for an invalid “file.encoding” input is always UTF-8 as of Java 18 or corresponds to the native encoding up to Java 17.

    Charset.forName() Taking Fallback Default Value

    Not part of the above JEP and not defined in any other JEP is the new method Charset.forName(String charsetName, Charset fallback). This method returns the specified fallback value instead of throwing an IllegalCharsetNameException or an UnsupportedCharsetException if the character set name is unknown or the character set is not supported.

    Simple Web Server

    Almost all modern programming languages allow starting up a rudimentary HTTP server to, for example, quickly test some web functionality.

    Through JDK Enhancement Proposal 408, Java also offers this possibility as of version 18.

    The easiest way to start the provided webserver is the jwebserver command. It starts the server on localhost:8000 and provides a file browser for the current directory:

    $ jwebserver
    Binding to loopback by default. For all interfaces use "-b 0.0.0.0" or "-b ::".
    Serving /home/sven and subdirectories on 127.0.0.1 port 8000
    URL http://127.0.0.1:8000/Code language: plaintext (plaintext)

    As shown, you can use the -b parameter to specify the IP address on which the server should listen. With -p, you can change the port and with -d the directory the server should serve. With -o, you can configure the log output. For example:

    $ jwebserver -b 127.0.0.100 -p 4444 -d /tmp -o verbose
    Serving /tmp and subdirectories on 127.0.0.100 port 4444
    URL http://127.0.0.100:4444/Code language: plaintext (plaintext)

    You get a list of options with explanations with jwebserver -h.

    Web Server Features

    The web server is very rudimentary and has the following limitations:

    • The only supported protocol is HTTP/1.1.
    • HTTPS is not provided.
    • Only the HTTP GET and HEAD methods are allowed.

    Java API: SimpleFileServer

    jwebserver is not a standalone tool, but just a wrapper that calls:

    java -m jdk.httpserver

    This command calls the main() method of the sun.net.httpserver.simpleserver.Main class of the jdk.httpserver module, which, in turn, calls SimpleFileServerImpl.start(…). This starter evaluates the command line parameters and finally creates the server via SimpleFileServer.createFileServer(…).

    With this method, you can also start a server via Java code:

    HttpServer server =
        SimpleFileServer.createFileServer(
            new InetSocketAddress(8080), Path.of("\tmp"), OutputLevel.INFO);
    server.start();Code language: Java (java)

    Using the Java API, you can extend the web server. You can, for example, make specific directories of the file system accessible via different HTTP paths, and you can extend the server with your own handlers for certain paths and HTTP methods (e.g., PUT).

    A complete tutorial is beyond the scope of this article. See the “API” and “Enhanced request handling” sections in the JEP for more details.

    Code Snippets in Java API Documentation

    Until now, if we wanted to integrate multiline code snippets into JavaDoc, we had to do this quite cumbersomely via <pre>…</pre> – optionally in combination with {@code … }. For this, we had to pay attention to two things:

    1. There must be no line breaks between <pre> and the code and between the code and </pre>.
    2. The code starts directly after the asterisks; i.e., if there are spaces between the asterisks and the code, they also appear in the JavaDoc. So the code must be shifted one character to the left compared to the rest of the text in the JavaDoc comment.

    Here is an example with <pre>:

    /**
     * How to write a text file with Java 7:
     *
     * <pre><b>try</b> (BufferedWriter writer = Files.<i>newBufferedWriter</i>(path)) {
     *  writer.write(text);
     *}</pre>
     */Code language: Java (java)

    And one with <pre> and {@code … }:

    /**
     * How to write a text file with Java 7:
     *
     * <pre>{@code try (BufferedWriter writer = Files.newBufferedWriter(path)) {
     *  writer.write(text);
     *}}</pre>
     */Code language: Java (java)

    The difference between the two variants is that in the first variant, we can format the code with HTML tags such as <b> and <i>, while in the second variant, such tags would not be evaluated but displayed.

    The @snippet Tag in Java 18

    JDK Enhancement Proposal 413 enhances the JavaDoc syntax with the @snippet tag, specifically designed to display source code. With the @snippet tag, we can write the comment as follows:

    /**
     * How to write a text file with Java 7:
     *
     * {@snippet :
     * try (BufferedWriter writer = Files.newBufferedWriter(path)) {
     *   writer.write(text);
     * }
     * }
     */Code language: Java (java)

    We can also highlight parts of the code using @highlight – for example, all occurrences of “text” within the second line of code:

    /**
     * {@snippet :
     * try (BufferedWriter writer = Files.newBufferedWriter(path)) {
     *   writer.write(text);  // @highlight substring="text"
     * }
     * }
     */Code language: Java (java)

    The following example highlights all words starting with “write” within the block marked with @highlight region and @end. With type="…", we can also specify the type of highlighting: bold, italic, or highlighted (with a colored background).

    /**
     * {@snippet :
     * // @highlight region regex="\bwrite.*?\b" type="highlighted"
     * try (BufferedWriter writer = Files.newBufferedWriter(path)) {
     *   writer.write(text);                                          
     * }
     * // @end
     * }
     */Code language: Java (java)

    With @link, we can link a part of the text, e.g., BufferedWriter, to its JavaDoc:

    /**
     * {@snippet :
     * // @link substring="BufferedWriter" target="java.io.BufferedWriter" :
     * try (BufferedWriter writer = Files.newBufferedWriter(path)) {
     *   writer.write(text);
     * }
     * }
     */Code language: Java (java)

    Attention: the colon at the end of the line with the @link tag is essential in this case, and it means that the comment refers to the following line. We could also write the comment at the end of the next line, just like in the first @highlight example – or use @link region and @end to specify a part within which all occurrences of BufferedWriter should be linked.

    Integrate Snippets from Other Files

    According to JEP, it should also be possible to refer to marked code in another file:

    /**
     * How to write a text file with Java 7:
     *
     * {@snippet file="FileWriter.java" region="writeFile"}
     */Code language: Java (java)

    In the FileWriter.java file, we would mark the code as follows:

    // @start region="writeFile"
    try (BufferedWriter writer = Files.newBufferedWriter(path)) {
      writer.write(text);
    }
    // @endCode language: Java (java)

    However, this variant leads to a “File not found” error message when calling the javadoc command of the current early-access release (build 18-ea+29-2007). This JEP is apparently not yet fully implemented at this time.

    These were the most important @snippet tags, in my opinion. You can find a complete reference in the JEP.

    Internet-Address Resolution SPI

    To find out the IP address(es) for a hostname in Java, we can use InetAddress.getByName(…) or InetAddress.getAllByName(…). Here is an example:

    InetAddress[] addresses = InetAddress.getAllByName("www.happycoders.eu");
    System.out.println("addresses = " + Arrays.toString(addresses));Code language: Java (java)

    The code gives me the following output (I added the line breaks manually for better readability):

    addresses = [www.happycoders.eu/104.26.15.71,
                 www.happycoders.eu/172.67.71.232, 
                 www.happycoders.eu/104.26.14.71]Code language: plaintext (plaintext)

    For reverse lookups (i.e., resolving an IP address to a hostname), the JDK provides the methods InetAddress::getCanonicalHostName and InetAddress::getHostName.

    By default, InetAddress uses the operating system’s resolver, i.e., it usually consults the hosts file and the configured DNS servers.

    This hardwiring has a few disadvantages:

    • Within tests, it is not possible to map a hostname to the URL of a mocked server.
    • New hostname lookup protocols (such as DNS over QUIC, TLS, or HTTPS) cannot be easily implemented in Java.
    • The current implementation leads to a blocking operating system call. That alone is unattractive since this call can sometimes take long and cannot be interrupted. When using virtual threads, this even leads to the point that the operating system thread cannot serve any other virtual threads during this time.

    JDK Enhancement Proposal 418 introduces a Service Provider Interface (SPI) to allow the platform’s built-in default resolver to be replaced by other resolvers.

    Internet-Address Resolution SPI / JEP 418 – Example

    The following example shows how to implement and register a simple resolver that responds to every request with the IP address 127.0.0.1. You can also find the code in this GitHub repository.

    We first write the resolver by implementing the java.net.spi.InetAddressResolver.InetAddressResolver interface introduced in Java 18 (class HappyCodersInetAddressResolver in GitHub):

    public class HappyCodersInetAddressResolver implements InetAddressResolver {
      @Override
      public Stream<InetAddress> lookupByName(String host, LookupPolicy lookupPolicy)
          throws UnknownHostException {
        return Stream.of(InetAddress.getByAddress(new byte[] {127, 0, 0, 1}));
      }
    
      @Override
      public String lookupByAddress(byte[] addr) {
        throw new UnsupportedOperationException();
      }
    }Code language: Java (java)

    Since I only want to present the basic principle here, I kept the resolver as simple as possible, and it does not support reverse lookups.

    Second, we need a resolver provider (class HappyCodersInetAddressResolverProvider in GitHub):

    public class HappyCodersInetAddressResolverProvider extends InetAddressResolverProvider {
      @Override
      public InetAddressResolver get(Configuration configuration) {
        return new HappyCodersInetAddressResolver();
      }
    
      @Override
      public String name() {
        return "HappyCoders Internet Address Resolver Provider";
      }
    }Code language: Java (java)

    The provider creates a new instance of the previously implemented resolver in the get() method.

    In the third step, we have to register the resolver. To do this, we create a file in the META-INF/services directory with the name java.net.spi.InetAddressResolverProvider and the following content (file in GitHub):

    eu.happycoders.jep416.HappyCodersInetAddressResolverProviderCode language: plaintext (plaintext)

    Now we run the code from above again (class Jep418Demo in GitHub):

    InetAddress[] addresses = InetAddress.getAllByName("www.happycoders.eu");
    System.out.println("addresses = " + Arrays.toString(addresses));Code language: Java (java)

    The output now reads:

    addresses = [/127.0.0.1]Code language: plaintext (plaintext)

    That is precisely the IP address we returned in our resolver.

    Preview and Incubator-Features

    In the following sections, you will find preview and incubator features that we already know from previous releases. They are resubmissions with minor changes.

    Pattern Matching for switch (Second Preview)

    “Pattern Matching for switch” was first introduced in Java 17 and enables switch statements (and expressions) such as the following (for more, see the linked Java 17 article):

    switch (obj) {
      case String s && s.length() > 5 -> System.out.println(s.toUpperCase());
      case String s                   -> System.out.println(s.toLowerCase());
    
      case Integer i                  -> System.out.println(i * i);
    
      default -> {}
    }Code language: Java (java)

    JDK Enhancement Proposal 420 introduced two changes in Java 18 – one in dominance checking and one related to exhaustiveness analysis in combination with sealed types.

    Improvement of the Dominance Test

    I described what dominance checking is in the Java 17 article linked above. In a nutshell: the following code leads to a compiler error:

    Object obj = ...
    switch (obj) {
      case String s                   -> System.out.println(s.toLowerCase());
      case String s && s.length() > 5 -> System.out.println(s.toUpperCase());
      ...
    }
    Code language: Java (java)

    The reason is that the pattern in line 3 “dominates” the longer pattern from line 4: If obj is a String, it is matched by the pattern in line 3, no matter how long it is. So no object is ever matched by the pattern in line 4.

    However, one case has not been considered so far – namely, the combination of a constant and a guarded pattern (a pattern with &&). So the following code is allowed in Java 17:

    String string = ...
    switch (string) {
      case String s && s.length() > 5 -> System.out.println(s.toUpperCase());
      case "foobar"                   -> System.out.println("baz");
      ...
    }
    Code language: Java (java)

    However, if obj is equal to “foobar”, it is not matched by line 4 but already by line 3 (because it is also longer than five characters).

    Since unreachable code is obviously not intended, we get the following compiler error in Java 18:

    java --enable-preview --source 18 SwitchTest.java
    SwitchTest.java:9: error: this case label is dominated by a preceding case label
          case "foobar"                   -> System.out.println("baz");
               ^Code language: plaintext (plaintext)

    Bugfix in the Exhaustiveness Analysis with Sealed Types

    You will learn what exhaustiveness analysis is in the article about sealed types.

    I explain the change in Java 18 using the following sealed example class hierarchy from the JEP:

    sealed interface I<T> permits A, B {}
    final class A<X> implements I<String> {}
    final class B<Y> implements I<Y> {}Code language: Java (java)

    The following code is not compilable:

    I<Integer> i = ...
    switch (i) {
      case A<Integer> a -> System.out.println("It's an A");  // not compilable
      case B<Integer> b -> System.out.println("It's a B");
    }Code language: Java (java)

    Both Java 17 and Java 18 recognize that I<Integer> cannot be converted to A<Integer> (since A<Integer> is an I<String>) and report:

    incompatible types: I<Integer> cannot be converted to A<Integer>

    In fact, because of the sealed class hierarchy, B<Integer> is the only class that can implement I<Integer>. Thus, the switch statement is complete as follows:

    I<Integer> i = ...
    switch (i) {
      case B<Integer> b -> System.out.println("It's a B");
    }Code language: Java (java)

    Java 17 reports here, however:

    the switch statement does not cover all possible input values

    That is an obvious bug that has been fixed in Java 18.

    Vector API (Third Incubator)

    The Vector API was already introduced in Java 16 and Java 17 as an Incubator feature. This API is not about the java.util.Vector class from Java 1.0 but about mathematical vector computation and its mapping to modern single-instruction-multiple-data (SIMD) architectures.

    JDK Enhancement Proposal 417 has again improved performance and extended support to “ARM Scalable Vector Extension” – an optional extension to the ARM64 platform.

    The incubator stage means that the feature can still go through significant changes. I will present the Vector API in more detail once it reaches preview status.

    Foreign Function & Memory API (Second Incubator)

    The Foreign Function & Memory API was created in Java 17 by combining the “Foreign Memory Access API” and the “Foreign Linker API”, both of which previously went through several incubator phases.

    The new API is being developed within Project Panama and is intended to replace JNI (Java Native Interface), which has already been part of the platform since Java 1.1. JNI allows C code to be called from Java. Anyone who has worked with JNI knows: JNI is highly complicated to implement, error-prone, and slow.

    The goal of the new API is to reduce implementation effort by 90% and accelerate API performance by a factor of 4 to 5.

    JDK Enhancement Proposal 419 has made extensive changes to the API. In the next release, Java 19, the API will reach the preview stage.

    Deprecations and Deletions

    Again in Java 18, some features have been marked as “deprecated for removal” or deleted.

    Deprecate Finalization for Removal

    Finalization has existed since Java 1.0 and is intended to help avoid resource leaks by allowing classes to implement a finalize() method to release system resources (such as file handles or non-heap memory) requested by the operating system.

    The garbage collector calls the finalize() method before releasing an object’s memory.

    That seems to be a reasonable solution. However, it has been shown that finalization has some fundamental, critical flaws:

    Performance:

    • It is unpredictable when the garbage collector will clean up an object (and whether it will do so at all). Therefore, it may happen that – after an object is no longer referenced – it takes a very long time for its finalize() method to be called (or that it is never called).
    • When the garbage collector performs a full GC, there can be noticeable latency if many of the objects being cleaned up have finalize() methods.
    • The finalize() method is called for every instance of a class, even if it is not necessary. There is no way to specify that individual objects do not need finalization.

    Security risks:

    • The finalize() method can execute arbitrary code, e.g., storing a reference of the object to be deleted. Thus, the garbage collector will not clean it up. If the reference to the object is later removed and the garbage collector deletes the object, its finalize() method is not called again.
    • When the constructor of a class throws an exception, the object resides on the heap. When the garbage collector later removes it, it calls its finalize() method, which can then perform operations on a possibly incompletely initialized object or even store it in the object graph.

    Error-proneness:

    • A finalize() method should always call the finalize() method of the parent class as well. However, the compiler does not enforce this (as it does with the constructor). Even if we write our code without errors, someone else could extend our class, override the finalize() method without calling the overridden method, and thereby cause a resource leak.

    Multithreading:

    • The finalize() method is called in an unspecified thread, so thread safety of the entire object must be maintained – even in an application that does not use multithreading.

    Alternatives to Finalization

    The following alternatives to finalization exist:

    • The “try-with-resources” introduced in Java 7 automatically generates a finally block for all classes that implement the AutoCloseable interface, in which the corresponding close() methods are called. Typical static code analysis tools find and complain about code that does not generate AutoCloseable objects inside “try-with-resources” blocks.
    • Through the Cleaner API introduced in Java 9, so-called “Cleaner Actions” can be registered. The garbage collector invokes them when an object is no longer accessible (not only when it reclaims its memory). Cleaner actions do not have access to the object itself (so they cannot store a reference to it); we only need to register them for an object when that specific object needs them; and we can determine in which thread they are called.

    For the above reasons and the availability of sufficient alternatives, the finalize() methods in Object and numerous other classes of the JDK class library were already marked as “deprecated” in Java 9.

    JDK Enhancement Proposal 421 marks the methods in Java 18 as “deprecated for removal”.

    Furthermore, the VM option --finalization=disabled is introduced, which completely disables finalization. This allows us to test applications before migrating them to a future Java version where finalization has been removed.

    JDK Flight Recorder Event for Finalization

    Not part of the above JEP is the new Flight Recorder event “jdk.FinalizerStatistics”. It is enabled by default and logs every instantiated class with a non-empty finalize() method. That makes it easy to identify those classes that still use a finalizer.

    These events are not triggered when finalization is disabled via --finalization=disabled.

    Terminally Deprecate Thread.stop

    Thread.stop() is marked as “deprecated for removal” in Java 18 – finally, after being “deprecated” since Java 1.2. Hopefully, it will be deleted in one of the following releases – together with suspend() and resume() and the corresponding ThreadGroup methods.

    (There is no JDK enhancement proposal for this change.)

    Remove the Legacy PlainSocketImpl and PlainDatagramSocketImpl Implementation

    In Java 13 and Java 15, the JDK developers reimplemented the Socket API and the DatagramSocket API.

    The old implementations could since be reactivated via the jdk.net.usePlainSocketImpl or jdk.net.usePlainDatagramSocketImpl system properties.

    In Java 18, the old code was removed, and the above system properties were removed.

    (There is no JDK enhancement proposal for this change.)

    Other Changes in Java 18

    In this section, you will find those changes that you will rarely encounter during your daily programming work. Nevertheless, it certainly does not hurt to skim them once.

    Reimplement Core Reflection with Method Handles

    If you have a lot to do with Java reflection, you will know that there is always more than one way to go. For example, to read the private value field of a String via reflection, there are two ways:

    1. Per so-called “core reflection”:

    Field field = String.class.getDeclaredField("value");
    field.setAccessible(true);
    byte[] value = (byte[]) field.get(string);Code language: Java (java)

    2. Via “method handles”:

    VarHandle handle =
        MethodHandles.privateLookupIn(String.class, MethodHandles.lookup())
            .findVarHandle(String.class, "value", byte[].class);
    byte[] value = (byte[]) handle.get(string);Code language: Java (java)

    (Important: Since Java 16, for both variants, you have to open the package java.lang from the module java.base for the calling module, e.g., via VM option --add-opens java.base/java.lang=ALL-UNNAMED).

    There is a third form that we can’t see directly: core reflection uses additional native JVM methods for the first few calls after starting the JVM and only starts compiling and optimizing the Java reflection bytecode after a while.

    Maintaining all three variants means a considerable effort for the JDK developers. Therefore, as part of JDK Enhancement Proposal 416, it was decided to reimplement the code of the reflection classes java.lang.reflect.Method, Field, and Constructor using method handles and thus reduce the development effort.

    ZGC / SerialGC / ParallelGC Support String Deduplication

    Since Java 18, the Z garbage collector, which was released as production-ready in Java 15, and the serial and parallel garbage collectors also support string deduplication.

    String deduplication means that the garbage collector detects strings whose value and coder fields contain the same bytes. The GC deletes all but one of these byte arrays and lets all string instances reference this single byte array.

    Remember, it is not actually the Strings that are deduplicated (as the name of the feature implies), but only their byte arrays. Nothing changes in the identities of the String objects themselves.

    String deduplication is disabled by default (as it is a potential attack vector via deep reflection) and must be explicitly enabled via VM option -XX:+UseStringDeduplication.

    (String deduplication was first released with JDK Enhancement Proposal 192 in Java 8u20 for G1. There is no separate JEP for inclusion in the ZGC, serial GC, and parallel GC in Java 18).

    Allow G1 Heap Regions up to 512 MB

    The G1 Garbage Collector usually determines the size of the heap regions automatically. Depending on the heap size, the size of the regions is set to a value between 1 MB and 32 MB.

    You can also set the region size manually via VM option -XX:G1HeapRegionSize. Sizes between 1 MB and 32 MB were previously allowed here as well.

    In Java 18, the maximum size of regions is increased to 512 MB. This is particularly intended to help reduce heap fragmentation for very large objects.

    The change only applies to the manual setting of the region size. When determined automatically by the JVM (i.e., without specifying the VM option), the maximum size remains 32 GB.

    (There is no JDK enhancement proposal for this change.)

    Complete List of All Changes in Java 18

    In addition to the JDK Enhancement Proposals and changes to the class libraries presented in this article, there are other changes (e.g., to the cryptography modules) beyond this article’s scope. You can find a complete list in the JDK 18 release notes.

    Summary

    Java 18 marks the beginning of the next cycle of non-LTS releases – until the next LTS version, Java 21, will be released in September 2023. If you have done the math, you will notice that there were five non-LTS releases and three years between Java 11 and Java 17 – but there will only be three non-LTS releases and two years between Java 17 and 21. Shortly before the release of Java 17, Oracle announced to shorten the release cycle.

    The releases will, therefore, not be more densely packed than before. In fact, Java 18 is quite manageable and does not contain any change to the language itself for a long time (after numerous language extensions like records and sealed classes).

    The main changes of Java 18 are:

    • UTF-8 will be the default character set on all operating systems in the future, regardless of language and locale settings.
    • Using the jwebserver command (or the SimpleFileServer class), we can quickly start a rudimentary web server.
    • With the @snippet tag, we get a powerful tool to integrate source code snippets into our JavaDoc documentation.
    • With the “Internet-Address Resolution SPI”, we can replace the standard resolver for IP addresses, which is especially helpful in tests.
    • The preview and incubator features “Pattern Matching for switch”, “Vector API”, and “Foreign Function & Memory API” were each sent to the next preview or incubator round.
    • Finalization and Thread.stop() have been marked “deprecated for removal”.

    As always, various other changes round out the release. You can download Java 18 here.

  • Java Switch Expression

    Java Switch Expression

    Switch Expressions were released in Java 14 under Project Amber.

    Switch Expressions are actually two enhancements that can be used independently but also combined:

    1. Arrow notation without break and fall-throughs
    2. Using switch as an expression with a return value

    Let’s look at the changes one by one (I’m using the examples from JEP 361, slightly modified).

    Starting Point

    In the following example, we print the word length for a given day of the week. For the last two cases, I wrote the code a bit more complicated than necessary to demonstrate what is possible with switch expressions.

    switch (day) {
      case MONDAY:
      case FRIDAY:
      case SUNDAY:
        System.out.println(6);
        break;
      case TUESDAY:
        System.out.println(7);
        break;
      case THURSDAY:
      case SATURDAY:
        System.out.println((int) Math.pow(2, 3));
        break;
      case WEDNESDAY:
        int three = 1 + 2;
        System.out.println(three * three);
        break;
    }Code language: Java (java)

    This notation is confusing and error-prone due to the so-called “fall-throughs”, i.e., the continuation of execution on the following case if the previous one was not terminated with a break statement.

    Accordingly, such constructs are marked as code smells by static code analysis (SCA) tools such as Sonar, Checkstyle, and PMD:

    Static code analysis (SCA) warnings for 'switch' statements without 'break'
    Static code analysis (SCA) warnings for ‘switch’ statements without ‘break’

    Switch with Arrow Notation

    The following example shows using an arrow instead of a colon, starting with Java 14. The following rules apply:

    • Before the arrow, you may list several cases separated by commas.
    • The arrow may be followed by either a single code statement (lines 2, 3, and 4) or a code block in curly braces (lines 5 to 8).
    • break statements are omitted in this notation.

    Here is a sample code for a switch statement in arrow notation:

    switch (day) {
      case MONDAY, FRIDAY, SUNDAY -> System.out.println(6);
      case TUESDAY                -> System.out.println(7);
      case THURSDAY, SATURDAY     -> System.out.println((int) Math.pow(2, 3));
      case WEDNESDAY -> {
        int three = 1 + 2;
        System.out.println(three * three);
      }
    }
    Code language: Java (java)

    Modern IDEs like IntelliJ recognize the improvement potential and offer an automatic conversion to the new format:

    Automatic replacement of 'switch' statements
    Automatic replacement of ‘switch’ statements

    Switch as an Expression with a Return Value

    We often use switch to assign a case-specific value to a variable. In the following example, instead of printing the weekday’s length, we store it in the numLetters variable:

    (The last two cases are again intentionally written verbosely to show what is possible with switch expressions.)

    int numLetters;
    switch (day) {
      case MONDAY:
      case FRIDAY:
      case SUNDAY:
        numLetters = 6;
        break;
      case TUESDAY:
        numLetters = 7;
        break;
      case THURSDAY:
      case SATURDAY:
        numLetters = (int) Math.pow(2, 3);
        break;
      case WEDNESDAY:
        int three = 1 + 2;
        numLetters = three * three;
        break;
      default:
        throw new IllegalStateException("Unknown day: " + day);
    }Code language: Java (java)

    To use the variable afterward, this conventional notation – even though we’ve covered every weekday – requires us to either initialize the variable beforehand or specify a default case. Otherwise, the compiler would abort with the error message “Variable ‘numLetters’ might not have been initialized”.

    As of Java 14, we can convert this statement into an expression. To do so, we return each value using the new keyword yield. We then assign the result of the switch expression directly to the variable:

    int numLetters = switch (day) {
      case MONDAY:
      case FRIDAY:
      case SUNDAY:
        yield 6;
    
      case TUESDAY:
        yield 7;
    
      case THURSDAY:
      case SATURDAY:
        yield (int) Math.pow(2, 3);
    
      case WEDNESDAY:
        int three = 1 + 2;
        yield three * three;
    
      default:
        throw new IllegalStateException("Unknown day: " + day);
    };Code language: Java (java)

    yield is a so-called “contextual keyword”; it therefore only has meaning in the context of a switch expression. Should you have used yield as a variable name in your source code – don’t worry; you can still do that. Even something like that would be allowed:

    int yield = 5; yield yield + yield;

    By the way, the default case is unnecessary here (in contrast to the conventional notation) – more about this in the section Exhaustiveness Analysis for Enums.

    Arrow Notation and Switch Expression Combined

    The switch expression just shown becomes much more elegant if we write it in arrow notation. We can write the return value

    • directly behind the arrow (lines 2 and 3),
    • as an expression or method call behind the arrow (line 4),
    • or return it with yield from a code block (line 7).
    int numLetters = switch (day) {
      case MONDAY, FRIDAY, SUNDAY -> 6;
      case TUESDAY                -> 7;
      case THURSDAY, SATURDAY     -> (int) Math.pow(2, 3);
      case WEDNESDAY              -> {
        int three = 1 + 2;
        yield three * three;
      }
      default -> throw new IllegalStateException("Unknown day: " + day);
    };
    Code language: Java (java)

    We can also let our IDE do the complete refactoring from the conventional switch statement to the switch expression with arrow notation:

    Automatic replacement of 'switch' statements by 'switch' expressions
    Automatic replacement of ‘switch’ statements by ‘switch’ expressions

    Exhaustiveness Analysis for Enums

    As the variable day is an enum, the compiler can recognize that we have covered all cases. Thus, we may omit the default case:

    int numLetters = switch (day) {
      case MONDAY, FRIDAY, SUNDAY -> 6;
      case TUESDAY                -> 7;
      case THURSDAY, SATURDAY     -> (int) Math.pow(2, 3);
      case WEDNESDAY              -> {
        int three = 1 + 2;
        yield three * three;
      }
    };Code language: Java (java)

    Our IDE is happy to do that for us as well:

    Automatic removal of the 'default' branch
    Automatic removal of the ‘default’ branch

    The notation without default case is shorter and assists us in future extensions of the enum. If we extend it – e.g., by a NEWDAY – the compiler will tell us that the switch expression is now incomplete:

    Incomplete 'switch' expression
    Incomplete ‘switch’ expression

    So switch expressions can also make our code more robust.

    Summary

    Switch expressions are a powerful tool. The arrow notation and the use as an expression with a return value allow a much more concise and less error-prone notation than before.

    Switch expressions were first introduced in Java 12 as a preview feature. In the second preview in Java 13, the break keyword, initially used to return values, was replaced by yield. With JDK Enhancement Proposal 361, Switch Expressions were released as a final feature in Java 14 without any further changes.

    Leave me a comment: Have you already had the opportunity to use the new Switch Expressions? If yes, how do you like them? If not, why not?

  • Generating Random Numbers in Java

    Generating Random Numbers in Java

    Generating random numbers (or strings or other random objects) is one of the most common programming tasks.

    This article describes:

    • which possibilities there are in Java to generate random numbers,
    • why these are so-called “pseudorandom numbers”,
    • what technology is behind their generation,
    • how to predict random numbers in Java,
    • and how the implementation of the various methods has changed throughout Java versions.

    Experienced Java developers familiar with the various ways to create random values can skip directly to the “Pseudorandom Number Generation” or “Changes in Implementations Over Time” section.

    You can find the code samples for this article in this GitHub repository.

    How to Generate Random Numbers

    This chapter shows the fundamental classes and methods for generating a random number in Java and what to consider when using them in terms of thread safety.

    Java Math.random() Method

    One of the oldest methods (it has existed since Java 1.0) to generate a random double number is to call Math.random():

    double d = Math.random();Code language: Java (java)

    The call returns a random number between 0 and 1. More precisely: a double floating-point number greater than or equal to 0.0 and less than 1.0.

    Math.random() is thread-safe according to the documentation. However, synchronization is broken from Java 1.3 up to and including Java 7. If you work with one of these versions, you must not call Math.random() from different threads.

    Internally, Math.random() calls the nextDouble() method of a static instance of the Random class held in the Math class, which is discussed in the next section.

    For more details on Math.random()‘s internal functionality and thread safety, see the chapter on implementing this method.

    Java Random Class

    Also present since Java 1.0 is the java.util.Random class. With it, you can generate a random int number as follows:

    Random random = new Random();
    int i = random.nextInt();Code language: Java (java)

    The call returns a random integer number in the range of Integer.MIN_VALUE (= -231 = -2.147.483.648) to Integer.MAX_VALUE (= 231-1 = 2.147.483.647).

    Other methods for generating random values are:

    • nextInt(int bound) – generates a random number greater than or equal to 0 and less than the specified upper bound.
    • nextLong() – generates a random long value.
    • nextBoolean() – returns a random boolean value, i.e., true or false.
    • nextFloat() – returns a random float number greater than or equal to 0.0 and less than 1.0.
    • nextDouble() – returns a random double number greater than or equal to 0.0 and less than 1.0 (this method is called from Math.random(), as described in the previous section).
    • nextBytes(byte[] bytes) – fills the specified byte array with random bytes.
    • nextGaussian() – returns a Gaussian-distributed random number with a standard deviation of 1.0, i.e., according to the normal distribution, the probability of a number close to 0 is higher than the probability of a number far from 0.

    You can use the setSeed(long seed) method or the second constructor Random(long seed) to set the so-called “seed” value of the random number generator. This is only necessary for special requirements. You can read more about this in the chapter on Pseudorandom Numbers.

    Extensions to java.util.Random in Java 8

    With the introduction of streams in Java 8, java.util.Random has been extended to include methods for generating random number streams. The Random.ints() method generates an IntStream: a stream of random int values.

    The following example prints seven random numbers to the console:

    Random random = new Random();
    random.ints().limit(7).forEach(System.out::println);Code language: Java (java)

    The limitation to seven elements set by limit(7) can also be requested in an overloaded variant of the ints() method:

    Random random = new Random();
    random.ints(7).forEach(System.out::println);Code language: Java (java)

    Two further variants allow the specification of lower and upper bounds of the generated values. The following example generates seven random numbers greater than or equal to 0 and less than 1,000 – once limited by limits() and once by the first parameter of the ints() method.

    Random random = new Random();
    random.ints(0, 1000).limit(7).forEach(System.out::println);
    random.ints(7, 0, 1000).forEach(System.out::println);Code language: Java (java)

    Corresponding four variants exist for:

    • longs() – generates a LongStream of random numbers
    • doubles() – generates a DoubleStream of random numbers

    Thread Safety of java.util.Random

    java.util.Random is thread-safe, so you can safely call the methods of a single shared Random object from multiple threads.

    Since the generated values are no true random numbers, but a random number is practically calculated from the previous one (this is very simplified; you can find more details in the chapter “Pseudorandom Numbers”) – and since this calculation must be done atomically, the invocation of the method is subject to a certain synchronization overhead.

    Many simultaneous invocations from multiple threads can thus harm performance. In the GitHub repo, you can find the program RandomMultipleThreadsDemo, demonstrating the difference.

    The following graph shows how long it takes on my 6-core i7 to generate 100 million random numbers via a shared Random instance: about one second for one thread, over 50 seconds for six parallel threads:

    java.util.Random Multithreading Performance – Shared Instance
    java.util.Random Multithreading Performance – Shared Instance

    I have measured the extreme case, in which the threads continuously generate random numbers, i.e., constantly cause contention (conflicts when accessing the shared state). If a thread generates a random number only occasionally, contention occurs less frequently and may not be measurable at all.

    Provided you expect thread contention and your application does not require the use of a single random number generator (which should only be the case in exceptional cases), you can create a separate Random object per thread. Then the time for 100 million random numbers remains at about one second, no matter how many threads are running in parallel (MultipleRandomMultipleThreadsDemo in GitHub):

    java.util.Random Multithreading Performance – One Instance per Thread
    java.util.Random Multithreading Performance – One Instance per Thread

    Better still is to use ThreadLocalRandom described in the following section.

    Java ThreadLocalRandom Class

    In Java 7, the java.util.concurrent.ThreadLocalRandom class was introduced. The static method ThreadLocalRandom.current() provides a random number generator for each thread independent of all other threads. This way, no thread contention can occur, and the synchronization overhead described in the previous section is eliminated.

    ThreadLocalRandom.current() returns a ThreadLocalRandom object, which in turn inherits from Random and thus provides the same methods, e.g., nextInt():

    Random random = ThreadLocalRandom.current();
    int randomNumber = random.nextInt();Code language: Java (java)

    The program ThreadLocalRandomMultipleThreadsDemo measures the performance of ThreadLocalRandom. The result: The generation of 100 million random numbers takes about 150 ms, no matter how many threads are running at the same time – an enormous performance gain compared to Random – not only with multiple threads but also with only one:

    ThreadLocalRandom Performance
    ThreadLocalRandom Performance

    ThreadLocalRandom should, therefore, always be your first choice.

    It is interesting to see how the implementation has changed fundamentally from Java 7 to Java 8. More about this in the section “Implementation of ThreadLocalRandom”.

    Generate a Random Number in a Range

    A common requirement is to generate a random number from a specific range. You have already seen a few possibilities:

    • Random.nextInt(int bound) – generates a random integer number between 0 and the specified upper bound.
    • Random.ints(int randomNumberOrigin, int randomNumberBound) – generates an infinite stream of random numbers in the specified number range.
    • Random.ints(long streamSize, int randomNumberOrigin, int randomNumberBound) – generates a stream of the specified number of random numbers in the specified number range.
    • the analogous stream-generating methods Random.longs() and Random.doubles().

    (The upper bound or randomNumberBound is always exclusive, i.e., the generated random numbers are always less than the specified maximum).

    So we can

    • either generate a single random number between 0 and an upper limit
    • or a stream of random numbers constrained by lower and upper bounds.

    However, if we want to generate a single random number from a range of numbers whose lower bound is not 0, we cannot use any existing JDK function but must take a roundabout route. Here are a few examples:

    Random Number between 1 and 10

    Since we can only define the upper bound of random numbers, we create a number between 0 and 9 and add a 1:

    Random random = ThreadLocalRandom.current();
    int number = 1 + random.nextInt(9);Code language: Java (java)

    Attention: Upper bounds are always exclusive, i.e., the code returns a maximum of 9. To include 10, i.e., to get numbers less than or equal to 10, we have to modify the code as follows:

    Random random = ThreadLocalRandom.current();
    int number = 1 + random.nextInt(10);Code language: Java (java)

    Random Number between 1 and 100

    To generate a random number between 1 and 100, we generate a number between 0 and 99 and add 1:

    Random random = ThreadLocalRandom.current();
    int number = 1 + random.nextInt(99);Code language: Java (java)

    Analogous to the previous example, we need to write nextInt(100) if we want to include 100.

    Random Number between Two Values

    If we need a random number between two given values more often, we should extract the generation to a helper method:

    public class RandomUtils
      public static int nextInt(Random random, int origin, int bound) {
        if (origin >= bound) {
          throw new IllegalArgumentException();
        }
        return origin + random.nextInt(bound - origin);
      }
    }Code language: Java (java)

    We can then call this, for example, as follows to generate a random number between 1 and 6 inclusive:

    Random random = ThreadLocalRandom.current();
    int randomNumberFrom1To6 = RandomUtils.nextInt(random, 1, 7);Code language: Java (java)

    This way, you can simulate the roll of a die, for example.

    How to Generate a Random String in Java

    So far, we have learned about methods of the Random class that allow us to create random integers (nextInt), random doubles (nextDouble), random arrays (nextBytes), and random booleans (nextBoolean).

    However, sometimes we need a random string – that is, a string filled with a random or specific number of random characters.

    We can do this by gradually filling a StringBuilder with random lowercase letters (you can find this and the following methods in the RandomUtils class in GitHub):

    public static String randomLowerCaseString(int length) {
      StringBuilder sb = new StringBuilder();
      Random r = ThreadLocalRandom.current();
      for (int i = 0; i < length; i++) {
        char c = (char) ('a' + r.nextInt(26));
        sb.append(c);
      }
      return sb.toString();
    }Code language: Java (java)

    It gets a bit more complicated if we want to extend the character range, e.g., to upper case letters, numbers, and the space character. Then we have to define an alphabet and pick a random character from it:

    private static final String ALPHANUMERIC_WITH_SPACE_ALPHABET =
        " 0123456789ABCDEFGHIJKLMNOPQRSTUVWXYZabcdefghijklmnopqrstuvwxyz";
    
    public static String randomAlphanumericalWithSpaceString(int length) {
      return randomString(length, ALPHANUMERIC_WITH_SPACE_ALPHABET);
    }
    
    public static String randomString(int length, String alphabet) {
      StringBuilder sb = new StringBuilder();
      Random r = ThreadLocalRandom.current();
      for (int i = 0; i < length; i++) {
        int pos = r.nextInt(alphabet.length());
        char c = alphabet.charAt(pos);
        sb.append(c);
      }
      return sb.toString();
    }Code language: Java (java)

    Since Java 8, we can also implement the randomString() method using a stream:

    public static String randomStringWithStream(int length, String alphabet) {
      return ThreadLocalRandom.current()
          .ints(length, 0, alphabet.length())
          .map(alphabet::charAt)
          .collect(StringBuilder::new, StringBuilder::appendCodePoint, StringBuilder::append)
          .toString();
    }Code language: Java (java)

    Alternatively, you can use one of the numerous methods of the RandomStringUtils class from the open-source Apache Commons Lang project.

    Pseudorandom Number Generation in Java

    This article has mentioned the topic of “pseudorandom numbers” a few times already, and now it is time to take a closer look at the subject.

    As briefly mentioned before, Random does not generate truly random numbers. It can’t because computers are based on algorithms, and algorithms are concrete rules that lead from a specific input to a particular output.

    What is generated instead are so-called “pseudorandom numbers”. These are based on a sequence of numbers that starts at a specific value (the so-called “seed”) and where the next number is calculated from the previous one.

    The algorithm is constructed in such a way that the generated numbers a) give the impression of being random and b) are evenly distributed in the number space (you can read the mathematical theory behind this in the Wikipedia article “Linear congruential generator”).

    Seed Value

    The starting value “seed” is generated from the system time when the Random() constructor is called. This makes it highly probable that the random number sequence will start at a different position each time a Random object is created.

    But we can also set the seed value ourselves:

    • in the constructor Random(long seed)
    • or with the method setSeed(long seed)

    When we do that, we always get the same sequence of random numbers. We can check this quite easily: The following code (class SetSeedExample in GitHub) prints the sequence of numbers 30, 63, 48, 84, 70 twice every time it is started – on any operating system and with any Java version.

    Random random = new Random(42);
    for (int i = 0; i < 5; i++) {
      System.out.println(random.nextInt(100));
    }
    
    random.setSeed(42);
    for (int i = 0; i < 5; i++) {
      System.out.println(random.nextInt(100));
    }Code language: Java (java)

    Why doesn’t the number sequence start at 42?

    You will find the answer in the next section.

    Deriving Random Numbers from the Random Number Generator’s State

    The “seed” value does not determine the first random number but the starting state of the random number generator. In the Random class, the state is stored in a 48-bit number calculated from the “seed”.

    Inappropriately, the state is stored in a variable that also has the name seed; the name state would have been more appropriate. The respective subsequent state is calculated using the following formula:

    seed = (seed * 25.214.903.917 + 11) & 248-1

    From this 48-bit value, as many bits are then taken left-justified as are required for the requested random value, e.g., 32 bits for an int:

    Deriving a 32-Bit Random Number from the Random 48-Bit State
    Deriving a 32-Bit Random Number from the Random 48-Bit State

    … or 1 bit for a boolean:

    Deriving a 1-Bit Random Number from the Random 48-Bit State
    Deriving a 1-Bit Random Number from the Random 48-Bit State

    And for numbers that require more than 48 bits, like long or double?

    • For a long, 32 bits are picked, then the next state is calculated, then another 32 bits are picked.
    • For a double, 26 bits are taken first and then another 27 bits, resulting in 53 bits (which corresponds to the precision of a double value).

    Never more than 32 bits are taken from the 48 bits. Why is the status then 48 bits long and not 32?

    The reason is the following:

    If the status were only 32 bits long, any given random integer would always be followed by the same successor. This, in turn, means that a single random number would be enough to predict all future random numbers.

    Because the remaining 16 bits are hidden for a 48-bit status, there are 216 possible statuses for a 32-bit value, i.e., 65,536 different statuses in which the random number generator could currently be. So, the same random integer number can have 65,536 different successors, and this makes a prediction from a single number impossible.

    However, if we know two consecutive random numbers, the situation is quite different. More about this in the section “Predictability of random numbers”.

    Generating Pseudorandom Numbers in java.util.Random

    What does this look like in java.util.Random‘s source code?

    Let’s start with the nextInt() method:

    public int nextInt() {
        return next(32);
    }Code language: Java (java)

    The invoked next() method looks like this.

    (I have printed the original implementation up to Java 1.3 because it is the easiest to understand. You can find the latest – optimized, but functionally identical – implementation chapter “Changes in Implementations over Time” below.)

    private static final long multiplier = 0x5DEECE66DL;
    private static final long addend = 0xBL;
    private static final long mask = (1L << 48) - 1;
    
    // ...
    
    synchronized protected int next(int bits) {
        long nextseed = (seed * multiplier + addend) & mask;
        seed = nextseed;
        return (int)(nextseed >>> (48 - bits));
    }
    Code language: Java (java)

    Line 8 implements the formula presented in the previous section for calculating the subsequent state.

    In line 10, the requested bits are extracted by “right shift” and casting to an int. The following graphic illustrates this for 32 bits:

    Random.next(32): right shift by 16 bits and cast to int
    Random.next(32): right shift by 16 bits and cast to int

    … and once for 1 bit:

    Random.next(1): right shift by 47 bits and cast to int
    Random.next(1): right shift by 47 bits and cast to int

    The nextBoolean() method then only has to check whether the 1-bit number thus obtained is 1 or 0:

    public boolean nextBoolean() {
        return next(1) != 0;
    }Code language: Java (java)

    The nextLong() method, as mentioned above, first gets 32 bits, shifts them 32 bits to the left, and adds a second 32-bit number:

    public long nextLong() {
        return ((long)(next(32)) << 32) + next(32);
    }Code language: Java (java)

    The nextDouble() method is a bit more complicated (again, first the – somewhat easier to read, since not yet highly optimized – original implementation up to Java 7):

    public double nextDouble() {
        long l = ((long)(next(26)) << 27) + next(27);
        return l / (double)(1L << 53);
    }Code language: Java (java)

    The method performs the following two steps:

    1. Concatenation of a 26-bit random number with a 27-bit random number to form a 53-bit number (i.e., a number between 0 and 253-1).
    2. Division by 253 (one more than the highest number that could be generated in step 1).

    This then results in a number >= 0.0 and < 1.0.

    Why are only 53 bits used for a double and not 64? The reason is that double-precision floating-point numbers use 53 bits for sign and fraction and 11 bits for the exponent. You can find a more detailed explanation in the Wikipedia article “Double-precision floating-point format”.

    Similarly, the nextFloat() method uses 24 bits and not 32 (see Wikipedia article “Single-precision floating-point format”):

    public float nextFloat() {
        return next(24) / ((float)(1 << 24));
    }Code language: Java (java)

    Predictability of Random Numbers

    In the penultimate section, I claimed that we could predict from two consecutive pseudorandom numbers which subsequent numbers will follow. We can verify this assertion with a simple test.

    The program RandomIntegerPairRepetitionFinder generates all 216 possible seed values for each of the 232 integer numbers – and from these their 216 potential successors. If the program finds the same pair of consecutive pseudorandom numbers more than once, it prints this to the console.

    After 24 hours, no repetition was found on my laptop. However, the program would have to run for almost 1,200 hours, or 50 days, to check all combinations. I don’t have that much time, so I can’t prove my claim.

    Nevertheless, we can write a program that predicts all further random numbers from two given ones. Such a program can detect if there is only one possible sequence for the input – and ask for a third number if two are not enough.

    How to Predict the Next Random Number in Java

    Given two random numbers generated by Random.nextInt(), predicting the subsequent random numbers is relatively easy.

    To do this, we determine the 216 possible seed values for the first given number, generate the respective successor for each and check whether it matches the second given number. If this is the case, we can calculate all subsequent random numbers based on the seed value determined in this way.

    You can find the complete code for this in the RandomIntegerPredictor class.

    The following code shows the method that determines the seed value. I have simplified it for printing in this article to use only two input numbers. The code in the linked class can also handle a longer input sequence.

    private static final int NUMBER_OF_POSSIBLE_SEEDS = 1 << 16;
    
    private static final long multiplier = 0x5DEECE66DL;
    private static final long addend = 0xBL;
    private static final long mask = (1L << 48) - 1;
    
    // ...
    
    private long getSeedMatchingForSequence() {
      long firstNumberSeedBase = Integer.toUnsignedLong(givenNumbers[0]) << 16;
    
      for (int noise = 0; noise < NUMBER_OF_POSSIBLE_SEEDS; noise++) {
        long seed = firstNumberSeedBase | noise;
        long nextSeed = getNextSeed(seed);
        int nextInt = (int) (nextSeed >>> 16);
        if (nextInt == givenNumbers[1]) {
          return seed;
        }
      }
    
      throw new IllegalArgumentException(
          "Found no matching seed; please verify your input sequence.");
    }
    
    private long getNextSeed(long seed) {
      return (seed * multiplier + addend) & mask;
    }Code language: Java (java)

    From the seed value thus obtained, we can derive the further sequence of numbers:

    public int[] predict(int numberOfPredictions) {
      long seed = getSeedMatchingForSequence();
    
      // Skip the given numbers
      for (int i = 0; i < givenNumbers.length; i++) {
        seed = getNextSeed(seed);
      }
    
      // Get the predictions
      int[] predictions = new int[numberOfPredictions];
      for (int i = 0; i < numberOfPredictions; i++) {
        predictions[i] = (int) (seed >>> 16);
        seed = getNextSeed(seed);
      }
    
      return predictions;
    }Code language: Java (java)

    The GitHub contains a demo, RandomIntegerPredictorDemo, which prints two random numbers, predicts the following ten random numbers, and finally prints ten more random numbers. The prediction is correct:

    Two random numbers:
    -1,179,305,299
    435,136,901
    
    Predicting 10 random numbers:
    -2,139,482,012
    1,388,148,251
    1,134,856,645
    -1,205,820,716
    182,240,689
    ...
    
    Next *actual* random numbers:
    -2,139,482,012
    1,388,148,251
    1,134,856,645
    -1,205,820,716
    182,240,689
    ...Code language: plaintext (plaintext)

    The repo also contains the RandomIntegerPredictorRunner command line runner, which you can call (after compiling the code) as follows:

    $ java eu.happycoders.random.predictor.RandomIntegerPredictorRunner 5 999571443 25208007
    Given numbers: [999571443, 25208007]
    Predicting 5 random numbers...
    -1,315,941,039
    136,476,741
    1,077,533,899
    -211,240,302
    143,354,061
    Code language: plaintext (plaintext)

    The first parameter, 5, specifies how many subsequent numbers to display; the following parameters are the known sequence of random numbers. The output is the prediction of the subsequent random numbers.

    Java SecureRandom Class

    In the last section of the previous chapter, you learned how to predict all subsequent random numbers from only two consecutive ones.

    For certain requirements (e.g., cryptography), this predictability is not acceptable. In such cases, we need a “secure” random number generator.

    The class java.security.SecureRandom has been available since Java 1.1. It generates “cryptographically strong” random numbers as defined in RFC 1750 “Randomness Recommendations for Security”.

    “Cryptographically strong” can be implemented in one of the following two ways (or a combination of both):

    • A deterministic sequence like Random, but with much larger “noise” (the bits from the seed not included in the generated random number), so that reverse-engineering the seed from a given sequence becomes virtually impossible with today’s hardware.
    • Truly random numbers generated by a special hardware that measures, for example, radioactive decay processes.

    Different types of secure random number generators can be made available through the Java Service Provider Interface (SPI) and selected at runtime via SecureRandom.getInstance(String algorithm) and some overloaded variants of this method.

    The constructor of SecureRandom provides a default implementation. SecureRandom inherits from Random and thus provides the same methods. The following example shows how you can generate a secure random floating-point number:

    SecureRandom secureRandom = new SecureRandom();
    double strongRandomNumber = secureRandom.nextDouble();Code language: Java (java)

    You can find more details in the SecureRandom JavaDoc.

    Changes in Implementations over Time

    In this section, you will learn how the random number generation methods presented in this article are implemented and how (and why) the implementations have been revised over the course of Java versions.

    Implementation of Math.random()

    The static method Math.random() internally calls the nextDouble() method on a static instance of the Random class. The code for creating the static Random object has been changed several times.

    In Java 1.0, the Math.random() method was simply provided with the synchronized keyword. That was correct but led to a high synchronization overhead:

    public static synchronized double random() {
        if (randomNumberGenerator == null)
            randomNumberGenerator = new Random();
        return randomNumberGenerator.nextDouble();
    }Code language: Java (java)

    Java 1.3 switched to the “Double-checked locking” pattern:

    // !!! DON'T DO THIS - NOT THREAD-SAFE !!!
    
    public static double random() {
        if (randomNumberGenerator == null) initRNG();
        return randomNumberGenerator.nextDouble();
    }
    
    private static synchronized void initRNG() {
        if (randomNumberGenerator == null) 
            randomNumberGenerator = new Random();
    }Code language: Java (java)

    This supposedly more performant implementation is not thread-safe! Due to the unsynchronized read access to randomNumberGenerator in the random() method, a thread could see an incompletely initialized object at this point. You can find a detailed explanation in the article linked above.

    Only in Java 8 this error was recognized, and the implementation was changed to the “Initialization-on-Demand Holder” pattern:

    private static final class RandomNumberGeneratorHolder {
        static final Random randomNumberGenerator = new Random();
    }
    
    public static double random() {
        return RandomNumberGeneratorHolder.randomNumberGenerator.nextDouble();
    }Code language: Java (java)

    In this pattern, randomNumberGenerator is not created until it is needed; and the JVM guarantees proper synchronization when initializing the RandomNumberGeneratorHolder class.

    Nothing else has changed in this implementation until Java 18.

    Implementation of java.util.Random

    In the chapter “Pseudorandom Numbers in Java”, I explained the basic implementation of the Random class using its Java 1.0 source code. The public methods internally call the next(int bits) method.

    Its synchronization was originally done via the synchronized keyword, which is easy to use, but – especially up to and including Java 5 – caused a high performance impact.

    Here, once again, the code from Java 1.0:

    private long seed;
    
    synchronized protected int next(int bits) {
        long nextseed = (seed * multiplier + addend) & mask;
        seed = nextseed;
        return (int)(nextseed >>> (48 - bits));
    }Code language: Java (java)

    In Java 1.4, the seed value was stored in a (then internal) sun.misc.AtomicLong and changed with attemptUpdate(). This method uses compare-and-set, i.e., optimistic locking:

    import sun.misc.AtomicLong;
    
    private AtomicLong seed;
    
    protected int next(int bits) {
        long oldseed, nextseed;
        do {
          oldseed = seed.get();
          nextseed = (oldseed * multiplier + addend) & mask;
        } while (!seed.attemptUpdate(oldseed, nextseed));
        return (int)(nextseed >>> (48 - bits));
    }Code language: Java (java)

    Java 5 moved to the new, official java.util.concurrent.atomic.AtomicLong and its compareAndSet() method:

    import java.util.concurrent.atomic.AtomicLong;
    
    private AtomicLong seed;
    
    protected int next(int bits) {
        long oldseed, nextseed;
        AtomicLong seed = this.seed;
        do {
            oldseed = seed.get();
            nextseed = (oldseed * multiplier + addend) & mask;
        } while (!seed.compareAndSet(oldseed, nextseed));
        return (int)(nextseed >>> (48 - bits));
    }Code language: Java (java)

    In Java 6, the AtomicLong variable was made final. Until Java 18, the implementation of the next() method was not changed again.

    Another change was made to the nextDouble() method. As a reminder – this is what it initially looked like:

    public double nextDouble() {
        long l = ((long)(next(26)) << 27) + next(27);
        return l / (double)(1L << 53);
    }Code language: Java (java)

    Since division is much more expensive than multiplication, in Java 8, the value 1/253 was extracted into a constant and is since used as a multiplication factor:

    private static final double DOUBLE_UNIT = 0x1.0p-53; // 1.0 / (1L << 53)
    
    public double nextDouble() {
        return (((long)(next(26)) << 27) + next(27)) * DOUBLE_UNIT;
    }Code language: Java (java)

    The functionality of the Random class has thus remained unchanged since Java 1.0. Up to Java 8, however, its performance has improved continuously.

    Implementation of java.util.concurrent.ThreadLocalRandom

    In Java 7, the ThreadLocalRandom.current() method returns a separate instance of ThreadLocalRandom per thread:

    private static final ThreadLocal<ThreadLocalRandom> localRandom =
        new ThreadLocal<ThreadLocalRandom>() {
            protected ThreadLocalRandom initialValue() {
                return new ThreadLocalRandom();
            }
    };
    
    public static ThreadLocalRandom current() {
        return localRandom.get();
    }Code language: Java (java)

    ThreadLocalRandom inherits from Random, which stores the state in an AtomicLong. Since its thread safety (and the resulting overhead) are not needed in ThreadLocalRandom, ThreadLocalRandom keeps the state in its own field rnd instead, which it accesses without synchronization:

    ThreadLocalRandom in Java 7: One Instance per Thread
    ThreadLocalRandom in Java 7: One Instance per Thread

    In Java 8, ThreadLocalRandom has been completely rewritten. Instead of providing separate instances per thread, ThreadLocalRandom.current() returns the same static instance of ThreadLocalRandom for all threads.

    To prevent all threads from accessing the same state (which would then have to be synchronized again), the state is stored in the threadLocalRandomSeed variable of the current thread’s Thread object:

    ThreadLocalRandom in Java 8: One Instance, Status Is Stored in the Thread
    ThreadLocalRandom in Java 8: One Instance, Status Is Stored in the Thread

    This field is accessed from ThreadLocalRandom via jdk.internal.misc.Unsafe:

    private static final Unsafe U = Unsafe.getUnsafe();
    private static final long SEED
        = U.objectFieldOffset(Thread.class, "threadLocalRandomSeed");
    
    // ...
    
    final long nextSeed() {
        Thread t; long r; // read and update per-thread seed
        U.putLong(t = Thread.currentThread(), SEED,
                  r = U.getLong(t, SEED) + (t.getId() << 1) + GOLDEN_GAMMA);
        return r;
    }
    Code language: Java (java)

    You can easily show that different threads use different ThreadLocalRandom instances in Java 7 and the same ThreadLocalRandom instance in Java 8 with the following code:

    for (int i = 0; i < 3; i++) {
      new Thread() {
        @Override
        public void run() {
          System.out.println(
              "ThreadLocalRandom instance: " + ThreadLocalRandom.current());
        }
      }.start();
    }Code language: Java (java)

    If you run the code under Java 7, you will see three different instances; under Java 8, you will see the same instance three times.

    Implementation of java.secure.SecureRandom

    SecureRandom is not itself an implementation of a secure random number generator. Concrete implementations are provided via the Service Provider Interface (SPI). Going into these is beyond the scope of this article.

    Two enhancements to SecureRandom itself are worth mentioning:

    • In Java 1.5, the getAlgorithm() method was added, returning the name of the implemented algorithm.
    • In Java 8, the static getInstanceStrong() method was added, returning the implementation of a particularly strong algorithm, such as those recommended for RSA key pairs.

    “Enhanced Pseudo-Random Number Generators” in Java 17

    In Java 17, the random number generators in the JDK have been extended with an interface hierarchy to allow for future extensions. You can find details about this in the article about Java 17.

    Summary

    This article started by showing the various ways to generate random numbers in Java.

    After that, you learned why random numbers are actually pseudorandom numbers, how to calculate a sequence of random numbers, and how to predict all future random numbers from two given random numbers.

    The article concluded with a journey through Java versions and in it showed how (and why) the implementations of the previously shown methods have changed over time.

  • Java Text Blocks

    Java Text Blocks

    In Java 15, text blocks (multiline strings) were introduced under Project Amber, whose goal is to develop and introduce new language features.

    In this article, you will learn:

    • Why do we need text blocks?
    • How to notate text blocks in Java?
    • How to indent a text block?
    • Which escape sequences can or must we use in a text block?

    Multiline Strings in Java

    Before Java 15, when we wanted to define a multi-line string in Java, it usually looked like this:

    String sql =
        "  SELECT id, firstName, lastName\n"
            + "    FROM Employee\n"
            + "   WHERE departmentId = \"IT\"\n"
            + "ORDER BY lastName, firstName";
    
    String html =
        "<html>\n"
            + "  <body>\n"
            + "    <p>Hello World!</p>\n"
            + "  </body>\n"
            + "</html>";Code language: Java (java)

    We had to replace line breaks and quotes with escape sequences (\n and \"). And to split the string into several lines in a somewhat readable way, we had to divide it and concatenate it again with +. That was not too bad (because the compiler made a single string out of it again), but it was not pleasant either.

    Text Block Notation

    Starting with Java 15, we can notate multiline strings as “text blocks”:

    String sql = """
          SELECT id, firstName, lastName
            FROM Employee
           WHERE departmentId = "IT"
        ORDER BY lastName, firstName""";
    
    String html = """
        <html>
          <body>
            <p>Hello World!</p>
          </body>
        </html>""";Code language: Java (java)

    The text block starts and ends with three quotation marks each. The following rules apply:

    • The starting quotes must be followed by a line break (which does not become part of the string).
    • If there is a line break before the ending quotes, this line break will be part of the string.
    • You do not need to escape single or double quotes within the text block, but you may (though SCA tools such as SonarLint recommend not doing so).
    • If you want to write more than two quotation marks, you have to escape every third of them.

    One of the first questions developers ask themselves is:

    How Far Must the Text Block Be Indented?

    The answer is: it doesn’t matter.

    The text block starts at the character furthest to the left (in the first example above, at the “O” of “ORDER BY”; and in the second example, at the angle brackets in the first and last line).

    The following three notations all lead to the same result:

        String sql1 = """
              SELECT id, firstName, lastName
                FROM Employee
               WHERE departmentId = "IT"
            ORDER BY lastName, firstName""";
    
        String sql2 = """
                       SELECT id, firstName, lastName
                         FROM Employee
                        WHERE departmentId = "IT"
                     ORDER BY lastName, firstName""";
    
        String sql3 = """
      SELECT id, firstName, lastName
        FROM Employee
       WHERE departmentId = "IT"
    ORDER BY lastName, firstName""";Code language: Java (java)

    All three strings have the following content – regardless of the indentation in the source code:

      SELECT id, firstName, lastName
        FROM Employee
       WHERE departmentId = "IT"
    ORDER BY lastName, firstNameCode language: plaintext (plaintext)

    Modern IDEs give us a hand here by showing the left margin of the text block (IntelliJ by a green line):

    Representation of the left margin of Java text blocks in IntelliJ
    Representation of the left margin of Java text blocks in IntelliJ

    But what if you want to create a text block that is indented?

    There is a trick for this: You insert a line break before the closing quotation marks and place the quotation marks where the text block should start, e.g., like this:

    String sql = """
          SELECT id, firstName, lastName
            FROM Employee
           WHERE departmentId = "IT"
        ORDER BY lastName, firstName
      """;Code language: Java (java)

    The text block is now indented by two characters.

    However, it also has a line break at the end. We can remove this with an escape sequence. Escape sequences are discussed in the following chapter.

    Escape Sequences in Text Blocks

    Text blocks have the advantage that the escape sequences most commonly used in strings, namely \" for quotes and \n for a line break, are no longer needed.

    Instead, there are two new escape sequences:

    Escape Sequence: Backslash at the End of the Line

    In the previous chapter, you saw that you can indent a text block by inserting a line break before the closing quotation marks. However, this line break is then also contained in the string. To remove it, you can put a backslash at the end of the last line:

    String sql = """
          SELECT id, firstName, lastName
            FROM Employee
           WHERE departmentId = "IT"
        ORDER BY lastName, firstName\
      """;Code language: Java (java)

    The backslash at the line end ensures that the string does not contain a line break at that position.

    This feature is not limited to the last line – you can end any line with a backslash:

    String sql = """
        SELECT id, firstName, lastName \
        FROM Employee
        WHERE departmentId = "IT" \
        ORDER BY lastName, firstName""";Code language: Java (java)

    This string thus contains only a single line break after “Employee”:

    SELECT id, firstName, lastName FROM Employee
    WHERE departmentId = "IT" ORDER BY lastName, firstNameCode language: plaintext (plaintext)

    This feature is helpful if you want to split a one-line string, e.g., a very long log statement, over several lines in the source code.

    Escape Sequence: \s

    Another escape sequence you can use to format a text block is “\s”.

    Trailing spaces are removed from each line by default, as in the following example (the dots are supposed to represent the spaces):

    String text = """
        one·····
        two·····
        three···""";
    
    text.lines().map(line -> "|" + line + "|").forEachOrdered(System.out::println);Code language: Java (java)

    The output of this code snippet is:

    |one|
    |two|
    |three|Code language: plaintext (plaintext)

    To preserve the spaces, you can replace them with the escape sequence “\s”:

    String text = """
        one\s\s\s\s\s
        two\s\s\s\s\s
        three\s\s\s""";Code language: Java (java)

    It is clearer and completely sufficient if we only escape the last space:

    String text = """
        one    \s
        two    \s
        three  \s""";Code language: Java (java)

    Thus, the program prints the desired result:

    |one     |
    |two     |
    |three   |Code language: plaintext (plaintext)

    Now you have learned the complete range of functions of the text blocks. Have fun using them!

    History of Text Blocks in Java

    Text blocks were first introduced via JDK Enhancement Proposal (JEP) 355 as a preview feature in Java 13. They were a replacement for JEP 326, “Raw String Literals”, which was not accepted by the community and subsequently withdrawn. If you’re interested in the reasoning behind this, you can find it in this post by Brian Goetz on the jdk-dev mailing list.

    In the second preview, JEP 368, the above-mentioned escape sequences were added in Java 14.

    Due to positive feedback, text blocks were released as a production-ready feature in Java 15 by JDK Enhancement Proposal 378 without further changes.

    Summary

    Text blocks finally allow us to notate multi-line strings in Java code conveniently. They are enclosed in triple quotes. Quotation marks and line breaks no longer have to be replaced by confusing escape sequences.

    Do you already use text blocks? How do you like them? Leave a comment below!

  • Java substring() Method

    Java substring() Method

    Java’s String.substring() method is one of the most used Java methods ever (at least according to Google search results). Reason enough to take a closer look at the method.

    This article describes how to use substring() – and how it works internally. There have been exciting changes in the course of Java releases. Experienced Java developers familiar with the use of the method can jump directly to the “How Does Substring Work in Java?” section.

    String.substring()

    The String.substring() method returns a substring of the original string, based on a beginning index and an ending index. The best way to explain this is with an image.

    In the following example, we extract a substring from position 5 to 8 from the string “HappyCoders” (counting starts at 0):

    Java substring Example
    Java substring Example

    When invoking the substring() method, we specify the beginning position, which is 5, as the first parameter, and the position after the ending position, which is 9, as the second parameter:

    String string = "HappyCoders";
    String substring = string.substring(5,9);
    System.out.println("substring = " + substring);Code language: Java (java)

    As expected, the program prints the substring “Code”. The length of the substring corresponds to the ending position minus the beginning position, i.e., 9-5 = 4.

    Specifying the Substring Length

    As shown in the previous example, we need to pass the beginning and ending index of the substring to the substring() method. However, sometimes we do not know the ending index but the requested substring length.

    This is easily solved: we can calculate the ending index as beginning index plus length. We can extract this directly into a method like the following:

    public static String substring(String string, int beginIndex, int length) {
      int endIndex = beginIndex + length;
      return string.substring(beginIndex, endIndex);
    }Code language: Java (java)

    We can then call the method as follows:

    String code = substring("HappyCoders", 5, 4);Code language: Java (java)

    We do not need to validate the parameters; the String.substring() method does that for us.

    Substring to the End

    To get a substring starting from a given position to the end of the string, we can use an overloaded String.substring() method where we only need to specify the beginning index.

    The following substring example shows how we extract from the string “Do or do not. There is no try.” the substring from position 14 to the end (i.e., the second sentence):

    String yodaQuote = "Do or do not. There is no try.";
    String thereIsNoTry = yodaQuote.substring(14);Code language: Java (java)

    Substring from the End

    Another task could be to extract a substring of a given length from the end of a string. To do this, we need to calculate the beginning index as the length of the string minus the requested substring length. We should also extract this into a method:

    public static String substringFromEnd(String string, int length) {
      int beginIndex = string.length() - length;
      return string.substring(beginIndex);
    }Code language: Java (java)

    Other Substring Tasks

    This section shows solutions to various string/substring tasks that must be solved using methods other than String.substring().

    How to Find a Substring within a String

    To find a particular substring within a given string, you use Java’s String.indexOf() method. Let’s say we want to find the positions of “Happy” and “Code” in “HappyCoders”. Here’s how it works:

    String string = "HappyCoders";
    int happyIndex = string.indexOf("Happy");
    int codeIndex = string.indexOf("Code");Code language: Java (java)

    For “Happy”, indexOf() returns 0; and for “Code”, it returns 5.

    If the specified substring is not found, indexOf() returns -1.

    You can find the last position of a substring with lastIndexOf():

    String string = "The needs of the many outweigh the needs of the few, or the one.";
    int lastNeedsIndex = string.lastIndexOf("needs");Code language: Java (java)

    In this example, lastIndexOf() returns 35.

    How to Check If a String Contains a Substring

    To check whether a string contains a particular substring, we can use the String.contains() method since Java 5. The following code, for example, checks whether the string “foobar” contains the string “oo”:

    String string = "foobar";
    boolean containsOo = string.contains("oo");Code language: Java (java)

    Before Java 5, we have to use the indexOf() method instead:

    boolean containsOo = string.indexOf("oo") != -1;Code language: Java (java)

    In fact, the String.contains() method internally calls String.indexOf().

    How to Replace a Substring within a String

    We can replace a substring in Java using the String.replace() method. In the following example, every occurrence of the word “the” in the given sentence is replaced with “a”:

    String string = "the quick brown fox jumps over the lazy dog";
    string = string.replace("the", "a");Code language: Java (java)

    How to Remove a Substring within a String

    To remove a substring, we can replace it with the empty string “”. In the following example, we delete every occurrence of “and “:

    String string = "When there is no emotion, there is no motive for violence.";
    string = string.replace("no ", "");Code language: Java (java)

    How Does Substring Work in Java?

    String is one of the most commonly used Java classes and often takes up a large part of the heap. No wonder it has been optimized repeatedly over time.

    For example, the hash code calculation was changed several times, and Java 9 introduced Compact Strings. Since then, strings containing only Latin-1 characters are encoded with only one byte per character instead of two.

    The substring function has also been fundamentally changed:

    Up to and including Java 6, a substring created by substring() points to the same char array as the original string. The beginning position and length of the substring are stored in the string’s offset and count fields.

    Here is the relevant part of the substring method from Java 1 to 6:

    public String substring(int beginIndex, int endIndex) {
        // ... parameter validation ... 
        return ((beginIndex == 0) && (endIndex == count)) ? this :
            new String(offset + beginIndex, endIndex - beginIndex, value);
    }Code language: Java (java)

    If the substring covers the complete original string, the original string is returned. Otherwise, the following constructor is called:

    String(int offset, int count, char value[]) {
        this.value = value;
        this.offset = offset;
        this.count = count;
    }Code language: Java (java)

    The substring and the original string thus share a char array and differ only in the offset and count values that define the underlying section of the char array. The JDK developers expected this to have two advantages:

    • Less memory usage on the heap
    • Faster execution of the substring method than if the array would be copied

    However, one important aspect was not considered:

    If the original string is no longer needed, the garbage collector cannot clean up its char array because the substring still references it. For example, if the original string contains 10,000 characters and the substring contains only ten characters, then 9,990 characters, or just under 20 KB (one char occupies two bytes) of the heap would be wasted.

    Java developers who were aware of this often employed one of the following two workarounds:

    String substring = new String(string.substring(5, 9));
    String substring = "" + string.substring(5, 9);Code language: Java (java)

    The string constructor used in the first line checks whether the string passed is a substring. If so, it creates a copy of the requested section. The string concatenation used in the second line only leads to the desired result as of Java 5 (see below).

    Ultimately, the JDK developers weighed the pros and cons of the previous solution and decided to change the implementation in Java 7 so that multiple strings no longer share char arrays. Instead, the substring function (or the String constructor it calls) creates a copy of the requested section of the char array.

    In Java 7, substring() is implemented as follows:

    public String substring(int beginIndex, int endIndex) {
        // ... parameter validation ...
        return ((beginIndex == 0) && (endIndex == value.length)) ? this
            : new String(value, beginIndex, subLen);
    }Code language: Java (java)

    At first sight, this looks the same. At a second glance, you notice that count has been replaced by value.length, which is the length of the char array. Since each string has its own char array, the offset and count fields are no longer needed.

    It also calls a different String constructor (with value at the beginning instead of at the end). This constructor looks like this:

    public String(char value[], int offset, int count) {
        // ... parameter validation ... 
        this.value = Arrays.copyOfRange(value, offset, offset+count);
    }Code language: Java (java)

    Therefore, a copy of the requested section of the char array is created.

    In Java 9, the substring method has been modified to take into account the encoding used (1-byte Latin 1 vs. 2-byte UTF-16). However, the basic functionality (calling Arrays.copyOfRange) has been retained.

    String.substring Internals – Demo

    I wrote a small program to demonstrate the changes of the substring method over the Java versions. You can find the code also in this GitHub repository.

    package eu.happycoders.substring;
    
    import java.lang.reflect.Field;
    
    public class SubstringInternalsDemo {
      public static void main(String[] args) throws IllegalAccessException {
        String string = "HappyCoders.eu";
        String substring = string.substring(5, 9);
    
        printDetails("original string", string);
        printDetails("substring", substring);
        printDetails("substring appended to empty string", "" + substring);
        printDetails("substring wrapped with new string", new String(substring));
      }
    
      private static void printDetails(String name, String string)
          throws IllegalAccessException {
        System.out.println(name + ":");
        System.out.println("  string identity  : " + identity(string));
        System.out.println("  string           : " + string);
    
        Object value = getPrivateField(string, "value");
        System.out.println("  value[] identity : " + identity(value));
        System.out.println("  value[]          : " + valueToString(value));
    
        // Java 1-6: offset + count
        Integer offset = (Integer) getPrivateField(string, "offset");
        if (offset != null) {
          System.out.println("  offset           : " + offset);
        }
    
        Integer count = (Integer) getPrivateField(string, "count");
        if (count != null) {
          System.out.println("  count            : " + count);
        }
    
        // Java 9+: coder
        Byte coder = (Byte) getPrivateField(string, "coder");
        if (coder != null) {
          System.out.println("  coder            : " + coder);
        }
    
        System.out.println();
      }
    
      private static String identity(Object o) {
        return "@" + Integer.toHexString(System.identityHashCode(o));
      }
    
      private static String valueToString(Object value) {
        if (value instanceof byte[]) {
          return Arrays.toString((byte[]) value);
        }
    
        if (value instanceof char[]) {
          return Arrays.toString((char[]) value);
        }
    
        return value.toString();
      }
    
      private static Object getPrivateField(String string, String fieldName)
          throws IllegalAccessException {
        try {
          Field field = String.class.getDeclaredField(fieldName);
          field.setAccessible(true);
          return field.get(string);
        } catch (NoSuchFieldException e) {
          return null;
        }
      }
    }Code language: Java (java)

    The program shows the identities and values of the strings and substrings and their internal fields. To test the workarounds described above, the substrings are concatenated once with an empty string and once wrapped by new String(…).

    To make the program run with versions older than Java 5, I could not use java.util.Arrays.toString(). A replacement implementation of Arrays is also in the GitHub repo.

    If we run the program with the oldest Java version still downloadable, Java 1.2, we get the following output:

    original string:
      string identity  : @b450fff4
      string           : HappyCoders.eu
      value[] identity : @b454fff4
      value[]          : [H, a, p, p, y, C, o, d, e, r, s, ., e, u]
      offset           : 0
      count            : 14
    
    substring:
      string identity  : @b42cfff4
      string           : Code
      value[] identity : @b454fff4
      value[]          : [H, a, p, p, y, C, o, d, e, r, s, ., e, u]
      offset           : 5
      count            : 4
    
    substring appended to empty string:
      string identity  : @b42cfff4
      string           : Code
      value[] identity : @b454fff4
      value[]          : [H, a, p, p, y, C, o, d, e, r, s, ., e, u]
      offset           : 5
      count            : 4
    
    substring wrapped with new string:
      string identity  : @bf34fff4
      string           : Code
      value[] identity : @bf30fff4
      value[]          : [C, o, d, e]
      offset           : 0
      count            : 4Code language: plaintext (plaintext)

    We can see that string, substring, and the substring concatenated with “” all refer to the identical char array @b454fff4. The string created with new String(…), on the other hand, uses a separate char array that contains only the text “Code”.

    In Java 1.3 and 1.4, string concatenation leads to a different result (you can find the entire output for all Java versions in the results directory on GitHub):

    ...
    
    substring appended to empty string:
      string identity  : @20c10f
      string           : Code
      value[] identity : @62eec8
      value[]          : [C, o, d, e,  ,  ,  ,  ,  ,  ,  ,  ,  ,  ,  ,  ]
      offset           : 0
      count            : 4
    
    ...Code language: plaintext (plaintext)

    That’s because, in these versions, a StringBuffer is used for concatenation, which is created with an initial length of 16 characters and whose toString() method returns a string using the same char array.

    In Java 5, the result of concatenating the substring with an empty string changes again:

    ...
    
    substring appended to empty string:
      string identity  : @1004901
      string           : Code
      value[] identity : @1b90b39
      value[]          : [C, o, d, e]
      offset           : 0
      count            : 4
    
    ...Code language: plaintext (plaintext)

    As of Java 5, StringBuffer.toString() and StringBuilder.toString() call the String constructor shown above, which uses Arrays.copyOfRange() to copy only the section of the char array that is needed.

    In Java 7 and 8, the output then looks like this:

    original string:
      string identity  : @26ffd553
      string           : HappyCoders.eu
      value[] identity : @f74f6ef
      value[]          : [H, a, p, p, y, C, o, d, e, r, s, ., e, u]
    
    substring:
      string identity  : @47ffccd6
      string           : Code
      value[] identity : @6ae11a87
      value[]          : [C, o, d, e]
    
    substring appended to empty string:
      string identity  : @6094cbe2
      string           : Code
      value[] identity : @48d593f7
      value[]          : [C, o, d, e]
    
    substring wrapped with new string:
      string identity  : @3de5627c
      string           : Code
      value[] identity : @6ae11a87
      value[]          : [C, o, d, e]Code language: plaintext (plaintext)

    As explained above, as of Java 7, the substring returned by String.substring() points to a separate char array. Also, the offset and count fields no longer exist.

    The workarounds by concatenation or invoking the String constructor are thus no longer necessary. It is still noticeable that string concatenation creates a new string with a new char array, while the String constructor reuses the char array.

    Since Java 9, String no longer contains a char array, but a byte array:

    original string:
      string identity  : @4c203ea1
      string           : HappyCoders.eu
      value[] identity : @71be98f5
      value[]          : [72, 97, 112, 112, 121, 67, 111, 100, 101, 114, 115, 46, 101, 117]
      coder            : 0
    
    substring:
      string identity  : @96532d6
      string           : Code
      value[] identity : @3796751b
      value[]          : [67, 111, 100, 101]
      coder            : 0
    
    substring appended to empty string:
      string identity  : @3498ed
      string           : Code
      value[] identity : @1a407d53
      value[]          : [67, 111, 100, 101]
      coder            : 0
    
    substring wrapped with new string:
      string identity  : @3d8c7aca
      string           : Code
      value[] identity : @3796751b
      value[]          : [67, 111, 100, 101]
      coder            : 0Code language: plaintext (plaintext)

    Analogous to the previous Java version, string concatenation creates a new byte array, while the String constructor reuses the existing byte array.

    Summary

    This article has shown how to use String.substring(), how the method works internally, and how its functionality has changed over time.

  • Sealed Classes in Java

    Sealed Classes in Java

    Sealed classes and interfaces were the big news in Java 17.

    In this article, you will learn:

    • What are sealed classes and interfaces?
    • How exactly do sealed classes and interfaces work?
    • What do we need them for?
    • Why should we restrict the extensibility of a class hierarchy?

    Let’s start with an example…

    Starting Point: Example Class Hierarchy

    Let the following class hierarchy be the starting point:

    Sealed classes example - initial situation
    Sealed classes example – initial situation

    Here is the Java source code for the example:

    public class Shape { ... }
    
    public class Circle     extends Shape { ... }
    public class Rectangle  extends Shape { ... }
    public class Square     extends Shape { ... }
    public class WeirdShape extends Shape { ... }
    
    public class TranspRectangle extends Rectangle { ... }
    public class FilledRectangle extends Rectangle { ... }Code language: Java (java)

    Usually, every developer can extend this class hierarchy at any place. An extended structure could look like this (I’ve colored the added classes light yellow):

    Sealed classes example - extension possibilities without sealing
    Sealed classes example – extension possibilities without sealing

    Now, we may want to restrict the extension of our class hierarchy. For example, we might want to specify that developers may only extend the WeirdShape class.

    Why would we want to do that, and how can we do it?

    Why Restrict the Extensibility of a Class Hierarchy?

    There may be several reasons why we want to restrict the free extensibility of our class hierarchy:

    • We want to protect the internal state of a class or a hierarchy of classes and not have it manipulated inconsistently by a child class.
    • We want to protect internal objects whose thread safety is guaranteed by our class or class hierarchy from being published so that foreign code cannot compromise thread safety.
    • We want to ensure that the Liskov substitution principle (LSP) is not violated. That is, we don’t want a developer to implement a derived class that breaks the API contract of the parent class.
    • We want to take advantage of exhaustiveness analysis in “pattern matching for switch”.

    Now that we know the reasons for constraining a class hierarchy, we move on to the next question: How can we do that?

    Sealing the Class Hierarchy – Step by Step

    We already know the first possibility…

    Restricting the Class Hierarchy with “final”

    By marking classes as “final”, we can prevent their extension in general.

    A second option would be to mark a class as package-private to permit only subclasses within the same package. However, this would have the consequence that the superclass would no longer be visible outside the package, which is undesirable in most cases.

    Let’s try to use “final” in our example. We mark the classes Circle, TranspRectangle, FilledRectangle, and Square as final (remember: WeirdShape should remain the only extendable class).

    This limits the extensibility of our class hierarchy, as shown in the following class diagram:

    Restricting the class hierarchy with "final"
    Restricting the class hierarchy with “final”

    To improve clarity, I have removed the crossed-out boxes below the final classes in the following graphic:

    Restricting the class hierarchy with "final"
    Restricting the class hierarchy with “final”

    This means we are on the right track, but we are still far from our goal. What now? Obviously, we can’t make Shape and Rectangle final because other classes should extend them.

    This is where sealed classes come in…

    Sealing the Class Hierarchy with “sealed” and “permits”

    Using “sealed types”, we can implement what is called a “sealed class hierarchy”. It works as follows:

    • We mark the class whose subclasses we want to restrict with the sealed keyword.
    • Using the keyword permits, we list the allowed subclasses.

    We extend the code of the Shape and Rectangle classes as follows:

    public sealed class Shape permits Circle, Square, Rectangle, WeirdShape { ... }
    
    public sealed class Rectangle extends Shape permits TranspRectangle, FilledRectangle { ... }Code language: Java (java)

    With this code, we state the following:

    • The Shape class may only be extended by the Circle, Square, Rectangle and WeirdShape classes.
    • The Rectangle class may only be extended by the TranspRectangle, and FilledRectangle classes.

    The following class diagram shows the constraints added by sealed and permits:

    Restricting the class hierarchy with "sealed" and "permits"
    Restricting the class hierarchy with “sealed” and “permits”

    For the sake of clarity, once more without the crossed-out classes:

    Restricting the class hierarchy with "sealed" and "permits"
    Restricting the class hierarchy with “sealed” and “permits”

    It looks like we have reached our goal. But one step is still missing…

    Opening the Sealed Class Hierarchy with “non-sealed”

    With the changes made so far, our code looks like this:

    public sealed class Shape permits Circle, Square, Rectangle, WeirdShape { ... }
    
    public final  class Circle     extends Shape { ... }
    public sealed class Rectangle  extends Shape permits TranspRectangle, FilledRectangle { ... }
    public final  class Square     extends Shape { ... }
    public        class WeirdShape extends Shape { ... }
    
    public final class TranspRectangle extends Rectangle { ... }
    public final class FilledRectangle extends Rectangle { ... }Code language: Java (java)

    When we try to compile this code, we get the following error message:

    $ javac *.java
    WeirdShape.java:3: error: sealed, non-sealed or final modifiers expected
    public class WeirdShape extends Shape {
           ^Code language: plaintext (plaintext)

    For preventing accidental openings of the sealed class hierarchy, all classes must be marked sealed, non-sealed, or final.

    Our WeirdShape class should be extensible, i.e., the sealing should be opened at this class. Therefore we have to mark this class as non-sealed:

    public non-sealed class WeirdShape extends Shape { ... }Code language: Java (java)

    Our final class hierarchy thus looks like this:

    Opening the sealed class hierarchy with "non-sealed"
    Opening the sealed class hierarchy with “non-sealed”

    How to Check if a Class Is Sealed and Which Classes Can Extend It

    The Class class has been extended with the following two methods:

    • isSealed() – returns true if the class or interface is sealed.
    • getPermittedSubclasses() – returns an array of classes or interfaces that are allowed to extend this class or interface, or null if this class/interface is not sealed.

    Particularities

    There are some particularities to keep in mind when using sealed class hierarchies.

    Sealing within a “Compilation Unit”

    The permits keyword can be omitted if subclasses derived from a sealed class are defined within the same class file (“compilation unit”). These are then considered “implicitly declared permitted subclasses”.

    In the following example, ChildInSameCompilationUnit is such a subclass; therefore, the permits keyword may be omitted:

    public sealed class SealedParentWithoutPermits {
    
      public final class ChildInSameCompilationUnit extends SealedParentWithoutPermits {
        // ...
      }
    
    }Code language: Java (java)

    Local Classes

    Local classes (i.e., classes defined within methods) must not extend sealed classes.

    The following code shows a local class extending an unsealed class. This code is valid:

    public class NonSealedParent {
    
      public void doSomethingSmart() {
        class LocalChild extends NonSealedParent {  // Allowed
          // ...
        }
        // ...
      }
    }Code language: Java (java)

    However, if the outer class is sealed, the local class may not inherit from it:

    public sealed class SealedParent {
    
      public void doSomethingSmart() {
        class LocalChild extends SealedParent {  // Not allowed
          // ...
        }
        // ...
      }
    }Code language: Java (java)

    instanceof Tests with Sealed Classes

    For instanceof tests, the compiler checks whether the class hierarchy allows the check ever to return true. If it does not, the compiler reports an “incompatible types” error, such as in the following code:

    Number n = getNumber();
    if (n instanceof String) {  // Not allowed
      // ...
    }Code language: Java (java)

    A Number object can never be an instance of String. The compiler therefore reports:

    incompatible types: Number cannot be converted to String

    Information from sealed class hierarchies is also included in this check. What this means is best explained with an example:

    Let’s assume we have an interface A and a class B:

    interface A {}
    class B {}Code language: Java (java)

    Thus, the following check is valid:

    public boolean isAaB(A a) {
      return a instanceof B;
    }Code language: Java (java)

    How can this check return true? By defining a class C that inherits from B and implements A:

    class C extends B implements A {}Code language: Java (java)

    The invocation of isAaB(new C()) then returns true.

    Now we seal interface A and allow only AChild as a subclass; we leave class B unchanged:

    sealed interface A permits AChild {}
    final class AChild implements A {}
    class B {}Code language: Java (java)

    The compiler now recognizes that an object of type A can never also be an instance of B. Accordingly, the check if (a instanceof B) is from now on acknowledged with the following compiler error:

    incompatible types: A cannot be converted to B

    Contextual Keywords

    The introduction of new keywords such as sealed, non-sealed, permits (or yield from switch expressions) raised the following question among JDK developers: What should happen to existing code that uses these keywords as method or variable names?

    Since Java places a high value on backward compatibility, it was decided not to affect existing code as much as possible. That is made possible by so-called “contextual keywords” – keywords that only have a meaning in a specific context.

    The terms sealed and permits, for example, are such “contextual keywords” and have meaning only in the context of a class definition. In other contexts, they can be used as method or class names. So the following is valid Java code:

    public void sealed() {
      int permits = 5;
    }Code language: Java (java)

    Exhaustiveness Analysis for “Pattern Matching for switch”

    In Java 17, “Pattern Matching for switch” was introduced as a preview feature. In combination with this feature, sealed classes allow exhaustiveness analysis, i.e., the compiler can check whether a switch statement or expression covers all possible cases.

    Here is a small class hierarchy with a sealed interface as the root:

    public sealed interface Color permits Red, Blue {}
    public final class Red implements Color {}
    public final class Blue implements Color {}Code language: Java (java)

    “Pattern Matching for switch” enables code like the following:

    Color color = getColor();
    switch (color) {
      case Red  r -> ...
      case Blue b -> ...
    }Code language: Java (java)

    The compiler recognizes that the object color can only be an instance of Red or Blue; thus, the switch statement is exhaustive and does not require a default case.

    Another advantage is that the compiler will point out the missing switch case if the class hierarchy is extended later.

    Let’s extend our class hierarchy with the color green (don’t forget to extend the permits list of Color):

    public sealed interface Color permits Red, Blue, Green {}
    public final class Red implements Color {}
    public final class Blue implements Color {}
    public final class Green implements Color {}Code language: Java (java)

    When trying to recompile the switch statement, the compiler aborts with the following error message:

    $ javac --enable-preview -source 17 SwitchTest.java
    SwitchTest.java:6: error: the switch statement does not cover all possible input values
    switch (color) {
    ^Code language: plaintext (plaintext)

    So, with sealed class hierarchies, the compiler can help us avoid incomplete switch statements or expressions – a common cause of errors when extending class hierarchies.

    Conclusion

    Sealed classes were introduced by JDK Enhancement Proposal 409 in Java 17. They allow us to protect a class hierarchy from unwanted extensions.

    For “Pattern Matching for switch”, introduced as a preview feature in 17, they also enable exhaustiveness analysis.

    Sealed Classes were developed along with other new language features such as records, switch expressions, text blocks, and pattern matching in Project Amber.

  • Java 17 Features (with Examples)

    Java 17 Features (with Examples)

    On September 14, 2021, the time had finally come: after the five “interim versions” Java 12 to 15, each of which was maintained for only half a year, the current Long-Term Support (LTS) release, Java 17, was published.

    Oracle will provide free upgrades for Java 17 for at least five years, until September 2026 – and extended paid support until September 2029.

    In Java 17, 14 JDK Enhancement Proposals have been implemented. I have sorted the changes by relevance for daily programming work. The article starts with enhancements to the language and changes to the module system. Following are various enhancements to the JDK class library, performance improvements, new preview and incubator features, deprecations and deletions, and in the end, other changes that one comes into contact with relatively rarely in daily work.

    Sealed Classes

    The big innovation in Java 17 (besides long-term support) is sealed classes (and interfaces).

    Due to the large scope of the topic, you’ll read what sealed classes are, how exactly they work, and why we need them in a separate article: Sealed Classes in Java

    (Sealed classes were first introduced in Java 15 as a preview feature. Three minor changes were published in Java 16. With JDK Enhancement Proposal 409, Sealed Classes are declared ready for production in Java 17 without any further changes.)

    Strongly Encapsulate JDK Internals

    In Java 9, the module system (Project Jigsaw) was introduced, especially to modularize code better and increase the Java platform’s security.

    Before Java 16: Relaxed Strong Encapsulation

    Until Java 16, this had little impact on existing code, as the JDK developers provided the so-called “Relaxed Strong Encapsulation” mode for a transition period.

    This mode allowed access via deep reflection to non-public classes and methods of those JDK class library packages that existed before Java 9 without configuration changes.

    The following example extracts the bytes of a String by reading its private value field:

    public class EncapsulationTest {
      public static void main(String[] args) throws ReflectiveOperationException {
        byte[] value = getValue("Happy Coding!");
        System.out.println(Arrays.toString(value));
      }
    
      private static byte[] getValue(String string) throws ReflectiveOperationException {
        Field VALUE = String.class.getDeclaredField("value");
        VALUE.setAccessible(true);
        return (byte[]) VALUE.get(string);
      }
    }Code language: Java (java)

    If we run this program with Java 9 to 15, we get the following output:

    $ java EncapsulationTest.java
    WARNING: An illegal reflective access operation has occurred
    WARNING: Illegal reflective access by EncapsulationTest (file:/.../EncapsulationTest.java) to field java.lang.String.value
    WARNING: Please consider reporting this to the maintainers of EncapsulationTest
    WARNING: Use --illegal-access=warn to enable warnings of further illegal reflective access operations
    WARNING: All illegal access operations will be denied in a future release
    [72, 97, 112, 112, 121, 32, 67, 111, 100, 105, 110, 103, 33]
    Code language: plaintext (plaintext)

    We see some warnings, but then we get the bytes we requested.

    Deep reflection on new packages, however, was not allowed by default and had to be explicitly allowed via “–add-opens” on the command line since the introduction of the module system.

    The following example attempts to instantiate the ConstantDescs class from the java.lang.constant package added in Java 12 (i.e., after the introduction of the module system) via its private constructor:

    Constructor<ConstantDescs> constructor = ConstantDescs.class.getDeclaredConstructor();
    constructor.setAccessible(true);
    ConstantDescs constantDescs = constructor.newInstance();Code language: Java (java)

    The program terminates with the following error message:

    $ java ConstantDescsTest.java
    Exception in thread "main" java.lang.reflect.InaccessibleObjectException: Unable to make private java.lang.constant.ConstantDescs() accessible: module java.base does not "opens java.lang.constant" to unnamed module @6c3f5566
            at java.base/java.lang.reflect.AccessibleObject.checkCanSetAccessible(AccessibleObject.java:361)
            at java.base/java.lang.reflect.AccessibleObject.checkCanSetAccessible(AccessibleObject.java:301)
            at java.base/java.lang.reflect.Constructor.checkCanSetAccessible(Constructor.java:189)
            at java.base/java.lang.reflect.Constructor.setAccessible(Constructor.java:182)
            at ConstantDescsTest.main(ConstantDescsTest.java:7)
    Code language: plaintext (plaintext)

    To make the program runnable, we need to open the new package for deep reflection via --add-opens:

    $ java --add-opens java.base/java.lang.constant=ALL-UNNAMED ConstantDescsTest.javaCode language: plaintext (plaintext)

    The code then runs through without errors or warnings.

    Since Java 16: Strong Encapsulation by Default + Optional Relaxed Strong Encapsulation

    In Java 16, the default mode was changed from “Relaxed Strong Encapsulation” to “Strong Encapsulation”. Since then, access to pre-Java 9 packages also had to be explicitly allowed.

    If we run the first example on Java 16 without explicitly allowing access, we get the following error message:

    $ java EncapsulationTest.java
    Exception in thread "main" java.lang.reflect.InaccessibleObjectException: Unable to make field private final byte[] java.lang.String.value accessible: module java.base does not "opens java.lang" to unnamed module @62fdb4a6
            at java.base/java.lang.reflect.AccessibleObject.checkCanSetAccessible(AccessibleObject.java:357)
            at java.base/java.lang.reflect.AccessibleObject.checkCanSetAccessible(AccessibleObject.java:297)
            at java.base/java.lang.reflect.Field.checkCanSetAccessible(Field.java:177)
            at java.base/java.lang.reflect.Field.setAccessible(Field.java:171)
            at EncapsulationTest.getValue(EncapsulationTest.java:12)
            at EncapsulationTest.main(EncapsulationTest.java:6)
    Code language: plaintext (plaintext)

    However, Java 16 still offered a workaround: Via VM option --illegal-access=permit, it was possible to switch back to “Relaxed Strong Encapsulation”:

    $ java --illegal-access=permit EncapsulationTest.java
    Java HotSpot(TM) 64-Bit Server VM warning: Option --illegal-access is deprecated and will be removed in a future release.
    WARNING: An illegal reflective access operation has occurred
    WARNING: Illegal reflective access by EncapsulationTest (file:/.../EncapsulationTest.java) to field java.lang.String.value
    WARNING: Please consider reporting this to the maintainers of EncapsulationTest
    WARNING: Use --illegal-access=warn to enable warnings of further illegal reflective access operations
    WARNING: All illegal access operations will be denied in a future release
    [72, 97, 112, 112, 121, 32, 67, 111, 100, 105, 110, 103, 33]Code language: plaintext (plaintext)

    Since Java 17: Exclusively Strong Encapsulation

    Per JDK Enhancement Proposal 403, this option is removed in Java 17. The --illegal-access VM option now leads to a warning, and access to String.value is no longer possible by default:

    java --illegal-access=permit EncapsulationTest.java
    OpenJDK 64-Bit Server VM warning: Ignoring option --illegal-access=permit; support was removed in 17.0
    Exception in thread "main" java.lang.reflect.InaccessibleObjectException: Unable to make field private final byte[] java.lang.String.value accessible: module java.base does not "opens java.lang" to unnamed module @3e77a1ed
            at java.base/java.lang.reflect.AccessibleObject.checkCanSetAccessible(AccessibleObject.java:354)
            at java.base/java.lang.reflect.AccessibleObject.checkCanSetAccessible(AccessibleObject.java:297)
            at java.base/java.lang.reflect.Field.checkCanSetAccessible(Field.java:178)
            at java.base/java.lang.reflect.Field.setAccessible(Field.java:172)
            at EncapsulationTest.getValue(EncapsulationTest.java:12)
            at EncapsulationTest.main(EncapsulationTest.java:6)Code language: plaintext (plaintext)

    If you want to use deep reflection from Java 17 onwards, you now have to explicitly allow it with --add-opens:

    $ java --add-opens java.base/java.lang=ALL-UNNAMED EncapsulationTest.java
    [72, 97, 112, 112, 121, 32, 67, 111, 100, 105, 110, 103, 33]Code language: plaintext (plaintext)

    The program runs, and we no longer see any warnings – the long transition period since Java 9 is now complete.

    Add java.time.InstantSource

    The java.time.Clock class is handy for writing tests that check time-dependent functionality.

    For example, when Clock is injected into the application classes via dependency injection, it can be mocked into tests, or a fixed time for test execution can be set using Clock.fixed().

    Since Clock provides the getZone() method, you always have to think about which concrete time zone to instantiate a Clock object with.

    To allow alternative, time zone-independent time sources, the interface java.time.InstantSource was extracted from Clock in Java 17. The new interface only provides the methods instant() and millis() for querying the time, where millis() is already implemented as a default method.

    The Timer class in the following example uses InstantSource to determine the start and end times of a Runnable execution and uses those times to calculate the duration of execution:

    public class Timer {
      private final InstantSource instantSource;
    
      public Timer(InstantSource instantSource) {
        this.instantSource = instantSource;
      }
    
      public Duration measure(Runnable runnable) {
        Instant start = instantSource.instant();
        runnable.run();
        Instant end = instantSource.instant();
        return Duration.between(start, end);
      }
    }
    Code language: Java (java)

    In production, we can instantiate Timer with the system clock (where, for lack of alternative InstantSource implementations, we have to worry about the time zone – let’s take the system’s default time zone):

    Timer timer = new Timer(Clock.systemDefaultZone());Code language: Java (java)

    We can test the measure() method by mocking InstantSource, having its instant() method return two fixed values, and comparing the return value of measure() with the difference of these values:

    @Test
    void shouldReturnDurationBetweenStartAndEnd() {
      InstantSource instantSource = mock(InstantSource.class);
      when(instantSource.instant())
          .thenReturn(Instant.ofEpochMilli(1_640_033_566_000L))
          .thenReturn(Instant.ofEpochMilli(1_640_033_567_750L));
    
      Timer timer = new Timer(instantSource);
      Duration duration = timer.measure(() -> {});
    
      assertThat(duration, is(Duration.ofMillis(1_750)));
    }Code language: Java (java)

    There is no JDK enhancement proposal for this extension.

    Hex Formatting and Parsing Utility

    To print hexadecimal numbers, we could previously use the toHexString() method of the Integer, Long, Float, and Double classes – or String.format(). The following code shows a few examples:

    System.out.println(Integer.toHexString(1_000));
    System.out.println(Long.toHexString(100_000_000_000L));
    System.out.println(Float.toHexString(3.14F));
    System.out.println(Double.toHexString(3.14159265359));
    
    System.out.println(
        "%x - %x - %a - %a".formatted(1_000, 100_000_000_000L, 3.14F, 3.14159265359));Code language: Java (java)

    The code produces the following output:

    3e8
    174876e800
    0x1.91eb86p1
    0x1.921fb54442eeap1
    3e8 - 174876e800 - 0x1.91eb86p1 - 0x1.921fb54442eeap1Code language: plaintext (plaintext)

    We could parse hexadecimal numbers with their respective counterparts:

    Integer.parseInt("3e8", 16);
    Long.parseLong("174876e800", 16);
    Float.parseFloat("0x1.91eb86p1");
    Double.parseDouble("0x1.921fb54442eeap1");
    Code language: Java (java)

    Java 17 provides the new class java.util.HexFormat to render and parse hexadecimal numbers using a unified API. HexFormat supports all primitive numbers (int, byte, char, long, short) and byte arrays – but no floating point numbers.

    Here is an example of conversions to hexadecimal numbers:

    HexFormat hexFormat = HexFormat.of();
    
    System.out.println(hexFormat.toHexDigits('A'));
    System.out.println(hexFormat.toHexDigits((byte) 10));
    System.out.println(hexFormat.toHexDigits((short) 1_000));
    System.out.println(hexFormat.toHexDigits(1_000_000));
    System.out.println(hexFormat.toHexDigits(100_000_000_000L));
    System.out.println(hexFormat.formatHex(new byte[] {1, 2, 3, 60, 126, -1}));Code language: Java (java)

    The output is:

    0041
    0a
    03e8
    000f4240
    000000174876e800
    0102033c7effCode language: plaintext (plaintext)

    It is noticeable that the output is always preceded by zeros.

    We can adjust the output, for example, as follows:

    HexFormat hexFormat = HexFormat.ofDelimiter(" ").withPrefix("0x").withUpperCase();Code language: Java (java)
    • ofDelimiter() sets a delimiter for formatting byte arrays.
    • withPrefix() defines a prefix – but only for byte arrays!
    • withUpperCase() switches the output to uppercase letters.

    The output is now:

    0041
    0A
    03E8
    000F4240
    000000174876E800
    0x01 0x02 0x03 0x3C 0x7E 0xFFCode language: plaintext (plaintext)

    The leading zeros cannot be removed.

    We can parse integral numbers as follows:

    int i = HexFormat.fromHexDigits("F4240");
    long l = HexFormat.fromHexDigitsToLong("174876E800");Code language: Java (java)

    Corresponding methods for char, byte, and short do not exist.

    Byte arrays can be parsed, for example, as follows:

    HexFormat hexFormat = HexFormat.ofDelimiter(" ").withPrefix("0x").withUpperCase();
    byte[] bytes = hexFormat.parseHex("0x01 0x02 0x03 0x3C 0x7E 0xFF");Code language: Java (java)

    There are other methods, e.g., to parse only a substring. You can find complete documentation in the HexFormat JavaDoc.

    There is no JDK enhancement proposal for this extension.

    Context-Specific Deserialization Filters

    Deserialization of objects poses a significant security risk. Malicious attackers can construct objects via the data stream to be deserialized, via which they can ultimately execute arbitrary code in arbitrary classes available on the classpath.

    Java 9 introduced deserialization filters, i.e., the ability to specify which classes may (or may not) be deserialized.

    Until now, there were two ways to define deserialization filters:

    • Per ObjectInputStream.setObjectInputFilter() for each deserialization separately.
    • System-wide via system property jdk.serialFilter or security property of the same name in the file conf/security/java.properties.

    These variants are not satisfactory for complex applications, especially those with third-party libraries that also contain deserialization code. For example, deserialization in third-party code cannot be configured via ObjectInputStream.setObjectInputFilter() (unless you change the third-party source code), but only globally.

    JDK Enhancement Proposal 415 makes it possible to set deserialization filters context-specifically, e.g., for a specific thread or based on the call stack for a particular class, module, or third-party library.

    The configuration of the filters is not easy and is beyond the scope of this article. You can find details in the JEP linked above.

    JDK Flight Recorder Event for Deserialization

    As of Java 17, it is also possible to monitor the deserialization of objects via JDK Flight Recorder (JFR).

    Deserialization events are disabled by default and must be enabled using the jdk.Deserialization event identifier in the JFR configuration file (see the article linked below for an example).

    If a deserialization filter is enabled, the JFR event indicates whether the deserialization was executed or rejected.

    You can find more detailed information and an example in the article “Monitoring Deserialization to Improve Application Security“.

    The Flight Recorder events for deserialization are not part of the above JDK Enhancement Proposal, nor is there a separate JEP for them.

    Enhanced Pseudo-Random Number Generators

    Until now, it was cumbersome to exchange the random number-generating classes Random and SplittableRandom in an application (or even to replace them by other algorithms) although they offer a mostly matching set of methods (e.g. nextInt(), nextDouble(), and stream-generating methods like ints() and longs()).

    The class hierarchy used to look like this:

    Pre-Java 17 Pseudo-Random Number Generators
    Pre-Java 17 Pseudo-Random Number Generators

    Through JDK Enhancement Proposal 356, Java 17 introduced a framework of interfaces inheriting from each other for the existing algorithms and new algorithms so that the concrete algorithms are easily interchangeable in the future:

    Java 17 Pseudo-Random Number Generators
    Java 17 Pseudo-Random Number Generators

    The methods common to all random number generators like nextInt() and nextDouble() are defined in RandomGenerator. So if you only need these methods, you should always use this interface in the future.

    The framework includes three new types of random number generators:

    • JumpableGenerator: provides methods to skip a large number of random numbers (e.g., 264).
    • LeapableGenerator: provides methods to skip a very large number of random numbers (e.g., 2128).
    • ArbitrarilyJumpableGenerator: offers additional methods to skip an arbitrary number of random numbers.

    In addition, duplicated code was eliminated from the existing classes, and code was extracted into non-public abstract classes (not visible in the class diagram) to make it reusable for future implementations of random number generators.

    In the future, new random number generators can be added via the Service Provider Interface (SPI) and be instantiated via RandomGeneratorFactory.

    Performance

    Java 17 brings asynchronous logging, a long-overdue performance improvement to the Unified JVM logging system introduced in Java 9.

    Unified Logging Supports Asynchronous Log Flushing

    Asynchronous logging is a feature that all Java logging frameworks support. Log messages are first written to a queue by the application thread, and a separate I/O thread then forwards them to the configured output (console, file, or network).

    This way, the application thread does not have to wait for the I/O subsystem to process the message.

    As of Java 17, you can enable asynchronous logging for the JVM itself. This is done via the following VM option:

    -Xlog:async

    The logging queue is limited to a fixed size. If the application sends more log messages than the I/O thread can handle, the queue fills up. It then discards further messages without comment.

    You can adjust the size of the queue via the following VM option:

    -XX:AsyncLogBufferSize=<Bytes>

    There is no JDK enhancement proposal for this extension.

    Preview and Incubator Features

    Auch wenn Java 17 ein Long-Term-Support (LTS) Release darstellt, enthält es Preview- und Incubator-Features, die voraussichtlich in einem der nächsten “Zwischen-Releases” Produktionsreife erlangen werden. Wer nur LTS-Releases einsetzt, muss also mindestens bis Java 23 warten, um diese Features einzusetzen.

    Pattern Matching for switch (Preview)

    Java 16 introduced “Pattern Matching for instanceof”, eliminating the need for explicit casts after instanceof checks. This allows for code such as the following:

    if (obj instanceof String s) {
      if (s.length() > 5) {
        System.out.println(s.toUpperCase());
      } else {
        System.out.println(s.toLowerCase());
      }
    } else if (obj instanceof Integer i) {
      System.out.println(i * i);
    }Code language: Java (java)

    Through JDK Enhancement Proposal 406, checking whether an object is an instance of a particular class can also be written as a switch statement (or expression).

    Pattern Matching for switch Statements

    Here is the example from above rewritten into a switch statement:

    switch (obj) {
      case String s -> {
        if (s.length() > 5) {
          System.out.println(s.toUpperCase());
        } else {
          System.out.println(s.toLowerCase());
        }
      }
    
      case Integer i -> System.out.println(i * i);
    
      default -> {}
    }Code language: Java (java)

    It is noticeable that the default case must be specified – in this case with an empty code block, since an action is to be performed only for String and Integer.

    The code becomes much more readable if we combine the case and if expressions by a logical “and” (this is called a “guarded pattern”):

    switch (obj) {
      case String s && s.length() > 5 -> System.out.println(s.toUpperCase());
      case String s                   -> System.out.println(s.toLowerCase());
    
      case Integer i                  -> System.out.println(i * i);
    
      default -> {}
    }
    Code language: Java (java)

    It is essential that a so-called “dominating pattern” must follow a “dominated pattern”. In the example, the shorter pattern from line 3 “String s” dominates the longer one from line 2.

    If we were to swap these lines, it would look like this:

    switch (obj) {
      case String s                   -> System.out.println(s.toLowerCase());
      case String s && s.length() > 5 -> System.out.println(s.toUpperCase());
    
      ...
    }
    Code language: Java (java)

    In this case, the compiler would complain about line 3 with the following error message:

    Label is dominated by a preceding case label ‘String s’

    The reason for this is that now every String – no matter what length – is matched by the pattern “String s” (line 2) and does not even get as far as the second case check (line 3).

    Pattern Matching for switch Expressions

    Pattern Matching can also be used for switch expressions (i.e., switch with a return value):

    String output = switch (obj) {
      case String s && s.length() > 5 -> s.toUpperCase();
      case String s                   -> s.toLowerCase();
    
      case Integer i                  -> String.valueOf(i * i);
      
      default -> throw new IllegalStateException("Unexpected value: " + obj);
    };Code language: Java (java)

    Here, the default case must return a value – or throw an exception as in the example. Otherwise, the return value of the switch expression could be undefined.

    Exhaustiveness Analysis with Sealed Classes

    By the way, when using Sealed Classes, the compiler can check whether a switch statement or expression is exhaustive. If this is the case, a default case is not needed.

    This has another not immediately obvious advantage: If the sealed hierarchy is extended one day, the compiler will recognize the then incomplete switch statement or expression, and you will be forced to complete it. That will save you from unnoticed errors.

    “Pattern Matching for switch” will be presented once again as a preview feature in Java 18 and is expected to reach production maturity in Java 19.

    Foreign Function & Memory API (Incubator)

    Since Java 1.1, the Java Native Interface (JNI) offers the possibility to call native C code from Java. However, JNI is highly complex to implement and slow to execute.

    To create a JNI replacement, Project Panama was launched. The concrete goals of this project are a) to simplify the implementation effort (90% of the work is to be eliminated) and b) to improve performance (by a factor of 4 to 5).

    In the past three Java releases, two new APIs were introduced in the incubator stage:

    1. The Foreign Memory Access API (introduced in Java 14, refined in Java 15 and Java 16),
    2. The Foreign Linker API (introduced in Java 16).

    JDK Enhancement Proposal 412 combined both APIs into the “Foreign Function & Memory API” in Java 17.

    This API is still in the incubator stage, so it may still be subject to significant changes. I will introduce the new API in the Java 19 article when it reaches the preview stage.

    Vector API (Second Incubator)

    As described in the article about Java 16, the Vector API is not about the old java.util.Vector class, but about mapping mathematical vector computations to modern CPU architectures with single instruction multiple data (SIMD) support.

    JDK Enhancement Proposal 414 improved performance and extended the API, e.g., with support for the Character class (previously, Byte, Short, Integer, Long, Float, and Double were supported).

    Since features in incubator status can still undergo significant changes, I will introduce the feature in detail when it reaches preview status.

    Deprecations and Deletions

    In Java 17, some outdated features have again been marked as “deprecated for removal” or removed completely.

    Deprecate the Applet API for Removal

    Java applets are no longer supported by any modern web browser and have already been marked as “deprecated” in Java 9.

    JDK Enhancement Proposal 398 marks them as “deprecated for removal” in Java 17. This means that they will be completely removed in one of the next releases.

    Deprecate the Security Manager for Removal

    The Security Manager has been part of the platform since Java 1.0 and was primarily intended to protect the computer and the user’s data from downloaded Java applets. These were started in a sandbox, in which the Security Manager denied access to resources like the file system or the network.

    As described in the previous section, Java applets have been marked as “deprecated for removal”, so this aspect of the Security Manager will no longer be relevant.

    Besides the browser sandbox, which generally denied access to resources, the Security Manager could also secure server applications via policy files. Examples are Elasticsearch and Tomcat.

    However, there is no longer too much interest in this, as the configuration is complicated, and security can nowadays be better implemented via the Java module system or isolation through containerization.

    In addition, the Security Manager represents a considerable maintenance effort. For all extensions to the Java class library, JDK developers must evaluate to what extent they must secure their changes via the Security Manager.

    For these reasons, the Security Manager was classified as “deprecated for removal” via JDK Enhancement Proposal 411 in Java 17.

    As of Java 24, the Security Manager can no longer be activated. It is not yet clear when the Security Manager will be completely removed.

    Remove RMI Activation

    Remote Method Invocation is a technology for invoking methods on “remote objects”, i.e., objects on another JVM.

    RMI Activation allows objects that have been destroyed on the target JVM to be automatically re-instantiated as soon as they are accessed. This is intended to eliminate the need for error handling on the client-side.

    However, RMI Activation is relatively complex and results in ongoing maintenance costs; it is also virtually unused, as analyses of open source projects and forums such as StackOverflow have shown.

    For this reason, RMI Activation was marked as “deprecated” in Java 15 and wholly removed in Java 17 via JDK Enhancement Proposal 407.

    Remove the Experimental AOT and JIT Compiler

    In Java 9, Graal was added to the JDK as an experimental Ahead-of-Time (AOT) compiler. In Java 10, Graal was then made available as a Just-in-Time (JIT) compiler.

    However, both features have been little used since then. As the maintenance overhead is significant, Graal was removed in the JDK 16 builds released by Oracle. Since no one complained about this, both AOT and JIT compilers were completely removed in Java 17 via JDK Enhancement Proposal 410.

    The Java-Level JVM Compiler Interface (JVMCI) used to integrate Graal has not been removed, and Graal continues to be developed. To use Graal as an AOT or JIT compiler, you can download the GraalVM Java distribution.

    Other Changes in Java 17

    In this section, you’ll find minor changes to the Java class library that you won’t come into contact with on a daily basis. However, I recommend you skim them at least once to know where to look when you need a corresponding functionality.

    New API for Accessing Large Icons

    Here is a little Swing application that displays the file system icon of the C:\Windows directory on Windows:

    FileSystemView fileSystemView = FileSystemView.getFileSystemView();
    Icon icon = fileSystemView.getSystemIcon(new File("C:\Windows"));
    
    JFrame frame = new JFrame();
    frame.setDefaultCloseOperation(JFrame.EXIT_ON_CLOSE);
    frame.getContentPane().add(new JLabel(icon));
    frame.pack();
    frame.setVisible(true);Code language: Java (java)

    The icon has a size of 16 by 16 pixels, and there was no way to display a higher resolution icon until now.

    In Java 17, the method getSystemIcon(File f, int width, int height) was added, allowing you to specify the size of the icon:

    Icon icon = fileSystemView.getSystemIcon(new File("C:\Windows"), 512, 512);Code language: Java (java)

    There is no JDK enhancement proposal for this extension.

    Add support for UserDefinedFileAttributeView on macOS

    The following code shows how extended attributes of a file can be written and read:

    Path path = ...
    
    UserDefinedFileAttributeView view =
        Files.getFileAttributeView(path, UserDefinedFileAttributeView.class);
    
    // Write the extended attribute with name "foo" and value "bar"
    view.write("foo", StandardCharsets.UTF_8.encode("bar"));
    
    // Print a list of all extended attribute names
    System.out.println("attribute names: " + view.list());
    
    // Read the extended attribute "foo"
    ByteBuffer byteBuffer = ByteBuffer.allocate(1024);
    view.read("foo", byteBuffer);
    byteBuffer.flip();
    String value = StandardCharsets.UTF_8.decode(byteBuffer).toString();
    System.out.println("value of 'foo': " + value);Code language: Java (java)

    This functionality has existed since Java 7 but was not supported for macOS until now. Since Java 17, the function is now also available for macOS.

    There is no JDK enhancement proposal for this extension.

    System Property for Native Character Encoding Name

    From Java 17 onwards, you can use the system property “native.encoding” to retrieve the operating system’s default character encoding:

    System.out.println("native encoding: " + System.getProperty("native.encoding"));Code language: Java (java)

    On Windows, this line will print Cp1252; on Linux and macOS, UTF-8.

    If you call this code with Java 16 or earlier, it will print null.

    There is no JDK enhancement proposal for this extension.

    Restore Always-Strict Floating-Point Semantics

    An almost unknown Java keyword is strictfp. It is used in class definitions to make floating-point operations within a class “strict”. This means that they lead to predictable results on all architectures.

    Strict floating-point semantics was the default behavior before Java 1.2 (i.e., more than 20 years ago).

    Starting with Java 1.2, “standard floating-point semantics” was used by default, leading to slightly different results depending on the processor architecture. On the other hand, it was more performant, especially on the x87 floating-point coprocessor, which was widespread at that time, since it had to perform additional operations for the strict semantics (for more details, see this Wikipedia article).

    Those who wanted to continue strict calculation from Java 1.2 had to indicate this by the strictfp keyword in the class definition:

    public strictfp class PredictiveCalculator {
      // ...
    }Code language: Java (java)

    Modern hardware can perform strict floating-point semantics without performance degradation. So it was decided in JDK Enhancement Proposal 306 to make it the default semantics again, starting with Java 17.

    The strictfp keyword is thus obsolete. The usage leads to a compiler warning:

    $ javac PredictiveCalculator.java
    PredictiveCalculator.java:3: warning: [strictfp] as of release 17, 
    all floating-point expressions are evaluated strictly and 'strictfp' is not requiredCode language: plaintext (plaintext)

    New macOS Rendering Pipeline

    In 2018, Apple marked the OpenGL library previously used by Java Swing for rendering on macOS as “deprecated” and introduced the Metal framework as its successor.

    JDK Enhancement Proposal 382 moves the Swing rendering pipeline for macOS to the Metal API.

    macOS/AArch64 Port

    Apple has announced that it will switch Macs from x64 to AArch64 CPUs in the long term. Accordingly, a corresponding port is provided via JDK Enhancement Proposal 391.

    The code extends the AArch64 ports for Linux and Windows published in Java 9 and Java 16 with macOS-specific adaptations.

    New Page for “New API” and Improved “Deprecated” Page

    JavaDoc generated from Java 17 onwards has a “NEW” page, which shows all new features grouped by version. For this purpose, the @since tags of the modules, packages, classes, etc., are evaluated.

    "NEW" page in JavaDoc generated since Java 17
    “NEW” page in JavaDoc generated since Java 17

    Also, the “DEPRECATED” page has been revised. Up to Java 16, we see an ungrouped list of all features marked as “deprecated”:

    Java 16's "DEPRECATED" page
    Java 16’s “DEPRECATED” page

    Starting with Java 17, we see deprecated features grouped by release:

    Java 17's "DEPRECATED" page
    Java 17’s “DEPRECATED” page

    There is no JDK enhancement proposal for this extension.

    Complete List of All Changes in Java 17

    This article has presented all the changes defined in JDK Enhancement Proposals (JEPs) as well as numerous class library enhancements for which no JEPs exist. For more changes, especially related to security libraries, see the official Java 17 release notes.

    Summary

    Even though Java 17 is the latest LTS release, this release is not much different from the previous ones. We again got a mixture of:

    • new language features (Sealed Classes),
    • API changes (InstantSource, HexFormat, context-specific deserialization filters),
    • a performance improvement (asynchronous logging of the JVM),
    • deprecations and deletions (Applet API, Security Manager, RMI Activation, AOT and JIT compiler),
    • and new preview and incubator features (Pattern Matching for switch, Foreign Function & Memory API, Vector API).

    In addition, the path taken in Java 9 with Project Jigsaw has been brought to an end by removing the transitionally provided “Relaxed Strong Encapsulation” mode and requiring access to private members of other modules (deep reflection) always to be explicitly enabled.

  • Java Records (with Examples)

    Java Records (with Examples)

    Records are one of two major new features in Java 16 (the second is “Pattern Matching for instanceof”). In this article, you will learn:

    • What are Java records, and why do we need them?
    • How to implement and use records in Java?
    • How can we extend a Java Record with additional functionality?
    • What is important in the context of inheritance?
    • What should you consider when serializing and deserializing records?
    • Why do you need records if you can have their components generated by the IDE … or by Lombok?

    Let’s start with an example from the times before records…

    Why Do We Need Records?

    Let’s say we want to create an immutable class Point with x and y coordinates and everything needed to make sense of this class. We want to instantiate Point objects, read their fields, and store them in sets or use them as keys in maps.

    The result would be something like the following code:

    public class Point {
      private final int x;
      private final int y;
    
      public Point(int x, int y) {
        this.x = x;
        this.y = y;
      }
    
      public int getX() {
        return x;
      }
    
      public int getY() {
        return y;
      }
    
      @Override
      public boolean equals(Object obj) {
        if (obj == this) return true;
        if (obj == null || obj.getClass() != this.getClass()) return false;
        Point that = (Point) obj;
        return this.x == that.x && this.y == that.y;
      }
    
      @Override
      public int hashCode() {
        return Objects.hash(x, y);
      }
    
      @Override
      public String toString() {
        return "Point[x=%d, y=%d]".formatted(x, y);
      }
    }Code language: Java (java)

    That’s quite a bit of boilerplate code for the “a class with x and y values” requirement.

    Those who wanted and were allowed to use Lombok in their projects had a clear advantage. Lombok can create constructors, getters, equals(), hashCode(), and toString() methods automatically. It reduces the code to a few lines:

    @AllArgsConstructor
    @Getter
    @EqualsAndHashCode
    @ToString
    public class Point {
      private final int x;
      private final int y;
    }Code language: Java (java)

    That is already much more comfortable. Lombok is mature and integrates seamlessly with almost any IDE. I have been using it happily for over ten years.

    Since Java 16, however, it is possible to do it even shorter:

    public record Point(int x, int y) {}Code language: Java (java)

    Using records, the original 22 lines – or the seven lines with Lombok – become only one line! This is not only shorter, but also more secure (see sections Java Record vs. Class and Java Records vs. Lombok).

    Let’s look at how exactly to write records and use them.

    How to Implement and Use Records in Java?

    In the previous section, we saw how to write a record with a single line of code:

    public record Point(int x, int y) {}Code language: Java (java)

    From this one line of code, the compiler generates a class Point with:

    • the final fields int x and int y (the so-called “components” of the record),
    • a constructor that sets both fields (the so-called “canonical constructor”),
    • the accessor methods x() and y() for reading the fields,
    • an equals() method that evaluates two Point instances as equal if their x and y coordinates are equal,
    • a hashCode() method that returns the same hash code for two equal Point instances (in the example, the hash code is calculated as x * 31 + y),
    • a toString() method that returns a human-readable text (in the example “Point[x=…, y=…]”).

    You can use Point like any regular class (in the first line of the following code example, the above mentioned, automatically generated “canonical constructor” is called):

    Point p = new Point(5, 10);
    int x = p.x();
    int y = p.y();Code language: Java (java)

    You can compare two points, for example, as follows:

    Point p1 = new Point(8, 4);
    Point p2 = new Point(4, 3);
    if (p1.equals(p2)) {
      // ...
    }Code language: Java (java)

    Java Record Constructors

    In the previous section, you learned that the compiler automatically creates a constructor, the so-called canonical constructor. In this chapter, you will learn how you can overwrite this canonical constructor, how you can write so-called “compact” constructor – and any other non-canonical constructors.

    Overwriting a Record’s Canonical Constructor

    We can implement the canonical constructor of a record ourselves:

    public record Point(int x, int y) {
      /** Canonical constructor as the compiler would generate it */
      public Point(int x, int y) {
        this.x = x;
        this.y = y;
      }
    }Code language: Java (java)

    However, this only makes sense if we execute additional code before or after assigning the record fields – for example, we might want to ensure that the coordinates are not negative:

    public record Point(int x, int y) {
      /** Canonical constructor */
      public Point(int x, int y) {
        if (x < 0 || y < 0) throw new IllegalArgumentException();
    
        this.x = x;
        this.y = y;
      }
    }Code language: Java (java)

    In addition to validation, we could also transform parameters or, for example, create a defensive copy of an array.

    With this form, the constructor’s signature must be exactly the same as the record’s. The following, in contrast, is not allowed:

    public record Point(int x, int y) {
      public Point(int a, int b) {  // Other names than x and y are not allowed!
        this.x = a;
        this.y = b;
      }
    }Code language: Java (java)

    The compiler would reject this with the following error message:

    $ javac Point.java
    Point.java:4: error: invalid canonical constructor in record Point
        public Point(int a, int b) {
               ^
      (invalid parameter names in canonical constructor)
    1 errorCode language: plaintext (plaintext)

    It is equally important that all fields are set (logically, they are final). If we were to set only x but not y, the compiler would abort with the following message:

    $ javac Point.java
    Point.java:4: error: variable y might not have been initialized
        }
        ^
    1 errorCode language: plaintext (plaintext)

    Interestingly, however, there is no need for a 1:1 mapping of the parameters to the fields. You don’t even have to use all parameters. So the following code is also valid:

    public record Point(int x, int y) {
      public Point(int x, int y) {
        this.x = x;
        this.y = x;  // Assigning this.y to x here - and ignoring y
      }
    }Code language: Java (java)

    Fortunately, modern IDEs recognize this. IntelliJ, for example, warns that “’x’ should probably not be assigned to ‘y’”.

    Finally, the visibility of the canonical constructor must not be more restrictive than the visibility of the record itself. This means that a record marked as private may have a constructor marked as public – but a record declared as public may not have a private constructor – the following is, therefore, not allowed:

    public record Point(int x, int y) {
      private Point(int x, int y) {  // private constructor not allowed for public record
        this.x = x;
        this.y = y;
      }
    }Code language: Java (java)

    The compiler would abort with the following error message:

    $ javac Point.java
    Point.java:2: error: invalid canonical constructor in record Point
      private Point(int x, int y) {
              ^
      (attempting to assign stronger access privileges; was public)
    1 errorCode language: plaintext (plaintext)

    Compact Constructor

    There is another more concise variant to override the canonical constructor. You can omit the parameters in the signature and the assignments completely. We call this type a “compact constructor”:

    public record Point(int x, int y) {
      /** Compact constructor */
      public Point { // ← No parameters here
        if (x < 0 || y < 0) throw new IllegalArgumentException();
        // ← No assignments here
      }
    }Code language: Java (java)

    The compiler automatically inserts the assignments this.x = x and this.y = y at the end of the constructor and thus ultimately generates exactly the same bytecode from the compact constructor as from the canonical constructor shown second in the previous section.

    The parameters may also be changed within the constructor, e.g., we could tacitly replace all negative values with 0:

    public record Point(int x, int y) {
      /** Compact constructor */
      public Point {
        x = Math.max(x, 0);
        y = Math.max(y, 0);
      }
    }Code language: Java (java)

    This would correspond to the following canonical constructor:

    public record Point(int x, int y) {
      /** Canonical constructor */
      public Point(int x, int y) {
        x = Math.max(x, 0);
        y = Math.max(y, 0);
        this.x = x;
        this.y = y;
      }
    }Code language: Java (java)

    Both forms of the constructor are ultimately the same, and only either a canonical or a compact constructor may be implemented.

    My recommendation is to always use a compact constructor. After all, we programmers want to express our ideas – and not write unnecessary boilerplate code.

    Modern IDEs such as IntelliJ can convert a canonical constructor into a compact constructor – and vice versa – with a single click.

    Caution: As the record’s components are only set at the end of the constructor, you should not access the accessor methods – x() and y() in the example – within the constructor. The components are still assigned default values at this point (i.e., 0 in the case of int).

    You should access the (not explicitly specified) constructor parameters instead:

    public record Point(int x, int y) {
      /** Compact constructor */
      public Point {
        System.out.println(x());  // Prints 0 (fields are not yet assigned)
        System.out.println(x);    // Prints the x parameter passed to the constructor
      }
    }Code language: Java (java)

    This becomes evident when you try to access the fields within the constructor using this:

    public record Point(int x, int y) {
      /** Compact constructor */
      public Point {
        System.out.println(this.x);  // Not allowed - x is not yet initialized
      }
    }Code language: Java (java)

    This code leads to a compiler error:

    $ javac Point.java
    Point.java:3: error: variable x might not have been initialized
        System.out.println(this.x);
                               ^
    1 errorCode language: plaintext (plaintext)

    It would have been consistent not to allow access via x() in the constructor either.

    Additional Constructors in Records

    You can extend records with additional constructors, such as a default constructor (one without parameters) or one that sets x and y to the same value:

    public record Point(int x, int y) {
      /** Default constructor */
      public Point() {
        this(0, 0);
      }
    
      /** Custom constructor */
      public Point(int value) {
        this(value, value);
      }
    }Code language: Java (java)

    As shown in the previous example, you must always a) set all fields and b) do this by delegating to the canonical (i.e., the automatically generated) constructor via this(…).

    Setting the values directly, as in the following code, is not allowed in these additional constructors:

    public record Point(int x, int y) {
      /** Default constructor */
      public Point() {
        this.x = 0;  // Not allowed!
        this.y = 0;  // Not allowed!
      }
    
      /** Custom constructor */
      public Point(int value) {
        this.x = value;  // Not allowed!
        this.y = value;  // Not allowed!
      }
    }Code language: Java (java)

    The reason for this is that no matter which constructor is used, the parameter validations that may be implemented in the canonical or compact constructor should always be called.

    Static Fields in Records

    Records can be extended by static fields (final and non-final). For example, we could extract the 0 from the default constructor shown above into a constant:

    public record Point(int x, int y) {
      private static final int ZERO = 0;
    
      public Point() {
        this(ZERO, ZERO);
      }
    }Code language: Java (java)

    We could also add a static instance counter that is incremented in the constructor:

    public record Point(int x, int y) {
      private static final int ZERO = 0;
    
      private static long instanceCounter = 0;
    
      public Point() {
        this(ZERO, ZERO);
    
        synchronized (Point.class) {
          instanceCounter++;
        }
      }
    }Code language: Java (java)

    In fact, I would rather implement such a counter as AtomicLong or LongAdder – but then they would be final again and therefore not suitable as an example for a non-final static field. ;-)

    Methods in Records

    Just like the canonical constructor, we can also override the automatically generated accessor methods of a record. The following record contains an array component and creates a defensive copy of the array in the constructor and in the accessor in order to prevent changes to the array stored in the record:

    public record ImmutableArrayHolder(int[] array) {
      /* Compact constructor */
      public ImmutableArrayHolder {
        array = array.clone();
      }
    
      /* Accessor method */
      public int[] array() {
        return array.clone();
      }
    }Code language: Java (java)

    Besides additional constructors and static fields, you can also define additional static and non-static methods in Java records.

    The following static method returns the value of the instance counter:

    public record Point(int x, int y) {
      private static long instanceCounter = 0;
    
      // ... Constructor(s) increasing instanceCounter ...
    
      public static synchronized long getInstanceCounter() {
        return instanceCounter;
      }
    }Code language: Java (java)

    To make Point thread-safe, any access to instanceCounter is synchronized – including the getter, to ensure that we don’t get a value from the CPU core cache, for example, but the latest value from main memory.

    We could implement a non-static method, for example, to calculate the Euclidean distance to another point:

    public record Point(int x, int y) {
      public double distanceTo(Point target) {
        int dx = target.x() - this.x();
        int dy = target.y() - this.y();
        return Math.sqrt(dx * dx + dy * dy);
      }
    }Code language: Java (java)

    We can call the method, for example, as follows:

    Point p1 = new Point(17, 3);
    Point p2 = new Point(18, 12);
    double distance = p1.distanceTo(p2);Code language: Java (java)

    When implementing and invoking record methods, there is no difference from normal classes.

    Records and Inheritance

    Records can implement interfaces:

    public interface WithXCoordinate {
      int x();
    }
    
    public record Point(int x, int y) implements WithXCoordinate {}Code language: Java (java)

    This is also possible in combination with sealed types released in Java 17:

    public interface WithXCoordinate permits Point, Point3D {
      int x();
    }
    
    public record Point(int x, int y) implements WithXCoordinate {}
    
    public record Point(int x, int y, int z) implements WithXCoordinate {}Code language: Java (java)

    Records cannot, however, inherit from classes. So the following is not allowed:

    public class TaggedElement {
      private String tag;
    }
    
    public record Point(int x, int y) extends TaggedElement {}  // Not allowed!Code language: Java (java)

    This is because records already inherit from the java.lang.Record class – and they are supposed to be immutable. And that they would not be if they inherited from a mutable class.

    Records are implicitly final, so you can’t inherit from them either. The following code is also invalid:

    public record Point(int x, int y) {}
    
    public class TaggedPoint extends Point {  // Not allowed!
      private String tag;
    
      TaggedPoint(int x, int y, String tag) {
        super(x, y);
        this.tag = tag;
      }
    }Code language: Java (java)

    Characteristics of Records

    Compared to regular classes, you should know some peculiarities about records. I will explain these in the following sections.

    Local Records

    Records may also be defined locally (i.e., within methods). This can be especially helpful if you want to store intermediate results consisting of several related variables.

    In the following example, we define, within the findFurthestPoint() method, the local record PointWithDistance: a combination of a Point and a double value representing the distance of the point to an origin point.

    With the help of the local record, we fill a list of points and their distances to the current point. From this list, we then determine the PointWithDistance with the greatest distance – to then extract the corresponding Point from it.

    public Point findFurthestPoint(Point origin, Point... points) {
      record PointWithDistance(Point point, double distance) {}
      
      List<PointWithDistance> pointsWithDistance = new ArrayList<>();
      for (Point point : points) {
        double distance = origin.distanceTo(point);
        pointsWithDistance.add(new PointWithDistance(point, distance));
      }
    
      PointWithDistance furthestPointWithDistance = Collections.max(
          pointsWithDistance,
          Comparator.comparing(PointWithDistance::distance));
    
      return furthestPointWithDistance.point();
    }Code language: Java (java)

    Records within Inner Classes

    Records may also be defined within inner classes:

    class OuterClass {
      // ...
    
      class InnerClass {
        record InnerClassRecord(String foo, int bar) {}
    
        // ...
      }
    }Code language: Java (java)

    This possibility is worth mentioning in that it was only made possible with the final release of records by JDK Enhancement Proposal 395.

    Records and Reflection

    You can easily change the final fields of regular classes using Reflection. In the following code, Point is the class from the beginning of this article:

    Point point = new Point(10, 5);
    System.out.println("point = " + point);
    
    Field xField = Point.class.getDeclaredField("x");
    xField.setAccessible(true);
    System.out.println("point.x = " + xField.get(point));
    
    xField.set(point, 55);
    System.out.println("point = " + point);Code language: Java (java)

    The code outputs the following:

    point = Point[x=10, y=5]
    point.x = 10
    point = Point[x=55, y=5]Code language: plaintext (plaintext)

    That means that we have read and changed the actually private and final x field of the Point class via reflection!

    If we call the same code with the Point record, we get the following output:

    point = Point[x=10, y=5]
    point.x = 10
    Exception in thread "main" java.lang.IllegalAccessException: 
    Can not set final int field eu.happycoders.records.Point.x to java.lang.IntegerCode language: plaintext (plaintext)

    We can thus also read private fields from records via reflection (and thus, for example, bypass an accessor that creates a defensive copy of a mutable component, such as an array).

    However, unlike classes, records are protected from changes by reflection.

    Deserializing Records

    Records have a particularity when deserializing them. I will show this with the following example.

    Let’s first extend the Point constructor with a parameter validation. Let’s say we want to exclude negative values. We use the compact notation for overriding the canonical constructor. We also make the class serializable:

    public record Point(int x, int y) implements Serializable {
      @Serial private static final long serialVersionUID = -1482007299343243215L;
    
      public Point {
        if (x < 0) throw new IllegalArgumentException("x must be >= 0");
        if (y < 0) throw new IllegalArgumentException("y must be >= 0");
      }
    }Code language: Java (java)

    To see the difference in deserialization, we create an analogous regular class PointClass:

    public final class PointClass implements Serializable {
      @Serial private static final long serialVersionUID = 8411630734446201523L;
    
      private final int x;
      private final int y;
    
      public Point(int x, int y) {
        if (x < 0) throw new IllegalArgumentException("x must be >= 0");
        if (y < 0) throw new IllegalArgumentException("y must be >= 0");
    
        this.x = x;
        this.y = y;
      }
    
      // ... getters, equals(), hashCode(), toString() ...
    }Code language: Java (java)

    We temporarily comment out the parameter validation and serialize an invalid Point record and an invalid PointClass class to a file each, using the following code:

    PointClass pc = new PointClass(-5, 5);  // Parameter validation temporarily commented
    try (FileOutputStream fileOut = new FileOutputStream("point-class.bin");
        ObjectOutputStream objectOut = new ObjectOutputStream(fileOut)) {
      objectOut.writeObject(pc);
    }
    
    Point p = new Point(-5, 5);  // Parameter validation temporarily commented
    try (FileOutputStream fileOut = new FileOutputStream("point-record.bin");
        ObjectOutputStream objectOut = new ObjectOutputStream(fileOut)) {
      objectOut.writeObject(p);
    }Code language: Java (java)

    After that, we uncomment the parameter validation and try to deserialize the serialized objects:

    try (FileInputStream fileIn = new FileInputStream("point-class.bin");
        ObjectInputStream objectIn = new ObjectInputStream(fileIn)) {
      PointClass pointClass = (PointClass) objectIn.readObject();
      System.out.println("pointClass = " + pointClass);
    }
    
    try (FileInputStream fileIn = new FileInputStream("point-record.bin");
        ObjectInputStream objectIn = new ObjectInputStream(fileIn)) {
      Point point = (Point) objectIn.readObject();
      System.out.println("point = " + point);
    }Code language: Java (java)

    The result is surprising and reveals another difference between records and classes:

    pointClass = PointClass{x=-5, y=5}
    Exception in thread "main" java.io.InvalidObjectException: x must be >= 0
    	at ...
    Caused by: java.lang.IllegalArgumentException: x must be >= 0
    	at records.Point.<init>(Point.java:10)Code language: plaintext (plaintext)

    The faulty class can be deserialized without any problems – the record, however, cannot.

    The reason: When deserializing a class, the values read from the ObjectInputStream are written directly into the fields of the class. In the case of a record, on the other hand, the canonical constructor is called – and any parameter validations it contains are executed.

    Java Record vs. Class

    I am often asked why you need records when you can simply have an IDE generate the constructor, getter, equals(), hashCode(), and toString().

    Firstly, in my opinion, it is not the task of an IDE to compensate for the shortcomings of a programming language. A programming language should be so sophisticated that we can express our ideas with as little code as possible – the compiler should do the rest. Not everyone uses the same IDE, and different IDEs generate different source code.

    Records have other concrete advantages:

    • Record components are truly immutable. While final fields of a regular class can be changed via reflection, this is not possible with records (see section Records and Reflection).
    • It is not possible to create invalid records via deserialization, as the canonical constructor of the record is called during deserialization (in contrast to classes).
    • For the equals(), hashCode(), and toString() methods, the compiler generates a special bytecode that calls implementations of these methods in the JVM. This means that these methods can be further optimized in future Java versions without having to recompile existing code.
    • Records work closely with other language features, such as Records Patterns finalized in Java 21.

    Java Records vs. Lombok

    Similarly, I am often asked about the advantages of records over Lombok.

    In my opinion, we should not hand over responsibility for something that a language should be able to do to a library. Because there are risks involved: What if the library is no longer maintained? What if it is not adapted to new Java versions or even completely discontinued?

    In addition, the same concrete disadvantages apply as with regular classes: Final fields of classes can be changed via reflection; invalid instances can be created via deserialization; equals(), hashCode(), and toString() cannot be optimized by the JVM; and pattern matching does not work with Lombok-annotated classes.

    Summary

    Records provide a compact notation to define classes with only final fields. Records automatically include a constructor that sets all final fields (the canonical constructor), read access methods for all fields, as well as equals(), hashCode(), and toString() methods optimized by the JVM.

    Records can be extended by additional constructors, static fields, and static as well as non-static methods. The canonical constructor can be overridden.

    Records can implement interfaces (including sealed ones) but cannot extend classes, nor can they be inherited from.

    When deserializing records, their canonical constructor is invoked – and any parameter validations it may contain.

    Records were released as preview features in Java 14 and Java 15 and were declared production-ready in Java 16 through JDK Enhancement Proposal 395. Records were developed as part of Project Amber, which also includes switch expressions, text blocks, pattern matching, and sealed classes.

  • Java 16 Features (with Examples)

    Java 16 Features (with Examples)

    With Java 16 released on March 16, 2021, two new language features from Project Amber will reach production readiness: “Pattern Matching for instanceof” and Records.

    In total, the JDK developers implemented an impressive 17 JDK Enhancement Proposals for this release.

    As always, I have tried to sort the enhancements by relevance for daily programming work. I.e., at the beginning of the article, you will find the already mentioned new language features, significant changes to the JDK class library, and new tools.

    After that, there are performance improvements, preview and incubator features, and finally, other changes.

    Pattern Matching for instanceof

    Let’s move on to the first major enhancement in Java 16. After two rounds of previews, “Pattern Matching for instanceof” was published as production-ready via JDK Enhancement Proposal 394.

    This fourth language extension from Project Amber eliminates the need for casts after an instanceof check by implicit type conversion.

    I’ll best explain what this means with an example. The following code checks the class of an object. If the object is a String, which is longer than five characters, it is converted to uppercase and printed. If instead, the object is an Integer, the value is squared and printed.

    Object obj = getObject();
    
    if (obj instanceof String) {
      String s = (String) obj;
      if (s.length() > 5) {
        System.out.println(s.toUpperCase());
      }
    } else if (obj instanceof Integer) {
      Integer i = (Integer) obj;
      System.out.println(i * i);
    }
    Code language: Java (java)

    In lines 4 and 9, we have to cast the object to String and Integer, respectively. We have become so accustomed to this notation that we no longer question the necessary boilerplate code.

    The following code shows how we can do it better since Java 16:

    if (obj instanceof String s) {          // <-- implicit cast to String s
      if (s.length() > 5) {
        System.out.println(s.toUpperCase());
      }
    } else if (obj instanceof Integer i) {  // <-- implicit cast to Integer i
      System.out.println(i * i);
    }
    Code language: Java (java)

    Instead of explicitly programming casts, we simply put a variable name after the instanceof check (lines 1 and 5). This variable is then of the type we checked in instanceof and visible within the if block.

    We can go one step further and combine the first two if statements:

    if (obj instanceof String s && s.length() > 5) {
      System.out.println(s.toUpperCase());
    } else if (obj instanceof Integer i) {
      System.out.println(i * i);
    }
    Code language: Java (java)

    The code is now much more concise, with five lines instead of nine. Pattern matching has eliminated redundancy and increased readability.

    Pattern Matching for instanceof – Scope

    A matched variable is only visible within the if block. That is logical, because only if the if comparison is positive, the variable can be cast to the desired type.

    If a field with the same name exists within the class, then this field is “shadowed” by a pattern matching variable. The following example shows what this means:

    public class PatternMatchingScopeTest {
    
      public static void main(String[] args) {
        new PatternMatchingScopeTest().processObject("Happy Coding!");
      }
    
      private String s = "Hello, world!";
    
      private void processObject(Object obj) {
        System.out.println(s);           // Prints "Hello, world!"
        if (obj instanceof String s) {
          System.out.println(s);         // Prints "Happy Coding!"
          System.out.println(this.s);    // Prints "Hello, world!"
        }
      }
    }
    Code language: Java (java)

    What does this program print?

    • In line 10, the field s defined in line 7 is printed.
    • Line 12 prints the variable s assigned in the instanceof expression, that is, the object obj, which was passed to the method, cast to a String.
    • To access the field s within the if block, we use this.s in line 13.

    It is not allowed to give a pattern matching variable the same name as a variable already defined in the method, as in the following example:

    private void processObject(Object obj) {
      String s = "Hello, world";
      if (obj instanceof String s) {  // Compiler error 
        // ...
      }
    }Code language: Java (java)

    The compiler aborts with the error message Fehlermeldung “Variable ‘s’ is already defined in the scope” ab.

    Pattern Matching for instanceof – Changes in Java 16

    Compared to the first two previews in Java 14 and Java 15, two refinements have been made for the final release:

    1. Pattern variables are no longer implicitly final, i.e., they can be changed. The following code is allowed in Java 16; in Java 15, it led to a “pattern binding may not be assigned” compiler error:

    if (obj instanceof String s && s.length() > 5) {
      s = s.toUpperCase();  // Compiler error in Java 15, allowed in Java 16
      System.out.println(s);
    } else if (obj instanceof Integer i) {
      i = i * i;            // Compiler error in Java 15, allowed in Java 16
      System.out.println(i);
    }Code language: Java (java)

    2. A “Pattern Matching for instanceof” expression results in a compiler error when comparing an expression of type S with a pattern of type T, where S is a subtype of T. Here is an example of this as well:

    private static void processInteger(Integer i) {
      if (i instanceof Number n) {  // Compiler error in Java 16
        // ...
      }
    }Code language: Java (java)

    The concrete error message in this example is “pattern type Number is a subtype of expression type Integer”. What exactly does that mean?

    Since Integer inherits from Number, both the instanceof check and the cast to Number are superfluous. The Integer object can be used without a cast in all places where Number is expected.

    Pattern Matching – Outlook

    In the following release, Java 17, the next pattern matching feature, “Pattern Matching for switch”, will debut as a preview feature.

    Records

    Also ready for production in Java 16 – and also after two preview rounds – are records.

    Records provide a compact notation to define classes with only final fields as in the following example:

    record Point(int x, int y) {}Code language: Java (java)

    What exactly are records? How to implement and use them? How to extend them with additional functions? Which peculiarities should you know (e.g., related to inheritance or deserialization)? Due to the scope of the topic, you will find the answers in this separate article: Records in Java

    (Records were first introduced as a preview feature in Java 14. In the second preview, some refinements were made in Java 15. Through JDK Enhancement Proposal 395, records were classified as production-ready with one final change: they may now also be defined within inner classes).

    Migrate from Mercurial to Git + Migrate to GitHub

    Previously, Java was developed using the Mercurial version control system. With JDK Enhancement Proposal 357, the Java source code was migrated to Git. There were several reasons for this:

    • Distribution: Many more developers are familiar with Git than with Mercurial. The move is intended to make it more attractive for the developer community to participate in JDK development.
    • Metadata size: The Mercurial repository requires about 1.2 GB of metadata. Git manages with only 300 MB, thus saving disk space and download time. In addition, Git offers so-called “Shallow Cloning” with the –depth parameter, whereby only a part of the commit history is cloned.
    • Tools: Git support is built into every IDE and numerous text editors. And there are graphical tools for all operating systems.
    • Hosting: There is a wide range of Git hosting providers available.

    Let’s stay on the topic of hosting: In JDK Enhancement Proposal 369, it was decided to host the JDK on GitHub. The reasons for this are:

    • GitHub offers excellent performance.
    • GitHub is the world’s largest Git hoster.
    • GitHub has a comprehensive API.

    The GitHub API, in turn, is integrated by numerous IDEs and enables, for example, pull requests to be created, reviewed, and commented directly in the IDE.

    Warnings for Value-Based Classes

    For the description of this JEP, I have to elaborate a bit:

    Project Valhalla stands for an enhancement of Java by so-called value types: immutable objects represented in memory by their value – and not by a reference to an object instance (analogous to primitive data types like int, long and double).

    Value types will consequently not have a constructor that creates a new instance with a unique identity each time it is called.

    Value type instances identified as equal by equals() will also be considered identical by ==.

    JDK Enhancement Proposal 390 identified existing JDK classes as candidates for future value types. These were marked with the new @ValueBased annotation, and their constructors were labeled as “deprecated for removal”.

    These include:

    • all wrapper classes of the primitive data types (Byte, Short, Integer, Long, Float, Double, Boolean, and Character),
    • Optional and its primitive variants,
    • numerous Date/Time API classes, such as LocalDateTime,
    • the collections created by List.of(), Set.of(), and Map.of().

    For a complete list of all classes marked as @ValueBased, see the JEP linked above.

    Without identity, these objects can no longer be used as monitors for synchronization. Therefore, as of Java 16, warnings are issued when synchronizing on instances of these objects.

    In the future (exactly when is yet to be determined – it won’t be in Java 18), constructors will be removed entirely; and trying to synchronize on value types will result in a compiler error or exception.

    Strongly Encapsulate JDK Internals by Default

    In Java 9, the module system (Project JigSaw) was introduced. Most programs continued to run without significant adjustments. At most, we had to add some Java EE dependencies, which have not been part of Java SE since then.

    Before Java 16: Relaxed Strong Encapsulation

    The reason for the smooth migration is that the JDK developers have provided us with the so-called “Relaxed strong encapsulation” mode for a transitional period.

    This mode means that all packages that existed before Java 9 are open to deep reflection for all unnamed modules – that is, accessing non-public classes and methods via setAccessible(true).

    Since Java 16: Strong Encapsulation

    In Java 16, this mode still exists but is disabled by default.

    Java 16 instead runs in “Strong encapsulation” mode, which means that any access to non-public classes and methods is prohibited unless explicitly allowed via “opens” in the module declaration or “–add-opens” on the command line.

    Therefore, when you upgrade to Java 16, you may see error messages of this type:

    java.lang.reflect.InaccessibleObjectException:
        Unable to make java.lang.invoke.MethodHandles$Lookup(java.lang.Class) accessible:
        module java.base does not "opens java.lang.invoke" to unnamed module @2de8da52Code language: plaintext (plaintext)

    In this example, the message means that the code tries to make the package-private constructor Lookup(Class lookupClass) of the inner class MethodHandles$Lookup accessible via reflection. That is no longer allowed in “Strong encapsulation” mode, and you must now explicitly allow this with “–add-opens”. The syntax is:

    --add-opens module/package=target-module(,target-module)*

    What do you have to enter instead of the placeholders “module”, “package”, and “target-module”?

    You can take these values directly from the last line of the error message:

    • module: “java.base”
    • package: “java.lang.invoke”
    • target-module: If you have defined a module for your code, the module name is at the end of the error message. Otherwise, it says “unnamed module” followed by a hash value. As “target-module”, you enter the module name, if available, otherwise “ALL-UNNAMED”. (You can’t use the concrete hash value “@2de8da52” because it changes every time you start the application).

    Let’s transfer the values from the error message, then the VM option to specify is:

    --add-opens java.base/java.lang.invoke=ALL-UNNAMED

    And if I don’t want to specify this option and instead prefer to have the old mode back?

    VM-Option –illegal-access

    You can use the VM option “–illegal-access” to restore the previous behavior. You can set the following modes:

    --illegal-access=deny“Strong encapsulation”:
    Deep reflection from other modules is generally forbidden (default setting in Java 16).
    --illegal-access=permit“Relaxed strong encapsulation”:
    Deep reflection from other modules to packages that existed before Java 9 is allowed. A warning is issued the first time it is accessed. Deep reflection on packages added since Java 9 is prohibited (default from Java 9 to 15).
    --illegal-access=warnLike “permit”, but a warning is issued not only on the first access but on every access.
    --illegal-access=debugLike “warn” with additional output of a stack trace.

    However, I strongly advise you not to use this VM option. In the next release, Java 17, the option will no longer be available, and “Strong encapsulation” will be the only available mode.

    (The activation of “Strong Encapsulation” by default is defined in JDK Enhancement Proposal 396.)

    New Stream Methods

    Java 16 introduces the following two new Stream methods:

    Stream.toList()

    If you wanted to terminate a stream into a list, you had the following options up to now:

    // ArrayList:
    Stream.of("foo", "bar", "baz").collect(Collectors.toList());
    
    // ImmutableCollections$ListN:
    Stream.of("foo", "bar", "baz").collect(Collectors.toUnmodifiableList());
    
    // LinkedList:
    Stream.of("foo", "bar", "baz").collect(Collectors.toCollection(LinkedList::new));Code language: Java (java)

    The return types of the first two variants are not guaranteed. In fact, for the first variant Collectors.toList(), the list is not even guaranteed to be modifiable. With the second variant Collectors.toUnmodifiableList(), it is at least guaranteed that the return value is an unmodifiable list.

    Stream.toList() is a fourth variant that also generates an unmodifiable list:

    // ImmutableCollections$ListN:
    Stream.of("foo", "bar", "baz").toList();Code language: Java (java)

    This method is implemented as a default method in the Stream interface and is overridden by a stream-specific optimization in most stream implementations.

    Stream.mapMulti()

    To merge collections contained in a stream into a single collection, we usually use flatMap():

    Stream<List<Integer>> stream =
        Stream.of(
            List.of(1, 2, 3),
            List.of(4, 5, 6),
            List.of(7, 8, 9));
    
    List<Integer> list = stream.flatMap(List::stream).toList();Code language: Java (java)

    As a parameter to flatMap(), we need to specify a mapper function that converts each collection contained in the stream into an intermediate stream.

    This example was highly simplified. The stream does not have to contain collections directly. For example, it could also contain Customer objects whose getOrders() method returns a list of orders. We could then use flatMap() to compile a list of all the customers’ orders:

    List<Customer> customers = getCustomers();
    List<Order> allOrders = customers.stream()
            .flatMap(customer -> customer.getOrders().stream())
            .toList();Code language: Java (java)

    Both examples have in common that a new stream is generated for each element of the original stream. This is subject to a particular overhead.

    Therefore, in Java 16, Stream.mapMulti() was introduced as a more efficient, imperative alternative to the declarative flatMap(): While with flatMap(), we specify which data we want to merge, with mapMulti() we implement how to merge this data.

    For this, we pass a BiConsumer to which the following two elements are given during the mapping process:

    1. The element of the stream, i.e., the collection to be collected (the list in the first example) or the object from which a collection is extracted (the customer in the second example).
    2. A Consumer to which we pass the elements of the collection one by one.

    Here is the first example converted to mapMulti():

    List<Integer> list = stream
            .mapMulti(
                (List<Integer> numbers, Consumer<Integer> consumer) ->
                    numbers.forEach(number -> consumer.accept(number)))
            .toList();Code language: Java (java)

    We can replace the lambda body with a single method reference:

    List<Integer> list = stream
            .mapMulti((BiConsumer<List<Integer>, Consumer<Integer>>) Iterable::forEach)
            .toList();Code language: Java (java)

    What we are saying here is: Iterate over each of the elements of the lists contained in the stream and pass all the individual elements to the provided Consumer. The intermediate step of creating a new stream per list is omitted.

    And here is the second example:

    List<Order> allOrders = customers.stream()
            .mapMulti(
                (Customer customer, Consumer<Order> consumer) ->
                    customer.getOrders().forEach(consumer))
            .toList();Code language: Java (java)

    We iterate over each customer’s orders and pass them to the provided Consumer.

    Should we now always use mapMulti() instead of flatMap()? No, mapMulti() is just another tool in our toolbox. We should generally not optimize prematurely and use whichever method is most readable in a given case. In the examples above, I would stick with flatMap().

    Should the code calling flatMap() prove to be a hotspot, you can test whether mapMulti() leads to a measurable performance increase and, only if so, switch over.

    Packaging Tool

    Since the javapackager tool introduced in Java 8 was removed again in Java 11 along with JavaFX, the Java community was eagerly waiting for a replacement.

    As a successor, the jpackage tool was presented in Java 14 in incubator status. With JDK Enhancement Proposal 392, jpackage is considered ready for production in Java 16.

    jpackage packages a Java application together with the Java runtime environment (i.e., the JVM and the class library*) into an installation package for different operating systems to provide end-users with a natural and straightforward installation experience.

    Supported are:

    • Windows (exe and msi)
    • macOS (pkg and dmg)
    • Linux (deb and rpm)

    (* For an application that uses the Java module system, the class library is compressed to the modules that are actually used.)

    How to Use jpackage

    The following example shows how a minimal, non-modular Java program is compiled and packaged with jpackage into an installer of the currently used operating system.

    The following file Main.java is located in the src/eu/happycoders directory:

    package eu.happycoders;
    
    public class Main {
      public static void main(String[] args) {
        System.out.println("Happy Coding!");
      }
    }Code language: Java (java)

    We compile the file as follows (you have to write the last two lines as one on Windows):

    javac -d target/classes src/eu/happycoders/Main.java
    jar cf lib/happycoders.jar -C target/classes .
    jpackage --name happycoders --input lib 
        --main-jar happycoders.jar --main-class eu.happycoders.MainCode language: plaintext (plaintext)

    On Windows, this creates the executable installer happycoders-1.0.exe; on Debian Linux, it generates the software package happycoders_1.0-1_amd64.deb.

    Using the --type option, you can create a different format, e.g., on macOS, a pkg file instead of the standard dmg file:

    jpackage --name happycoders --input lib 
        --main-jar happycoders.jar --main-class eu.happycoders.Main --type pkgCode language: plaintext (plaintext)

    Creating installers for operating systems other than the one currently in use is not supported.

    More jpackage Options

    To find out how to use jpackage for a modular application and what other options the tool offers, see the jpackage documentation.

    Performance Improvements

    Java 16 introduces performance improvements to garbage collectors and metaspace and allows more efficient interprocess communication via the newly supported Unix-domain sockets.

    ZGC: Concurrent Thread-Stack Processing

    The goal of the Z Garbage Collector (ZGC), released in Java 15, is to keep stop-the-world phases as short as possible (i.e., in the single-digit millisecond range).

    That is to be achieved by taking as many garbage collection operations as possible out of the so-called safepoints (during which the application is stopped) and executing them in parallel with the application.

    JDK Enhancement Proposal 376 removes the last of these operations, the so-called “thread stack processing”, from the safepoints.

    The safepoints are thus reduced to what is absolutely necessary. They no longer contain operations whose execution time scales with the size of the heap. ZGC stop-the-world phases now usually take less than a millisecond, regardless of the heap size.

    For more details, see the JEP linked above and the ZGC wiki.

    Concurrently Uncommit Memory in G1

    Determining how much memory the G1 garbage collector returns to the operating system and the actual return both used to be done in a stop-the-world pause.

    This has been optimized so that only the calculation occurs during the pause, but the actual release runs in parallel with the application.

    (There is no JDK enhancement proposal for this optimization.)

    Elastic Metaspace

    The JVM uses the so-called “metaspace” to store class metadata, i.e., all information about a class, such as the parent class, methods, and field names – but not the content of the fields (which is located on the heap).

    Depending on the application profile, the metaspace may have an excessively high memory consumption.

    JDK Enhancement Proposal 387 reduces the metaspace’s memory footprint, and memory is returned faster to the operating system.

    In addition, the source code for metaspace management has been simplified to reduce maintenance costs.

    Unix-Domain Socket Channels

    Unix-domain sockets are used for inter-process communication (IPC) within a host.

    They are similar to TCP/IP sockets but are addressed via file system paths, not IP addresses. They are more secure (no access possible from outside the host) and provide faster connection initiation and higher throughput than TCP/IP loopback connections.

    Thanks to JDK Enhancement Proposal 380, Java developers can now also use Unix-domain sockets.

    From a programming perspective, little changes compared to TCP/IP sockets: Unix-domain socket support has been integrated into the existing SocketChannel and ServerSocketChannel APIs.

    The following (very rudimentary) example shows how to open a TCP/IP server socket on port 8080 and how a client connects to that server:

    var socketAddress = new InetSocketAddress(8080);
    
    // Server
    var serverSocketChannel = ServerSocketChannel.open();
    serverSocketChannel.bind(socketAddress);
    
    // Client
    var socketChannel = SocketChannel.open();
    socketChannel.connect(remoteAddress);Code language: Java (java)

    And here is the analogous example using the Unix-domain socket path “~/happycoders.socket”:

    var socketPath = Path.of(System.getProperty("user.home")).resolve("happycoders.socket");
    var socketAddress = UnixDomainSocketAddress.of(socketPath);
    
    // Server
    var serverSocketChannel = ServerSocketChannel.open(StandardProtocolFamily.UNIX);
    serverSocketChannel.bind(socketAddress);
    
    // Client
    var socketChannel = SocketChannel.open(StandardProtocolFamily.UNIX);
    socketChannel.connect(remoteAddress);Code language: Java (java)

    So you just have to specify the StandardProtocolFamily.UNIX type when opening a channel and use an address of type UnixDomainSocketAddress instead of InetSocketAddress. The subsequent work with the channel is the same for both types.

    Unix-domain sockets are not limited to Unix platforms; they are also supported by Windows 10 and Windows Server 2019.

    Experimental, Preview, and Incubator Features

    Since Java 10, a new Java release is published every six months. This means that new features can be delivered and tested in a non-final state. The Java community can then provide feedback that is taken into account in the further development of the features.

    Java 16 also includes enhanced and new preview and incubator features. I will not present the incubator features in detail but refer to the Java version, in which these features are ready for production.

    Sealed Classes (Second Preview)

    Sealed classes were introduced in Java 15 as a preview.

    With JDK Enhancement Proposal 397, three small changes have been made for Java 16:

    1. In the Java Language Specification (JLS), the concept of “contextual keywords” replaces the previous “restricted identifiers” and “restricted keywords”. “Contextual keywords ensure that new keywords such as sealed, permits (or yield from the switch expressions) may continue to be used outside the respective context, e.g., as variable or method names. That means that existing code does not have to be changed when upgrading to a new Java version.

    So here’s what’s allowed:

    public void sealed() {
      int permits = 5;
    }Code language: Java (java)

    2. The permits keyword can be omitted if subclasses derived from a sealed class are defined within the same class file (“compilation unit”). These are then considered “implicitly declared permitted subclasses”.

    You can find an example of this in the article about Sealed Classes.

    What has been changed in the second preview of Sealed Classes is that local classes (that is, classes defined within methods) are not allowed to extend sealed classes.

    You can also find an example of this in the article about Sealed Classes.

    3. For instanceof tests, the compiler checks whether the class hierarchy allows the check ever to return true. Since the second preview of Sealed Classes, the information from sealed class hierarchies is included in this check.

    I explain what this means with an example in the article about Sealed Classes.

    Vector API (Incubator)

    Vector … hasn’t it been around since Java 1.0?

    No, this is not about the List implementation java.util.Vector, but about vector calculus in the mathematical sense.

    A vector basically corresponds to an array of scalar values (byte, short, int, long, float, or double). In vector calculus, scalar operations (e.g., addition) are applied to two vectors of the same size. The operation is applied in pairs to each element of the vectors.

    In vector addition, for example, you add the first element of the first vector to the first element of the second vector, the second element of the first vector to the second element of the second vector, and so on (you might remember this from math class):

    Example of vector addition
    Example of vector addition

    Modern CPUs and GPUs can perform such operations up to a particular vector size within a single CPU cycle, significantly increasing performance.

    The vector API, first introduced as an incubator feature with JDK Enhancement Proposal 338, allows us to implement such operations in Java. The JVM will map them to the most efficient CPU instructions of the underlying hardware architecture.

    Incubator features can be subject to significant changes. I will therefore present the Vector API when it has reached preview status.

    Foreign Linker API (Incubator) + Foreign-Memory Access API (Third Incubator)

    Since Java 1.1, the Java Native Interface (JNI) has enabled access to native C code from Java. Anyone who has used JNI knows that it is complex, error-prone, and slow. You have to write a lot of Java and C boilerplate code and keep it in sync, which is complicated even with tool support.

    To replace JNI with a more modern API, Project Panama was launched.

    The Foreign Linker API (JDK Enhancement Proposal 389), together with the Foreign-Memory Access API, introduced as an incubator feature in Java 14 and further refined in Java 15 and Java 16 (JDK Enhancement Proposal 393), provide this replacement.

    The Panama developers have set the following goals:

    1. The previously time-consuming and error-prone process is simplified (the target is to reduce 90% of the effort).
    2. The performance is significantly increased compared to JNI (the target is a factor of 4 to 5).

    Foreign Linker API and Foreign-Memory Access API will be merged into the “Foreign Function & Memory API” in Java 17. It will remain in incubator status until Java 18 and reach the preview stage in Java 19.

    Deprecations

    In Java 16, some functions have been marked as “deprecated”. I would like to list one of them here, the rest can be found in the release notes.

    Terminally Deprecated ThreadGroup stop, destroy, isDestroyed, setDaemon and isDaemon

    In Java 14, the JDK developers started to mark Thread and ThreadGroup methods, which have been deprecated since Java 1.2, as “deprecated for removal”.

    In Java 16, the ThreadGroup methods stop(), destroy(), isDestroyed(), setDaemon() and isDaemon() have now also been marked as “deprecated for removal”.

    The mechanism for destroying a thread group was poorly implemented in the JDK from the beginning and is to be completely removed in a future version; this also makes the concept of the daemon thread group obsolete.

    Other Changes in Java 16

    In this chapter, I list changes that most Java developers will not encounter in their daily work. But it doesn’t hurt to have read about them once :-)

    Add InvocationHandler::invokeDefault Method for Proxy’s Default Method Support

    If you work with dynamic proxies, you’ll find this enhancement interesting. The best way to explain it is with an example. Let’s take the following interface:

    public interface GreetingInterface {
      String getName();
    
      default String greet() {
        return "Hello, " + getName();
      }
    }Code language: Java (java)

    We use the following code to create a dynamic proxy for this interface (this is not a new feature – dynamic proxies have been around since Java 1.3):

    GreetingInterface greetingProxy = (GreetingInterface) Proxy.newProxyInstance(
        GreetingTest.class.getClassLoader(),
        new Class[] {GreetingInterface.class},
        (proxy, method, args) -> {
          if (method.getName().equals("getName")) {
            return "Sven";
          } else if (method.getName().equals("greet")) {
            return "Hello, " + ((GreetingInterface) proxy).getName();
          } else {
            throw new IllegalStateException(
                "Method not implemented: " + method);
          }
        });
    Code language: Java (java)

    We can then use the dynamic proxy via the GreetingInterface methods:

    System.out.println("name  = " + greetingProxy.getName());
    System.out.println("greet = " + greetingProxy.greet());Code language: Java (java)

    The output is:

    name  = Sven
    greet = Hello, SvenCode language: plaintext (plaintext)

    If you have been paying attention, you will notice that we had to duplicate some code, namely the implementation of the greet() method. It is implemented once as a default method in the GreetingInterface – and again in the InvocationHandler lambda (line 8 of the second listing).

    In Java 16, the InvocationHandler class has been extended with the static invokeDefault() method, which allows us to eliminate the duplicated code and call the interface’s default method instead (line 8):

    GreetingInterface greetingProxy = (GreetingInterface) Proxy.newProxyInstance(
        GreetingTest.class.getClassLoader(),
        new Class[] {GreetingInterface.class},
        (proxy, method, args) -> {
          if (method.getName().equals("getName")) {
            return "Sven";
          } else if (method.isDefault()) {
            return InvocationHandler.invokeDefault(proxy, method, args);
          } else {
            throw new IllegalStateException(
                "Method not implemented: " + method);
          }
        });
    Code language: Java (java)

    In line 7, I also replaced checking for the method name “greet” by if (method.isDefault()), thus extending the if branch to all default methods. This way, we don’t have to adjust the InvocationHandler should we add more interface default methods in the future.

    (This enhancement is not defined in any JDK enhancement proposal.)

    Day Period Support Added to java.time Formats

    With the DateTimeFormatter class, you can format date values of the Java Date/Time API, e.g., LocalDate, LocalTime, LocalDateTime, or Instant, Year, and YearMonth.

    You can, for example, format the current time as follows:

    DateTimeFormatter.ofPattern("EEEE, MMMM d, yyyy, h:mm a", Locale.US)
        .format(LocalDateTime.now());Code language: Java (java)

    The result is, for example:

    Wednesday, December 1, 2021, 9:14 PM

    In Java 16, the list of available format characters has been extended by the letter “B”, which stands for a prolonged form of the time of day:

    DateTimeFormatter.ofPattern("EEEE, MMMM d, yyyy, h:mm B", Locale.US)
        .format(LocalDateTime.now());Code language: Java (java)

    The generated string is now:

    Wednesday, December 1, 2021, 9:16 at night

    (No JDK enhancement proposal exists for this change.)

    Alpine Linux Port

    Alpine Linux, which is particularly popular in the cloud environment, is based on the C library “musl”. That means that code compiled against the C library “glibc” used in most Linux distributions will not run easily on Alpine Linux.

    This also includes the JVM. To run Java on Alpine, we needed a glibc portability layer until now.

    Alpine Linux is popular precisely because it is only a few megabytes in size. Together with a stripped-down JVM, you can generate a Docker image as small as 38 MB.

    The glibc portability layer would add another 26 MB on top of that.

    JDK Enhancement Proposal 386 ports the JDK to Alpine Linux (and all other Linux distributions that use “musl”). That eliminates the need for the glibc portability layer, which significantly reduces the size of Docker images.

    Windows/AArch64 Port

    Windows on the ARM64/AArch64 processor architecture has also become an important platform. Therefore, the JDK has been ported to Windows/AArch64 through JDK Enhancement Proposal 388.

    The Linux/AArch64 port, which has already existed since Java 9, was taken as a basis so that the effort remained reasonable.

    Enable C++14 Language Features

    This change is interesting for C++ developers who want to participate in the development of the JDK itself. The C++ part of the JDK was previously limited to the C++98/03 language specification – i.e., a specification that is over 20 years old.

    JDK Enhancement Proposal 347 raises support to C++14.

    Since the target audience of this article is Java developers, I won’t go into the significance of this change for the build systems used and the C++ language resources allowed in the JDK. You can find these details in the JEP linked above.

    Complete List of All Changes in Java 16

    In this article, I presented all Java 16 changes defined in JDK Enhancement Proposals, as well as some JDK class library enhancements and performance optimizations for which no JEPs exist.

    You can find a complete list of changes in the official Java 16 release notes.

    Summary

    Java 16 was a very comprehensive release:

    • “Pattern matching for instanceof” and records have outgrown the preview phase and can now be used in productive code. Especially with records, you will be able to eliminate many lines of boilerplate code.
    • The move to Git and GitHub makes participation in JDK development more attractive to the developer community.
    • “Warnings for Value-Based Classes” is the first step towards value types (Project Valhalla).
    • “Strong Encapsulation” is now the default, i.e., access to other modules via deep reflection must be explicitly allowed (with opens or --add-opens).
    • Stream.toList() and Stream.mapMulti() extend our stream toolbox.
    • Using jpackage, we can finally create installation packages again (after the removal of javapackager in Java 11).
    • Performance improvements have been made to the garbage collectors and metaspace. The introduction of Unix-domain socket channels allows interprocess communication within a host to be implemented more efficiently.
    • Other Incubator projects added were the Vector API and the Foreign Linker API.
    • Minor enhancements to the class library and two new ports round out the release.

    If you liked the article, feel free to leave me a comment or share the article via one of the share buttons at the end.

    We are approaching the next Long-Term Support (LTS) release, Java 17, with huge steps. Do you want to be informed when the following article is published? Then click here to sign up for the HappyCoders newsletter.

  • Java 15 Features (with Examples)

    Java 15 Features (with Examples)

    On September 15, 2020, Java 15 brought us “Text Blocks”, the third language enhancement from Project Amber (after “var” in Java 10 and “Switch Expressions” in Java 14) – and with ZGC and Shenandoah, two new garbage collectors optimized for very short breaks.

    But that’s not all: A total of 14 JDK Enhancement Proposals (JEPs) have made it into this release.

    As always, I have sorted the changes according to relevance for daily programming work. The features already mentioned are followed by enhancements to the JDK class library, performance changes, experimental, preview, and incubator features, deprecations and deletions, and finally, other changes that we rarely come into contact with.

    Text Blocks

    Until now, when we wanted to define a multi-line string in Java, it usually looked like this:

    String sql =
        "  SELECT id, title, text\n"
            + "    FROM Article\n"
            + "   WHERE category = \"Java\"\n"
            + "ORDER BY title";Code language: Java (java)

    Starting with Java 15, we can notate this string as a “text block”:

    String sql = """
          SELECT id, title, text
            FROM Article
           WHERE category = "Java"
        ORDER BY title""";Code language: Java (java)

    Learn how exactly to write and format text blocks, which escape sequences we don’t need anymore … and which ones we have available instead, in the main article “Java Text Blocks”.

    (Text Blocks were first introduced as a preview feature in Java 13. They were a replacement for JEP 326, “Raw String Literals”, which was not accepted by the community and subsequently withdrawn. In the second preview in Java 14, two new escape sequences were added. Due to positive feedback, Text Blocks were released as a production-ready feature in Java 15 by JDK Enhancement Proposal 378 without further changes.)

    New Garbage Collectors: ZGC + Shenandoah

    The requirements for modern applications are becoming increasingly demanding. With memory requirements ranging from gigabytes to terabytes, they may have to achieve response times in the single-digit millisecond range.

    Conventional garbage collectors (such as the allrounder G1) with stop-the-world phases of a hundred milliseconds and more are not optimally suited to such requirements.

    Aiming to eliminate stop-the-world pauses as much as possible (by doing most of the work in parallel with the running application), or at least reduce them to a few milliseconds, Oracle and RedHat have developed two new garbage collectors that have been shipped as preview features since Java 11 and 12, respectively.

    As of Java 15, they are ready for productive use and will hopefully make the Java platform attractive to even more developers.

    ZGC: A Scalable Low-Latency Garbage Collector

    The Z Garbage Collector, or ZGC, promises not to exceed pause times of 10 ms while reducing overall application throughput by no more than 15% compared to the G1GC (the reduction in throughput is the cost of low latency).

    ZGC supports heap sizes from 8 MB up to 16 TB.

    The pause times are independent of both the heap size and the number of surviving objects.

    Like G1, ZGC is based on regions, is NUMA compatible, and can return unused memory to the operating system.

    You can configure ZGC with a “soft” heap upper limit (VM option -XX:SoftMaxHeapSize): ZGC will only exceed this limit if necessary to avoid an OutOfMemoryError.

    To activate ZGC, use the following VM option:

    -XX:+UseZGC

    The detailed functionality of ZGC is beyond the scope of this article. You can read all about it in the ZGC wiki.

    (Initially, ZGC was included as a preview in Java 11. Java 13 added the Uncommit and SoftMaxHeapSize functions. Since Java 14, ZGC is also available for Windows and macOS. With JDK Enhancement Proposal 377, ZGC was released for production use in Java 15.)

    Shenandoah: A Low-Pause-Time Garbage Collector

    Just like ZGC, Shenandoah promises minimal pause times, regardless of the heap size.

    You can read about exactly how Shenandoah achieves this on the Shenandoah wiki.

    You can activate Shenandoah with the following VM option:

    -XX:+UseShenandoahGC

    Just like G1 and ZGC, Shenandoah returns unused memory to the operating system after a while.

    There is currently no support for NUMA and SoftMaxHeapSize; however, at least NUMA support is planned.

    (Shenandoah has been included in the JDK as a preview since Java 12. With JDK Enhancement Proposal 379, Shenandoah was released for production use.)

    New String and CharSequence Methods

    A few methods have been added to the String and CharSequence classes in Java 15. These extensions are not defined in JDK Enhancement Proposals.

    String.formatted()

    We could previously replace placeholders in a string as follows, for example:

    String message =
        String.format(
            "User %,d with username %s logged in at %s.",
            userId, username, ZonedDateTime.now());Code language: Java (java)

    Starting from Java 15, we can use an alternative syntax:

    String message =
        "User %,d with username %s logged in at %s."
            .formatted(userId, username, ZonedDateTime.now());Code language: Java (java)

    It makes no difference which method you use. Both methods will eventually call the following code:

    String message =
        new Formatter()
            .format(
                "User %,d with username %s logged in at %s.",
                userId, username, ZonedDateTime.now())
            .toString();Code language: Java (java)

    So the choice is ultimately a matter of taste. I quickly made friends with the new spelling.

    String.stripIndent()

    Suppose we have a multi-line string where each line is intended and has some trailing spaces, such as the following. We print each line, bounded by two vertical bars.

    String html = """
          <html>    s
            <body>      s
              <h1>Hello!</h1>
            </body>    s
          </html>         s
        """;
    
    html.lines()
        .map(line -> "|" + line + "|")
        .forEachOrdered(System.out::println);Code language: Java (java)

    As you learned in the first chapter, the alignment of a text block is based on the closing quotation marks. The output, therefore, looks like this:

    |  <html>     |
    |    <body>       |
    |      <h1>Hello!</h1>|
    |    </body>     |
    |  </html>          |Code language: plaintext (plaintext)

    Using the stripIndent() method, we can remove the indentation and trailing spaces:

    html.stripIndent()
        .lines()
        .map(line -> "|" + line + "|")
        .forEachOrdered(System.out::println);Code language: Java (java)

    The output is now:

    |<html>|
    |  <body>|
    |    <h1>Hello!</h1>|
    |  </body>|
    |</html>|Code language: plaintext (plaintext)

    String.translateEscapes()

    Occasionally we get to deal with a string that contains escaped escape sequences, such as the following:

    String s = "foo\\nbar\\tbuzz\\\\";
    
    System.out.println(s);Code language: Java (java)

    The output looks like this:

    foo\nbar\tbuzz\\Code language: plaintext (plaintext)

    Sometimes, however, we want to display the evaluated escape sequences: a newline instead of “\n”, a tab instead of “\t”, and a backslash instead of “\”.

    Until now, we had to rely on third-party libraries such as Apache Commons Text for this:

    System.out.println(StringEscapeUtils.unescapeJava(s));Code language: Java (java)

    Starting from Java 15, we can avoid the additional dependency and use the JDK method String.translateEscapes():

    System.out.println(s.translateEscapes());Code language: Java (java)

    The output now reads:

    foo
    bar     buzzCode language: plaintext (plaintext)

    CharSequence.isEmpty()

    Also new is the default method isEmpty() in the CharSequence interface. The method simply checks whether the character sequence’s length is 0:

    default boolean isEmpty() {
      return this.length() == 0;
    }Code language: Java (java)

    This method is thus automatically available in the Segment, StringBuffer, and StringBuilder classes.

    String and CharBuffer, which also implement CharSequence, each have their optimized implementation of isEmpty(). With String, for example, the call to length() is unnecessarily expensive because, since Java 9 (JEP 254 “Compact Strings”), the string’s encoding must also be taken into account when calculating its length.

    Helpful NullPointerExceptions

    Helpful NullPointerExceptions, introduced in Java 14, are enabled by default in Java 15 and later.

    “Helpful NullPointerExceptions” no longer only show us in which line of code a NullPointerException occurred, but also which variable (or return value) in the corresponding line is null and which method could therefore not be called.

    You can find an example in the article linked above.

    Performance Changes

    This chapter was called “Performance Improvements” in the previous parts of the series. However, the change described in the first section of this chapter may result in noticeable performance degradation.

    Therefore, I decided to include the change in this chapter rather than under “Deprecations and Deletions” – and rename the chapter accordingly.

    Disable and Deprecate Biased Locking

    The best way to explain this change is with an example.

    The following JMH benchmark measures how long it takes to populate a vector with ten million numbers (you can find the code in this GitHub repository):

    @Benchmark
    @BenchmarkMode(Mode.SampleTime)
    @Warmup(iterations = 2, time = 1, timeUnit = TimeUnit.SECONDS)
    @Measurement(iterations = 2, time = 1, timeUnit = TimeUnit.SECONDS)
    public void test(Blackhole blackhole) {
      Vector<Integer> vector = new Vector<>(10_000_000);
      for (int i = 0; i < 10_000_000; i++) {
        vector.add(i);
      }
      blackhole.consume(vector);
    }Code language: Java (java)

    I recommend starting the test with the VM option -XX:+UnlockExperimentalVMOptions -XX:+UseEpsilonGC to use the Epsilon garbage collector, which has been part of the JDK since Java 11 as an experimental garbage collector.

    Epsilon GC does not perform garbage collection and is very well suited to avoid GC interference in tests.

    I ran the test on my Dell XPS 15 with an Intel Core i7-10750H – first with Java 14. You can find the complete test result in the vector_results_java14.txt file. The relevant two lines of the result are the following:

    Benchmark                                         Mode  Cnt  Score   Error  Units
    BiasedLockingVectorBenchmark.test               sample  148  0,071 ± 0,001   s/opCode language: plaintext (plaintext)

    In Java 14, it takes an average of 71 milliseconds to fill a vector with ten million elements.

    Next, I ran the test with Java 15. The test result is in the file vector_results_java15.txt. Here are the relevant lines of the output:

    Benchmark                                         Mode  Cnt  Score   Error  Units
    BiasedLockingVectorBenchmark.test               sample   55  0,202 ± 0,004   s/opCode language: plaintext (plaintext)

    On Java 15, the same operation takes 202 milliseconds, almost three times as long!

    How does this happen?

    As the title of the section already revealed, the reason is the deactivation of “Biased Locking”.

    What Is Biased Locking?

    Biased locking is an optimization of thread synchronization aimed at reducing synchronization overhead when the same monitor is repeatedly acquired by the same thread (i.e., when the same thread repeatedly calls code synchronized on the same object).

    In the example above, this means that the first time the add() method is called, the vector monitor is biased to the thread in which the test method is executed. This bias speeds up the monitor’s acquisition in the following 9,999,999 add() method calls.

    The exact way it works is complicated, which brings us to the following question:

    Why Was Biased Locking Disabled?

    Biased locking mainly benefits legacy applications that use data structures such as Vector, Hashtable, or StringBuffer, where each access is synchronized.

    Modern applications usually use non-synchronized data structures such as ArrayList, HashMap, or StringBuilder – and the data structures optimized for multithreading in the java.util.concurrent package.

    Because the code for biased locking is highly complex and deeply intertwined with the JVM code, it requires a great deal of maintenance and makes changes within the JVM’s synchronization system costly and error-prone.

    Therefore, the JDK developers decided in JDK Enhancement Proposal 374 to disable biased locking by default, mark it as “deprecated” in Java 15 and remove it entirely in one of the following releases.

    What Does This Mean for Us Java Developers?

    If not already done, now is the time to replace Vector and Hashtable with ArrayList and HashMap (or other suitable data structures).

    For the sake of completeness, here is a test for ArrayList (you can find the complete result in the file arraylist_results.txt):

    Benchmark                               Mode  Cnt  Score   Error  Units
    ArrayListBenchmark.test               sample  160  0,064 ± 0,001   s/opCode language: plaintext (plaintext)

    ArrayList is thus about 10% faster than Vector with biased locking and more than three times faster than Vector without biased locking.

    Specialized Implementations of TreeMap Methods

    In TreeMap, specialized methods putIfAbsent(), computeIfAbsent(), computeIfPresent(), compute(), and merge() were implemented.

    These methods were only specified as default methods in the Map interface since Java 8.

    The TreeMap-specific implementations are optimized for the underlying red-black tree; accordingly, they are more performant than the interface’s default methods.

    (No JDK enhancement proposal exists for this TreeMap enhancement.)

    Experimental, Preview, and Incubator Features

    Java 15 has a new preview feature called “Sealed Classes”. Three other features have been promoted to the second preview or incubator round.

    I will not present the new features in all details here but refer to the respective Java release in which the features reach production maturity.

    Sealed Classes (Preview)

    There are several reasons to restrict the inheritability of a class (see the main article on Sealed Classes for more information)

    Until now, however, there were only limited possibilities to restrict the inheritability of a class:

    1. The class can be declared as final so that one can implement no subclasses at all.
    2. The class can be declared package-private, allowing only subclasses within the package. However, this makes the superclass invisible outside the package, even if the derived classes are made public. That is undesirable in most cases.

    “Sealed Classes” introduced as a preview feature by JDK Enhancement Proposal 360 offer developers of a Java class or interface the possibility to restrict which other classes and interfaces can extend or implement them.

    A sealed class structure is defined as follows:

    • The sealed keyword marks a sealed class.
    • After the keyword permits, you list the allowed subclasses.
    • A subclass of a sealed class must be either sealed, final, or non-sealed. In the first case, you must again define the allowed subclasses with permits. The last case means that the subclass is again open to inheritance – just like any regular class.

    Here is an example:

    public sealed class Shape permits Circle, Square, Rectangle, WeirdShape { ... }
    
    public final class Circle extends Shape { ... }
    public final class Square extends Shape { ... }
    
    public sealed class Rectangle extends Shape 
        permits TransparentRectangle, FilledRectangle { ... }
    public final class TransparentRectangle extends Rectangle { ... }
    public final class FilledRectangle extends Rectangle { ... }
    
    public non-sealed class WeirdShape extends Shape { ... }Code language: Java (java)

    The following class diagram shows the class hierarchy implemented in the sample code. The orange rectangles demonstrate that the hierarchy is extensible only under WeirdShape.

    Class hierarchy with "sealed classes"
    Class hierarchy with “sealed classes”

    Combined with “Pattern Matching for switch”, which will be introduced as a preview feature in Java 17, sealed classes will also allow exhaustion analysis (i.e., the compiler can check whether a switch expression covers all possible classes). Read more on this in the main article about Sealed Classes.

    To use sealed classes in Java 15, you need to enable them either in your IDE (in IntelliJ via File→Project Structure→Project Settings→Project→Project language level) or with the --enable-preview option when calling the javac and java commands.

    Pattern Matching for instanceof (Second Preview)

    “Pattern Matching for instanceof” was introduced as a preview in Java 14.

    JDK Enhancement Proposal 375 delivers the feature without changes as a second preview to collect further feedback from the Java community.

    “Pattern Matching for instanceof” will be ready for production in the upcoming release, Java 16.

    Records (Second Preview)

    Records were also presented as a preview feature in Java 14.

    A quick recap: with a record, we define a class with only final fields, as in the following example:

    record Point(int x, int y) {}Code language: Java (java)

    We can instantiate a record and read its fields as follows:

    Point p = new Point(3, 5);
    int x = p.x();
    int y = p.y();Code language: Java (java)

    Some fine-tuning has been done for Java 15 by JDK Enhancement Proposal 384:

    1. You can no longer change a record’s fields using reflection.
    2. You can combine records with sealed interfaces.
    3. You can define “local records” within methods.

    Let’s go through the changes in detail.

    Changing Fields of a Record via Reflection

    In Java 14, it was possible to change the final fields of a record via reflection. The following example shows how you could change the x value of the Point record p shown above:

    Field X = Point.class.getDeclaredField("x");
    X.setAccessible(true);
    X.set(p, newX);Code language: Java (java)

    In Java 15, this attempt results in an IllegalAccessException.

    Records and Sealed Interfaces

    Records can implement sealed interfaces, which were also added as a preview feature in Java 15. Accordingly, sealed interfaces may also list records in their “permits” list.

    Local Records

    Records may now also be defined within methods and are then only visible within this method. These local records are helpful when you want to store intermediate results with multiple related variables.

    You can find an example of this in the main article on records.

    (Records will be released as a final version in the next release, Java 16. You can find an introduction in all details in the article linked above.)

    Foreign-Memory Access API (Second Incubator)

    The Foreign-Memory Access API, also introduced in Java 14 as an incubator, allows Java applications to efficiently and securely access memory outside the Java heap.

    Several changes have been made to the API as part of JDK Enhancement Proposal 383.

    This interface will remain in the incubator stage until Java 18 and will make its first preview appearance in Java 19 as the “Foreign Function & Memory API”.

    Deprecations and Deletions

    In this section, you will find features that have been marked as “deprecated” or wholly removed from the JDK in Java 15.

    Remove the Nashorn JavaScript Engine

    The JavaScript engine “Nashorn”, introduced in JDK 8 and marked as “deprecated” in Java 11, has been completely removed from the JDK by JDK Enhancement Proposal 372 in Java 15.

    As a reason, the JDK developers cite the rapid development speed of ECMAScript (the standard behind JavaScript), which makes the further development of Nashorn an unmanageable challenge.

    Remove the Solaris and SPARC Ports

    Ports for the outdated Solaris operating system and SPARC processor architecture have been marked as “deprecated” in Java 14.

    JDK Enhancement Proposal 381 finally removes the Solaris/SPARC, Solaris/x64, and Linux/SPARC ports from the JDK in Java 15 to free up development resources for other projects.

    Deprecate RMI Activation for Removal

    Java Remote Method Invocation (Java RMI) is a technology that allows objects of one JVM to invoke methods on objects of another JVM (“remote objects”).

    A practically unused and complex-to-maintain feature of RMI is RMI Activation.

    RMI Activation allows an object that has been destroyed on the target JVM to be automatically re-instantiated during an RMI call. That is to avoid complex error handling in the RMI client.

    However, it turns out that the actual use of RMI Activation is vanishingly small. The JDK developers have searched open source projects, Stack Overflow, and other forums for RMI Activation and found almost no mention.

    The ongoing maintenance costs caused by RMI Activation are therefore disproportionate to the benefits. RMI Activation is consequently marked as “deprecated for removal” by JEP 385. In the upcoming release, Java 17, it will be removed entirely.

    Other Changes in Java 15

    In this chapter, I have listed changes that you don’t necessarily need to know as a Java developer. But it doesn’t hurt to skim this section once :-)

    Hidden Classes

    Application frameworks such as Java EE and Spring generate numerous classes dynamically at runtime. In particular, they create proxies for application classes to add features such as access control, caching, transaction management, and JPA lazy loading.

    The existing ClassLoader.defineClass() and Lookup.defineClass() APIs generate bytecode indistinguishable from the bytecode that results from compiling static application classes.

    Thus, the dynamically generated classes are discoverable by all other classes in the class loader hierarchy and exist as long as the class loader in which they were generated.

    That is typically undesirable. On the one hand, those classes are usually considered framework-specific implementation details that should remain hidden from the rest of the application. On the other hand, they are often only needed for a particular time, unnecessarily increasing the application’s memory requirements after they have been used.

    In Java 15, JDK Enhancement Proposal 371 has introduced “hidden classes” into the JDK.

    Hidden classes are defined via the MethodHandles.Lookup.defineHiddenClass() method and cannot be used by other classes – neither directly nor via reflection.

    Since most Java developers will not use the feature directly, I will not go into more detail here.

    Edwards-Curve Digital Signature Algorithm (EdDSA)

    EdDSA is a modern signature method that is faster than previous signature methods, such as DSA and ECDSA while maintaining the same security strength. EdDSA is supported by many crypto libraries such as OpenSSL and BoringSSL. Many users already use EdDSA certificates.

    JDK Enhancement Proposal 339 introduces the EdDSA signature algorithm into Java 15.

    The following example shows how you can create a digital signature for the message “Happy Coding!”:

    String message = "Happy Coding!";
    
    KeyPairGenerator kpg = KeyPairGenerator.getInstance("Ed25519");
    KeyPair kp = kpg.generateKeyPair();
    
    Signature sig = Signature.getInstance("Ed25519");
    sig.initSign(kp.getPrivate());
    sig.update(message.getBytes(StandardCharsets.UTF_8));
    byte[] signature = sig.sign();
    
    System.out.println("signature = " + Base64.getEncoder().encodeToString(signature));Code language: Java (java)

    If you run the program on an older release than Java 15, you will get a NoSuchAlgorithmException with the message “Ed25519 KeyPairGenerator not available”.

    Reimplement the Legacy DatagramSocket API

    The “DatagramSocket API” implemented in java.net.DatagramSocket and java.net.MulticastSocket has existed since Java 1.0 and is a mixture of legacy Java and C code that is difficult to maintain and extend.

    In particular, IPv6 support is not cleanly implemented, and some concurrency bugs cannot be fixed without significant refactoring. Also, the existing code does not adapt well to Virtual Threads (lightweight threads managed by the JVM), currently being developed in Project Loom.

    JDK Enhancement Proposal 373 replaces the API with a simpler, more modern implementation that is easier to maintain and adaptable to virtual threads.

    The “Socket API”, which also originates from Java 1.0, was already rewritten in Java 13.

    Make Compressed Oops and Compressed Class Pointers Independent

    Compressed Class Pointers and Compressed OOPs have been coupled until now: If Compressed OOPs were deactivated, Compressed Class Pointers were also automatically deactivated. As there was no reason for this restriction, it was removed in Java 15.

    (There is no JDK Enhancement Proposal for this change, it is described in the bug tracker under JDK-8241825).

    Compressed Heap Dumps

    To analyze the objects located on the heap of a running application, you can create a heap dump as follows:

    jcmd <Prozess-ID> GC.heap_dump <Dateiname>Code language: plaintext (plaintext)

    Depending on the type of application, the generated file can be several GB in size.

    Since Java 15, you have the option to save the file gzip-compressed. To do so, you must specify the -gz parameter with a value from 1 (fastest compression) to 9 (best compression). Here is an example:

    jcmd 10664 GC.heap_dump /tmp/heap.dmp -gz=5Code language: plaintext (plaintext)

    Based on a few tests, I would usually recommend compression level 1. This achieves a file reduction to about 30% of its original size. Compression level 9 reaches 26% but takes more than 20 times as long.

    (There is no JDK Enhancement Proposal for this change, it is described in the bug tracker under JDK-8237354).

    Support for Unicode 13.0

    An upgrade of the Unicode support accompanies us in almost every Java release:

    • Java 11: Unicode 10
    • Java 12: Unicode 11
    • Java 13: Unicode 12.1

    In Java 15, support is increased to Unicode 13.0. That is relevant, among other things, for the String and Character classes, which must be able to handle the new characters, code blocks, and scripts.

    You can find an example in the article about Java 11.

    (There is no JDK enhancement proposal for Unicode 13.0 support; the change is described in the bug tracker under JDK-8239383).

    Complete List of All Changes in Java 15

    This article has presented all the features of Java 15 defined in JDK Enhancement Proposals and some performance improvements and deletions not assigned to any JEP.

    For a complete list of changes, see the official Java 15 release notes.

    Summary

    Java 15 was another impressive release:

    • Using text blocks, we can finally represent multi-line strings in a readable way.
    • We can use the new garbage collectors ZGC and Shenandoah to reduce the pause times of our application to less than 10 ms.
    • String has been extended by the methods formatted(), stripIndent(), and translateEscapes().
    • Helpful NullPointerExceptions have been enabled by default in Java 15.
    • By disabling biased locking, legacy applications that use data structures such as Vector or Hashtable can become noticeably slower.
    • Die TreeMap methods putIfAbsent(), computeIfAbsent(), computeIfPresent(), compute(), and merge() have been optimized.
    • Another feature from Project Amber, “Sealed Classes,” was included as a preview; and there were second previews for Records and “Pattern Matching for instanceof.”
    • The JavaScript engine “Nashorn” was removed, among other things.

    If you liked the article, feel free to leave me a comment or share the article using one of the share buttons at the end.

    If you want to be informed when the next part of the series is published, click here to sign up for the free HappyCoders newsletter.

  • Java 14 Features (with Examples)

    Java 14 Features (with Examples)

    After the previous release was relatively small, Java 14 was released with an impressive 16 implemented JDK Enhancement Proposals (JEPs) on March 17, 2020.

    Java 14 introduces a significant change to the language: Switch Expressions.

    Another valuable feature, “Helpful NullPointerExceptions”, will save us a lot of troubleshooting work in the future.

    Two exciting previews, “Records” and “Pattern Matching for instanceof”, are also included.

    As always, there are also some performance improvements; and quite a few features have been marked as “deprecated” or removed.

    Switch Expressions (Standard)

    Switch Expressions is the second language enhancement from Project Amber to reach production status (the first was “var” in Java 10). Switch expressions allow a much more concise notation than before using arrow notation:

    switch (day) {
      case MONDAY, FRIDAY, SUNDAY -> System.out.println(6);
      case TUESDAY                -> System.out.println(7);
      case THURSDAY, SATURDAY     -> System.out.println(8);
      case WEDNESDAY              -> System.out.println(9);
    }
    Code language: Java (java)

    As an expression, switch can also return a value:

    int numLetters = switch (day) {
      case MONDAY, FRIDAY, SUNDAY -> 6;
      case TUESDAY                -> 7;
      case THURSDAY, SATURDAY     -> 8;
      case WEDNESDAY              -> 9;
    };
    Code language: Java (java)

    To find out what other possibilities switch expressions offer, e.g. how to return a value from code blocks with yield, when default cases are necessary and when they are not, and how the compiler can perform a completeness analysis on enums, see the main article on switch expressions.

    (Switch Expressions were first introduced as a preview feature in Java 12. In the second preview in Java 13, the keyword break, used initially to return values, was replaced by yield. Due to positive feedback, Switch Expressions were released as a final feature in Java 14 by JDK Enhancement Proposal 361 without further changes.)

    Helpful NullPointerExceptions

    We all know the following problem: Our code throws a NullPointerException:

    Exception in thread "main" java.lang.NullPointerException
        at eu.happycoders.BusinessLogic.calculate(BusinessLogic.java:80)Code language: plaintext (plaintext)

    And in the code, we find something like this:

    long value = context.getService().getContainer().getMap().getValue();Code language: Java (java)

    What is null now?

    • context?
    • context.getService()?
    • Service.getContainer()?
    • Container.getMap()?
    • Map.getValue()? (in case this method returns a Long object)

    To fix the error, we have the following options:

    • We could analyze the source code.
    • We could debug the application (very costly if the error is difficult to reproduce or only occurs in production).
    • We could split the code into multiple lines and rerun it (we would have to redeploy the application and wait for the error to occur again).

    After upgrading to Java 14, you won’t have to ask yourself this question anymore because then the error message will look like this, for example:

    Exception in thread "main" java.lang.NullPointerException: 
    Cannot invoke "Map.getValue()" because the return value of "Container.getMap()" is null
        at eu.happycoders.BusinessLogic.calculate(BusinessLogic.java:80)Code language: plaintext (plaintext)

    We can now see exactly where the exception occurred: Container.getMap() returned null, so Map.getValue() could not be called.

    Something similar can happen when accessing arrays, as in the following line of code:

    this.world[x][y][z] = value;Code language: Java (java)

    If a NullPointerException occurs in this line, it was previously not possible to tell whether world, world[x], or world[x][y] was null. With Java 14, this is clear from the error message:

    Exception in thread "main" java.lang.NullPointerException: 
    Cannot store to int array because "this.world[x][y]" is null
        at eu.happycoders.BusinessLogic.calculate(BusinessLogic.java:107)Code language: plaintext (plaintext)

    In Java 14, “Helpful NullPointerExceptions” are disabled by default and must be enabled with -XX:+ShowCodeDetailsInExceptionMessages. In Java 15, this feature will be enabled by default.

    (Helpful NullPointerExceptions are specified in JDK Enhancement Proposal 358.)

    Experimental, Preview, and Incubator Features

    The following features are not yet production-ready. They are shipped at a more or less advanced stage of development to be able to improve them based on feedback from the Java community.

    The first three features (Records, Pattern Matching for instanceof, and Text Blocks) are being developed (like Switch Expressions) in Project Amber, whose goal is to make Java syntax more modern and concise.

    I will not present the features in all details but only briefly outline each and refer to the Java version in which the features reach production readiness. I will then cover them in detail in the corresponding article of this series.

    Records (Preview)

    The first new preview feature in Java 14 is Records, defined in JDK Enhancement Proposal 359.

    A record offers a compact syntax for a class with only final fields. These are set in the constructor and can be read via access methods.

    Here is a simple example:

    record Point(int x, int y) {}Code language: Java (java)

    This one-liner creates a class Point with

    • final instance fields x and y,
    • a constructor setting both fields,
    • and access methods x() and y() to read the fields.

    Point can be used as follows:

    Point p = new Point(3, 5);
    int x = p.x();
    int y = p.y();Code language: Java (java)

    The equals(), hashCode() and toString() methods are generated automatically for records.

    Records can have static fields and methods but no instance fields. They can implement interfaces but cannot inherit from other classes. They are implicitly final, so you can’t inherit from them either.

    Records will reach production readiness in Java 16. For a detailed presentation, see the main article on Java records.

    Pattern Matching for instanceof (Preview)

    The second preview in Java 14 is “Pattern Matching for instanceof”. This feature, defined in JDK Enhancement Proposal 305, eliminates the annoying need to cast to the target type after an instanceof check.

    The easiest way to illustrate this is with an example.

    The following code gets the Object obj. If it is a String and longer than five characters, it should be converted to uppercase and printed. If it is an Integer, it should be squared and printed.

    To do this, we need to perform a cast in lines 4 and 9:

    Object obj = getObject();
    
    if (obj instanceof String) {
      String s = (String) obj;
      if (s.length() > 5) {
        System.out.println(s.toUpperCase());
      }
    } else if (obj instanceof Integer) {
      Integer i = (Integer) obj;
      System.out.println(i * i);
    }Code language: Java (java)

    Many of us have become so accustomed to this style that we no longer even question it. But there is a better way!

    Starting with Java 14, we can omit the casts and write the code as follows instead:

    if (obj instanceof String s) {
      if (s.length() > 5) {
        System.out.println(s.toUpperCase());
      }
    } else if (obj instanceof Integer i) {
      System.out.println(i * i);
    }Code language: Java (java)

    After an instanceof statement, we can now specify a variable name. If obj is of the specified type, it is bound to the new variable name; this new variable is then of the specified target type and visible in the “then block”.

    We can even go one step further and combine the if statements of lines 1 and 2:

    if (obj instanceof String s && s.length() > 5) {
      System.out.println(s.toUpperCase());
    } else if (obj instanceof Integer i) {
      System.out.println(i * i);
    }Code language: Java (java)

    Thus, we have reduced nine lines of code to five while significantly increasing readability.

    Just like Records, “Pattern Matching for instanceof” will be production-ready in Java 16.

    Text Blocks (Second Preview)

    Text Blocks were introduced in Java 13 as a preview. They allow the notation of multiline strings as in the following example:

    String sql = """
        SELECT id, firstName, lastName FROM Employee
        WHERE departmentId = "IT"
        ORDER BY lastName, firstName""";Code language: Java (java)

    JDK Enhancement Proposal 368 introduces two new escape sequences in Java 14:

    • Backslash at the end of the line to suppress a line break.
    • \s for spaces to prevent them from being removed from the end of the line.

    You can find examples of these escape sequences in the main article on text blocks.

    Text blocks will reach production status in the next release, Java 15. The article linked above describes them in full detail.

    ZGC on macOS + Windows (Experimental)

    ZGC, a garbage collector developed by Oracle to achieve pause times of 10 ms or less, was first introduced in Java 11 as an experimental feature for Linux.

    The JDK Enhancement Proposals JEP 364 and JEP 365 now make the Z Garbage Collector available on macOS and Windows (still as an experimental feature).

    You can enable ZGC with the JVM flags -XX:+UnlockExperimentalVMOptions -XX:+UseZGC.

    ZGC will be ready for production in Java 15. I will present it in detail in the corresponding article.

    Packaging Tool (Incubator)

    The jpackage tool is being developed based on JDK Enhancement Proposal 343. You can use this tool to create a platform-specific installer for a Java application, which in turn installs the application and the JRE required for it.

    Platform-specific means that the installer feels familiar to users of a particular platform. On Windows, for example, this is an .msi or .exe file that is launched by double-clicking it. For macOS, a .pkg or .dmg file. And for Linux, a .deb or .rpm file.

    The functionality is based on the javapackager tool, which was included since JDK 8, but removed in Java 11 along with JavaFX.

    jpackage will be ready for production in Java 16. In the corresponding article of this series, I will show how to use the tool.

    Foreign-Memory Access API (Incubator)

    JDK Enhancement Proposal 370 introduces an API that allows Java programs to efficiently and securely access memory outside the Java heap.

    The Foreign-Memory Access API is part of Project Panama, which aims to create a faster and easier-to-use replacement for the Java Native Interface (JNI).

    This interface will remain in the incubator stage until Java 18 and will first appear as a preview version in Java 19 as “Foreign Function & Memory API”.

    Performance Improvements

    Java 14 has some performance improvements in memory access and garbage collectors.

    Non-Volatile Mapped Byte Buffers

    With a MappedByteBuffer, you can “map” a file into a memory region to read and write it via regular memory access operations. In the “Memory-mapped files” section of the article “Java Files” series, you can read more about this.

    Changed data must be transferred to the storage medium regularly. For NVMs, there are more efficient procedures with less overhead than with conventional storage media.

    Starting with Java 14, you can use these efficient mechanisms. For this purpose, you have to specify that the file is located on an NVM medium when creating the MappedByteBuffer. To do this, select one of the new modes ExtendedMapMode.READ_ONLY_SYNC or ExtendedMapMode.READ_WRITE_SYNC when calling FileChannel.map(), as in the following example:

    try (FileChannel channel =
        FileChannel.open(
            Path.of("test-file.bin"),
            StandardOpenOption.CREATE,
            StandardOpenOption.WRITE,
            StandardOpenOption.READ)) {
      MappedByteBuffer buffer = channel.map(ExtendedMapMode.READ_WRITE_SYNC, 0, 256);
      // read from / write to the buffer
    }Code language: Java (java)

    Non-Volatile Mapped Byte Buffers are only available on Linux since only Linux has the required special operating system calls.

    (Non-Volatile Byte Buffers are specified in JDK Enhancement Proposal 352.)

    NUMA-Aware Memory Allocation for G1

    The physical distance between CPU core and memory module plays an increasingly important role on modern machines with multiple CPUs and multiple cores per CPU. The further away a memory module is from the CPU core, the higher the latency for memory access.

    As of Java 14, through JDK Enhancement Proposal 345, the G1 Garbage Collector can take advantage of such architectures to increase overall performance.

    Threads are assigned to nearby NUMA nodes. Objects created by a thread are always created on the same NUMA node. And as long as they are in Young Generation, they remain on that node by being evacuated only to Survivor Regions on the same NUMA node.

    NUMA-Aware Memory Allocation is only available for Linux, and you must explicitly enable it via the VM option +XX:+UseNUMA.

    Parallel GC Improvements

    In the parallel garbage collector, management for parallel processing of tasks has been optimized, potentially leading to significant performance improvements.

    Deprecations and Deletions

    The following features have been marked as “deprecated” or “for removal” or permanently removed from the JDK in Java 14.

    Thread Suspend/Resume Are Deprecated for Removal

    Besides Thread.stop(), the following methods have also been marked as “deprecated” since Java 1.2:

    • Thread.suspend()
    • Thread.resume()
    • ThreadGroup.suspend()
    • ThreadGroup.resume()
    • ThreadGroup.allowThreadSuspension()

    The reason for this is that thread suspension is highly prone to deadlocks:

    If Thread.suspend() is called within a synchronized block, the corresponding monitor remains locked at least until Thread.resume() is called. However, if this happens in another thread, within a synchronized block on the same monitor, this second thread will block when trying to enter the synchronized block.

    In Java 14, the above methods were marked as “for removal”.

    The method Thread.stop(), which is also marked as “deprecated” – and in my eyes much more dangerous – has not been marked as “for removal” yet and will probably be with us for a while.

    (No JDK enhancement proposal exists for this change.)

    Deprecate the Solaris and SPARC Ports

    The Solaris operating system and the SPARC processor architecture are no longer state-of-the-art. To use development resources elsewhere, Oracle has proposed in JDK Enhancement Proposal 362 to mark the Solaris/SPARC, Solaris/x64, and Linux/SPARC ports as “deprecated” in Java 14 and to remove them entirely in one of the subsequent releases.

    Remove the Concurrent Mark Sweep (CMS) Garbage Collector

    The Concurrent Mark Sweep (CMS) garbage collector was marked as “deprecated” in Java 9 with JEP 291. Development resources should be reallocated in favor of more modern garbage collectors such as G1GC and ZGC.

    As a replacement for CMS, the allrounder G1, available since Java 6 and promoted to the standard garbage collector in Java 9, is recommended.

    JEP 363 finally removes CMS from the JDK in Java 14.

    Deprecate the ParallelScavenge + SerialOld GC Combination

    There is an unusual and rarely used combination of GC algorithms: the pairing of parallel GC algorithm for the young generation (“ParallelScavenge”) and serial algorithm for the old generation (“SerialOld”).

    You can activate this combination by enabling the ParallelGC and disabling the ParallelOldGC at the same time, which in turn automatically enables the SerialOldGC:

    -XX:+UseParallelGC -XX:-UseParallelOldGC

    This setting can reduce the total memory consumption of up to 3% of the Java heap.

    However, the upside does not outweigh the high maintenance effort. Therefore, it was decided to use the development resources elsewhere and mark this GC combination as “deprecated” in Java 14 (JEP 366).

    As a substitute, parallel GC is recommended for both young and old generations, which is activated as follows:

    -XX:+UseParallelGC

    The ParallelScavenge + SerialOld combination will no longer be usable in Java 15.

    Remove the Pack200 Tools and API

    The compression method for .class and .jar files, Pack200, introduced in Java 5, has been marked as “deprecated” in Java 11.

    In times of 100-Mbps DSL lines and 18-TB hard disks, the effort required to maintain such unique compression methods – just to squeeze out a few extra bytes compared to standard methods – is out of all proportion to the benefits.

    With JDK Enhancement Proposal 367, Pack200 and the associated tools were finally removed from the JDK.

    Other Changes in Java 14

    In this category, I have usually listed changes that Java developers did not necessarily need to know about. In Java 14, however, the “other changes” are pretty interesting.

    JFR Event Streaming

    In the article on Java 11, I introduced Java Flight Recorder (JFR) and JDK Mission Control (JMC). Flight Recorder collects valuable data about the JVM during the execution of an application and stores it in a file. You can then visualize the stored data with Mission Control:

    JDK Mission Control
    JDK Mission Control

    As of Java 14, JDK Enhancement Proposal 349 enables continuous monitoring of a Java application by allowing the data collected by Flight Recorder to be read from within the running application (instead of storing it in a file and analyzing it after the fact).

    The following sample source code shows how this works:

    int[] array = createRandomArray(1_000_000_000);
    
    try (var rs = new RecordingStream()) {
      rs.enable("jdk.CPULoad").withPeriod(Duration.ofSeconds(1));
    
      rs.onEvent(
          "jdk.CPULoad",
          event -> {
            float jvmUser = event.getFloat("jvmUser");
            float jvmSystem = event.getFloat("jvmSystem");
            float machineTotal = event.getFloat("machineTotal");
    
            System.out.printf(
                Locale.US,
                "JVM User: %5.1f %%, JVM System: %5.1f %%, Machine Total: %5.1f %%%n",
                jvmUser * 100,
                jvmSystem * 100,
                machineTotal * 100);
          });
    
      rs.startAsync();
    
      Arrays.parallelSort(array);
    }Code language: Java (java)

    First, you create a stream of JFR events with new RecordingStream().

    You activate a concrete event (in the example “jdk.CPULoad” with RecordingStream.enable().

    Using RecordingStream.onEvent(), we define how to react to the event. The event itself consists of several data fields, which we can read with getFloat() – or other getters, depending on the data type.

    With RecordingStream.startAsync(), we start the recording in a separate thread. In the main thread, we sort an array with a billion elements, which takes about 15 seconds on my laptop.

    Meanwhile, you can see well from the flight recorder data that Arrays.parallelSort() almost completely utilizes the CPU:

    JVM User:  45.1 %, JVM System:  15.0 %, Machine Total:  60.1 %
    JVM User:  86.5 %, JVM System:   0.5 %, Machine Total:  95.2 %
    JVM User:  91.8 %, JVM System:   0.3 %, Machine Total: 100.0 %
    JVM User:  93.0 %, JVM System:   0.2 %, Machine Total:  96.9 %
    ...Code language: plaintext (plaintext)

    Accounting Currency Format Support

    In some countries, such as the USA, negative numbers in accounting are not represented by a minus sign but by parenthesis.

    In Java 14, the so-called language tag extension “u-cf-account” is added, which allows specifying in a Locale object the additional information whether we use it in the context of accounting.

    You can use this extension as in the following example:

    // Example *without* language tag extension
    Locale locale = Locale.forLanguageTag("en-US");
    NumberFormat cf = NumberFormat.getCurrencyInstance(locale);
    System.out.println("Normal:     " + cf.format(-14.95));
    
    // Example *with* language tag extension
    Locale localeAccounting = Locale.forLanguageTag("en-US-u-cf-account");
    NumberFormat cfAccounting = NumberFormat.getCurrencyInstance(localeAccounting);
    System.out.println("Accounting: " + cfAccounting.format(-14.95));Code language: Java (java)

    As of Java 14, the program prints the following:

    Normal:     -$14.95
    Accounting: ($14.95)Code language: plaintext (plaintext)

    If you run the program under Java 13 or older, the tag extension is ignored, and the program formats both lines the same:

    Normal:     -$14.95
    Accounting: -$14.95Code language: plaintext (plaintext)

    You can find more Unicode language tag extensions in the article about Java 10.

    Complete List of All Changes in Java 14

    This article presented all features of Java 14 defined in JDK Enhancement Proposals and some performance improvements and deletions not associated with any JEP.

    For a complete list of changes, see the official Java 14 release notes.

    Summary

    Java 14 is an impressive release. Switch Expressions are ready for production. And thanks to Helpful NullPointerExceptions, we will save a lot of debugging work in the future.

    Two additional features from Project Amber have been added to the JDK as previews: Records and “Pattern Matching for instanceof”. And Text Blocks have been extended by the escape sequences “Backslash at the end of the line” and “\s”.

    The (still experimental) low-latency garbage collector ZGC is now also available on Windows and macOS. And those who miss javapackager can now experiment with its successor jpackage.

    JFR event streaming and several performance improvements round out the release.

    If you liked the article, feel free to leave me a comment or share the article using one of the share buttons at the end.

    And if you want to be informed when the next article goes online, click here to sign up for the free HappyCoders newsletter.

  • Java 13 Features (with Examples)

    Java 13 Features (with Examples)

    Java 13 was released on September 17, 2019.

    The changes in Java 13 are pretty modest. In total, only five JDK Enhancement Proposals (JEPs) have made it into the release – and three of them are classified as experimental or preview features.

    The article starts with the experimental and preview features, as these are the most exciting changes in Java 13.

    Next are performance improvements, enhancements to the JDK class library, and other changes that we rarely encounter in our daily development work.

    Experimental and Preview Features

    I will not go into the experimental and preview features in full depth here. A detailed description will follow in those parts of the series where these features will reach production maturity.

    Switch Expressions (Second Preview)

    JEP 325 introduced switch expressions as a preview in Java 12. switch can be used as a statement or as an expression since then. “Expression” means that switch returns a value, such as in the following example from the JEP:

    int numLetters = switch (day) {
      case MONDAY, FRIDAY, SUNDAY:
        break 6;
      case TUESDAY:
        break 7;
      case THURSDAY, SATURDAY:
        break 8;
      case WEDNESDAY:
        break 9;
    };Code language: Java (java)

    Based on feedback from the developer community, JDK Enhancement Proposal 354 replaces the break keyword in switch expressions with the new yield keyword:

    int numLetters = switch (day) {
      case MONDAY, FRIDAY, SUNDAY:
        yield 6;
      case TUESDAY:
        yield 7;
      case THURSDAY, SATURDAY:
        yield 8;
      case WEDNESDAY:
        yield 9;
    };Code language: Java (java)

    The new keyword is only recognized in the scope of a Switch Expression. So if you use yield elsewhere in your source code, there is most likely no need to adjust your source code.

    Switch Expressions will reach production status in the next release, Java 14. You can find all details about them in the main article on Switch Expressions.

    Text Blocks (Preview)

    To define a multiline string, we used to use escape sequences for line breaks and double quotes contained in the string. An SQL statement looked like this, for example:

    String sql =
        "SELECT id, firstName, lastName FROM Employee\n"
            + "WHERE departmentId = \"IT\"\n"
            + "ORDER BY lastName, firstName";
    Code language: Java (java)

    JDK Enhancement Proposal 355 allows us to write such a string in a much more readable way:

    String sql = """
        SELECT id, firstName, lastName FROM Employee
        WHERE departmentId = "IT"
        ORDER BY lastName, firstName""";Code language: Java (java)

    Text blocks will reach production readiness in Java 15. You can find an introduction in all details in the main article on text blocks.

    To use text blocks in Java 13, you must either enable them in your IDE (in IntelliJ via File→Project Structure→Project Settings→Project→Project language level) or use the --enable-preview parameter when running the javac and java commands.

    Text blocks replaces the withdrawn JEP 326, “Raw String Literals”, which was not accepted by the community. If you are interested in the reasons, you can find them on the jdk-dev mailing list.

    ZGC: Uncommit Unused Memory (Experimental)

    ZGC is an experimental garbage collector introduced in Java 11 that promises extremely short stop-the-world pauses of 10 ms or less.

    JDK Enhancement Proposal 351 extends ZGC to return unused heap memory to the operating system after a specific time.

    Using -XX:ZUncommitDelay, you can specify the time in seconds, after which ZGC returns unused memory. By default, this value is 300 seconds.

    The feature is enabled by default and can be disabled with -XX:-ZUncommit.

    ZGC will reach production status in Java 15. In the corresponding article, I will introduce the new garbage collector in more detail.

    Performance Improvements

    Dynamic CDS Archives

    Java 10 introduced Application Class Data Sharing – a feature that allows creating a so-called shared archive file. This file contains the application classes in a binary form as required by the JVM of the platform used. The file is mapped into the JVM’s memory via memory-mapped I/O.

    Until now, it was relatively complex to create this file. First, we had to dump a class list during a test run of the application. Only in a second step could we generate the shared archive from this list.

    The following sample java calls taken from the article linked above:

    java -Xshare:off -XX:+UseAppCDS 
        -XX:DumpLoadedClassList=helloworld.lst 
        -cp target/helloworld.jar eu.happycoders.appcds.Main
    
    java -Xshare:dump -XX:+UseAppCDS 
        -XX:SharedClassListFile=helloworld.lst 
        -XX:SharedArchiveFile=helloworld.jsa 
        -cp target/helloworld.jarCode language: plaintext (plaintext)

    JDK Enhancement Proposal 350 simplifies this process. As of Java 13, you can specify the -XX:ArchiveClassesAtExit parameter to generate the shared archive at the end of the application execution. The additional parameters -Xshare:on and -XX:+UseAppCDS are no longer required:

    java -XX:ArchiveClassesAtExit=helloworld.jsa 
        -cp target/helloworld.jar eu.happycoders.appcds.MainCode language: plaintext (plaintext)

    The created shared archive is much smaller than before (256 KB instead of 9 MB). It now only contains the classes of the application. The JDK classes are loaded from the base archive classes.jsa delivered with the JDK.

    The shared archive is used as follows as of Java 13:

    java -XX:SharedArchiveFile=helloworld.jsa 
        -cp target/helloworld.jar eu.happycoders.appcds.MainCode language: plaintext (plaintext)

    In the article linked at the beginning of this section, you can find an example of using AppCDS with step-by-step instructions. Try to reproduce the example and use the new -XX:ArchiveClassesAtExit option instead of the previous two steps.

    Soft Max Heap Size

    You can use the new command line parameter -XX:SoftMaxHeapSize to set a “soft” upper limit for the heap size. The garbage collector will then try to keep the heap below this limit and only exceed it if necessary to avoid an OutOfMemoryError.

    The application scenario lies in environments in which you pay for the actual RAM usage. Thus, the heap can generally be kept small but may temporarily grow beyond the soft upper limit when memory requirements increase.

    Currently, only the (experimental) ZGC supports this feature.

    (There is no JDK enhancement proposal for this feature.)

    JDK Class Library Enhancements

    Several methods have been added to the ByteBuffer class, allowing read/write operations to be performed at specified buffer positions instead of the position managed by the ByteBuffer, as was previously the case.

    If you need a refresher on ByteBuffer, I recommend this ByteBuffer basics article.

    ByteBuffer.slice()

    Using ByteBuffer.slice() you can create a view on a section of the buffer. This method, which already existed before Java 13, returns a view that starts at the buffer’s current position and whose capacity and limit correspond to the remaining bytes in the buffer.

    New is the method ByteBuffer.slice(int index, int length). It allows you to create a view that starts at position index and contains length bytes. The new method thus ignores the position, capacity, and limit of the underlying buffer.

    New ByteBuffer.get() and put() Methods

    Analogously, there are two new get(), and two new put() methods, which do not read/write the data at the current position of the buffer – but at an explicitly specified position:

    • get​(int index, byte[] dst, int offset, int length) – transfers length bytes from the buffer position specified by index into the byte array dst starting at position offset.
    • get​(int index, byte[] dst) – transfers data from the buffer position specified by index into the byte array dst. The number of bytes transferred is equal to the length of the destination array.
    • put​(int index, byte[] src, int offset, int length) – transfers length bytes from the byte array src starting at position offset into the buffer starting at position index.
    • put​(int index, byte[] src) – transfers all bytes from the byte array src into the buffer starting at position index.

    The buffer’s position remains unchanged for all four methods.

    FileSystems.newFileSystem()

    Using the FileSystems.newFileSystem(Path path, ClassLoader loader) method, you can create a pseudo-file system with contents mapped to a file (such as a ZIP or JAR file).

    The method was overloaded in Java 13 with a variant, which makes it possible to pass a provider-specific file system configuration: FileSystems.newFileSystem(Path path, Map env, ClassLoader loader)

    Furthermore, two variants have been added, each without the loader parameter. A class loader is only required if the so-called FileSystemProvider for the file type to be mapped is not registered in the JDK but must be loaded via the specified class loader. For standard file types like ZIP or JAR, this is not required.

    Other Changes in Java 13 (Which You Don’t Necessarily Need to Know About as a Java Developer)

    This section lists changes that rather few Java developers will come into contact with.

    Reimplement the Legacy Socket API

    The java.net.Socket and java.net.ServerSocket APIs have existed since Java 1.0, and the underlying code (a mix of Java and C code) is difficult to maintain and extend, especially in light of Project Loom, which aims to introduce Virtual Threads (lightweight threads managed by the JVM).

    JDK Enhancement Proposal 353 replaces the old implementation with a more modern, better maintainable, and extensible implementation, which in particular should be adaptable to Project Loom without further refactorings.

    Unicode 12.1

    As in the previous two Java releases, Unicode support has been increased in Java 13 – to version 12.1. That means that classes such as String and Character must handle the new characters, code blocks, and type systems.

    For an example, see the article about Unicode 10 in Java 11.

    (No JDK enhancement proposal exists for Unicode 12.1 support.)

    Complete List of All Changes in Java 13

    This article has presented all the features of Java 13 that are defined in JDK Enhancement Proposals – and enhancements to the JDK class library that are not associated with any JEP.

    For a complete list of changes, see the official Java 13 Release Notes.

    Summary

    Java 13 is a very modest release.

    In the second preview of “Switch Expressions”, break was replaced by yield. Multiline strings finally made their way into the language with the “Text Blocks” preview.

    The experimental ZGC can return unused memory to the operating system and may be configured with a “soft” maximum heap size.

    “Dynamic CDS Archives” makes employing Application Class Data Sharing a piece of cake from Java 13 onwards.

    ByteBuffer has been extended with methods to read and write at absolute positions, and there are some new variants of the FileSystems.newFileSystem() method.

    The Java 1.0 Socket API has been completely rewritten to be fit for the lightweight threads developed in Project Loom.

    If you liked the article, I would be happy about a comment, or if you shared the article via one of the share buttons at the end.

    If you want to be informed when the next part of the series goes online, click here to sign up for the HappyCoders newsletter.

  • Java 12 Features (with Examples)

    Java 12 Features (with Examples)

    Java 12, released on March 19, 2019, is the first “interim” release after the last Long-Term-Support (LTS) release, Java 11.

    The changes to Java 12 are somewhat moderate compared to the previous versions. For the first time since Java 7, there is no change to the language itself.

    I have sorted the changes by relevance for daily developer work. I’ll start with enhancements to the class library. Next are performance improvements, experimental and preview features, and finally, minor changes you probably won’t encounter as a developer.

    New String and Files methods

    After we got a few new String methods in Java 11 and the Files.readString() and writeString() methods, the JDK developers extended both classes again for Java 12.

    String.indent()

    To indent a string, we used to write a small helper method that put the desired number of spaces in front of the String. If it should work over multiple lines, the method became correspondingly complex.

    Java 12 has such a method built-in: String.indent(). The following example shows how to indent a multiline string by four spaces:

    String s = "I am\na multiline\nString.";
    System.out.println(s);
    System.out.println(s.indent(4));Code language: Java (java)

    The program prints the following:

    I am
    a multiline
    String.
        I am
        a multiline
        String.Code language: MIPS Assembly (mipsasm)

    String.transform()

    The new String.transform() method applies an arbitrary function to a String and returns the function’s return value. Here are a few examples:

    String uppercase = "abcde".transform(String::toUpperCase);
    Integer i        = "12345".transform(Integer::valueOf);
    BigDecimal big   = "1234567891011121314151617181920".transform(BigDecimal::new);Code language: Java (java)

    When you look at the source code of String.transform(), you will notice that there is no rocket science at work. The method reference is interpreted as a function, and the String is passed to its apply() method:

    public <R> R transform(Function<? super String, ? extends R> f) {
      return f.apply(this);
    }Code language: Java (java)

    Then why use transform() instead of just writing the following?

    String uppercase = "abcde".toUpperCase();
    Integer i        = Integer.valueOf("12345");
    BigDecimal big   = new BigDecimal("1234567891011121314151617181920");Code language: Java (java)

    The advantage of String.transform() is that the function to be applied can be determined dynamically at runtime, while in the latter notation, the conversion is fixed at compile time.

    Files.mismatch()

    You can use the Files.mismatch() method to compare the contents of two files.

    The method returns -1 if both files are the same. Otherwise, it returns the position of the first byte at which both files differ. If one of the files ends before a difference is detected, the length of that file is returned.

    (The new string and files methods are not defined in a JDK enhancement proposal).

    The Teeing Collector

    For some requirements, you may want to terminate a Stream with two collectors instead of one and combine the result of both collectors.

    In the following example source code, we want to determine the difference from largest to smallest number from a stream of random numbers (we use Optional.orElseThrow() introduced in Java 10 to avoid a “code smell” blaming):

    Stream<Integer> numbers = new Random().ints(100).boxed();
    
    int min = numbers.collect(Collectors.minBy(Integer::compareTo)).orElseThrow();
    int max = numbers.collect(Collectors.maxBy(Integer::compareTo)).orElseThrow();
    long range = (long) max - min;Code language: Java (java)

    The program compiles but aborts at runtime with an exception:

    Exception in thread "main" java.lang.IllegalStateException: 
            stream has already been operated upon or closed
        at java.base/java.util.stream.AbstractPipeline.evaluate(AbstractPipeline.java:229)
        at java.base/java.util.stream.ReferencePipeline.collect(ReferencePipeline.java:578)
        at eu.happycoders.sandbox.TeeingCollectorTest.main(TeeingCollectorTest.java:12)Code language: plaintext (plaintext)

    The exception text lets us know that we may terminate a Stream only once.

    How can we solve this task then?

    One variant would be to write a custom collector that accumulates minimum and maximum in a 2-element int array:

    Stream<Integer> numbers = new Random().ints(100).boxed();
    
    int[] result =
        numbers.collect(
            () -> new int[] {Integer.MAX_VALUE, Integer.MIN_VALUE},
            (minMax, i) -> {
              if (i < minMax[0]) minMax[0] = i;
              if (i > minMax[1]) minMax[1] = i;
            },
            (minMax1, minMax2) -> {
              if (minMax2[0] < minMax1[0]) minMax1[0] = minMax2[0];
              if (minMax2[1] > minMax1[1]) minMax1[1] = minMax2[1];
            });
    
    long range = (long) result[1] - result[0];Code language: Java (java)

    This approach is quite complex and not very legible.

    We can do it easier using the “Teeing Collector” introduced in Java 12. We can specify two collectors (called downstream collectors) and a merger function that combines the results of the two collectors:

    Stream<Integer> numbers = new Random().ints(100).boxed();
    
    long range =
        numbers.collect(
            Collectors.teeing(
                Collectors.minBy(Integer::compareTo),
                Collectors.maxBy(Integer::compareTo),
                (min, max) -> (long) max.orElseThrow() - min.orElseThrow()));Code language: Java (java)

    Much more elegant and readable, right?

    Why is this collector called “Teeing Collector”?

    The name comes from the English pronunciation of the letter “T”, as the collector’s graphical representation looks like a … “T”:

    Teeing Collector

    (There is also no JDK enhancement proposal for the Teeing Collector).

    Support for Compact Number Formatting

    Using the static method NumberFormat.getCompactNumberInstance(), we can create a formatter for the so-called “compact number formatting”. This is a form that is easy for humans to read, such as “2M” or “3 billion”.

    The following example shows how some numbers are displayed – once in the short and once in the long compact form:

    NumberFormat nfShort =
        NumberFormat.getCompactNumberInstance(Locale.US, NumberFormat.Style.SHORT);
    NumberFormat nfLong =
        NumberFormat.getCompactNumberInstance(Locale.US, NumberFormat.Style.LONG);
    
    System.out.println("        1,000 short -> " + nfShort.format(1_000));
    System.out.println("      456,789 short -> " + nfShort.format(456_789));
    System.out.println("    2,000,000 short -> " + nfShort.format(2_000_000));
    System.out.println("3,456,789,000 short -> " + nfShort.format(3_456_789_000L));
    System.out.println();
    System.out.println("        1,000 long -> " + nfLong.format(1_000));
    System.out.println("      456,789 long -> " + nfLong.format(456_789));
    System.out.println("    2,000,000 long -> " + nfLong.format(2_000_000));
    System.out.println("3,456,789,000 long -> " + nfLong.format(3_456_789_000L));
    Code language: GLSL (glsl)

    The program will print the following:

            1,000 short -> 1K
          456,789 short -> 457K
        2,000,000 short -> 2M
    3,456,789,000 short -> 3B
    
            1,000 long -> 1 thousand
          456,789 long -> 457 thousand
        2,000,000 long -> 2 million
    3,456,789,000 long -> 3 billionCode language: Microtik RouterOS script (routeros)

    “Compact Number Formats” is defined in the corresponding Unicode standard.

    (A JDK enhancement proposal does not exist for “Compact Number Formatting”.)

    Performance Improvements

    The following improvements ensure that our Java applications start faster, have lower garbage collector latencies, and a better memory footprint.

    Default CDS Archives

    In the article on Java 10, you can find an introduction to Class-Data Sharing (CDS).

    To enable class data sharing, you previously had to run java -Xshare:dump once for each Java installation to generate the classes.jsa shared archive file.

    With the JDK Enhancement Proposal 341, all 64-bit ports of the JDK are now shipped with this file included so that the execution of java -Xshare:dump is no longer necessary and Java applications use the default CDS archive by default.

    Abortable Mixed Collections for G1

    One of the goals of the G1 Gargabe Collector is to adhere to specified maximum pause times for those cleanup tasks that it cannot do in parallel with the application – i.e., to not stop the application for longer than the specified time.

    For G1, you specify this time with the -XX:MaxGCPauseMillis parameter. The default maximum pause time is 200 ms if you omit the parameter.

    G1 uses a heuristic to determine a set of heap regions to clean up during such a stop-the-world phase (called the “collection set”).

    Especially in the case of “mixed collections” (i.e., when cleaning up regions of young and old generations), it can happen – notably if the behavior of the application changes – that the heuristic determines a collection set that is too large and thus the application is interrupted longer than intended.

    JDK Enhancement Proposal 344 optimizes the Mixed Collections to split the collection set into a mandatory and an optional part if the maximum pause time is repeatedly exceeded. The mandatory part is executed uninterruptibly – and the optional part in small steps until the maximum pause time is reached.

    In the meantime, the algorithm tries to adjust the heuristic so that it can soon again determine collection sets that it can process in the given pause time.

    Promptly Return Unused Committed Memory from G1

    In environments where you pay for the memory you actually use, the garbage collector should quickly return unused memory to the operating system.

    The G1 garbage collector can return memory, but it does so only during the garbage collection phase. However, no memory is returned if the heap allocation or the current rate of object allocations does not trigger a garbage collection cycle.

    Suppose we have an application that runs a memory-intensive batch process only once a day but is pretty much idle the rest of the time. Thus, after the batch process has been processed, there is no reason for a garbage collection cycle, and we pay for memory containing unused objects (red highlighted area) for most of the day:

    JEP 346: Memory usage without periodic GCs
    JEP 346: Memory usage without periodic GCs

    JEP 346 provides a solution to this problem. When the application is inactive, a parallel garbage collection cycle is started periodically, releasing any memory that may no longer be needed.

    This feature is disabled by default. You can enable it by specifying an interval in milliseconds in which G1 should check whether such a cycle should be started via the -XX:G1PeriodicGCInterval parameter. This way, it will return the memory quickly:

     JEP 346: Memory usage with periodic GCs
    JEP 346: Memory usage with periodic GCs

    Experimental and Preview Features

    This section lists experimental features and previews, i.e., functionality that are still in the development stage and may be modified based on feedback from the Java community until the final release.

    Instead of going into detail about these features, I will refer to the Java version where the respective features are released as “production-ready”.

    Switch Expressions (Preview)

    Thanks to JDK Enhancement Proposal 325, we can now simplify switch statements by separating multiple cases with commas and using arrow notation to eliminate error-prone break statements:

    switch (day) {
      case MONDAY, FRIDAY, SUNDAY -> System.out.println(6);
      case TUESDAY                -> System.out.println(7);
      case THURSDAY, SATURDAY     -> System.out.println(8);
      case WEDNESDAY              -> System.out.println(9);
    }Code language: Handlebars (handlebars)

    Furthermore, we can use switch expressions to assign case-dependent values to a variable:

    int numLetters = switch (day) {
      case MONDAY, FRIDAY, SUNDAY -> 6;
      case TUESDAY                -> 7;
      case THURSDAY, SATURDAY     -> 8;
      case WEDNESDAY              -> 9;
    };Code language: Java (java)

    switch expressions can also be written using the conventional notation (with colon and break). When doing so, you specify the value to be returned after the break keyword:

    int numLetters = switch (day) {
      case MONDAY, FRIDAY, SUNDAY:
        break 6;
      case TUESDAY:
        break 7;
      case THURSDAY, SATURDAY:
        break 8;
      case WEDNESDAY:
        break 9;
    };Code language: Java (java)

    (Note: break will be replaced by yield in the following preview).

    Switch Expressions will be production-ready in Java 14. You can find all details about them in the main article on Switch Expressions.

    To use Switch Expressions in Java 12, you have to enable them either in your IDE (in IntelliJ you can do this via File→Project Structure→Project Settings→Project→Project language level) or with the --enable-preview parameter when running the javac and java commands.

    Shenandoah: A Low-Pause-Time Garbage Collector (Experimental)

    In Java 11, Oracle’s “Z Garbage Collector” was introduced as an experimental feature.

    Java 12 brings another low-latency garbage collector: “Shenandoah”, developed by Red Hat. Just like ZGC, Shenandoah aims to minimize the pause times of full GCs.

    You can enable Shenandoah using the following option in the java command line:

    -XX:+UnlockExperimentalVMOptions -XX:+UseShenandoahGC

    Shenandoah and ZGC will reach production readiness in Java 15. In the corresponding part of this series, I will describe both garbage collectors in more detail.

    (This experimental release is defined in JDK Enhancement Proposal 189.)

    Other Changes in Java 12 (Which You Don’t Necessarily Need to Know as a Java Developer)

    In this section, I list changes that will not affect the daily work of most Java developers. However, it is certainly not wrong to have skimmed over the changes once.

    Unicode 11

    After Java 11 added support for Unicode 10, support was raised to Unicode 11 in Java 12. That means that, in particular, the classes String and Character have to handle the new characters, code blocks, and scripts added in Unicode 11.

    For an example, see the section on Unicode 10 linked earlier.

    (No JDK enhancement proposal exists for Unicode 11 support.)

    Microbenchmark Suite

    To date, microbenchmarks for the JDK class library have been managed as a separate project. These benchmarks regularly measure the performance of the JDK class library and are used, for example, to ensure that JDK methods have not become slower with new Java releases.

    JDK Enhancement Proposal 230 moves the existing collection of microbenchmarks into the JDK source code to simplify the execution and evolution of tests.

    JVM Constants API

    The constant pool of a .class file contains constants that arise when compiling a .java file. These are, for one thing, constants that are defined in the Java code, such as the string “Hello world!”, but also the names of referenced classes and methods (e.g. “java/lang/System”, “out”, and “println”). Each constant is assigned a number that the bytecode of the .class file references.

    JDK Enhancement Proposal 334 intends to make it easier to write Java programs that read or write JVM bytecode. For this purpose, it provides new interfaces and classes to represent the elements in the constant pool.

    These interfaces and classes are located in the new java.lang.constant package and form a hierarchy beginning with the ConstantDesc interface. A “Hello World!”, for example, is represented by the String class, which, since Java 12, also implements this interface (just like Integer, Long, Float, and Double).

    It gets more complicated with constants that represent references to classes and their methods. We cannot use the reflection classes Class and MethodHandle because we do not necessarily know the referenced classes and methods, but only their names, parameters, and return values.

    For this purpose, we now have (among others) the classes ClassDesc to denote a class and MethodHandleDesc and MethodTypeDesc to denote a method.

    Further details of this rather exotic feature would go beyond the scope of this article.

    One AArch64 Port, Not Two

    Two different ports for 64-bit ARM CPUs exist in the JDK to date:

    • “arm64” – developed by Oracle (as an extension of the 32-bit ARM port “arm”)
    • “aarch64” – simultaneously but independently developed by Red Hat

    JDK Enhancement Proposal 340 removes Oracle’s port to focus development resources on a single port.

    Complete List of All Changes in Java 12

    This article has presented all the features of Java 12 that are defined in JDK Enhancement Proposals, as well as enhancements to the JDK class library that are not associated with any JEP.

    For a complete list of changes, see the official Java 12 Release Notes.

    Summary

    The changes in Java 12 are pretty manageable. We got a few new String and Files methods and the Teeing Collector, which allows us to terminate a Stream over two collectors and combine their results.

    Class data sharing is now enabled by default, thanks to the classes.jsa shared archive file provided on 64-bit systems.

    The G1 Garbage Collector can abort mixed collections if they take too long. It quickly returns unneeded memory to the operating system.

    With Switch Expressions and the Shenandoah Garbage Collector, two experimental or preview features have also found their way into Java 12.

    If you liked the article, feel free to leave me a comment or share the article using one of the share buttons at the end of the article.

    Would you like to be informed by e-mail when the next part of the series is published? Then click here to sign up for the HappyCoders newsletter.

  • Java 11 Features (with Examples)

    Java 11 Features (with Examples)

    With Java 11, the first Long-Term Support (LTS) release of the JDK since the switch to the six-month release cycle was published on September 25, 2018. “Long-Term Support” means that Oracle will provide this version with security patches for several years.

    The last LTS release was Java 8. Java 9 and 10 were not LTS releases, which means that support for these versions was discontinued with each subsequent release.

    I have sorted the changes in Java 11 according to relevance for daily developer work. First come changes to the language itself. Followed by enhancements to the JDK class library, tools, and experimental features. And finally, deprecations, deletions, and other minor changes.

    It is also important to know that from version 11 onwards, the Oracle JDK can only be used freely by developers. Companies need a paid support contract with Oracle. OpenJDK 11, on the other hand, is free to use for everyone.

    Local-Variable Syntax for Lambda Parameters

    JDK Enhancement Proposal 323 allows the use of “var” in parameters of implicitly typed lambda expressions.

    What is an implicitly typed lambda expression?

    Let’s start with an explicitly typed lambda expression. In the following example, explicit means that the data types of the lambda parameters l and s – i.e., List<String> and String – are specified:

    (List<String> l, String s) -> l.add(s);Code language: Java (java)

    However, the compiler can also derive types from the context so that the following – implicitly typed – notation is also permitted:

    (l, s) -> l.add(s);Code language: Java (java)

    Since Java 11, you can use the “var” keyword introduced in Java 10 instead of the explicit types:

    (var l, var s) -> l.add(s);Code language: Java (java)

    But why write “var” when you can omit the types completely, as in the example before?

    The reason for this is annotations. If a variable is to be annotated, the annotation must be placed at the type – an explicit type or “var”. An annotation is not permitted to be placed on the variable name.

    If you want to annotate the variables in the above example, only the following notation was possible until now:

    (@Nonnull List<String> l, @Nullable String s) -> l.add(s);Code language: Java (java)

    Java 11 now also allows the following, shorter variant with “var”:

    (@Nonnull var l, @Nullable var s) -> l.add(s);Code language: Java (java)

    The different notations must not be mixed. That means you must either specify the type for all variables, omit all types, or use “var” for all variables.

    Which form you ultimately choose depends on the readability in the specific case and the style guidelines of your team.

    HTTP Client (Standard)

    Before Java 11, using native JDK resources to, for example, send data via HTTP POST required a lot of code.

    (The following example uses BufferedReader.lines(), which was added in Java 8, to read the response as a Stream and combine it into a String using a collector. Before Java 8, this required several more lines.)

    public String post(String url, String data) throws IOException {
      URL urlObj = new URL(url);
      HttpURLConnection con = (HttpURLConnection) urlObj.openConnection();
      con.setRequestMethod("POST");
      con.setRequestProperty("Content-Type", "application/json");
    
      // Send data
      con.setDoOutput(true);
      try (OutputStream os = con.getOutputStream()) {
        byte[] input = data.getBytes(StandardCharsets.UTF_8);
        os.write(input, 0, input.length);
      }
    
      // Handle HTTP errors
      if (con.getResponseCode() != 200) {
        con.disconnect();
        throw new IOException("HTTP response status: " + con.getResponseCode());
      }
    
      // Read response
      String body;
      try (InputStreamReader isr = new InputStreamReader(con.getInputStream());
          BufferedReader br = new BufferedReader(isr)) {
        body = br.lines().collect(Collectors.joining("n"));
      }
      con.disconnect();
    
      return body;
    }Code language: Java (java)

    JDK 11 includes the new HttpClient class, which significantly simplifies working with HTTP.

    You can write the code above much shorter and more expressive using HttpClient:

    public String post(String url, String data) throws IOException, InterruptedException {
      HttpClient client = HttpClient.newHttpClient();
    
      HttpRequest request =
          HttpRequest.newBuilder()
              .uri(URI.create(url))
              .header("Content-Type", "application/json")
              .POST(BodyPublishers.ofString(data))
              .build();
    
      HttpResponse<String> response = client.send(request, BodyHandlers.ofString());
    
      if (response.statusCode() != 200) {
        throw new IOException("HTTP response status: " + response.statusCode());
      }
    
      return response.body();
    }Code language: Java (java)

    The new HttpClient class is highly versatile:

    • In the example above, we send a String via BodyPublishers.ofString(). Using the methods ofByteArray(), ofByteArrays(), ofFile(), and ofInputStream() of the same class, we can read the data to be sent from various other sources.
    • Similarly, the BodyHandlers class, whose ofString() method we use to get the response as a String, can also return byte arrays and streams or store the received response in a file.
    • HttpClient also supports HTTP/2 and WebSocket, unlike the previous solution.
    • Furthermore, in addition to the synchronous programming model shown above, HttpClient provides an asynchronous model. The HttpClient.sendAsync() method returns a CompletableFuture, which we can then use to continue working asynchronously.

    For example, an asynchronous variant of the post method might look like this:

    public void postAsync(
        String url, String data, Consumer<String> consumer, IntConsumer errorHandler) {
      HttpClient client = HttpClient.newHttpClient();
    
      HttpRequest request =
          HttpRequest.newBuilder()
              .uri(URI.create(url))
              .header("Content-Type", "application/json")
              .POST(BodyPublishers.ofString(data))
              .build();
    
      client
          .sendAsync(request, BodyHandlers.ofString())
          .thenAccept(
              response -> {
                if (response.statusCode() == 200) {
                  consumer.accept(response.body());
                } else {
                  errorHandler.accept(response.statusCode());
                }
              });
    }
    Code language: Java (java)

    (HttpClient is defined by JDK Enhancement Proposal 321.)

    New Collection.toArray() Method

    Until now, the Collection interface provided two toArray() methods to convert collections to arrays. The following example shows these two methods (and two different usages of the second method) using a String list as an example:

    List<String> list = List.of("foo", "bar", "baz");
    
    Object[] strings1 = list.toArray();
    
    String[] strings2a = list.toArray(new String[list.size()]);
    String[] strings2b = list.toArray(new String[0]);Code language: Java (java)

    The first toArray() method (without parameters) returns an Object array, because due to Type Erasure, the type information of list is no longer known at runtime.

    The second toArray() method expects an array of the requested type. If this array is at least as large as the collection, the elements are stored in this array (strings2a). Otherwise, a new array of the needed size is created (strings2b).

    Since Java 12, we can also write the following:

    String[] strings = list.toArray(String[]::new);Code language: Java (java)

    This method allows the Collection classes to create an array of the necessary size using the passed array constructor reference.

    However, this possibility is not (or rarely?) used. The method is implemented only in the Collection interface. It creates an empty array and then calls the existing toArray() method:

    default <T> T[] toArray(IntFunction<T[]> generator) {
      return toArray(generator.apply(0));
    }Code language: Java (java)

    I haven’t looked at all the Collection implementations. But all the ones I have looked at do not override this new method. If you know of a Collection class that overrides this method, feel free to drop me a comment.

    (The new toArray() method is not defined in a JDK enhancement proposal).

    New String Methods

    In Java 11, the String class has been extended with some helpful methods:

    String.strip(), stripLeading(), stripTailing()

    The String.strip() method removes all leading and trailing whitespaces from a String.

    Isn’t that what we already have the String.trim() method for?

    Yes, with the following difference:

    • trim() removes all characters with a code point U+0020 or smaller. This includes, for example, “space”, “tab”, “newline”, and “carriage return”.
    • strip() removes those characters that Character.isWhitespace() classifies as whitespaces. On the one hand, these are some (but not all) characters with code point U+0020 or smaller. And on the other hand, characters defined in the Unicode Standard as spaces, line breaks, and paragraph separators (e.g., U+2002 – a space as wide as the letter ‘n’).

    There are two variants of the method: stripLeading() removes only leading whitespaces, stripTailing() only trailing ones.

    String.isBlank()

    The new String.isBlank() method returns true if and only if the String contains only those characters that the Character.isWhitespace() method mentioned in the previous point classifies as whitespaces.

    String.repeat()

    You can use String.repeat() to repeatedly concatenate a String:

    System.out.println(":-) ".repeat(10));
    
    ⟶
    
    :-) :-) :-) :-) :-) :-) :-) :-) :-) :-) 
    Code language: Java (java)

    String.lines()

    The String.lines() method splits a String at line breaks and returns a Stream of all lines.

    Here’s a quick example:

    Stream<String> lines = "foonbarnbaz".lines();
    lines.forEachOrdered(System.out::println);
    
    ⟶
    
    foo
    bar
    bazCode language: Java (java)

    (There is no JDK enhancement proposal for the String class extensions.)

    Files.readString() und writeString()

    Reading and writing text files has been continuously simplified since Java 6. In Java 6, we had to open a FileInputStream, wrap it with an InputStreamReader and a BufferedReader, then load the text file line by line into a StringBuilder (alternatively, omit the BufferedReader and read the data in char[] blocks) and close the readers and the InputStream in the finally block.

    Luckily, we had libraries like Apache Commons IO that did this work for us with the FileUtils.readFileToString() and writeFileToString() methods.

    In Java 7, we could create the nested stream/reader or stream/writer combinations much easier using Files.newBufferedWriter() and Files.newBufferedReader(). And thanks to try-with-resources, we didn’t need a finally block anymore.

    However, several lines of code were still necessary:

    public static void writeStringJava7(Path path, String text) throws IOException {
      try (BufferedWriter writer = Files.newBufferedWriter(path, StandardCharsets.UTF_8)) {
        writer.write(text);
      }
    }
    
    private static String readFileJava7(Path path) throws IOException {
      StringBuilder sb = new StringBuilder();
      try (BufferedReader reader = Files.newBufferedReader(path, StandardCharsets.UTF_8)) {
        String line;
        while ((line = reader.readLine()) != null) {
          sb.append(line).append('n');
        }
      }
      return sb.toString();
    }Code language: Java (java)

    Java 11 finally gives us methods that can rival those of third-party libraries:

    Files.writeString(path, text, StandardCharsets.UTF_8);
    
    text = Files.readString(path, StandardCharsets.UTF_8);Code language: Java (java)

    At this point, I would like to raise a little anticipation for Java 18: JEP 400 will finally set UTF-8 as the default character set for all architectures and operating systems, so we can then omit the character set parameter.

    (There is no JDK enhancement proposal for this class library extension.)

    Path.of()

    Up to now, we had to create Path objects via Paths.get() or File.toPath(). The introduction of interface default methods in Java 8 allowed JDK developers to integrate appropriate factory methods directly into the Path interface.

    Since Java 11, you can create path objects as follows, for example:

    // Relative path foo/bar/baz
    Path.of("foo/bar/baz");
    Path.of("foo", "bar/baz");
    Path.of("foo", "bar", "baz");
    
    // Absolute path /foo/bar/baz
    Path.of("/foo/bar/baz");
    Path.of("/foo", "bar", "baz");
    Path.of("/", "foo", "bar", "baz");Code language: Java (java)

    As parameters, you can specify the whole path or parts of the path – in any combination, as shown in the example.

    To define an absolute path, the first part must start with “/” on Linux and macOS – and with a drive letter, such as “C:” on Windows.

    (There is no JDK enhancement proposal for this class library extension.)

    Epsilon: A No-Op Garbage Collector

    With JDK 11, we get a new garbage collector: Epsilon GC.

    Epsilon GC does … nothing. Well, not quite. It manages the allocation of objects on the heap – but it has no garbage collection process to release the objects again.

    What is the purpose of a garbage collector that does not collect garbage?

    The following scenarios are conceivable:

    • Performance tests: In micro benchmarks, for example, where you compare different implementations of algorithms with each other, a regular garbage collector is a hindrance, as it can influence the execution times and thus falsify the measurement results. By using Epsilon GC, you can exclude such influences.
    • Extremely short-lived applications, such as those developed for AWS Lambda, should be terminated as quickly as possible. A garbage collection cycle would be a waste of time if the application was terminated a few milliseconds later anyway.
    • Eliminating latencies: If developers have a good understanding of the memory requirements of their application and entirely (or almost entirely) dispense with object allocations, Epsilon GC enables them to implement a latency-free application.

    You can activate Epsilon GC – analogous to all other garbage collectors – with the following option in the java command line:

    -XX:+UseEpsilonGC

    (Epsilon GC is defined by JDK Enhancement Proposal 318.)

    Launch Single-File Source-Code Programs

    For small Java programs consisting of only one class, JDK Enhancement Proposal 330 becomes interesting.

    This makes it possible to compile and execute a .java file using the java command. Furthermore, a .java file can be made executable using a so-called “shebang”.

    I’ll show you precisely what that means with a simple example.

    Create a file with the name Hello.java and the following content:

    public class Hello {
      public static void main(String[] args) {
        if (args.length > 0) {
          System.out.printf("Hello %s!%n", args[0]);
        } else {
          System.out.println("Hello!");
        }
      }
    }
    Code language: Java (java)

    Until now, you had to compile this program with javac first and then run it with java:

    $ javac Hello.java
    $ java Hello Anna
    
    ⟶
    
    Hello Anna!Code language: MIPS Assembly (mipsasm)

    Starting with Java 11, you can omit the first step:

    $ java Hello.java Anna
    
    ⟶
    
    Hello Anna!Code language: plaintext (plaintext)

    The source code is compiled into the working memory and executed from there.

    On Linux and macOS, you can go one step further and directly write an executable Java script. To do this, you have to insert a so-called “shebang” and the source version in the first line:

    #!/usr/bin/java --source 11
    
    public class Hello {
      public static void main(String[] args) {
        if (args.length > 0) {
          System.out.printf("Hello %s!%n", args[0]);
        } else {
          System.out.println("Hello!");
        }
      }
    }Code language: Java (java)

    The file must not have a .java extension. Rename it to Hello and make it executable:

    mv Hello.java Hello
    chmod +x HelloCode language: plaintext (plaintext)

    Now you can execute it directly:

    $ ./Hello Anna
    
    ⟶
    
    Hello Anna!Code language: Microtik RouterOS script (routeros)

    Pretty cool. For smaller tools, this can be very useful.

    Nest-Based Access Control

    When using inner classes, we Java developers frequently face the following warning:

    Synthetic accessor warning in IntelliJ
    Synthetic accessor warning in IntelliJ

    What is it all about?

    The Java Language Specification (JLS) allows access to private fields and methods of inner classes. The Java Virtual Machine (JVM), on the other hand, does not (yet) allow this.

    To resolve this contradiction, the Java compiler (up to Java 10) inserts so-called “synthetic accessor methods” when accessing these private fields and methods – with default “package-private” visibility.

    These additional methods result in seemingly private fields and methods being accessible from the entire package. Accordingly, the warning occurs.

    Until now, you could solve this problem by either making the corresponding members package-private yourself or – at least in Eclipse – annotating the code with @SuppressWarnings(“synthetic-access”).

    JDK Enhancement Proposal 181 extends the JVM’s access control mechanisms to allow access to private members of inner classes without synthetic accessors.

    Should you have made methods and fields of inner classes package-private or used @SuppressWarnings for the above reason, you can undo this after upgrading to Java 11.

    Analysis Tools

    Java Flight Recorder

    Numerous tools help us analyze and fix errors during the development process. However, certain problems only occur at the runtime of an application. Analyzing them is often difficult or impossible, as we are often unable to reproduce such errors.

    Java Flight Recorder (JFR) can assist us by recording JVM data at runtime and making it available in a file for subsequent analysis.

    Flight Recorder has already existed for several years as a commercial feature in Oracle’s JDK. With JDK Enhancement Proposal 328, it becomes part of the OpenJDK and can thus be used freely.

    How to Start Flight Recorder?

    You can start Flight Recorder in two ways. Firstly, you can activate it at the start of an application using the following option on the java command line:

    -XX:StartFlightRecording=filename=<file name>

    Secondly, you can use jcmd to activate Flight Recorder in a running Java application:

    jcmd JFR.start filename=<file name>

    You can specify numerous options; for example, you can use “duration” to specify how long the recorder should run. To present all options in detail would go beyond the scope of this article. You can find them in Oracle’s official Flight Recorder documentation.

    Java Flight Recorder Example

    In the following example, let 31100 be the process ID of the Java application to be analyzed. You start the recording as follows (we specify a name for the recording via the optional “name” parameter):

    $ jcmd 31100 JFR.start filename=myrecording.jfr name=myrecording
    31100:
    Started recording 1. No limit specified, using maxsize=250MB as default.
    
    Use jcmd 31100 JFR.dump name=myrecording to copy recording data to file.Code language: plaintext (plaintext)

    Normally Flight Recorder saves the recording to the specified file only at certain intervals and when you exit the application. However, you can also save the recording manually in between by executing the dump command that was displayed at startup:

    $ jcmd 31100 JFR.dump name=myrecording
    31100:
    Dumped recording "myrecording", 344.8 kB written to:
    
    <path>/myrecording.jfrCode language: Mizar (mizar)

    If you did not specify a “name” parameter at startup, you can specify the recording number (in the example above “1”) as the name.

    You can stop Flight Recorder as follows:

    $ jcmd 31100 JFR.stop name=myrecording
    31100:
    Stopped recording "myrecording".Code language: plaintext (plaintext)

    How do you analyze the file saved by Flight Recorder?

    Therefore we need another tool…

    JDK Mission Control

    To view the collected data, you need another tool: JDK Mission Control. On the project’s GitHub page, you can find links to several distributors where you can download Mission Control for Windows, Mac, and Linux.

    Click “File / Open File…” to load the analysis file. Mission Control first shows you an overview of the collected data:

    JDK Mission Control – Overview
    JDK Mission Control – Overview

    Using the navigation on the left, you can then dive deeper into specific areas, such as threads, memory usage, locks, etc… In “Threads”, for example, you can see which threads ran from when to when:

    JDK Mission Control – Threads
    JDK Mission Control – Threads

    The other navigation points also contain exciting presentations of the collected data. Try it out for yourself right now!

    Low-Overhead Heap Profiling

    An important tool for analyzing memory problems (e.g., high garbage collector latencies or OutOfMemoryErrors) are heap dumps for analyzing the objects located on the heap. The market offers numerous tools for this purpose. Up to now, these tools do not reveal at which point in the code the objects located on the heap were created.

    With JEP 331, the Java Virtual Machine Tool Interface (JVMTI) – i.e., the interface through which these tools obtain the data about the running application – is extended by the possibility to collect stack traces of all object allocations. The heap analysis tools can display this additional information and thus make it much easier for us developers to analyze problems.

    Experimental and Preview Features

    I will only briefly discuss experimental and preview features and instead refer to the Java versions where these features are released as “production-ready”.

    ZGC: A Scalable Low-Latency Garbage Collector (Experimental)

    The “Z Garbage Collector” – ZGC for short – is an alternative garbage collector developed by Oracle to reduce the pause times of full GCs (i.e., complete collections across all heap regions) to a maximum of 10 ms – without reducing the overall throughput by more than 15% compared to G1GC.

    For now, ZGC is available for Linux only. You can enable it with the following JVM flags:

    -XX:+UnlockExperimentalVMOptions -XX:+UseZGC

    ZGC will reach production status in Java 15. I will describe this new garbage collector in more detail in the corresponding part of this series.

    (This experimental release is defined by JDK Enhancement Proposal 333.)

    Deprecations and Deletions

    This section lists all features marked as “deprecated” or removed from the JDK.

    Remove the Java EE and CORBA Modules

    JDK Enhancement Proposal 320 removes the following modules from the JDK:

    • java.xml.ws (JAX-WS)
    • java.xml.bind (JAXB)
    • java.activation (JAF)
    • java.xml.ws.annotation (Common Annotations)
    • java.corba (CORBA)
    • java.transaction (JTA)
    • java.se.ee (aggregator module for the six previously mentioned modules)
    • jdk.xml.ws (tools for JAX-WS)
    • jdk.xml.bind (tools for JAXB)

    The listed technologies were initially developed for the Java EE platform and were integrated into the standard edition “Java SE” when Java 6 was released. They were marked “deprecated” in Java 9 and finally removed with Java 11.

    Should you miss these libraries after upgrading to Java 11, you can pull them back into your project, e.g., via Maven dependencies.

    Deprecate the Nashorn JavaScript Engine

    The JavaScript engine “Rhino” introduced in JDK 8 was marked as “deprecated for removal” with JEP 335 in Java 11 and is to be removed entirely in one of the subsequent versions.

    The reason for this is the rapid development of ECMAScript (the standard behind JavaScript) and the node.js engine, which have made further development of Rhino too costly.

    Deprecate the Pack200 Tools and API

    Pack200 is a special compression method introduced in Java 5 that achieves higher compression rates than standard methods, especially for .class and .jar files. Pack200 was developed to save as much bandwidth as possible in the early 2000s.

    However, the algorithm is complex, and the further development costs are no longer in proportion to the benefits in times of 100-Mbit Internet lines.

    Therefore, the tool has been marked as “deprecated” with JDK Enhancement Proposal 336 and should be removed in one of the following Java releases.

    JavaFX Goes Its Own Way

    Starting with Java 11, JavaFX (and the associated javapackager tool) is no longer shipped with the JDK. Instead, you can download it as a separate SDK from the JavaFX homepage.

    (There is no JDK enhancement proposal for this change.)

    Other Changes in Java 11 (Which You Don’t Necessarily Need to Know as a Java Developer)

    This section lists other changes under the hood of Java 11 that you probably won’t notice directly. Nevertheless, it may be useful to skim the following sections.

    Unicode 10

    With JDK Enhancement Proposal 327, Java 11 has been extended to include support for Unicode 10.0.

    What does that mean?

    Especially the String and Character classes had to be extended by the new code blocks and characters. This is relevant, for example, for String.toUpperCase() and toLowerCase() as well as for Character.getName() and Character.UnicodeBlock.of().

    Here is a short code example (the Unicode code point 0x1F929 stands for the emoji 🤩):

    System.out.println("name  = " + Character.getName(0x1F929));
    System.out.println("block = " + Character.UnicodeBlock.of(0x1F929));Code language: Java (java)

    Up to Java 10, the code prints the following:

    name  = null
    block = nullCode language: plaintext (plaintext)

    Java 11, on the other hand, knows the new emoji – what luck ;-)

    name  = GRINNING FACE WITH STAR EYES
    block = SUPPLEMENTAL_SYMBOLS_AND_PICTOGRAPHSCode language: plaintext (plaintext)

    I cannot print a valuable example for String.toUpperCase() and toLowerCase() as the new exotic scripts “Masaram Gondi”, “Nushu”, “Soyombo”, and “Zanabazar Square” can hardly be displayed by any system.

    Improve Aarch64 Intrinsics

    JDK Enhancement Proposal 315 improves existing and adds new so-called “intrinsics” for the AArch64 platform (i.e., 64-bit ARM CPUs).

    Intrinsics are used to execute architecture-specific assembly code instead of Java code, which significantly improves the performance of specific JDK class library methods.

    This JEP adds intrinsics for trigonometric functions and the logarithm function, and optimizes existing instrinsics for methods such as String.compareTo() and String.indexOf().

    Transport Layer Security (TLS) 1.3

    Until now, the JDK supported the following security protocols:

    • Secure Socket Layer (SSL) version 3.0
    • Transport Layer Security (TLS) versions 1.0, 1.1, and 1.2
    • Datagram Transport Layer Security (DTLS) versions 1.0 and 1.2

    JEP 332 extends this list to include the modern security standard TLS 1.3.

    ChaCha20 and Poly1305 Cryptographic Algorithms

    JEP 329 adds two cryptographic algorithms to the JDK – ChaCha20 and Poly1305. They are used, for example, by the security protocols mentioned in the previous section.

    Key Agreement with Curve25519 and Curve448

    With JEP 324, the key exchange protocols of the JDK are extended by the elliptic curves “Curve25519” and “Curve448”. Both curves enable high-speed encryption and decryption of the symmetric key to be used.

    Dynamic Class-File Constants

    The .class file format was extended to include the CONSTANT_Dynamic constant, offering “language designers and compiler implementors broader options for expressivity and performance”. Should you plan to develop a language or compiler, you can find more details in JDK Enhancement Proposal 309.

    Complete List of All Changes in Java 11

    This article has presented all the features of Java 11 that are defined in JDK Enhancement Proposals, as well as enhancements to the JDK class library that are not associated with any JEP.

    For a complete list of changes, see the official Java 11 Release Notes.

    Summary

    Java 11 now allows us to use “var” in lambda parameters.

    We can conveniently access HTTP interfaces using the new HttpClient.

    String has been extended with some helpful functions. Using Files.readString() and writeString(), we can finally read and write text files with a single line of code without a third party library, and with Path.of(), we can create Path objects more concisely than with Paths.get().

    We can use Epsilon GC to perform microbenchmarks without disruptive GC cycles.

    We can compile and execute small programs consisting of only one class with a single java call – or even make them executable using a “shebang”, as we know it from Perl, for example.

    Thanks to Nest-Based Access Control, the compiler no longer needs to insert synthetic access methods.

    And with Flight Recorder, a handy analysis tool, which until now could only be used with a support contract from Oracle, has been made freely available to everyone. I can only recommend trying it out!

    If you liked this overview, I’m happy about a comment or if you share the article via one of the share buttons at the end. Would you like to be informed when the next article goes online? Then click here to sign up for the HappyCoders newsletter.

  • Java 10 Features (with Examples)

    Java 10 Features (with Examples)

    With Java 10, on March 20, 2018, the six-month release cycle of the JDK began. Instead of waiting years for a major update, we are now treated to new features – and previews of new features – every six months.

    In this article, I’ll show you what’s new in Java 10.

    I have sorted the changes by relevance for daily developer work. Changes to the language itself are at the top, followed by enhancements to the JDK class library.

    Next come performance improvements, deprecations and deletions, and finally, other changes that we developers don’t notice much of (unless we’re working on the JDK itself).

    Local-Variable Type Inference (“var”)

    Since Java 10, we can use the keyword var to declare local variables (local means: within methods). This allows, for example, the following definitions:

    var i = 10;
    var hello = "Hello world!";
    var list = List.of(1, 2, 3, 4, 5);
    var httpClient = HttpClient.newBuilder().build();
    var status = getStatus();Code language: Java (java)

    For comparison – this is how the definitions look in classic notation:

    int i = 10;
    String hello = "Hello world!";
    List<Integer> list = List.of(1, 2, 3, 4, 5);
    HttpClient httpClient = HttpClient.newBuilder().build();
    Status status = getStatus();Code language: Java (java)

    To what extent you use var will probably lead to lengthy discussions in many teams. I use it if it is a) significantly shorter and b) I can clearly see the data type in the code.

    In the example above, this would be the case in lines 3 and 4 (for List and HttpClient). The classic notation is much longer in both cases. And the assignments on the right – i.e. List.of() and HttpClient.newBuilder().build() – let me clearly see the data type.

    In the following cases, on the other hand, I would refrain from using var:

    • In line 1, you don’t save a single character; here, I would stick with int.
    • In line 2, var is only minimally shorter than String – so I would rather use String here, too. But I also understand if teams decide otherwise.
    • In line 5, I would stick with the old notation. Otherwise, I can’t tell offhand what getStatus() returns. Is it an int? A String? An enum? A complex value object? Or even a JPA entity from the database?

    For a more detailed essay on when to use var and when not to, see the official style guidelines. Most importantly, agree on a consistent usage within your team.

    (Local-Variable Type Inference is defined in JDK Enhancement Proposal 286.)

    Immutable Collections

    With the methods Collections.unmodifiableList(), unmodifiableSet(), unmodifiableMap(), unmodifiableCollection() – and four further variants for sorted and navigable sets and maps – the Java Collections Framework offers the possibility to create unmodifiable wrappers for collection classes.

    Here is an example:

    List<Integer> list = new ArrayList<>();
    list.add(1);
    list.add(2);
    list.add(3);
    List<Integer> unmodifiable = Collections.unmodifiableList(list);Code language: Java (java)

    If we now try to add an element via the wrapper, we get an UnsupportedOperationException:

    unmodifiable.add(4);
    
    ⟶
    
    Exception in thread "main" java.lang.UnsupportedOperationException
    	at java.base/java.util.Collections$UnmodifiableCollection.add(...)
    	at ...Code language: Java (java)

    However, the wrapper does not prevent us from modifying the underlying list. All subsequent changes to it are also visible in the wrapper. This is because the wrapper does not contain a copy of the list, but a view:

    list.add(4);
    System.out.println("unmodifiable = " + unmodifiable);
    
    ⟶
    
    unmodifiable = [1, 2, 3, 4]Code language: Java (java)

    List.copyOf(), Set.copyOf(), and Map.copyOf()

    With Java 10, we now also have the possibility to create immutable copies of collections. For this purpose, we have the static interface methods List.copyOf(), Set.copyOf() and Map.copyOf().

    If we create such a copy and then modify the original collection, the changes will no longer affect the copy:

    List<Integer> immutable = List.copyOf(list);
    list.add(4);
    System.out.println("immutable = " + immutable);
    
    ⟶
    
    immutable = [1, 2, 3]Code language: Java (java)

    The attempt to change the copy is – just like when using unmodifiableList() – acknowledged with an UnsupportedOperationException:

    immutable.add(4);
    
    ⟶
    
    Exception in thread "main" java.lang.UnsupportedOperationException
        at java.base/java.util.ImmutableCollections.uoe(...)
        at java.base/java.util.ImmutableCollections$AbstractImmutableCollection.add(...)
        at ...Code language: Java (java)

    Note: Should you need a modifiable copy of the list, you can always use the copy constructor:

    List<Integer> copy = new ArrayList<>(list);Code language: Java (java)

    Collectors.toUnmodifiableList(), toUnmodifiableSet(), and toUnmodifiableMap()

    The collectors created using Collectors.toList(), toSet() and toMap() collect the elements of a Stream into mutable lists, sets and maps. The following example shows the use of these collectors and the subsequent modification of the results:

    List<Integer> list = IntStream.rangeClosed(1, 3).boxed().collect(Collectors.toList());
    Set<Integer> set = IntStream.rangeClosed(1, 3).boxed().collect(Collectors.toSet());
    Map<Integer, String> map = IntStream.rangeClosed(1, 3).boxed()
            .collect(Collectors.toMap(Function.identity(), String::valueOf));
    
    list.add(4);
    set.add(4);
    map.put(4, "4");
    
    System.out.println("list = " + list);
    System.out.println("set  = " + set);
    System.out.println("map  = " + map);
    Code language: Java (java)

    As you would expect, the program produces the following output (although the elements of the set and map may appear in a different order):

    list = [1, 2, 3, 4]
    set  = [1, 2, 3, 4]
    map  = {1=1, 2=2, 3=3, 4=4}Code language: plaintext (plaintext)

    In Java 10, the methods Collectors.toUnmodifiableList(), toUnmodifiableSet(), and toUnmodifiableMap() have been added, which now allow us to collect stream elements into immutable lists, sets, and maps:

    List<Integer> list =
        IntStream.rangeClosed(1, 3).boxed().collect(Collectors.toUnmodifiableList());
    
    Set<Integer> set =
        IntStream.rangeClosed(1, 3).boxed().collect(Collectors.toUnmodifiableSet());
    
    Map<Integer, String> map = 
        IntStream.rangeClosed(1, 3)
            .boxed()
            .collect(Collectors.toUnmodifiableMap(Function.identity(), String::valueOf));Code language: Java (java)

    Attempting to modify such a list, set or map is met with an UnsupportedOperationException.

    (There is no JDK enhancement proposal for this extension.)

    Optional.orElseThrow()

    Optional, introduced in Java 8, provides the get() method to retrieve the value wrapped by the Optional. Before calling get(), you should always check with isPresent() whether a value exists:

    Optional<String> result = getResult();
    if (result.isPresent()) {
      System.out.println(result.get());
    }Code language: Java (java)

    If the Optional is empty, get() would otherwise throw a NoSuchElementException.

    To minimize the risk of an unintended exception, IDEs and static code analysis tools issue a warning if get() is used without isPresent():

    IntelliJ warning for Optional.get() without isPresent()
    IntelliJ warning for Optional.get() without isPresent()

    However, there are also cases where such an exception is desired. Previously, one had to add appropriate @SuppressWarnings annotations to the code to suppress the warnings.

    Java 10 offers a nicer solution with the method orElseThrow(): The method is an exact copy of the get() method – only the name is different. Since it is clear from the name that this method can throw an exception, misunderstandings are ruled out. The static code analysis no longer criticizes the usage as a code smell.

    Here is the source code of both methods for comparison:

    public T get() {
      if (value == null) {
        throw new NoSuchElementException("No value present");
      }
      return value;
    }
    
    public T orElseThrow() {
      if (value == null) {
        throw new NoSuchElementException("No value present");
      }
      return value;
    }Code language: Java (java)

    (There is no JDK enhancement proposal for this extension.)

    Time-Based Release Versioning

    After the version format was (finally) changed from the somewhat cryptic 1.8.0_291 to a much more readable 9.0.4 from Java 8 to 9, JEP 322 added the release date in Java 10 – and for Java 11, an “LTS” (Long-Term Support) in advance.

    The command java -version returns the following answers in Java 8 to 11:

    Java 8:

    $ java -version
    java version "1.8.0_291"Code language: plaintext (plaintext)

    Java 9:

    $ java -version
    java version "9.0.4"Code language: plaintext (plaintext)

    Java 10:

    $ java -version
    java version "10.0.2" 2018-07-17Code language: plaintext (plaintext)

    Java 11:

    $ java -version
    java version "11.0.11" 2021-04-20 LTSCode language: plaintext (plaintext)

    To date, there has been no further change to the versioning scheme.

    Parallel Full GC for G1

    With JDK 9, the Garbage-First (G1) garbage collector has replaced the parallel collector as the default GC.

    While the parallel GC could perform a full garbage collection (i.e., cleaning up all regions of the heap) in parallel with the running application, this was not possible with G1 until now. G1 had to temporarily stop the application (“stop-the-world”), leading to noticeable latencies.

    Since G1 was designed to avoid full collections as much as possible, this rarely posed a problem.

    In Java 10, with JDK Enhancement Proposal 307, the full gargage collection of the G1 collector has now also been parallelized. The worst-case latencies (pause times) reach those of the parallel collector.

    Application Class-Data Sharing

    Since many Java developers are not familiar with it, I would like to briefly digress and explain class-data sharing (without the “application” prefix).

    Class-Data Sharing

    When a JVM starts, it loads the JDK class library from the file system (up to JDK 8 from the jre/lib/rt.jar file; since JDK 9 from the jmod files in the jmods directory). In the process, the class files are extracted from the archives, converted into an architecture-specific binary form, and stored in the main memory of the JVM process:

    Loading the JDK class library without class data sharing – single JVM
    Loading the JDK class library without class data sharing – single JVM

    If multiple JVMs are started on the same machine, this process repeats. Each JVM keeps its copy of the class library in memory:

    Loading the JDK class library without class data sharing – multiple JVMs
    Loading the JDK class library without class data sharing – multiple JVMs

    Class-data sharing (“CDS”) has two goals:

    1. Reducing the startup time of the JVM.
    2. Reducing the JVM’s memory footprint.

    Class-data sharing works as follows:

    1. Using the command java -Xshare:dump, you initially create a file called classes.jsa (JSA stands for Java Shared Archive). This file contains the complete class library in a binary format for the current architecture.
    2. When the JVM is started, the operating system “maps” this file into the JVM’s memory using memory mapped I/O. Firstly, this is faster than loading the jar or jmod files. And secondly, the operating system loads the file into RAM only once, providing each JVM process with a read-only view of the same memory area.

    The following graphic shall illustrate this:

    Loading the JDK class library with Class-Data Sharing
    Loading the JDK class library with Class-Data Sharing

    Application Class-Data Sharing – Step by Step

    Application class-data sharing (also called “Application CDS” or “AppCDS”) extends CDS by the possibility to store not only the JDK class library but also the classes of your application in a JSA file and to share them among the JVM processes.

    I’ll show you how this works with a simple example (you can also find the source code in this GitHub repository):

    The following two Java files are located in the src/eu/happycoders/appcds directory:

    Main.java:

    package eu.happycoders.appcds;
    
    public class Main {
      public static void main(String[] args) {
        new Greeter().greet();
      }
    }Code language: Java (java)

    Greeter.java:

    package eu.happycoders.appcds;
    
    public class Greeter {
      public void greet() {
        System.out.println("Hello world!");
      }
    }Code language: Java (java)

    We compile and package the classes as follows and then start the main class:

    javac -d target/classes src/eu/happycoders/appcds/*.java
    jar cf target/helloworld.jar -C target/classes .
    
    java -cp target/helloworld.jar eu.happycoders.appcds.MainCode language: plaintext (plaintext)

    We should now see the “Hello World!” greeting.

    To use Application CDS, we next need to create a list of classes that the application uses. To do this, we run the following command (on Windows, you must omit the backslashes and write everything on one line):

    java -Xshare:off -XX:+UseAppCDS \
        -XX:DumpLoadedClassList=helloworld.lst \
        -cp target/helloworld.jar eu.happycoders.appcds.MainCode language: plaintext (plaintext)

    Attention: This command only works in OpenJDK. In Oracle JDK, you will get a warning about Application CDS being a commercial feature that you must unlock first (with -XX:+UnlockCommercialFeatures). So it’s best to use OpenJDK!

    In your working directory, you should now find the file helloworld.lst with roughly the following content:

    java/lang/Object
    java/lang/String
    ...
    eu/happycoders/appcds/Main
    eu/happycoders/appcds/Greeter
    ...
    java/lang/Shutdown
    java/lang/Shutdown$LockCode language: plaintext (plaintext)

    As you can see, not only the application’s classes are listed, but also those of the JDK class library.

    Next, we create the JSA file from the class list.

    (Note: While you could have specified the target/classes directory as classpath in the previous steps, the following step only works with the packaged helloworld.jar file.)

    java -Xshare:dump -XX:+UseAppCDS \
        -XX:SharedClassListFile=helloworld.lst \
        -XX:SharedArchiveFile=helloworld.jsa \
        -cp target/helloworld.jarCode language: plaintext (plaintext)

    During processing, you will see some statistics, and afterward, you will find the file helloworld.jsa in the working directory. It should be about 9 MB in size.

    To use the JSA file, you now start the application as follows:

    java -Xshare:on -XX:+UseAppCDS \
        -XX:SharedArchiveFile=helloworld.jsa \
        -cp target/helloworld.jar eu.happycoders.appcds.MainCode language: plaintext (plaintext)

    If everything worked, you should see a “Hello world!” again.

    The following graphic summarizes how application class-data sharing works:

    Application Class Data Sharing ("AppCDS")
    Application Class Data Sharing (“AppCDS”)

    (Application CDS is defined in Java Enhancement Proposal 310.)

    Experimental Java-Based JIT Compiler

    Since Java 9, the Graal Compiler (a Java compiler written in Java) has been supplied as an experimental Ahead-of-Time (AOT) compiler. This allows a Java program to be compiled into a native executable file (e.g., an exe file on Windows).

    In Java 10, JEP 317 created the possibility of using Graal also as a just-in-time (JIT) compiler – at least on the Linux/x64 platform. For this purpose, Graal uses the JVM Compiler Interface (JVMCI) introduced in JDK 9.

    You can activate Graal via the following option on the java command line:

    -XX:+UnlockExperimentalVMOptions -XX:+UseJVMCICompiler

    Other Changes in Java 10 (Which You Don’t Necessarily Need to Know as a Java Developer)

    This section lists those Java 10 features that I don’t think every Java developer needs to know about in detail.

    On the other hand, it doesn’t hurt to have heard of them at least once. :-)

    Heap Allocation on Alternative Memory Devices

    With the implementation of JEP 316, you can now allocate the Java heap – instead of on conventional RAM – on an alternative memory device such as NV-DIMM (non-volatile memory).

    The alternative memory must be provided by the operating system via a file system path (e.g., /dev/pmem0) and is included via the following option on the java command line:

    -XX:AllocateHeapAt=<path>

    Additional Unicode Language-Tag Extensions

    JDK Enhancement Proposal 314 adds so-called “language-tag extensions”. These allow to store the following additional information in a Locale object:

    KeyDescriptionExamples
    cuCurrencyISO 4217 currency codes
    fwFirst day of weeksun (Sunday), mon (Monday)
    rgRegion overrideuszzzz (US units)
    tzTimezoneuslax (Los Angeles), deber (Berlin)

    The following two extensions have already existed since Java 7:

    KeyDescriptionExamples
    caCalendargregorian, buddhist, chinese
    nuNumbering systemarab, roman

    The following example source code shows the creation of a German locale (“de-DE”) with US dollar as currency (“cu-usd”), Wednesday as the first day of the week (“fw-wed”), and the Los Angeles time zone (“tz-uslax”):

    Locale locale = Locale.forLanguageTag("de-DE-u-cu-usd-fw-wed-tz-uslax");
    
    Currency currency = Currency.getInstance(locale);
    
    Calendar calendar = Calendar.getInstance(locale);
    DayOfWeek firstDayOfWeek = DayOfWeek.of((calendar.getFirstDayOfWeek() + 5) % 7 + 1);
    
    DateFormat dateFormat = DateFormat.getTimeInstance(LONG, locale);
    String time = dateFormat.format(new Date());
    
    System.out.println("currency       = " + currency);
    System.out.println("firstDayOfWeek = " + firstDayOfWeek);
    System.out.println("time           = " + time);Code language: Java (java)

    At the time of writing this article (8:45 p.m. in Berlin), the program prints the following:

    currency       = USD
    firstDayOfWeek = WEDNESDAY
    time           = 11:45:50 PDTCode language: plaintext (plaintext)

    In Java 9, the additional tags are ignored, and the program prints the following (40 seconds later):

    currency       = EUR
    firstDayOfWeek = MONDAY
    time           = 20:46:30 MESZCode language: plaintext (plaintext)

    Since probably only very few Java developers have to deal with such details, I have placed this extension under “Other Changes”.

    Garbage Collector Interface

    Until Java 9, some parts of the garbage collector source code were hidden within long if-else chains deep in the sources of the Java interpreter and the C1 and C2 compilers. To implement a new garbage collector, developers had to know all these places and extend them for their specific needs.

    JDK Enhancement Proposal 304 introduces a clean garbage collector interface in the JDK source code, isolating the garbage collector algorithms from the interpreter and compilers.

    The interface will allow developers to add new GCs without having to adjust the code base of the interpreter and compiler.

    Root Certificates

    Until Java 9, the OpenJDK did not include root certificates in the cacerts keystore file, so SSL/TLS-based features were not readily executable.

    With JDK Enhancement Proposal 319, the root certificates contained in the Oracle JDK were adopted in the OpenJDK.

    Thread-Local Handshakes

    Thread-local handshakes are an optimization to improve VM performance on x64 and SPARC-based architectures. The optimization is enabled by default. You can find details in JDK Enhancement Proposal 312.

    Remove the Native-Header Generation Tool

    With JEP 313, the javah tool was removed, which developers could use to generate native header files for JNI. The functionality has been integrated into the Java compiler, javac.

    Consolidate the JDK Forest into a Single Repository

    In JDK 9, the source code was located in eight separate Mercurial repositories, which often led to considerable additional work during development. For over a thousand changes, it was necessary to distribute logically related commits across multiple repositories.

    With JEP 296, the entire JDK source code was consolidated into a monorepo. The monorepo now allows atomic commits, branches, and pull requests, making development on the JDK much easier.

    Complete List of All Changes in Java 10

    This article has presented all the features of Java 10 that are defined in JDK Enhancement Proposals, as well as enhancements to the JDK class library that are not associated with any JEP.

    For a complete list of changes, see the official Java 10 Release Notes.

    Conclusion

    With var, immutable collections, and Optional.orElseThrow(), Java 10 has provided us with some helpful new tools. The G1 garbage collector now works almost entirely in parallel. And with Application Class-Data Sharing, we can further speed up the start of our application and reduce its memory footprint. If you feel like experimenting, you can activate the Graal compiler written in Java.

    If you liked the article, feel free to leave me a comment or share it using one of the share buttons at the end. Do you want to be informed when the next article is published on HappyCoders? Then click here to sign up for the HappyCoders newsletter.

  • compareTo, Comparable, Comparator – Comparing Objects in Java

    compareTo, Comparable, Comparator – Comparing Objects in Java

    This article explains:

    • How to compare two objects in Java?
    • What is a Comparator, and what do you need it for?
    • What are the possibilities for creating a Comparator?
    • How to create a Comparator with Java 8
    • What is the difference between Comparator and Comparable?

    But first, the question: Why do you want to compare a Java object with another?

    The most significant application for comparing two objects is certainly the sorting of object lists or arrays. To sort objects, the program has to compare them and find out if one object is smaller, larger, or equal to another.

    You can find the article’s source code in this GitHub repository.

    How to Compare Two Objects in Java?

    You compare Java primitives (int, long, double, etc.) using the operators <, <=, ==, =>, >.

    That does not work for objects.

    For objects, you either use a compare or a compareTo method instead. I will explain both methods using Strings and a self-written “Student” class as examples.

    How to Compare Two Strings in Java?

    Suppose we have the following two strings:

    String s1 = "Happy";
    String s2 = "Coders";Code language: Java (java)

    Now we want to determine if s1 is less than, greater than, or equal to s2. In other words: whether – according to alphabetical sorting* – s1 would come before or after s2.

    We do that as follows:

    int result = s1.compareTo(s2);Code language: Java (java)

    The result variable now contains:

    • a value less than 0 if s1 comes before s2 according to alphabetical sorting
    • 0, if s1 and s2 are equal (i.e. s1.equals(s2) is true)
    • a value greater than 0 if s1 comes after s2 according to alphabetical sorting

    In the example above, result would be greater than 0 because “Happy” would be sorted after “Coders”.

    (* In the case of String.compareTo(), alphabetical means: according to the Unicode values of the String’s characters, e.g., an uppercase letter always comes before a lowercase letter, and German umlauts come only after all regular upper and lowercase letters.)

    Sorting Strings in Java

    The compareTo() method is used behind the scenes to sort an array or list of objects, for example as follows:

    public class NameSortExample {
      public static void main(String[] args) {
        String[] names = {"Mary", "James", "Patricia", "John", "Jennifer", "Robert"};
        Arrays.sort(names);
        System.out.println(Arrays.toString(names));
      }
    }Code language: Java (java)

    The program prints the names in alphabetical order:

    [James, Jennifer, John, Mary, Patricia, Robert]Code language: plaintext (plaintext)

    (The tutorial “Sorting in Java” will show you which other possibilities exist to sort objects or primitives like int, long, double.)

    But what if we don’t want to sort strings alphabetically at all, but by their length, for example? For this, we need a so-called Comparator. Before we get to that, let me first explain the Comparable interface, which we just used.

    The Java Comparable Interface

    The String.compareTo() method we used above is derived from the java.lang.Comparable interface, which is implemented by the String class.

    The Comparable interface defines only this single method. All classes, whose objects should be comparable, implement it. Besides String, these are, for example, Integer, BigInteger, Long, Date, LocalDateTime, and many more.

    The order resulting from the compareTo() method is called “natural order”: Strings are sorted alphabetically; dates and times are sorted in chronological order.

    The following section will show you how to make a custom class comparable (and thus sortable).

    Java Comparable Example

    To make custom classes comparable and thus sortable, you have to implement the Comparable interface and its compareTo() method.

    The following example shows how to do this for a Student class that should be sorted by matriculation number (ID) by default:

    public class Student implements Comparable<Student> {
      private int id;
      private String firstName;
      private String lastName;
    
      // ... constructor ...
      // ... getters and setters ...
      // ... toString() method ...
    
      @Override
      public int compareTo(Student o) {
        if (this.id < o.id) {
          return -1;
        } else if (this.id == o.id) {
          return 0;
        } else {
          return 1;
        }
      }
    }Code language: Java (java)

    Using the ternary operator, you can write the compareTo() method as a one-liner:

    @Override
    public int compareTo(Student o) {
      return this.id < o.id ? -1 : (this.id == o.id ? 0 : 1);
    }Code language: Java (java)

    It is even more elegant to call the static Integer.compare() method to compare the two int values:

    @Override
    public int compareTo(Student o) {
      return Integer.compare(this.id, o.id);
    }Code language: Java (java)

    Don’t worry, the JVM inlines this method call, so there won’t be a performance loss.

    Attention – Trap: Subtracting ints

    Sometimes you can see the following code in a compareTo() method:

    return this.id - o.id;

    You should never write it this way, because it will not work if, for example, this.id is -2,000,000,000 and o.id is 1,000,000,000. In this case, this.id is smaller, so the compareTo() method should return a negative number. But it does not because the subtraction causes an arithmetic underflow – the result of the subtraction is 1,294,967,296 – a positive number!

    And here is an example that creates three students, writes them to a list, and then sorts them:

    public class StudentSortExample {
      public static void main(String[] args) {
        List<Student> students = new ArrayList<>();
        students.add(new Student(47271, "Kerrie", "Adkins"));
        students.add(new Student(99319, "Aarron", "Wicks"));
        students.add(new Student(11056, "Kaya", "Molina"));
    
        Collections.sort(students);
    
        System.out.println("students = " + students);
      }
    }Code language: Java (java)

    As expected, the students are sorted by their matriculation number (I inserted the line breaks manually for clarity):

    students = [Student{id=11056, firstName='Kaya', lastName='Molina'},
        Student{id=47271, firstName='Kerrie', lastName='Adkins'},
        Student{id=99319, firstName='Aarron', lastName='Wicks'}]Code language: plaintext (plaintext)

    Let’s get back to the String that we want to sort by length, not alphabetically.

    The Java Comparator Interface

    To sort two objects by an order other than their natural order (or to sort objects of classes that do not implement Comparable at all), we have to use the java.util.Comparator interface.

    The interface defines the method compare(T o1, T o2) to compare the two passed objects. The method has the following return values – analogous to the compareTo() method:

    • a value less than 0 if o1 is less than o2
    • 0, if o1 and o2 are equal (i.e. o1.equals(o2) returns true)
    • a value greater than 0 if o1 is greater than o2

    Java Comparator Example: Sorting Strings by Length

    A comparator, which compares strings by their length, would be implemented as follows:

    public class StringLengthComparator implements Comparator<String> {
      @Override
      public int compare(String o1, String o2) {
        if (o1.length() < o2.length()) {
          return -1;
        } else if (o1.length() == o2.length()) {
          return 0;
        } else {
          return 1;
        }
      }
    }Code language: Java (java)

    Again we can compress the code to a single line using the ternary operator:

    @Override
    public int compare(String o1, String o2) {
      return o1.length() < o2.length() ? -1 : (o1.length() == o2.length() ? 0 : 1);
    }Code language: Java (java)

    We can use the StringLengthComparator as follows:

    public class NameSortByLengthExample {
      public static void main(String[] args) {
        String[] names = {"Mary", "James", "Patricia", "John", "Jennifer", "Robert"};
        Arrays.sort(names, new StringLengthComparator());
        System.out.println(Arrays.toString(names));
      }
    }Code language: Java (java)

    The names are no longer sorted alphabetically, but by their length in ascending order:

    [Mary, John, James, Robert, Patricia, Jennifer]Code language: plaintext (plaintext)

    How to Create a Comparator?

    Up to Java 7, you could create a comparator – as shown in the example above – only by implementing the Comparator interface.

    Since Java 8, you can also notate a comparator as a Lambda expression or – quite conveniently, as you will see in a moment – using the methods Comparator.comparing(), thenComparing(), and reversed().

    Comparator as a Public Class

    Using the example StringLengthComparator, we have already seen the first variant: We write a public class and pass an instance of it to the sorting method:

    Arrays.sort(names, new StringLengthComparator());Code language: Java (java)

    If we want to sort by string length in several places, we can also extract a constant:

    private static final StringLengthComparator STRING_LENGTH_COMPARATOR =
        new StringLengthComparator();Code language: Java (java)

    Alternatively, we could define a singleton:

    public class StringLengthComparator implements Comparator<String> {
      public static final StringLengthComparator INSTANCE = new StringLengthComparator();
    
      private StringLengthComparator() {}
    
      @Override
      public int compare(String o1, String o2) {
        return Integer.compare(o1.length(), o2.length());
      }
    }Code language: Java (java)

    A public class also gives us the possibility to control the sorting behavior by constructor parameters. For example, we could make the sort order configurable:

    public class StringLengthComparator implements Comparator<String> {
      public static final StringLengthComparator ASC = new StringLengthComparator(true);
      public static final StringLengthComparator DESC = new StringLengthComparator(false);
    
      private final boolean ascending;
    
      private StringLengthComparator(boolean ascending) {
        this.ascending = ascending;
      }
    
      @Override
      public int compare(String o1, String o2) {
        int result = Integer.compare(o1.length(), o2.length());
        return ascending ? result : -result;
      }
    }
    Code language: Java (java)

    We would use this comparator, for example, as follows to sort our list of names in descending order:

    Arrays.sort(names, StringLengthComparator.DESC);Code language: Java (java)

    A public class thus gives us the greatest possible freedom and flexibility in defining our comparator.

    Comparator as an Anonymous Class

    If we need a comparator in only one place, we can also define it as an anonymous class.

    With the following code, for example, we sort our students by last name:

    students.sort(new Comparator<Student>() {
      @Override
      public int compare(Student o1, Student o2) {
        return o1.getLastName().compareTo(o2.getLastName());
      }
    });Code language: Java (java)

    Since some last names occur more frequently, we should perhaps sort better by last and first name. We do this by first checking if the last names are the same. If this is the case, we also compare the first names:

    students.sort(new Comparator<Student>() {
      @Override
      public int compare(Student o1, Student o2) {
        int result = o1.getLastName().compareTo(o2.getLastName());
        if (result == 0) {
          result = o1.getFirstName().compareTo(o2.getFirstName());
        }
        return result;
      }
    });Code language: Java (java)

    In both cases, a modern IDE like IntelliJ will tell us that you can do this more elegantly from Java 8 on (and it will ideally also offer us to refactor the code):

    Refactoring a Comparator to a Lambda expression

    You will find out what the result is in the next section.

    Writing a Java Comparator as a Lambda

    From Java 8 on, we can use a Lambda instead of the anonymous class. Sorting by last name is then done as follows:

    students.sort((o1, o2) -> o1.getLastName().compareTo(o2.getLastName()));Code language: Java (java)

    Sorting by last and first name is also made shorter by the Lambda notation:

    students.sort((o1, o2) -> {
      int result = o1.getLastName().compareTo(o2.getLastName());
      if (result == 0) {
        result = o1.getFirstName().compareTo(o2.getFirstName());
      }
      return result;
    });Code language: Java (java)

    Things will get really nice with the method that I will show in the following section. A modern IDE also offers us this step:

    Refactoring to a Comparator chain

    Java 8: Creating a Comparator With Comparator.comparing()

    The most elegant method for constructing a comparator, which is also available since Java 8, is the use of Comparator.comparing(), Comparator.thenComparing() and Comparator.reversed() – as well as their variations for the primitive data types int, long and double.

    To sort the students by last name, we can write the following:

    students.sort(Comparator.comparing(Student::getLastName));Code language: Java (java)

    We simply pass a reference to the method that returns the field to be sorted by.

    We sort by last and first names as follows:

    students.sort(Comparator.comparing(Student::getLastName)
            .thenComparing(Student::getFirstName));Code language: Java (java)

    This notation makes it very easy for us to also cover the scenario where two students have the same last name and the same first name. To sort them additionally by ID, we just have to add a thenComparingInt():

    students.sort(Comparator.comparing(Student::getLastName)
            .thenComparing(Student::getFirstName)
            .thenComparingInt(Student::getId));Code language: Java (java)

    Comparator.comparing() and the comparator chains we can build with it make the code shorter and more concise.

    Comparable vs. Comparator – Summary

    In the course of the article, we learned about the interfaces java.lang.Comparable and java.util.Comparator. Let me summarize the differences in a few sentences:

    By implementing the Comparable.compareTo() method, we define the natural order of objects of a class, i.e., the order by which the objects of the class are sorted by default, e.g., by Arrays.sort(arrayOfObjects) or Collections.sort(listOfObjects).

    Using a Comparator, we can sort objects in an order other than their natural order. And we can sort objects that do not implement the Comparable interface, i.e., that do not have a natural order.

    Since Java 8, comparators can be defined very elegantly, as for example in students.sort(Comparator.comparing(Student::getLastName).

  • Java Deep Reflection: How to Hack Integer and String

    Java Deep Reflection: How to Hack Integer and String

    I am currently reading the book “The Pragmatic Programmer” by Andrew Hunt and David Thomas. In this book, the authors give the following task:

    Which of these “impossible” things can happen?

    […]
    3. In C++: a = 2; b = 3; if (a + b != 5) exit(1);
    […]

    One of the correct answers is 3. In C++ there are several reasons why the condition “a + b != 5” could be met:

    • Operator overloading: you can have, for example, the ‘+’ operator perform a multiplication.
    • Variable aliasing: b is an alias for a, so the assignment b = 3 also sets a to 3, making the sum 6.

    Since neither of these is available in Java, I was wondering: Can I write the same code in Java so that the condition is met? The answer is yes. You will learn how this is possible in this article.

    You can find the article’s code examples in my GitHub-Repository.

    2 + 3 = 5

    Let’s start very simply: with a main function, in which two primitive ints, a and b, are declared, followed by the code we want to hack:

    import static java.lang.System.exit;
    
    public class ImpossibleThings1 {
      public static void main(String[] args) {
        int a, b;
        a = 2; b = 3; if (a + b != 5) exit(1);
      }
    }Code language: Java (java)

    Of course, in this example, a + b = 5, so that the program ends regularly, i.e., with exit code 0.

    2 + 3 = 6: Deep Reflection with Integer

    It does not need too many changes to make the condition true (that 2 + 3 is not 5) and the program end with error code 1:

    public class ImpossibleThings2 {
      static {
        try {
          Field VALUE = Integer.class.getDeclaredField("value");
          VALUE.setAccessible(true);
          VALUE.set(2, 3);
        } catch (ReflectiveOperationException e) {
          throw new Error(e);
        }
      }
    
      public static void main(String[] args) {
        Integer a, b;
        a = 2; b = 3; if (a + b != 5) exit(1);
      }
    }Code language: Java (java)

    Here is the proof:

    Screenshot showing the output "exit code 1"
    Screenshot showing the output “exit code 1”

    What have we done? We use Integer instead of int and make use of extensive autoboxing and unboxing. In the next section, I will describe what exactly is going on here.

    Auto(un)boxing uncovered

    In the following example, I have replaced autoboxing and unboxing with explicit boxing and unboxing. This makes clearer what happens. The changes are marked yellow (to facilitate this, I had to use a raw text box here).

    public class ImpossibleThings3 {
      static {
        try {
          Field VALUE = Integer.class.getDeclaredField("value");
          VALUE.setAccessible(true);
          Integer two = Integer.valueOf(2);
          VALUE.set(two, 3);
        } catch (ReflectiveOperationException e) {
          throw new Error(e);
        }
      }
    
      public static void main(String[] args) {
        Integer a, b;
        a = Integer.valueOf(2);
        b = Integer.valueOf(3);
        if (a.intValue() + b.intValue() != 5) exit(1);
      }
    }

    Integer.valueOf() returns cached integer instances for the values -128 to 127.*

    An Integer object stores the actual value in a private field called value. You can retrieve that value via intValue().

    In the static initializer, we get the cached Integer object for the number 2. Using deep reflection, we set its value to the number 3. Since value is a private field, we must first allow access to it with Field.setAccessible(true).

    If we would now print this object with System.out.println(two), we would see this “3”.

    In the main method, a = 2 is boxed to a = Integer.valueOf(2), which, in turn, returns the same cached Integer instance as two, whose value is now 3. b is also 3, so a + b gives 6, which is known to be unequal to 5 (unless the 5 has also been “hacked” … which, as far as I know, is not possible with an int primitive).

    (*This behavior is not guaranteed, but in practice, it is so. You can increase the cached integer range with -XX:AutoBoxCacheMax.)

    Deep Reflection with Strings

    You can do the same with Strings. The following examples work with Java 9 or higher. An adaptation for older versions follows below.

    public class ImpossibleThings4 {
      static {
        try {
          Field VALUE = String.class.getDeclaredField("value");
          VALUE.setAccessible(true);
          VALUE.set("Hello world", "You have been hacked".getBytes());
        } catch (ReflectiveOperationException e) {
          throw new Error(e);
        }
      }
    
      public static void main(String[] args) {
        System.out.println("Hello world");
      }
    }Code language: Java (java)

    The output of this program is “You have been hacked”. Here’s the proof:

    Screenshot showing the output of "You have been hacked"
    Screenshot showing the output of “You have been hacked”

    However, it is not always as simple as it seems in this example. To what extent we can manipulate strings with deep reflection depends on three factors:

    • whether Strings exist as constants or are created at runtime,
    • whether Strings contain special characters that cannot be encoded as Latin-1,
    • which Java version we use.

    Strings must be constants

    First of all, Strings must be defined as constants. Only constants, if they are the same, are replaced by the same object reference.

    The following still works:

    public class ImpossibleThings5 {
      static { ... }
    
      public static void main(String[] args) {
        System.out.println("Hello" + " " + "world");
      }
    }Code language: Java (java)

    Here the compiler already concatenates the three parts into a single String – so that, at runtime, this is the same String as the one whose value content we change.

    The following, however, does not work:

    public class ImpossibleThings6 {
      static { ... }
    
      public static void main(String[] args) {
        System.out.println("Hello " + getName());
      }
    
      private static String getName() {
        return "world";
      }
    }Code language: Java (java)

    Here, “Hello ” and “world” are concatenated only at runtime. The concatenation creates a new String object with value containing “Hello world”.

    Comparing object identities

    It gets clearer if we look at the identities of the String objects. Looking at the first String example again:

    public class ImpossibleThings4WithIdentity {
      static {
        try {
          Field VALUE = String.class.getDeclaredField("value");
          VALUE.setAccessible(true);
          String s1 = "Hello world";
          System.out.println("identityHashCode(s1) = " + System.identityHashCode(s1));
          VALUE.set(s1, "You have been hacked".getBytes());
        } catch (ReflectiveOperationException e) {
          throw new Error(e);
        }
      }
    
      public static void main(String[] args) {
        String s2 = "Hello world";
        System.out.println("identityHashCode(s2) = " + System.identityHashCode(s2));
        System.out.println(s2);
      }
    }Code language: Java (java)

    The output is:

    Screenshot displaying the object identities
    Screenshot displaying the object identities

    The String object s1, which we modify in the static initializer, is, therefore, identical* to the String object s2, which we print out in the main method. So we print out precisely the String that we have changed using deep reflection.

    Let’s check the same for the String we concatenated from String constants in the source code:

    public class ImpossibleThings5WithIdentity {
      static { ... }
    
      public static void main(String[] args) {
        String s2 = "Hello" + " " + "world";
        System.out.println("identityHashCode(s2) = " + System.identityHashCode(s2));
        System.out.println(s2);
      }
    }Code language: Java (java)

    We see the following output:

    Screenshot displaying the object identities
    Screenshot displaying the object identities

    Also in this example, the String objects s1 and s2 are identical.*

    And finally, we check the object identities in the third variant, where the getName() method returns part of the String:

    public class ImpossibleThings6WithIdentity {
      static { ... }
    
      public static void main(String[] args) {
        String s2 = "Hello " + getName();
        System.out.println("identityHashCode(s2) = " + System.identityHashCode(s2));
        System.out.println(s2);
      }
    
      private static String getName() {
        return "world";
      }
    }Code language: Java (java)

    Here is the output of the third test:

    Screenshot displaying the object identities
    Screenshot displaying the object identities

    So we have confirmed that s1 and s2 are two different String objects. Therefore, changing s1 by reflection does not affect s2.

    (* Two non-identical objects could also have the same identity hash code. We would still have to check the identity with s1 == s2. However, the probability is minimal, so for our examples, comparing hash codes is sufficient.)

    String representation: Latin-1 vs. UTF-16

    If we slightly modify the first String example, we get a rather unexpected result. Let’s change the String we’re going to print from “Hello world” to “Hello world ✓” (with a checkmark at the end):

    public class ImpossibleThings7 {
      static {
        try {
          Field VALUE = String.class.getDeclaredField("value");
          VALUE.setAccessible(true);
          VALUE.set("Hello world ✓", "You have been hacked".getBytes());
        } catch (ReflectiveOperationException e) {
          throw new Error(e);
        }
      }
    
      public static void main(String[] args) {
        System.out.println("Hello world ✓");
      }
    }Code language: Java (java)

    What will the code print out now? What do you think? (We are still at Java 9 or higher.)

    1. “Hello world ✓”
    2. “You have been hacked”
    3. “You have been hacked ✓”
    4. “潙⁵慨敶戠敥慨正摥”

    You can find the answer in the following screenshot:

    Screenshot showing Chinese characters
    Screenshot showing Chinese characters

    How can this be explained?

    For an explanation, we have to look at the internal representation of a String. Since Java 9, a String’s internal representation is as a byte[]. The way characters are encoded into bytes depends on whether the String contains only Latin-1-encodable characters or others as well. If the String contains only characters that can be encoded in Latin-1, exactly one byte is used per character. However, if the String also contains other characters, it is encoded as UTF-16.

    This feature is called “String Compaction”, is defined in JEP 254 and is activated by default. You can deactivate it with the VM option -XX:-CompactStrings – in which case Strings are always stored as UTF-16.

    What does that mean for our example?

    • The String “Hello world” is represented by the following bytes:
      48 65 6c 6c 6f 20 77 6f 72 6c 64
      ^^ ^^ ^^ ^^ ^^ ^^ ^^ ^^ ^^ ^^ ^^
      H  e  l  l  o     W  o  r  l  d
    • The string “Hello world ✓” is stored as follows:
      48 00 65 00 6c 00 6c 00 6f 00 20 00 77 00 6f 00 72 00 6c 00 64 00 20 00 13 27
      ^^^^^ ^^^^^ ^^^^^ ^^^^^ ^^^^^ ^^^^^ ^^^^^ ^^^^^ ^^^^^ ^^^^^ ^^^^^ ^^^^^ ^^^^^
        H     e     l     l     o           W     o     r     l     d           ✓
      (Here in little-endian format since I work on an Intel system.)

    The information on how the String is encoded is stored in a field called coder. 0 stands for Latin-1, and 1 for UTF-16.

    In the string “Hello world ✓” the field coder, therefore, contains the value 1 due to the UTF-16 encoding.

    In the previous code example, we set the value field of the string “Hello world ✓” to "You have been hacked".getBytes(). The method getBytes() returns the bytes in the standard character encoding, which – unless otherwise defined by the system property “file.encoding” – is UTF-8 (at least since Java 1.5; before that, it was ISO-8859-1).

    Since the string “You have been hacked” does not contain any special characters, its UTF-8 encoding is identical to its Latin-1 encoding, so it occupies exactly one byte per character.

    The String “Hello world ✓” thus contains the following byte sequence in its value field:

    59 6f 75 20 68 61 76 65 20 62 65 65 6e 20 68 61 63 6b 65 64
    ^^ ^^ ^^ ^^ ^^ ^^ ^^ ^^ ^^ ^^ ^^ ^^ ^^ ^^ ^^ ^^ ^^ ^^ ^^ ^^
    Y  o  u     h  a  v  e     b  e  e  n     h  a  c  k  e  d

    Since the “Hello world ✓” field coder still contains a 1 (because of the initial UTF-16 encoding), the byte array is interpreted as UTF-16 – and that’s what leads to the output of the Chinese characters.

    Roughly speaking, we have done the following:

    byte[] bytes = "You have been hacked".getBytes(StandardCharsets.UTF_8);
    String string = new String(bytes, StandardCharsets.UTF_16);Code language: Java (java)

    How can we solve the problem?

    Pretty simple: we also have to copy the content of coder. On this occasion, we also change the copying of value so that we read the corresponding field from the String “You have been hacked” instead of calling its getBytes() method. This method has, up to now, delivered the underlying byte array purely by chance. It worked because “You have been hacked” does not contain any special characters, and the system property “file.encoding” is not set (at least for me and most likely not for you).

    public class ImpossibleThings8 {
      static {
        try {
          Field VALUE = String.class.getDeclaredField("value");
          VALUE.setAccessible(true);
    
          Field CODER = String.class.getDeclaredField("coder");
          CODER.setAccessible(true);
    
          VALUE.set("Hello world ✓", VALUE.get("You have been hacked"));
          CODER.set("Hello world ✓", CODER.get("You have been hacked"));
        } catch (ReflectiveOperationException e) {
          throw new Error(e);
        }
      }
    
      public static void main(String[] args) {
        System.out.println("Hello world ✓");
      }
    }Code language: Java (java)

    Instead of Chinese characters, we now see “You have been hacked” again:

    Screenshot displaying "You have been hacked" instead of Chinese characters
    Screenshot displaying “You have been hacked” instead of Chinese characters

    Specifying String constants twice is not a beautiful thing to do. We solve this by extracting the code into a method and passing the two Strings as parameters:

    public class StringHacker_Java9 {
      public static void hackString(String victim, String replacement) {
        try {
          Field VALUE = String.class.getDeclaredField("value");
          VALUE.setAccessible(true);
    
          Field CODER = String.class.getDeclaredField("coder");
          CODER.setAccessible(true);
    
          VALUE.set(victim, VALUE.get(replacement));
          CODER.set(victim, CODER.get(replacement));
        } catch (ReflectiveOperationException e) {
          throw new Error(e);
        }
      }
    }Code language: Gherkin (gherkin)

    Next, we have to take a look at older Java versions.

    String representation: byte[] vs. char[]

    As mentioned in the introduction of this chapter, the examples only work with Java 9. The reason is: Up to Java 8, the value of a String was not stored in a byte[] but in a char[]. Accordingly, the field coder did not exist up to Java 8.

    If we started the previous examples with Java 8,

    • the call VALUE.set("…".getBytes()) would throw an IllegalArgumentException: Can not set final [C field java.lang.String.value to [B.
    • in the last two examples (where we do not explicitly set a byte array, but copy the contents of value), the subsequent call to String.class.getDeclaredField("coder") would throw a NoSuchFieldException: coder.

    We have already eliminated the IllegalArgumentException in the last two examples. And we can simply ignore the NoSuchFieldException – if the field coder does not exist, we do not need to copy it:

    public class StringHacker_Java7 {
      public static void hackString(String from, String to) {
        try {
          Field VALUE = String.class.getDeclaredField("value");
          VALUE.setAccessible(true);
          VALUE.set(from, VALUE.get(to));
    
          // For "Compact Strings" introduced in Java 9
          try {
            Field CODER = String.class.getDeclaredField("coder");
            CODER.setAccessible(true);
            CODER.set(from, CODER.get(to));
          } catch (NoSuchFieldException e) {
            // Ignore
          }
        } catch (ReflectiveOperationException e) {
          throw new Error(e);
        }
      }
    }Code language: Java (java)

    Here is proof that this code also runs under Java 7:

    String deep reflection with Java 7
    String deep reflection with Java 7

    Substrings with offset und count

    If we go back further in the history of Java, we encounter another change of the String internals from Java 6 to Java 7. Up to Java 6, the value character array was reused if you created a substring with String.substring().

    For this operation, the character array of the original String was transferred unchanged into the substring. And the fields offset and count of the substring indicated the section of the character array representing its content.

    The goal of this logic was to reduce memory consumption.

    More often, however, the opposite happened: When the original String was no longer needed, the shorter substring still held a reference to the original, then unnecessarily longer character array. For this reason, the Java developers changed the functionality of String.substring() in Java 7 so that only the required part of the character array was copied into the substring.

    Therefore, to make our code run on Java 6 and lower, we also need to copy the offset and count fields.

    Before Java 7, there was neither the ReflectiveOperationException, nor the possibility to catch several exception types in one catch block. That makes the catch block a bit verbose. Here is the code that also runs under 6:

    public class StringHacker {
      public static void hackString(String from, String to) {
        try {
          Field VALUE = String.class.getDeclaredField("value");
          VALUE.setAccessible(true);
          VALUE.set(from, VALUE.get(to));
    
          // "offset" and "count" for Strings up to Java 6
          try {
            Field OFFSET = String.class.getDeclaredField("offset");
            OFFSET.setAccessible(true);
            OFFSET.setInt(from, OFFSET.getInt(to));
    
            Field COUNT = String.class.getDeclaredField("count");
            COUNT.setAccessible(true);
            COUNT.setInt(from, COUNT.getInt(to));
          } catch (NoSuchFieldException e) {
            // Ignore
          }
    
          // For "Compact Strings" introduced in Java 9
          try {
            Field CODER = String.class.getDeclaredField("coder");
            CODER.setAccessible(true);
            CODER.set(from, CODER.get(to));
          } catch (NoSuchFieldException e) {
            // Ignore
          }
        } catch (IllegalAccessException e) {
          e.printStackTrace();
        } catch (NoSuchFieldException e) {
          e.printStackTrace();
        }
      }
    }Code language: Java (java)

    The following screenshot shows the code running on Java 6:

    String deep reflection with Java 6
    String deep reflection with Java 6

    Experiment “Compressed Strings” in Java 6u21

    The article would not be complete if I did not briefly mention the “Compressed Strings” introduced as “experimental” in Java 6 (not to be confused with the aforementioned “Compact Strings” introduced in Java 9).

    If enabled with the -XX:+UseCompressedStrings VM option, then, if a String contains only Latin-1 characters, the value field stores a byte array instead of a character array. However, this was not done in the String source code, but internally in the JVM. This optimization saved memory but was very inefficient because the byte array had to be converted to a character array for almost all string operations. In Java 7, the developers removed this feature again.

    Since this optimization was done JVM-internally, our code is also working with activated “Compressed Strings” without further adjustment:

    String deep reflection with Java 6 and "-XX:+UseCompressedStrings"
    String deep reflection with Java 6 and “-XX:+UseCompressedStrings”

    Conclusion

    In practice, you should refrain from changing the internal values of cached Integer or String objects. This approach could have unforeseeable consequences. Such a modification affects not only your own code but also the rest of the project, including all libraries and frameworks loaded by the same classloader.

    Also, you should not rely on the internal representation of a class. As shown in the String example, this can change from one Java version to the next.

    Furthermore, we get an error message for the code examples from this article since Java 9:

    An illegal reflective access operation has occurred
    […]
    All illegal access operations will be denied in a future release

    This means: We must not assume that our code will work forever and ever. In Java 14 (release candidate) and 15 (early access) however, the code still works. And since many 3rd party frameworks make use of Deep Reflection, Oracle will certainly not remove this feature in the foreseeable future.

  • Java ByteBuffer Example: How to Use flip() and compact()

    Java ByteBuffer Example: How to Use flip() and compact()

    In this article, I will show you, with an example, how Java’s ByteBuffer works and what the methods flip() and compact() do precisely.

    The article answers the following questions:

    • What is a ByteBuffer, and what do you need it for?
    • How to create a ByteBuffer?
    • What do the values position, limit, and capacity mean?
    • How to write into the ByteBuffer, how to read from it?
    • What exactly do the methods flip() and compact() do?

    Let’s go!

    What Is a Bytebuffer, and What Do We Need It For?

    You need a ByteBuffer to write data to or read data from a file, a socket, or another I/O component using a so-called “Channel”.

    (This article is mainly about ByteBuffer itself. To learn how to write and read files with ByteBuffer and FileChannel, see the “FileChannel” article in the “Files” tutorial).

    A ByteBuffer is a wrapper around a byte array and provides methods for convenient writing to and reading from the byte array. The ByteBuffer internally stores the read/write position and a so-called “limit”.

    You will learn what this means in the following example – step-by-step.

    You can find the code written for this article in this GitHub Repository.

    How to Create a ByteBuffer

    First, you must create a ByteBuffer with a given size (“capacity”). There are two methods for this:

    • ByteBuffer.allocate(int capacity)
    • ByteBuffer.allocateDirect(int capacity)

    The capacity parameter specifies the size of the buffer in bytes.

    The allocate() method creates the buffer in the Java heap memory, where the Garbage collector will remove it after use.

    allocateDirect(), on the other hand, creates the buffer in native memory, i.e., outside the heap. Native memory has the advantage that read and write operations are executed faster. The reason is that the corresponding operating system operations can access this memory area directly, and data does not have to be exchanged between the Java heap and the operating system first. The disadvantage of this method is higher allocation and deallocation costs.

    ByteBuffer was introduced in Java 1.4, i.e. in 2002. Capacity, limit and position are stored in int variables, which is why the maximum capacity of a ByteBuffer is only 2 GB. To manage a larger off-heap memory block, you can use the Foreign Function and Memory API (FFM API), which was finalised in Java 22.

    We create a ByteBuffer with a size of 1,000 bytes as follows:

    var buffer = ByteBuffer.allocate(1000);Code language: Java (java)

    Then we have a look at the buffer’s metrics – position, limit, and capacity:

    Since we will repeatedly print these metrics throughout the example, we create a printMetrics method for them:

    private static void printMetrics(ByteBuffer buffer) {
      System.out.printf("position = %4d, limit = %4d, capacity = %4d%n",
          buffer.position(), buffer.limit(), buffer.capacity());
    }Code language: Java (java)

    After creating the ByteBuffer, we see the following output:

    position = 0, limit = 1000,  capacity = 1000 Code language: plaintext (plaintext)

    Here is a graphical representation so that you can better imagine the buffer. The yellow area is empty and can subsequently be filled.

    ByteBuffer mit position = 0, limit = 1000,  capacity = 1000

    ByteBuffer Position, Limit, and Capacity

    The printed metrics mean:

    • position is the read/write position. It is always 0 for a new buffer.
    • limit has two meanings: When we write to the buffer, limit indicates the position up to which we can write. When we read from the buffer, limit indicates up to which position the buffer contains data. Initially, a ByteBuffer is always in write mode, and limit is equal to capacity – we can fill the empty buffer up to the end.
    • capacity indicates the size of the buffer. Its value of 1,000 corresponds to the 1,000 that we passed to the allocate() method. It will not change during the lifetime of the buffer.

    The ByteBuffer Read-Write Cycle

    A complete read-write cycle consists of the steps put(), flip(), get() and compact(). We will look at these in the following sections.

    Writing to the ByteBuffer Using put()

    For writing into the ByteBuffer, there are several put() methods to write single bytes, a byte array, or other primitive types (like char, double, float, int, long, short) into the buffer.

    In our example, we write 100 times the value 1 into the buffer, and then we look at the buffer metrics again:

    for (int i = 0; i < 100; i++) {
      buffer.put((byte) 1);
    }
    
    printMetrics(buffer);Code language: Java (java)

    After running the program, we see the following output:

    position = 100, limit = 1000,  capacity = 1000Code language: plaintext (plaintext)

    The position has moved 100 bytes to the right; the buffer now looks as follows:

    ByteBuffer with position = 100, limit = 1000,  capacity = 1000

    Next, we write 200 times a two in the buffer. We use a different method this time: We first fill a byte array and copy it into the buffer. Finally, we print the metrics again:

    byte[] twos = new byte[200];
    Arrays.fill(twos, (byte) 2);
    buffer.put(twos);
    
    printMetrics(buffer);Code language: Java (java)

    Now we see:

    position = 300, limit = 1000,  capacity = 1000Code language: plaintext (plaintext)

    The position has shifted another 200 bytes to the right; the buffer looks like this:

    ByteBuffer with position = 300, limit = 1000,  capacity = 1000

    Switching to Read Mode with Buffer.flip()

    For reading from the buffer, there are corresponding get() methods. These are invoked, for example, when writing to a channel using Channel.write(buffer).

    Since position indicates not only the write position but also the read position, we must set position back to 0.

    At the same time, we set limit to 300 to indicate that one can read a maximum of 300 bytes from the buffer.

    In the program code, we do this as follows:

    buffer.limit(buffer.position());
    buffer.position(0);Code language: Java (java)

    Since these two lines are needed every time you switch from write to read mode, there is a ByteBuffer method that does exactly the same for us:

    buffer.flip();Code language: Java (java)

    Invoking printMetrics() now shows the following values:

    position = 0, limit = 300,  capacity = 1000Code language: plaintext (plaintext)

    The position pointer has returned to the beginning of the buffer, and limit points to the end of the filled area:

    ByteBuffer with position = 0, limit = 300,  capacity = 1000

    With this, the buffer is ready to be read.

    Reading from the ByteBuffer with get()

    Let’s assume that the channel we want to write to can currently only take 200 of the 300 bytes. We can simulate this by supplying the ByteBuffer.get() method with a 200-byte-sized byte array in which the buffer should write its data:

    buffer.get(new byte[200]);Code language: Java (java)

    printMetrics() now displays the following:

    position = 200, limit = 300,  capacity = 1000Code language: plaintext (plaintext)

    The read position has shifted to the right by 200 bytes – i.e., to the end of the data already read, which is equal to the beginning of the data that is not yet read:

    ByteBuffer with position = 200, limit = 300,  capacity = 1000

    Switching to Write Mode – How Not to Do It

    To write back to the buffer now, you could make the following mistake: You set position to the end of the data, i.e., 300, and limit back to 1,000, which brings us back to precisely the state we were in after writing the ones and twos:

    ByteBuffer with position = 300, limit = 1000,  capacity = 1000

    Let’s assume that we would now write 300 more bytes into the buffer. The buffer would then look like this:

    ByteBuffer with position = 600, limit = 1000,  capacity = 1000

    If we would now use flip() to switch back to read mode, position would be back to 0:

    ByteBuffer with position = 0, limit = 600,  capacity = 1000

    Now, however, we would read the first 200 bytes, which we’ve already read, once more.

    This approach is, therefore, wrong. The following section explains how to do it correctly.

    Switching to Write Mode with Buffer.compact()

    Instead, we must proceed as follows when switching to write mode:

    • We calculate the number of remaining bytes: remaining = limit - position. In the example, this results in 100.
    • We move the remaining bytes to the beginning of the buffer.
    • We set the write position to the end of the bytes shifted left. That’s 100 in the example.
    • We set limit to the end of the buffer.

    ByteBuffer also provides a convenience method for this:

    buffer.compact();Code language: Java (java)

    After invoking compact(), printMetrics() prints the following:

    position = 100, limit = 1000,  capacity = 1000Code language: plaintext (plaintext)

    In the graphic, the compact() process looks like this:

    ByteBuffer with position = 100, limit = 1000,  capacity = 1000

    The Next Cycle

    Now we can write the next 300 bytes into the buffer:

    byte[] threes = new byte[300];
    Arrays.fill(threes, (byte) 3);
    buffer.put(threes);Code language: Java (java)

    printMetrics() now displays the following values:

    position =  400, limit = 1000, capacity = 1000Code language: plaintext (plaintext)

    After writing the threes, position has shifted to the right by 300 bytes:

    ByteBuffer with position =  400, limit = 1000, capacity = 1000

    Now we can easily switch back to read mode using flip():

    buffer.flip();Code language: Java (java)

    A final call to printMetrics() prints the following values:

    position =    0, limit =  400, capacity = 1000Code language: plaintext (plaintext)

    The reading position is at the beginning of the buffer, to where the compact() method shifted the remaining 100 twos. So we can now continue reading at precisely the position where we stopped before.

    ByteBuffer with position =  0, limit = 400, capacity = 1000

    Summary

    This article has explained the functionality of the Java ByteBuffer and its flip() and compact() methods with an example.

    If this article has helped you understand ByteBuffer better, feel free to share it using one of the share buttons below, and leave me a comment.

  • FileChannel, Memory-Mapped I/O, Locks (Java Files Tutorial)

    FileChannel, Memory-Mapped I/O, Locks (Java Files Tutorial)

    The previous five parts of this article series covered reading and writing files, directory and file path construction, directory and file operations, and writing and reading structured data.

    In today’s part, I explain the NIO classes FileChannel and ByteBuffer introduced in Java 1.4 with JSR 51 (“New I/O APIs for the JavaTM Platform”). Moreover, I show what possibilities they provide to read and write files and what their advantages are – compared to the methods discussed before.

    In detail, you’ll learn:

    • What are FileChannels and ByteBuffers, and what are their advantages?
    • How to write and read files with FileChannel and ByteBuffer?
    • What are memory-mapped files, and what are their advantages?
    • How to lock specific sections of a file?
    • Which write method has the best performance?

    You can find the code from this article in my GitHub Repository.

    Terminology

    What is a FileChannel?

    A Channel is a communication link to a file, socket, or another component that provides I/O functionality. Unlike InputStream or OutputStream, a Channel is bidirectional, which means you can use it for both writing and reading.

    A FileChannel is a Channel for connecting to a file.

    What is a ByteBuffer?

    A ByteBuffer is basically a byte array (on the Java heap or in native memory), combined with write and read methods. This encapsulation allows writing to or reading from the ByteBuffer without having to know the position of the written / read data within the actual array.

    You can learn how exactly a ByteBuffer works in the ByteBuffer main article.

    File access with FileChannel + ByteBuffer

    To write data into a FileChannel or read from it, you need a ByteBuffer.

    Accessing a file via FileChannel and ByteBuffer
    Accessing a file via FileChannel and ByteBuffer

    Data is put into the ByteBuffer with put() and then written from the buffer to the file with FileChannel.write(buffer). FileChannel.write() calls get() on the buffer to retrieve the data.

    Using FileChannel.read(buffer) data is read from the file. The read() method puts the data into the ByteBuffer with put(), and from there, you can retrieve it with get().

    Advantages of FileChannel

    FileChannel provides the following advantages over the FileInputStream and FileOutputStream classes introduced in the first two parts of the series:

    • You can read and write at any position within the file.
    • You can force the operating system to write changed data from the cache to the storage medium.
    • You can map sections of a file to memory (“memory-mapped file“), which allows very efficient data access.
    • You can set locks on file sections so that other threads and processes cannot access them simultaneously.
    • Data can be transferred very efficiently from one channel to another.

    Reading and writing files with FileChannel and ByteBuffer

    In this chapter, I show you – using code examples – how to read and write data with FileChannel and ByteBuffer, how to access certain positions within the file, how to determine and change the file size, and how to force writing from cache to storage media.

    How to read a file using FileChannel?

    Opening a FileChannel to read a file

    To read a file, you must first open a FileChannel. The most direct way to do this is:

    Path path = ...;
    FileChannel channel = FileChannel.open(path, StandardOpenOption.READ);Code language: Java (java)

    (You can read about how to construct a Path object in the third part of this series.)

    Alternatively, you can create a FileChannel from a RandomAccessFile:

    Path path = ...;
    RandomAccessFile file = new RandomAccessFile(path.toFile(), "r");
    FileChannel channel = file.getChannel();Code language: Java (java)

    … or from a FileInputStream:

    Path path = ...;
    FileInputStream in = new FileInputStream(path.toFile());
    FileChannel channel = in.getChannel();Code language: Java (java)

    In this example, it makes no difference which variant you choose. In the end, the getChannel() methods create a new FileChannel using the file information stored in RandomAccessFile or FileInputStream. So, although you can only read data sequentially from a FileInputStream, this restriction does not apply to the FileChannel created from the FileInputStream.

    However, the readable and writable flags are set accordingly:

    • A FileChannel created with FileInputStream.getChannel() can only be used for reading.
    • A FileChannel created with RandomAccessFile.getChannel() can be used for reading and writing.
    • How you can use a FileChannel created with FileChannel.open() is determined by the options passed in as the second parameter. Since we specified StandardOpenOption.READ in the example above, only read access is allowed in this case. (You can find an overview of the available options in the JavaDoc of StandardOpenOption.)

    Reading a file with FileChannel and ByteBuffer

    Once you have opened a FileChannel, you can read from it into a ByteBuffer with FileChannel.read(). The following example reads blocks of 1,024 bytes each, outputs their respective lengths and their first and last bytes – until the end of the file is reached:

    Path path = Path.of("read-demo.bin");
    try (FileChannel channel = FileChannel.open(path,
            StandardOpenOption.READ)) {
      ByteBuffer buffer = ByteBuffer.allocate(1024);
    
      int bytesRead;
      while ((bytesRead = channel.read(buffer)) != -1) {
        System.out.printf("bytes read from file: %d%n", bytesRead);
        if (bytesRead > 0) {
          System.out.printf("  first byte: %d, last byte: %d%n",
                  buffer.get(0), buffer.get(bytesRead - 1));
        }
        buffer.rewind();
      }
    }Code language: Java (java)

    Using channel.read(buffer), we read as many bytes as possible from the file and put them into the buffer. With buffer.get(index), we read single bytes from the buffer without setting its read position before and without changing the read position in the process. Using buffer.rewind(), we set the buffer’s position to 0 at the end of the loop so that it can be filled again.

    Reading a file with ByteBuffer.flip() and compact()

    In the following second example, we proceed somewhat differently. We read all bytes of the buffer and sum them up. Instead of accessing the data with buffer.get(index), we first use buffer.flip() to set the read position to the beginning of the buffer and then buffer.get() to read single bytes from the current read position.

    We do not read the entire buffer, but only a random number of bytes, and thus simulate that we cannot process the data completely. Then we switch back to buffer write mode with buffer.compact() and read more bytes from the FileChannel. For a better understanding, I recommend you read the article Java ByteBuffer: How to use flip() and compact().

    Path path = Path.of("read-demo.bin");
    try (FileChannel channel = FileChannel.open(path,
            StandardOpenOption.READ)) {
      ByteBuffer buffer = ByteBuffer.allocate(1024);
    
      int bytesRead;
      while ((bytesRead = channel.read(buffer)) != -1) {
        System.out.printf("bytes read from file: %d%n", bytesRead);
    
        long sum = 0;
    
        buffer.flip();
        int numBytesToRead =
                ThreadLocalRandom.current().nextInt(buffer.remaining());
        for (int i = 0; i < numBytesToRead; i++) {
          sum += buffer.get();
        }
    
        System.out.printf("  bytes read from buffer: %d, sum of bytes: %d%n",
                numBytesToRead, sum);
        buffer.compact();
      }
    }Code language: Java (java)

    In the output, we see that the first call to channel.read() reads 1,024 bytes from the file, and each subsequent call reads precisely as many bytes as we previously read from the buffer (and as much free space has become available in the buffer accordingly).

    How to write a file with FileChannel?

    Opening a FileChannel for writing to a file

    To write a file, you must open a FileChannel first. This works just as with reading:

    Path path = ...;
    FileChannel channel = FileChannel.open(path,
        StandardOpenOption.CREATE, StandardOpenOption.WRITE);Code language: Java (java)

    Instead of StandardOpenOption.READ we specify StandardOpenOption.WRITE. Additionally, in the example, I specify StandardOpenOption.CREATE so that the file is created if it does not exist.

    Other OpenOptions relevant to write operation are:

    • StandardOpenOption.CREATE_NEW: The file is created if it does not already exist; otherwise, a FileAlreadyExistsException is thrown.
    • StandardOpenOption.APPEND: Data is appended to the file. Position 0 of the FileChannel does not correspond to position 0 within the file but rather to the current length of the file.
    • StandardOpenOption.TRUNCATE_EXISTING: The file is completely cleared before writing. This option cannot be used together with APPEND.

    Similar to reading, you can also create a writable FileChannel using RandomAccessFile.getChannel() or FileOutputStream.getChannel().

    Writing to a file using ByteBuffer.flip() and compact()

    The following example writes ten times a random number of bytes into the ByteBuffer and then from there into the FileChannel:

    Path path = Path.of("write-demo.bin");
    try (FileChannel channel = FileChannel.open(path,
            StandardOpenOption.CREATE, StandardOpenOption.WRITE)) {
    
      ByteBuffer buffer = ByteBuffer.allocate(1024);
    
      for (int i = 0; i < 10; i++) {
        int bytesToWrite =
                ThreadLocalRandom.current().nextInt(buffer.capacity());
        for (int j = 0; j < bytesToWrite; j++) {
          buffer.put((byte) ThreadLocalRandom.current().nextInt(256));
        }
    
        buffer.flip();
        channel.write(buffer);
        buffer.compact();
      }
    
      // channel.write() doesn't guarantee all data to be written to the channel.
      // If there are remaining bytes in the buffer, write them now.
      buffer.flip();
      while (buffer.hasRemaining()) {
        channel.write(buffer);
      }
    }Code language: Java (java)

    The buffer’s write position is initially set to 0. With buffer.put(), we fill the ByteBuffer up to a random position. With buffer.flip(), we switch to buffer read mode; with channel.write(buffer), we write the contents of the buffer to the file. And with buffer.compact(), we switch the buffer back to write mode.

    Calling channel.write(buffer) does not guarantee that the entire contents of the buffer are written to the channel. Therefore, in the end, we have to call channel.write(buffer) until buffer.hasRemaining() returns false, i.e., the buffer does not contain any more data.

    Once again, I recommend reading the article Java ByteBuffer: How to use flip() and compact().

    How to read or write data at a specific position

    The read/write position within a channel can be read with FileChannel.position() and changed at any time with FileChannel.position(newPosition). In the following example, a file is written from back to front with the bytes 0xff to 0x00. Afterward, the content is read at ten random positions and displayed on the screen.

    Path path = Path.of("position-demo.bin");
    try (FileChannel channel = FileChannel.open(path,
            StandardOpenOption.CREATE, StandardOpenOption.WRITE,
            StandardOpenOption.READ)) {
    
      ByteBuffer buffer = ByteBuffer.allocate(1);
    
      // Write backwards
      for (int pos = 255; pos >= 0; pos--) {
        buffer.put((byte) pos);
        buffer.flip();
        channel.position(pos);
        while (buffer.remaining() > 0) {
          channel.write(buffer);
        }
        buffer.compact();
      }
    
      // Read from random positions
      for (int i = 0; i < 10; i++) {
        long pos = ThreadLocalRandom.current().nextLong(channel.size());
        channel.position(pos);
        channel.read(buffer);
        buffer.flip();
        byte b = buffer.get();
        System.out.printf("Byte at position %d: %d%n", pos, b);
        buffer.compact();
      }
    }Code language: Java (java)

    In the section “Memory-mapped Files”, you will see how you can code this much more elegantly.

    How to determine file size?

    You can determine a file’s size as follows:

    long fileSize = channel.size();Code language: Java (java)

    How to change the file size

    How to expand a file?

    When writing to a file, the file is automatically expanded when you write beyond the end of the file.

    For example, you could create a 1 GB file (assuming it doesn’t already exist) containing 230-1 zeros and 1 one as follows:

    Path path = Path.of("1g-demo.bin");
    try (FileChannel channel = FileChannel.open(path,
            StandardOpenOption.CREATE, StandardOpenOption.WRITE)) {
    
      ByteBuffer buffer = ByteBuffer.allocate(1);
      buffer.put((byte) 1);
      buffer.flip();
    
      channel.position((1 << 30) - 1);
      channel.write(buffer);
    }Code language: Java (java)

    How to shrink a file?

    To reduce the size of a file, you have to call channel.truncate(). In the following example, the previously created 1 GB file is truncated to 1 KB:

    Path path = Path.of("1g-demo.bin");
    try (FileChannel channel = FileChannel.open(path,
            StandardOpenOption.WRITE)) {
      channel.truncate(1 << 10);
    }Code language: Java (java)

    If the specified new size is greater than or equal to the current size, invoking truncate() has no effect.

    How to force writing from file cache to storage medium?

    For performance reasons, the operating system caches changes to files and usually does not write them immediately to the storage medium.

    Using channel.force(boolean metaData), you can instruct the operating system to write all changes immediately. The parameter metaData determines whether metadata (such as the time of the last modification and the last access) should also be written to the storage medium right away:

    • If you specify true, also metadata is written immediately, which requires additional I/O operations and therefore takes longer.
    • If you specify false, only the actual file content is written.

    There is no guarantee that the value of the metaData flag is respected on all operating systems.

    Memory-mapped Files: How to map a file section into memory

    A special kind of ByteBuffer is the MappedByteBuffer – it maps a section of a file directly into memory (therefore: “memory-mapped file”). This allows very efficient access to the file without having to use FileChannel.write() and read(). The MappedByteBuffer can be accessed like a byte array, i.e., it can be written to at any position and read from any position. Changes are written transparently to the file in the background.

    Direct mapping results in an enormous performance gain over conventional reading and writing. The file is mapped directly into the memory’s “user space”. In contrast, with conventional writing and reading methods, data must be copied back and forth between “kernel space” and “user space”.

    The following code is an elegant rewrite of the example from the section “How to read or write data at a specific position” (in which a file was written from back to front and then read at random positions) – using a MappedByteBuffer:

    Path path = Path.of("mapped-byte-buffer-demo.bin");
    try (FileChannel channel = FileChannel.open(path,
            StandardOpenOption.CREATE, StandardOpenOption.WRITE,
            StandardOpenOption.READ)) {
      MappedByteBuffer buffer =
              channel.map(FileChannel.MapMode.READ_WRITE, 0, 256);
    
      // Write backwards
      for (int pos = 255; pos >= 0; pos--) {
        buffer.put(pos, (byte) pos);
      }
    
      // Read from random positions
      for (int i = 0; i < 10; i++) {
        int pos = ThreadLocalRandom.current().nextInt((int) channel.size());
        byte b = buffer.get(pos);
        System.out.printf("Byte at position %d: %d%n", pos, b);
      }
    }Code language: Java (java)

    Characteristics of memory-mapped files

    Please note the following when using memory-mapped files:

    • You must specify the position and size of the section to be mapped at the beginning. In the example, the first 256 bytes are mapped. If the file does not exist, a 256-byte file is created. If the file exists and is smaller, it is expanded to 256 bytes. If the file is larger, its size and contents after the first 256 bytes remain unchanged.
    • A maximum of 2 GB can be mapped into memory. When the MappedByteBuffer was introduced with Java 1.4 in 2002, Java developers apparently could not imagine that today almost every developer laptop is equipped with 16 to 32 GB RAM. Up to and including Java 15 (early access), this limit has not been increased.
    • MappedByteBuffer does not implement the Closeable interface. Therefore, in the example above, we cannot create it within the try block. There is also no method to “un-map” it manually. If we tried to delete the file at the end of the example above, we would get an AccessDeniedException in most cases. The MappedByteBuffer is removed by the garbage collector when it is no longer needed. To “un-map” the file, it registers a so-called “Cleaner”, which is invoked when the MappedByteBuffer is only “phantom reachable”. In the code of the performance test described below, you can find a hack using sun.misc.Unsafe to un-map the file manually.

    Creating a MappedByteBuffer from a FileInputStream / FileOutputStream

    We have seen earlier that we can also create a FileChannel using FileInputStream.getChannel() or FileOutputStream.getChannel(). What happens if we try to map such a channel into memory?

    Since that FileChannel is practically independent of FileInputStream or FileOutputStream, the following is possible without problems:

    var fis = new FileInputStream(fileName);
    var channel = fis.getChannel();
    var map = channel.map(FileChannel.MapMode.READ_ONLY, 0, channel.size());Code language: Java (java)

    The following, however, does not work:

    var fos = new FileOutputStream(fileName);
    var channel = fos.getChannel();
    var map = channel.map(FileChannel.MapMode.READ_WRITE, 0, channel.size());Code language: Java (java)

    Das Kommando channel.map() führt hierbei zu einer NonReadableChannelException, da der durch FileOutputStream.getChannel() erzeugte FileChannel nur ein Schreiben erlaubt – der MapMode.READ_WRITE hingegen auch einen Lesezugriff erfordert. Einen MapMode.WRITE_ONLY gibt es nicht.

    The command channel.map() results in a NonReadableChannelException because the FileChannel created by FileOutputStream.getChannel() allows only write access – MapMode.READ_WRITE however, requires read access. There is no MapMode.WRITE_ONLY.

    How to lock files and file sections

    For more complex applications (e.g., a file or database server), you may want to access the same file from different threads or even processes. Therefore, entire files or file sections that are being written to must be locked so that no other threads or processes can access them at the same time.

    Locking is directly supported by the operating system and the file system, so that this also works between different Java programs or between Java programs and any other processes on the same system – or when using shared storage – e.g., a network drive – also between processes on different systems.

    A distinction is made between shared locks (“read locks”) and exclusive locks (“write locks”). If one process holds an exclusive lock on a file section, no other process can get a lock on the same or an overlapping file section – neither an exclusive nor a shared lock. If one process holds a shared lock, other processes can also get shared locks to the same or overlapping file sections.

    You can set a lock with the following methods:

    • FileChannel.lock(position, size, shared) – this method waits until a lock of the requested type (shared = true → shared; shared = false → exclusive) can be set for the file section specified by position and size.
    • FileChannel.lock() – this method waits until an exclusive lock can be set for the entire file.
    • FileChannel.tryLock(position, size, shared) – this method tries to set a lock of the requested type for the specified file section. If a lock cannot be obtained, the method does not wait but returns null instead.
    • FileChannel.tryLock() – this method tries to set an exclusive lock for the whole file. If this is not possible, it returns null.

    If the lock is successfully set, the methods return a FileLock object. You can release the lock using its release() or close() method. Here is a simple example that sets an exclusive lock on the entire file and then writes 1,000 random bytes:

    Path path = Path.of("lock-demo.bin");
    
    byte[] bytes = new byte[1000];
    ThreadLocalRandom.current().nextBytes(bytes);
    
    try (FileChannel channel = FileChannel.open(path,
            StandardOpenOption.CREATE, StandardOpenOption.WRITE);
         FileLock lock = channel.lock()) {
      ByteBuffer buffer = ByteBuffer.wrap(bytes);
      channel.write(buffer);
    }Code language: Java (java)

    Performance Tests

    I wrote a program to measure the performance of different write methods – at different buffer and file sizes.

    In order to obtain a result that is as free of side effects as possible, I repeated each test 32 times and then determined the median. I created files from 1 MB to 1 GB in size and provided between 1 KB and 1 MB for the ByteBuffer.

    All tests are performed without force(). I want to test the speed at which the data is transferred to the operating system, not the speed of the storage media.

    You are welcome to clone the test program from my GitHub Repository and run it on your system.

    The test program also measures the write speed of those FileChannels that are created via RandomAccessFile.getChannel() and FileOutputStream.getChannel(). However, since the test results are almost identical to those of FileChannel.open(), I do not show them in the following sections.

    Test results

    The test results are too extensive to be printed here in full. You can have a look at them in this Google Document.

    First and foremost, the writing speed depends on the type of access – sequential or random access. Interestingly, buffer and file size also have a significant impact on the result.

    Test results for sequential write access

    With sequential write access, speed increases continuously up to a file size of 128 MB; after that, it stagnates or decreases. I suspect that from this size on, the operating system starts to write data to the storage medium, so from here on, its speed is included in the measurement results. Therefore, I only show results up to a file size of 128 MB.

    The following four diagrams show the write speed in relation to the buffer size for file sizes of 1 MB, 8 MB, 16 MB, and 128 MB.

    Sequential file write speed for 1 MB files
    Sequential file write speed for 1 MB files
    Sequential file write speed for 8 MB files
    Sequential file write speed for 8 MB files
    Sequential file write speed for 16 MB files
    Sequential file write speed for 16 MB files
    Sequential file write speed for 128 MB files
    Sequential file write speed for 128 MB files

    Test results for sequential write access – Analysis

    For files up to 8 MB in size, memory-mapped files are fastest, regardless of the buffer size.

    For 16 MB files, this is only valid up to a buffer size of 16 KB. With a buffer size of 32 KB or more, a FileChannel with a native ByteBuffer is faster. With a file size of 128 MB, FileChannel is faster already at a buffer size of 16 KB.

    The native ByteBuffer is up to 20% faster than the ByteBuffer on the Java heap. The larger the file and buffer, the higher the performance gain from the native buffer.

    Bis zu einer Buffergröße von 8 KB ist der FileOutputStream mit dem BufferedOutputStream schneller als der FileChannel. Ab 8 KB Buffergröße sind Stream und Channel mit Heap-Buffer etwa gleich schnell. Die Grenze von 8 KB ist auf den internen 8 KB großen Buffer des BufferedOutputStream zurückzuführen. Dieser füllt erst den Buffer, bevor er die Daten in die Datei schreibt.

    Up to a buffer size of 8 KB, FileOutputStream with BufferedOutputStream is faster than FileChannel. Above 8 KB buffer size, stream and channel with heap buffer are about the same speed. The limit of 8 KB is due to BufferedOutputStream‘s internal 8 KB buffer. BufferedOutputStream first fills the buffer before it writes the data to the file.

    Starting from 1 MB buffer size, write speed decreases for all write methods and file sizes.

    Test results for random write access

    The following three diagrams show the random access write speed in relation to the buffer size for file sizes of 1 MB, 8 MB, and 128 MB. I have not written any larger files because the random write access tests generally take much longer than the sequential write access tests.

    Random access file write speed for 1 MB files
    Random access file write speed for 1 MB files
    Random access file write speed for 8 MB files
    Random access file write speed for 8 MB files
    Random access file write speed for 128 MB files
    Random access file write speed for 128 MB files

    Test results for random write access – Analysis

    With random write access, memory-mapped files are the fastest way to write files – regardless of file and buffer sizes. FileChannel follows by far; the performance gain from native buffers can reach up to 20% here as well.

    Conclusion

    For random write access, the choice should always be memory-mapped files.

    With sequential write access, you can also work with memory-mapped files for file sizes up to 8 MB. For larger files, the best performance is achieved with FileChannel and a direct ByteBuffer with a minimum size of 16 KB and a maximum size of 512 KB.

    Of course, these are only rough guidelines, derived from measurement results on my system. If you want to tune the performance down to the last MB/s, I recommend testing different write methods and buffer sizes for your specific use case.

    Summary

    In today’s article, I showed you what FileChannel and ByteBuffer are and how to read and write files with them. You learned what memory-mapped files are and how to set locks on file sections so that other processes cannot write to them simultaneously.

    This concludes the six-part series about files in Java. If you liked this article (or the whole series), feel free to share it using one of the share buttons below. If you would like to be informed about new articles, click here to sign up for the HappyCoders newsletter.

    I’d like to know from you: What part of this series did you find most helpful or most enjoyable? Leave me a comment!

  • DataOutputStream + DataInputStream (Java Files Tutorial)

    DataOutputStream + DataInputStream (Java Files Tutorial)

    In the first four parts of this article series, we covered reading and writing files, directory and file path construction, and directory and file operations.

    Up to now, we have only read and written byte arrays and Strings. In this fifth part, you will learn how to write and read structured data with DataOutputStream, DataInputStream, ObjectOutputStream, and ObjectInputStream. The article will answer the following questions in detail:

    • How to store primitive data types (int, long, char, etc…) in binary files and how to read them?
    • What are the different ways to write Strings to and read them from binary files?
    • How to store complex Java objects in binary files and how to read them?

    You can find the code examples from this article in my GitHub repository.

    Writing structured data to and reading from binary files

    Using DataOutputStream and DataInputStream, it is possible to write primitive data types (byte, short, int, long, float, double, boolean, char) as well as Strings to a binary file and read them out again. DataOutputStream and DataInputStream are wrapped around an OutputStream (e.g. FileOutputStream) or an InputStream (e.g. FileInputStream) using the Decorator pattern.

    Writing structured data with DataOutputStream

    The following example writes variables of all primitive data types into the file test1.bin:

    public class TestDataOutputStream1 {
      public static void main(String[] args) throws IOException {
        try (var out = new DataOutputStream(new BufferedOutputStream(
              new FileOutputStream("test1.bin")))) {
          out.writeByte((byte) 123);
          out.writeShort((short) 1_234);
          out.writeInt(1_234_567);
          out.writeLong(1_234_567_890_123_456L);
          out.writeFloat((float) Math.E);
          out.writeDouble(Math.PI);
          out.writeBoolean(true);
          out.writeChar('€');
        }
      }
    }Code language: Java (java)

    The file test1.bin now contains the following bytes:

    7b 04 d2 00 12 d6 87 00 04 62 d5 3c 8a ba c0 40 2d f8 54 40 09 21 fb 54 44 2d 18 01 20 acCode language: plaintext (plaintext)

    The values were therefore written sequentially to the file in big-endian format:

    • 7b = 123
    • 04 d2 = 1,234
    • 00 12 d6 87 = 1,234,567
    • 00 04 62 d5 3c 8a ba c0 = 1,234,567,890,123,456
    • 40 2d f8 54 = 2.7182817
    • 40 09 21 fb 54 44 2d 18 = 3.141592653589793
    • 01 = true
    • 20 ac = ‘€’ (Unicode U-20AC)

    Reading structured data with DataInputStream

    Just as easily as we wrote the data, we can read it back:

    public class TestDataInputStream1 {
      public static void main(String[] args) throws IOException {
        try (var in = new DataInputStream(new BufferedInputStream(
              new FileInputStream("test1.bin")))) {
          System.out.println(in.readByte());
          System.out.println(in.readShort());
          System.out.println(in.readInt());
          System.out.println(in.readLong());
          System.out.println(in.readFloat());
          System.out.println(in.readDouble());
          System.out.println(in.readBoolean());
          System.out.println(in.readChar());
        }
      }
    }Code language: Java (java)

    The program outputs the following:

    123
    1234
    1234567
    1234567890123456
    2.7182817
    3.141592653589793
    true
    €Code language: plaintext (plaintext)

    That’s is precisely the data we wrote.

    Different data types for writeByte() and writeShort()

    If you take a closer look at the write methods of DateOutputStream, you will notice that writeByte(), writeShort(), and also writeChar() each take an int as parameter instead of the particular data type. I could not find out the reason for this; also, the source code of these methods does not contain any explanation. This is error-prone, and you should know what the consequences are if the passed values do not fit into the mentioned datatype.

    What happens in that case? Let’s test it for writeByte() with the following code. I have added the resulting bytes as comments to the code to make it easier to relate them.

    public class TestDataOutputStream2 {
      public static void main(String[] args) throws IOException {
        try (var out = new DataOutputStream(new BufferedOutputStream(
              new FileOutputStream("test2.bin")))) {
          out.writeByte(1000);  // --> e8
          out.writeByte(128);   // --> 80
          out.writeByte(127);   // --> 7f (Byte.MAX_VALUE)
          out.writeByte(0);     // --> 00
          out.writeByte(-128);  // --> 80 (Byte.MIN_VALUE)
          out.writeByte(-129);  // --> 7f
          out.writeByte(-1000); // --> 18
        }
      }
    }Code language: Java (java)

    Overflows are, therefore, not indicated by an error message. What we see instead is the last byte of each number’s int representation. We can show that with the following code (standard text box used to allow highlighting):

    public class TestDataOutputStream3 {
      public static void main(String[] args) throws IOException {
        try (var out = new DataOutputStream(new BufferedOutputStream(
              new FileOutputStream("test2.bin")))) {
          out.writeInt(1000);  // --> 00 00 03 e8
          out.writeInt(128);   // --> 00 00 00 80
          out.writeInt(127);   // --> 00 00 00 7f
          out.writeInt(0);     // --> 00 00 00 00
          out.writeInt(-128);  // --> ff ff ff 80
          out.writeInt(-129);  // --> ff ff ff 7f
          out.writeInt(-1000); // --> ff ff fc 18
        }
      }
    }

    The same applies to writeShort(). Here I have included the int representation directly in the comments after the writeShort() methods.

    public class TestDataOutputStream4 {
      public static void main(String[] args) throws IOException {
        try (var out = new DataOutputStream(new BufferedOutputStream(
              new FileOutputStream("test2.bin")))) {
          out.writeShort(1000000);  // --> 42 40 (int: 00 0f 42 40)
          out.writeShort(32768);    // --> 80 00 (int: 00 00 80 00)
          out.writeShort(32767);    // --> 7f ff (int: 00 00 7f ff)
          out.writeShort(0);        // --> 00 00 (int: 00 00 00 00)
          out.writeShort(-32768);   // --> 80 00 (int: ff ff 80 00)
          out.writeShort(-32769);   // --> 7f ff (int: ff ff 7f ff)
          out.writeShort(-1000000); // --> bd c0 (int: ff f0 bd c0)
        }
      }
    }

    Different data type for writeChar()

    A char is represented by two bytes in Java and can be assigned to an int without type casting. The following is perfectly ok:

    int a    = 'a'; // Unicode U+0066
    int euro = '€'; // Unicode U+20AC
    int word = '字'; // Unicode U+5B57Code language: Java (java)

    Therefore it is syntactically correct for writeChar() to accept an int. But what happens if we pass values that are greater than two bytes or negative? Let’s try it out. In the comments in the following code example, you can see the resulting bytes and – for the large and negative numbers – also the respective int representations. Again, we see that the last two bytes of the int representations are used.

    public class TestDataOutputStream5 {
      public static void main(String[] args) throws IOException {
        try (var out = new DataOutputStream(new BufferedOutputStream(
              new FileOutputStream("test5.bin")))) {
          out.writeChar('a');  // --> 00 61
          out.writeChar('€');  // --> 20 ac
          out.writeChar('字'); // --> 5b 57
    
          out.writeChar(723_790_628); // --> 2b 24 (int: 2b 24 2b 24)
          out.writeChar(-100);        // --> ff 9c (int: ff ff ff 9c)
          out.writeChar(-16_776_261); // --> 03 bb (int: ff 00 03 bb)
        }
      }
    }

    What do we get if we read the created file with readChar()? Here is the source code for it:

    public class TestDataInputStream5 {
      public static void main(String[] args) throws IOException {
        try (var in = new DataInputStream(new BufferedInputStream(
              new FileInputStream("test5.bin")))) {
          System.out.println(in.readChar());
          System.out.println(in.readChar());
          System.out.println(in.readChar());
          System.out.println(in.readChar());
          System.out.println(in.readChar());
          System.out.println(in.readChar());
        }
      }
    }Code language: Java (java)

    And here is the output:

    a
    €
    字
    ⬤
    ワ
    λCode language: plaintext (plaintext)

    For example, 723,790,628 has now been converted to the Unicode character U+2B24 (black large circle) via the hexadecimal representation 0x2b242b24 – the last two bytes of which are 0x2b24. -100 became U+FF9C (Halfwidth Katakana Letter Wa) via 0xffffff9c. And -16,776,261 became U+03BB (Greek Small Letter Lamda) via 0xff0003bb.

    Writing Strings with DataOutputStream

    DataOutputStream confuses with three different methods to write Strings:

    • writeBytes(String s)
    • writeChars(String s)
    • writeUTF(String s)

    DataInputStream, on the other hand, offers only the readUTF() method to read a String – besides a readLine() method marked as deprecated, which we will not consider further here.

    How are the three write methods different? Let’s test it with a String that contains all the different types of characters Unicode has to offer:

    public class TestDataOutputStream6 {
      static final String STRING = "Hello World äöü ß α € ↖ ?";
    
      public static void main(String[] args) throws IOException {
        try (var out = new DataOutputStream(new BufferedOutputStream(
              new FileOutputStream("test6.bin")))) {
          out.writeBytes(STRING);
          out.writeChars(STRING);
          out.writeUTF(STRING);
        }
      }
    }Code language: Java (java)

    The Atom editor displays the content of the created file – depending on the set character set – as follows:

    Display of file contents with character encoding ISO-8859-1
    Display of file contents with character encoding ISO-8859-1
    Display of file contents with character encoding UTF-16 big-endian
    Display of file contents with character encoding UTF-16 big-endian
    Display of file contents with character encoding UTF-8
    Display of file contents with character encoding UTF-8

    As the output suggests, the methods differ in the character encoding used to write the String to the file:

    • writeBytes() writes the string in ISO-8859-1 format, also known as Latin-1, where all special characters after the “ß” can not be displayed.
    • writeChars() writes the string in UTF-16 format. Here all characters are displayed correctly.
    • writeUTF() writes the string in a modified UTF-8 format. “Supplementary characters”, i.e., all characters with a code greater than U+FFFF (the special character ‘?’ has the code U+1F525) are stored differently than in UTF-8, which is why Atom displays six question marks instead of the fire symbol.

    The following subsections explain the contents of the file.

    Writing Strings with DataOutputStream.writeBytes()

    writeBytes() has written the following bytes to the file (in the first line you see the hexadecimal encoding of the bytes, in the second line the respective written character):

    48 65 6c 6c 6f 20 57 6f 72 6c 64 20 e4 f6 fc 20 df 20 b1 20 ac 20 96 20 3d 25
    H  e  l  l  o     W  o  r  l  d     ä  ö  ü     ß     α     €     ↖     ?Code language: plaintext (plaintext)

    writeBytes() has written one byte for each character. Now we also see what happened to the special characters: The α character, for example, has the code U+03B1, of which only the lower byte 0xB1 was written to the file. In ISO-8859-1, 0xB1 stands for the character ‘±’, which we also see in the editor. The € character has the code U+20AC, of which only 0xAC appears in the file, which in ISO-8859-1 stands for ‘¬’. The arrow has the code U+2196, whose lower part 0x96 is not assigned in ISO-8859-1, so Atom shows an empty box here.

    You should, therefore, not use the method writeBytes() anywhere in your code. That is unless you are 100% sure that your text only contains characters that can be encoded by ISO-8859-1.

    The fire symbol is still interesting: It is written to the file as 0x3D 0x25 – that’s two bytes. How can this be, when writeBytes() writes only one byte for each character?

    The answer is: In Java, the fire symbol is not one character, but two! The following is not allowed:

    char c = '?';Code language: Java (java)

    This code produces the error message “Too many characters in character literal”. We can use the following code to examine this:

    public class TestDataOutputStream7 {
      public static void main(String[] args) throws IOException {
        String fire = "?";
        System.out.println("fire = " + fire);
        System.out.println("fire.length() = " + fire.length());
    
        char c0 = fire.charAt(0);
        char c1 = fire.charAt(1);
        System.out.println("fire.charAt(0) = " + c0 +
              " (hex: " + Integer.toHexString(c0) + ")");
        System.out.println("fire.charAt(1) = " + c1 +
              " (hex: " + Integer.toHexString(c1) + ")");
      }
    }Code language: Java (java)

    Here’s what we’re going to see:

    fire = ?
    fire.length() = 2
    fire.charAt(0) = ? (hex: d83d)
    fire.charAt(1) = ? (hex: dd25)Code language: plaintext (plaintext)

    So the fire symbol consists of two characters with the codes U+D83D and U+DD25. These codes are not independent characters, but so-called “surrogates”, which are used to represent Unicode symbols with a code greater than U+FFFF, i.e., those that cannot be represented with two bytes.

    Writing Strings with DataOutputStream.writeChars()

    The method writeChars() has written the following bytes to the file:

    00 48 00 65 00 6c 00 6c 00 6f 00 20 00 57 00 6f 00 72 00 6c 00 64 00 20
    H     e     l     l     o           W     o     r     l     d
    
    00 e4 00 f6 00 fc 00 20 00 df 00 20 03 b1 00 20 20 ac 00 20 21 96 00 20 d8 3d dd 25
    ä     ö     ü           ß           α           €           ↖           ?Code language: plaintext (plaintext)

    Here we see two bytes for each character – the respective UTF-16 big-endian encoding. The fire symbol is written as two times two bytes – just as I’ve explained in the previous section.

    Writing Strings with DataOutputStream.writeUTF()

    By using writeUTF(), we wrote the following bytes to the file:

    00 27 48 65 6c 6c 6f 20 57 6f 72 6c 64 20
          H  e  l  l  o     W  o  r  l  d
    
    c3 a4 c3 b6 c3 bc 20 c3 9f 20 ce b1 20 e2 82 ac 20 e2 86 96 20 ed a0 bd ed b4 a5
    ä     ö     ü        ß        α        €           ↖           ? Code language: plaintext (plaintext)

    The first thing you notice here is that the text is preceded by two bytes 0x00 0x27. This is the length of the String as a short value. 0x27 is decimal 39 – this stands for the number of bytes following the first two bytes.

    At the fire icon, we see the modified UTF-8 encoding mentioned before. According to https://www.compart.com/de/unicode/U+1F525, its actual UTF-8 encoding would be 0xF0 0x9F 0x94 0xA5. Java is doing its own thing at this point.

    Reading Strings with DataInputStream

    Now how can we read our Strings back? For the Strings written with writeBytes() and writeChars(), there are no corresponding read methods. Anyway, if we want to use these methods, we would have to write the length of the String into the file first – otherwise, we wouldn’t know where it ends. Here is the code adapted for this purpose:

    public class TestDataOutputStream8 {
      static final String STRING = "Hello World äöü ß α € ↖ ?";
    
      public static void main(String[] args) throws IOException {
        try (var out = new DataOutputStream(new BufferedOutputStream(
              new FileOutputStream("test8.bin")))) {
          out.writeInt(STRING.length());
          out.writeBytes(STRING);
    
          out.writeInt(STRING.length());
          out.writeChars(STRING);
    
          out.writeUTF(STRING);
        }
      }
    }Code language: Java (java)

    We would then have to read the length, followed by the appropriate number of bytes, and construct a String from them while specifying the correct character encoding:

    public class TestDataInputStream8 {
      public static void main(String[] args) throws IOException {
        try (var in = new DataInputStream(new BufferedInputStream(
              new FileInputStream("test8.bin")))) {
          // read String written by writeBytes()
          int len = in.readInt();
          byte[] bytes = new byte[len];
          in.read(bytes, 0, len);
          String s = new String(bytes, StandardCharsets.ISO_8859_1);
          System.out.println(s);
    
          // read String written by writeChars()
          len = in.readInt();
          bytes = new byte[len * 2];
          in.read(bytes, 0, len * 2);
          s = new String(bytes, StandardCharsets.UTF_16BE);
          System.out.println(s);
    
          // read String written by writeUTF()
          s = in.readUTF();
          System.out.println(s);
        }
      }
    }Code language: Java (java)

    Here’s the output:

    Hello World äöü ß ± ¬ – =%
    Hello World äöü ß α € ↖ ?
    Hello World äöü ß α € ↖ ?Code language: plaintext (plaintext)

    Reading the Strings written with writeBytes() and writeChars() is quite complicated. Besides, writeBytes() cannot encode all characters, as stated before.

    So my clear recommendation for Strings is to use only writeUTF() and readUTF().

    Writing Java objects to and reading them from files

    Java not only gives us the ability to write primitive data types and Strings. We can also write and read entire Java objects. For this purpose, Java provides the classes ObjectOutputStream and ObjectInputStream.

    Writing Java objects to files with ObjectOutputStream

    Using ObjectOutputStream.writeObject(), you can write any Java object into a file. The only prerequisite is that the object and all objects referenced by it – directly and transitively – are serializable (i.e. implement java.io.Serializable). Otherwise, a NotSerializableException is thrown.

    Here is an example where we write a String, an ArrayList and a list created by List.of() into a file:

    public class TestObjectOutputStream1 {
      public static void main(String[] args) throws IOException {
        try (var out = new ObjectOutputStream(new BufferedOutputStream(
              new FileOutputStream("objects1.bin")))) {
          // Write a string
          out.writeObject("Hello World äöü ß α € ↖ ?");
    
          // Write an array list
          ArrayList<Integer> list = new ArrayList();
          list.add(42);
          list.add(47);
          list.add(74);
          out.writeObject(list);
    
          // Write an unmodifiable list
          out.writeObject(List.of("Hello", "World"));
        }
      }
    }Code language: Java (java)

    The created file looks like this:

    File written by ObjectOutputStream
    File written by ObjectOutputStream

    We see our String and can recognize a few class names, but more is not easily revealed. We will not discuss the binary format here.

    Reading Java objects from files with ObjectInputStream

    With the following code, we can read the objects from the file:

    public class TestObjectInputStream1 {
      public static void main(String[] args) throws IOException,
            ClassNotFoundException {
        try (var fis = new FileInputStream("objects1.bin");
             var in = new ObjectInputStream(new BufferedInputStream(fis))) {
          while (true) {
            Object o = in.readObject();
            System.out.println("o.class = " + o.getClass() + "; o = " + o);
          }
        } catch (EOFException ex) {
          System.out.println("EOF");
        }
      }
    }Code language: Java (java)

    The program’s output:

    o.class = class java.lang.String; o = Hello World äöü ß α € ↖ ?
    o.class = class java.util.ArrayList; o = [42, 47, 74]
    o.class = class java.util.ImmutableCollections$List12; o = [Hello, World]
    EOFCode language: plaintext (plaintext)

    As you can see, we do not need to know the structure of the file, i.e., which object types it contains and in which order. ObjectOutputStream writes the respective class names into the file, and ObjectInputStream creates the corresponding objects again.

    There’s one particular characteristic we have to pay attention to with ObjectInputStream: In the try-with-resources block, it is essential to assign both FileInputStream and ObjectInputStream to one variable each. The following would be syntactically correct, but semantically wrong:

    var out = new ObjectInputStream(new BufferedInputStream(
          new FileInputStream("objects1.bin")));Code language: Java (java)

    The reason is that ObjectInputStream‘s constructor can throw an IOException. This happens if the binary file was not written by an ObjectOutputStream and, therefore, cannot be read by ObjectInputStream. In case of an exception, the (previously opened) FileInputStream would not be closed automatically, because only objects that are assigned to a variable in the try block are closed.

    Advanced object serialization and deserialization topics

    ObjectOutputStream and ObjectInputStream are much more powerful than shown here. Their purpose – the serialization and deserialization of Java objects – is not only used in the context of file operations. But also, for example, in distributed in-memory caches or remote method invocation.

    This article is not intended as a tutorial about Java object serialization and deserialization. So I will not go into details here (like “back references”, writeUnshared(), readUnshared(), writeObject(), readObject(), etc.). I will write a detailed tutorial on these advanced serialization topics after the series about files is finished.

    Summary and outlook

    In this article, you have seen how to use DataOutputStream and DataInputStream to write primitive data types and Strings to and read them from files, and how to use ObjectOutputStream and ObjectInputStream to write and read complex Java objects.

    We have only scratched the surface of ObjectOutputStream and ObjectInputStream. I will cover advanced serialization topics in a future article.

    In the next and last article, I will introduce you to the FileChannel and ByteBuffer classes added in Java 1.4. These speed up working with huge files (when used with direct buffers), allow setting locks on file sections, and mapping files into memory (“memory-mapped files”) to access them as easily as byte arrays.

    If you liked this article, please take a moment to share it using one of the share buttons below. If you would like to be notified when the next part is published, click here to sign up for the HappyCoders newsletter.

  • How to List, Move, Copy, and Delete Files (Java Files Tutorial)

    How to List, Move, Copy, and Delete Files (Java Files Tutorial)

    Previous articles in this series have covered reading files with Java, writing files, and constructing directory and file paths with the File and Path classes. This fourth part describes the most important directory and file operations. It answers the following questions:

    • How to list all files in a directory?
    • How to search for files matching specific criteria within a directory tree?
    • How to find the current directory?
    • How to find the user’s home directory?
    • How to find the temporary directory, and how to create a temporary file?
    • How do I move files with Java?
    • How do I rename a file?
    • How do I copy a file?
    • How to delete a file?
    • How to create a symbolic link with Java?

    The article answers all questions using the NIO.2 File API, introduced in Java 7 with JSR 203.

    Directory operations

    For the following directory operations, you need a Path-object representing the directory. You can construct this object using the static method Path.of() (or, before Java 11, using Paths.get()).

    A comprehensive tutorial on constructing directory paths with Path, Paths, and File can be found in the third part of this series.

    How to list directory contents with Files.list()

    The easiest way to list the complete contents of a directory is the Files.list() method. It returns a Stream of Path objects, which we simply write to System.out in the following example:

    Path currentDir = Path.of(System.getProperty("user.home"));
    Files.list(currentDir).forEach(System.out::println);Code language: Java (java)

    How to search a directory recursively with Files.list()

    Let’s move on to a more complex case. In the following example, we want to output all regular files located in the home directory or a subdirectory of any depth thereof and whose name starts with “settings”.

    import java.io.*;
    import java.nio.file.*;
    
    public class FindFilesRecursivelyExample {
      public static void main(String[] args) throws IOException {
        Path currentDir = Path.of(System.getProperty("user.home"));
        findFileRecursively(currentDir, "settings");
      }
    
      private static void findFileRecursively(
            Path currentDir, String fileNamePrefix) throws IOException {
        Files.list(currentDir).forEach(child -> {
          if (Files.isRegularFile(child)
                && child.getFileName().toString().startsWith(fileNamePrefix)) {
            System.out.println(child);
          }
    
          if (Files.isDirectory(child) ) {
            try {
              findFileRecursively(child, fileNamePrefix);
            } catch (AccessDeniedException e) {
              System.out.println("Access denied: " + child);
            } catch (IOException e) {
              throw new UncheckedIOException(e);
            }
          }
        });
      }
    }Code language: Java (java)

    You can use the methods Files.isRegularFile() and Files.isDirectory() to check if a file is a regular file or directory. Another file type is the symbolic link – you can recognize it with Files.isSymbolicLink(). It is also possible that all three methods return false, in which case the file is of type “other” (what exactly this could be is unspecified).

    In the example above, we have to catch IOException inside the lambda and wrap it with an UncheckedIOException because the forEach consumer of the stream must not throw a checked exception.

    How to search a directory recursively with Files.walk()

    You can write the previous example much shorter and more elegant – using Files.walk():

    private static void findFileWithWalk(Path currentDir, String fileNamePrefix)
          throws IOException {
      Files.walk(currentDir).forEach(child -> {
        if (Files.isRegularFile(child)
              && child.getFileName().toString().startsWith(fileNamePrefix)) {
          System.out.println(child);
        }
      });
    }Code language: Java (java)

    However, this variant has the disadvantage that an AccessDeniedException cannot be caught individually as before. If such an exception occurs here, the entire Files.walk() method terminates. If this is acceptable for your application, this way is more beautiful than the previous one.

    How to search a directory recursively with Files.walkFileTree()

    Another variant is Files.walkFileTree(). This method implements the visitor pattern. It sends each file within the directory structure to a FileVisitor, which you pass to the method. In the following example, we use the SimpleFileVisitor class, which implements all methods of FileVisitor. We only override the visitFile() method:

    private static void findFileWithWalkFileTree(
          Path currentDir, String fileNamePrefix) throws IOException {
      Files.walkFileTree(currentDir, new SimpleFileVisitor<Path>() {
        @Override
        public FileVisitResult visitFile(Path file, BasicFileAttributes attrs)
              throws IOException {
          if (Files.isRegularFile(file)
                && file.getFileName().toString().startsWith(fileNamePrefix)) {
            System.out.println(file);
          }
          return FileVisitResult.CONTINUE;
        }
      });
    }Code language: Java (java)

    The method’s return value, FileVisitResult.CONTINUE, indicates that walkFileTree() should continue to traverse the directory tree. Other return values would be:

    • TERMINATE – terminates the walkFileTree() method.
    • SKIP_SIBLINGS – skips all other files of the current directory.
    • SKIP_SUBDIR – skips the current directory – this return value cannot be returned by visitFile(), but by FileVisitor.preVisitDirectory().

    The walkFileTree() variant, too, would terminate processing in the case of an AccessDeniedException. However, there is a way to prevent this. To do so, you also need to overwrite the method FileVisitor.visitFileFailed():

    private static void findFileWithWalkFileTree(
          Path currentDir, String fileNamePrefix) throws IOException {
      Files.walkFileTree(currentDir, new SimpleFileVisitor<Path>() {
        @Override
        public FileVisitResult visitFile(Path file, BasicFileAttributes attrs)
              throws IOException {
          if (Files.isRegularFile(file)
                && file.getFileName().toString().startsWith(fileNamePrefix)) {
            System.out.println(file);
          }
          return FileVisitResult.CONTINUE;
        }
    
        @Override
        public FileVisitResult visitFileFailed(Path file, IOException exc)
              throws IOException {
          if (exc instanceof AccessDeniedException) {
            System.out.println("Access denied: " + file);
            return FileVisitResult.CONTINUE;
          } else {
            return super.visitFileFailed(file, exc);
          }
        }
      });
    }Code language: Java (java)

    How to search a directory with Files.find()

    An alternative approach is the Files.find() method. It expects a “matcher” as the third parameter: this is a function that has a Path and BasicFileAttributes as input parameters and returns a boolean indicating whether the corresponding file should be included in the result or not.

    private static void findFileWithFind(Path currentDir, String fileNamePrefix)
          throws IOException {
      Files.find(currentDir, Integer.MAX_VALUE,
            (path, attributes) -> Files.isRegularFile(path)
                  && path.getFileName().toString().startsWith(fileNamePrefix))
            .forEach(System.out::println);
    }Code language: Java (java)

    Again, an AccessDeniedException would end the entire search prematurely. I don’t know of any way to circumvent this with Files.find(). If you expect subdirectories with denied access, you should either use Files.walkFileTree() and overwrite the visitFileFailed() method to catch the exception. Alternatively, use Files.list() and implement the recursion yourself.

    Accessing specific directories

    Attention: If you are using a version older than Java 11, you must replace Path.of() with Paths.get() in the following code examples.

    Accessing the current directory

    The current directory can be found via the system property “user.dir”:

    Path currentDir = Path.of(System.getProperty("user.dir"));Code language: Java (java)

    Accessing the user’s home directory

    You can find the home directory of the current user via the system property “user.home”:

    Path homeDir = Path.of(System.getProperty("user.home"));Code language: Java (java)

    Accessing the temporary directory

    And you can find the temporary directory via the system property “java.io.tmpdir”:

    Path tempDir = Path.of(System.getProperty("java.io.tmpdir"));Code language: Java (java)

    If you want to create a temporary file in the temporary directory, you do not need to access the temporary directory first. There is a shortcut for this. You will find it at the beginning of the following chapter, “File operations”.

    File operations

    How to create a temporary file

    After the last chapter concluded with accessing the temporary directory, this one starts with a shortcut to creating temporary files:

    Path tempFile = Files.createTempFile("happycoders-", ".tmp");Code language: Java (java)

    The two parameters are a prefix and a suffix. The createTempFile() method will insert a random number between them. When I run the method repeatedly on my Windows system and print the variable tempFile to the console, I get the following output:

    tempFile = C:\Users\svenw\AppData\Local\Temp\happycoders-7164892815754554616.tmp
    tempFile = C:\Users\svenw\AppData\Local\Temp\happycoders-3557939636108137420.tmp
    tempFile = C:\Users\svenw\AppData\Local\Temp\happycoders-16515581992479122220.tmp
    tempFile = C:\Users\svenw\AppData\Local\Temp\happycoders-4078166990204004103.tmpCode language: plaintext (plaintext)

    On Linux it looks like this:

    tempFile = /tmp/happycoders-6859515894563322081.tmp
    tempFile = /tmp/happycoders-3688163816397144832.tmp
    tempFile = /tmp/happycoders-2576679508175526427.tmp
    tempFile = /tmp/happycoders-8074586277964353976.tmpCode language: plaintext (plaintext)

    It is essential to know that createTempFile() does not only create the respective Path object but actually creates an empty file.

    How to move a file in Java

    To move a file, use the method Files.move(). The following example creates a temporary file and moves it to the home directory of the logged-on user:

    Path tempFile = Files.createTempFile("happycoders-", ".tmp");
    Path targetDir = Path.of(System.getProperty("user.home"));
    Path target = targetDir.resolve(tempFile.getFileName());
    Files.move(tempFile, target);Code language: Java (java)

    The second parameter of the move() method must represent the target file, not the target directory! If you invoked Files.move(tempFile, targetDir) here, you would get a FileAlreadyExistsException. Therefore, in the example, we use the resolve() method to concatenate the targetDir with the name of the file to be copied.

    How to move a directory including all subdirectories

    You can move a directory just like a file. In the following example, we create two temporary directories and one file in the first directory. We then move the first directory into the second:

    Path tempDir1 = Files.createTempDirectory("happycoders-");
    Path tempDir2 = Files.createTempDirectory("happycoders-");
    Path tempFile = Files.createTempFile(tempDir1, "happycoders-", ".tmp");
    Path target = tempDir2.resolve(tempDir1.getFileName());
    Files.move(tempDir1, target);Code language: Java (java)

    How to rename file with Java

    After all, renaming a file (or a directory) is a special case of moving, with the destination directory being the same as the source directory and only the file name changing. In the following example, we rename a temporary file to “happycoders.tmp”:

    Path tempFile = Files.createTempFile("happycoders-", ".tmp");
    Path target = tempFile.resolveSibling("happycoders.tmp");
    Files.move(tempFile, target);Code language: Java (java)

    Invoking tempFile.resolveSibling("happycoders.tmp") is a shortcut for tempFile.getParent().resolve("happycoders.tmp"): The directory is extracted from the source file and concatenated with the new file name.

    How to copy a file in Java

    Copying a file is similar to renaming it. The following example copies a temporary file to the home directory:

    Path tempFile = Files.createTempFile("happycoders-", ".tmp");
    Path targetDir = Path.of(System.getProperty("user.home"));
    Path target = targetDir.resolve(tempFile.getFileName());
    Files.copy(tempFile, target);Code language: Java (java)

    This method has a significant advantage over proprietary implementations with FileInputStream and FileOutputStream, as they were necessary before Java 7 and the NIO.2 File API: Files.copy() delegates the call to operating system-specific – and thus optimized – implementations.

    How to delete a file in Java

    You can delete a file (or a directory) with Files.delete():

    Path tempFile = Files.createTempFile("happycoders-", ".tmp");
    Files.delete(tempFile);Code language: Java (java)

    The directory on which you invoke Files.delete() must be empty. Otherwise, the method will throw a DirectoryNotEmptyException. You can try this with the following code:

    Path tempDir = Files.createTempDirectory("happycoders-");
    Path tempFile = Files.createTempFile(tempDir, "happycoders-", ".tmp");
    Files.delete(tempDir);Code language: Java (java)

    First, a temporary directory is created, then a temporary file in it. Then an attempt is made to delete the (non-empty) directory.

    You can create a symbolic link with the method Files.createSymbolicLink(). Attention: You have to specify target and source in reverse order as with all previous methods: first, the link path, then the path of the file to be linked. The following example creates a temporary file and then sets a symbolic link to the created file from the home directory.

    Path tempFile = Files.createTempFile("happycoders-", ".tmp");
    Path linkDir = Paths.get(System.getProperty("user.home"));
    Path link = linkDir.resolve(tempFile.getFileName());
    Files.createSymbolicLink(link, tempFile);Code language: Java (java)

    This example works on Linux without restrictions. On Windows, you need administrative rights to create symbolic links. If these are missing, the following exception is thrown: FileSystemException: [link]: A required privilege is not held by the client.

    Summary and outlook

    This fourth article in the series about files in Java introduced the most important directory and file operations.

    In the next part, I will show you how to write and read structured data with DataOutputStream and DataInputStream.

    We then move on to the following advanced topics:

    • NIO channels and buffers introduced in Java 1.4, to speed up working with large files
    • Memory-mapped I/O for convenient and blazing-fast file access without streams
    • File locking, to access the same files in parallel – i.e., from several threads or processes – without conflict

    As always, I appreciate it if you share the article or your feedback via the comment function. Would you like to be informed when the next part is published? Then click here to sign up for the HappyCoders newsletter.

  • File and Directory Names in Java: File, Path, Paths

    File and Directory Names in Java: File, Path, Paths

    After covering file reading and writing operations in Java, this third part of the series of articles shows how to use the classes File, Path, and Paths to construct file and directory paths – regardless of the operating system.

    If you have already dealt with file operations in Java, you have probably used these classes to pass a filename to one of the read or write operations with new File(), Paths.get() or Path.of().

    Most programmers do not study these classes in much more detail. This is partly because these classes can be confusing even for experienced Java programmers: What is the difference between File.getName() and File.getPath()? What is the difference between File.getAbsolutePath(), File.getCanonicalPath() and Path.normalize()? What is the difference between Paths.get() and Path.of()?

    This article answers the following questions:

    • What is the difference between a filename, a directory name, and a path?
    • How to construct a relative directory or file path independent of the operating system?
    • How to construct an absolute directory or file path independent of the operating system?
    • What changed with the introduction of the NIO.2 File API?
    • What exactly is returned by the File methods getName(), getPath(), getParent(), getParentFile(), getAbsolutePath(), getAbsoluteFile(), getCanonicalPath(), getCanonicalFile()?
    • What is returned by the Path methods getFileName(), getName(int index), getParent(), getRoot(), toAbsolutePath() und normalize()?
    • How to join Path objects with Path.resolve() and Path.resolveSibling()?
    • When to use File and when to use Path? And can I convert the two into each other?

    Basics: Definitions of terms, operating system independence, NIO.2

    What is the difference between filename, directory name, relative path, and absolute path?

    Before we start, we need to agree on terminology. For example, the terms “path” and “directory” are often confused.

    • Filename: the name of a file without a directory and separators, e.g., readme.txt
    • Directory name: the name of a particular directory without parent directory(s), for example, apache-maven-3.6.3 or log
    • Path: the “route” to an object of the file system, i.e., to files and directories. A path can be absolute or relative:
      • An absolute path is always unique and independent of the current position in the file system.
      • A relative path is related to the current position within the file system. It describes how to get from this position to the target. If the target is located in the current directory, the relative path usually equals the file or directory name.

    The following table shows some examples of absolute and relative paths to directories and files – for both Windows and Linux/Mac:

    Linux / MacWindows
    Absolute path to a directory:/var/logC:\Windows
    Absolute path to a file:/var/log/syslogC:\Windows\explorer.exe
    Relative path to a directory:../../var/log

    (from /home/user to /var/log)
    ..\Windows

    (from C:\Users to C:\Windows)
    Relative path to a file:../../var/log/syslog

    (from /home/user to /var/log/syslog)
    ..\Windows\explorer.exe

    (from C:\Users to C:\Windows\explorer.exe)

    Operating system independent path and directory names

    As seen in the table, absolute paths on Windows start with a drive letter and a colon; directories are separated by a backslash (‘\’). On Linux and Mac, absolute paths start with a forward slash (‘/’), which also separates directories.

    You can access the separator of the currently used operating system with the constant File.separator or the method FileSystems.getDefault().getSeparator() and thus generate pathnames “manually” (i.e. by concatenating strings). For example like this:

    String homePath = System.getProperty("user.home");
    String fileName = "test" + System.currentTimeMillis();
    String filePath = homePath + File.separator + fileName;
    System.out.println("filePath = " + filePath);Code language: Java (java)

    Depending on the operating system we get a different output:

    • Windows: filePath = C:\Users\svenw\test1578950760671
    • Linux: filePath = /home/sven/test1578950836130

    With the home directory, this works quite well, but with the temp directory (we get this from the system property “java.io.tmpdir”) we get the following output:

    • Windows: filePath = C:\Users\svenw\AppData\Local\Temp\\test1578950862590
    • Linux: filePath = /tmp/test1578950884314

    Did you spot the problem?

    On Windows, the path for the temporary directory already ends with a backslash. By adding a separator, our code creates a double backslash in the file path.

    We could now check if the directory name already ends with a separator and add it only if it is not present. But that is not necessary at all. You can construct file and directory names much more elegantly – completely without string operations, using the classes java.io.File and (from Java 7) java.nio.file.Path.

    “Old” Java File API vs. NIO.2 File API

    In Java 7, the “NIO.2 File API” was introduced with JSR 203 (NIO stands for “New I/O”). This provides a whole new set of classes for handling files (introduced in the previous article about writing and reading files).

    Files and directories were previously represented by the class java.io.File. This leads to confusion, especially for beginners, because the class name suggests that the class only represents files, not directories.

    In NIO.2, this task is taken over by the – now appropriately named – class java.nio.file.Path. Its interface has been completely rewritten compared to java.io.File.

    Constructing file and directory paths with java.io.File

    Let’s start with the “old” class, java.io.File. A file object can represent a filename, a directory name, a relative file or directory path, or an absolute file or directory path (where a file/directory name is actually also a relative file/directory path, relative to the directory in which the file/directory is located).

    java.io.file: File and directory names

    Representing file names with java.io.File

    You can define a filename (without specifying a directory) as follows (we stick to the pattern “test<timestamp>” used above):

    File file = new File("test" + System.currentTimeMillis());Code language: Java (java)

    You can now read the following information from the File object:

    MethodReturn value
    file.getName()test1578953190701
    file.getPath()test1578953190701
    file.getParent() / file.getParentFile()null
    file.getAbsolutePath() / file.getAbsoluteFile()/happycoders/git/filedemo/test1578953190701

    The method getName() returns the filename we passed to the constructor. getPath() returns the path, which in this case corresponds to the filename since we have not specified a directory. For the same reason, getParent() and getParentFile() both return null, the first method returns a String, the second a corresponding File object.

    Using the methods getAbsolutPath() and getAbsolutFile(), you map this file into the current working directory and get the complete path of the file including its directory and filename. These two methods also differ only in that the first returns a String, and the second returns a corresponding File object.

    There are also the methods getCanonicalPath() and getCanonicalFile(), which would return the same values as getAbsolutePath() and getAbsoluteFile() in this and the following examples. We will see in a later example, in which cases they can contain other values.

    Representing directory names with java.io.File

    The File object constructed in the previous section could just as well represent a directory with the same name instead of a file. The methods listed in the table above would return the same results.

    A distinction would only be possible if a file or directory with this name already exists. If a corresponding file exists, the method file.isFile() returns true. If, on the other hand, a directory with this name exists, the method file.isDirectory() returns true. If neither file nor directory exists, both methods return false. Depending on the further use, the File object can then be used either to create a directory or to create a file.

    java.io.File: Relative file and directory paths

    Relative file path with java.io.File

    To specify a directory, we can pass it to the File constructor as a parameter – in the simplest form as a String. With the following code, you put the test file into a tests directory:

    File file = new File("tests", "test" + System.currentTimeMillis());Code language: Java (java)

    The getters now provide the following information about the File object (with the differences to the previous example highlighted in bold):

    MethodReturn value
    file.getName()test1578953190701
    file.getPath()tests/test1578953190701
    file.getParent() / file.getParentFile()tests
    file.getAbsolutePath() / file.getAbsoluteFile()/happycoders/git/filedemo/tests/test1578953190701

    We can now see a difference between getName() and getPath(): the first method returns only the file name without the directory information, the second method returns the complete relative path. getParent() and getParentFile() (remember: the first method returns a String, the second a corresponding File object) now return the specified directory tests. In the absolute path information returned by getAbsolutePath() and getAbsoluteFile() (again: String vs. File), the subdirectory tests gets inserted accordingly.

    The directory can also be passed as a File object instead of a String:

    File directory = new File("tests");
    File file = new File(directory, "test" + System.currentTimeMillis());Code language: Java (java)

    Relative file path with nested directories

    Several directory levels can also be nested:

    File testsDirectory = new File("tests");
    File yearDirectory = new File(testsDirectory, "2020");
    File dayDirectory = new File(yearDirectory, "2020-01-13");
    File file = new File(dayDirectory, "test" + System.currentTimeMillis());Code language: Java (java)

    This allows us to construct directory paths of any depth without having to use the separator character even once. The example constructs a file object with the path tests/2020/2020-01-13/test1578953190701.

    What will the getParent() method return now? tests/2020/2020-01-13 or just 2020-01-13? Let’s try it…

    MethodReturn value
    file.getName()test1578953190701
    file.getPath()tests/2020/2020-01-13/test1578953190701
    file.getParent() / file.getParentFile()tests/2020/2020-01-13
    file.getAbsolutePath() / file.getAbsoluteFile()/happycoders/git/filedemo/tests/2020/2020-01-13/test1578953190701

    The parent, therefore, represents the path to the parent directory, not just its name. To access the name of the parent directory we can use file.getParentFile().getName().

    Relative directory path with java.io.File

    Also, in the examples from the previous section, test1578953190701 could be a directory instead of a file. The path does not allow any conclusions to be drawn.

    java.io.File: Absolute file and directory paths

    Absolute directory path with java.io.File

    Attention: We look at absolute paths in reverse order: We first construct the directory path and then the file path, since we cannot generate an absolute file path without an absolute directory path as a parent.

    (There is one exception, which we have already seen in the previous examples: We can obtain the absolute file path for a file in the current directory by invoking the File constructor with only the file name and then calling the method getAbsoluteFile() / getAbsolutePath() on the created File object.)

    We have the following options for constructing an absolute directory path:

    • from an absolute directory path represented as a String (therefore dependent on the operating system)
    • from the system properties mentioned at the beginning, like “user.home” and “java.io.tmpdir”
    • from the current directory

    Constructing an absolute directory path from a String

    Once we have the absolute directory path in a String (for example, from a configuration file), we can pass it directly to the File constructor. The following example uses a String constant for simplicity:

    File directory = new File("/var/log/myapp");Code language: Java (java)

    For this absolute directory, the File object’s getters return the following values:

    MethodReturn value
    file.getName()myapp
    file.getPath()/var/log/myapp
    file.getParent() / file.getParentFile()/var/log
    file.getAbsolutePath() / file.getAbsoluteFile() /var/log/myapp

    The Methods getPath(), getAbsolutePath() and getAbsoluteFile() now all return the absolute path of the directory. getParent() and getParentFile() return the absolute path of the parent directory.

    Constructing an absolute directory path from system properties

    Through the system properties user.home and java.io.tmpdir, you get – independent of the operating system – the user’s home directory and the temporary directory.

    The System.getProperty() method finally returns the path as a String, which we can then pass to the File constructor. Above, we saw that on Windows, the temporary directory has a trailing backslash, the home directory does not. Does that cause us problems at this point?

    We can use the following code to test it on Windows:

    String homeDir = System.getProperty("user.home");
    System.out.println("homeDir                = " + homeDir);
    System.out.println("homeDir as File object = " + new File(homeDir));
    
    String tempDir = System.getProperty("java.io.tmpdir");
    System.out.println("tempDir                = " + tempDir);
    System.out.println("tempDir as File object = " + new File(tempDir));Code language: Java (java)

    The program delivers the following output:

    homeDir                = C:\Users\svenw
    homeDir as File object = C:\Users\svenw
    tempDir                = C:\Users\svenw\AppData\Local\Temp\
    tempDir as File object = C:\Users\svenw\AppData\Local\TempCode language: plaintext (plaintext)

    The unnecessary trailing backslash has been removed, so we don’t have to worry about anything.

    Creating an absolute directory path from the current directory

    Using what we know so far, we could construct the absolute directory path of the current directory as follows:

    File file = new File("dummy");
    File absoluteFile = file.getAbsoluteFile();
    File absoluteDirectory = absoluteFile.getParentFile();Code language: Java (java)

    Here we have generated a dummy file path, constructed the absolute path for it (which maps the file into the current directory), and then extracted the parent – the absolute path of the directory in which the file is located.

    Admittedly, this is rather cumbersome. Fortunately, there is a more elegant way: The current directory can also be read from a system property, user.dir, and then passed to the File constructor:

    File currentDir = new File(System.getProperty("user.dir"));Code language: Java (java)

    Absolute file path with java.io.File

    After having looked at different ways of creating an absolute directory path, we can now construct an absolute file path. All we have to do is pass the directory and filename to the File constructor.

    File tempDir = new File(System.getProperty("java.io.tmpdir"));
    File subDir = new File(tempDir, "myapp");
    String fileName = "foo";
    File file = new File(subDir, fileName);Code language: Java (java)

    For this example, the getters of the File object return the following values:

    MethodReturn value
    file.getName()foo
    file.getPath()/tmp/myapp/foo
    file.getParent() / file.getParentFile()/tmp/myapp
    file.getAbsolutePath() / file.getAbsoluteFile()/tmp/myapp/foo

    We see a similar pattern as in the example with the absolute directory path /var/log/myapp: The methods getPath(), getAbsolutePath() and getAbsoluteFile() return the absolute path of the file. And getParent() and getParentFile() return the absolute path of the parent directory.

    Attention:

    If you create a file object for a file in the current directory, it makes a difference whether you create the object with the current directory and filename or just the filename. The methods getAbsoluteFile() / getAbsolutePath() return the absolute file path in both cases. However, getPath() returns the absolute path only in the first case; whereas in the second case it returns only the filename. And getParent() and getParentFile() only return the parent directory in the first case, but null in the second case.

    java.io.file: Overview of File’s getter methods

    The following table summarizes what File‘s getters return depending on the file system object represented:

    MethodFile/directory nameRelative file/directory pathAbsolute file/directory path
    getName()File/directory nameFile/directory nameFile/directory name
    getPath()File/directory nameRelative file/directory pathAbsolute file/directory path
    getParent() / getParentFile()null Relative path to parent directoryAbsolute path to parent directory
    getAbsolutePath() / getAbsoluteFile()Absolute path from combination of current directory and file/directory nameAbsolute path from combination of current directory and relative file/directory pathAbsolute file/directory path

    Once again as a reminder: getParent() and getAbsolutePath() return a String; getParentFile() and getAbsoluteFile() return a corresponding File object.

    java.io.file: What is the difference between getCanonicalPath() / getCanonicalFile() and getAbsolutePath() / getAbsolutePath()?

    In all previous examples, the methods getCanonicalPath() and getCanonicalFile() would have returned the same result as getAbsolutePath() and getAbsoluteFile() – namely the respective absolute path (as String or File object).

    So what is the difference?

    A “canonical path” is unique; i.e., there is only one such path to a file. In contrast, there can be more than one absolute path to the same file. An example:

    For the file /var/log/syslog, this String is also the “canonical path”. The same String is also an absolute path. However, there are other absolute paths, such as

    • /var/log/./syslog,
    • /var/log/../log/syslog,
    • /home/user/../../var/log/syslog,
    • as well as all paths that eventually point to /var/log/syslog via symbolic links.

    Constructing file and directory paths with java.nio.file.Path and Paths

    Although the interface of java.nio.file.Path has been completely changed from java.io.File, the underlying concepts have remained unchanged. Filenames, directory names, relative file and directory paths, and absolute file and directory paths are still the file system objects being represented.

    What was changed? In the following sections, you see how to construct Path objects, using the same structure and the same examples as with the File objects before.

    In the following sections, I will not make a distinction between file and directory names. We have already seen above that, as long as the corresponding file system object does not exist, its path does not indicate whether it is a file or a directory.

    java.nio.file.Path: File and directory names

    Instead of a constructor, we use a factory method for java.nio.file.Path to create instances. The factory method was originally located in the class java.nio.file.Paths (with “s” at the end), but in Java 11, it was also directly included in the Path class. We create a Path object for the file name “test<timestamp>” as follows:

    Path path = Paths.get("test" + System.currentTimeMillis());Code language: Java (java)

    Starting with Java 11, you can use Path.of() instead of Paths.get(). There is practically no difference. Internally, Paths.get() calls the newer method Path.of() and this in turn calls FileSystems.getDefault().getPath().

    Path path = Path.of("test" + System.currentTimeMillis());Code language: Java (java)

    The following methods provide information analogous to methods of the File class shown above:

    MethodReturn value
    path.getFileName()test1579037366379
    path.getNameCount()1
    path.getName(0)test1579037366379
    path.getParent()null
    path.getRoot()null
    path.toAbsolutePath()/happycoders/git/filedemo/test1579037366379
    path.normalize() test1579037366379

    First of all: All methods shown – except for getNameCount() – return a Path object. There are no variants of these methods that return a String. The only way to convert a Path object into a String is to call its toString() method.

    The getFileName() method returns the name of the file or directory. getNameCount() is always 1 for a filename without directory information, or for directories without a parent directory. And the first name, retrievable by getName(0), is also the file/directory name. getParent() returns – like File‘s method with the same name – null. The method getRoot() also returns null, since a single filename is always relative. With toAbsolutePath() we map – analogous to File.getAbsolutePath() – the file/directory into the current directory and get the corresponding absolute path.

    Path.normalize() is similar to File.getCanonicalPath() with the difference that when normalizing a path, relative paths remain relative, while getCanonicalPath() always generates an absolute path for both absolute and relative File objects.

    java.nio.file.Path: Relative file and directory paths

    To include directories, Path offers two different approaches:

    • You can list all directories in the factory method Paths.get() or Path.of().
    • You can use its resolve() method to convert an existing Path object into a new Path object, where the resolve() method is equivalent to changing the directory with the Windows or Linux cd command.

    Constructing relative file and directory paths with Paths.get() / Path.of()

    You can pass any number of directory names to the factory methods. For example, you would construct the relative path tests/test1578953190701 as follows (the timestamp is hard-coded for simplicity):

    Path path = Paths.get("tests", "test1578953190701");Code language: Java (java)

    This Path object’s getters return the following results (I highlighted the differences to the individual file names in bold again):

    MethodReturn value
    path.getFileName()test1578953190701
    path.getNameCount()2
    path.getName(0)tests
    path.getName(1)test1578953190701
    path.getParent() tests
    path.getRoot()null
    path.toAbsolutePath()/happycoders/git/filedemo/tests/test1578953190701
    path.normalize()tests/test1578953190701

    Due to the directory, nameCount has increased from 1 to 2. In the name array, the directory name was inserted at position 0; the file name has moved to position 1. getParent() also returns the directory name. The absolute path and the normalized version also contain the directory name.

    Constructing nested file and directory paths with Paths.get() / Path.of()

    If the file is to be located in the directory tests/2020/2020-01-13, call the factory method as follows:

    Path path = Paths.get("tests", "2020", "2020-01-13", "test1578953190701");Code language: Java (java)

    Here once again, the getters’ results:

    MethodReturn value
    path.getFileName()test1578953190701
    path.getNameCount()4
    path.getName(0)tests
    path.getName(1)2020
    path.getName(2)2020-01-13
    path.getName(3)test1578953190701
    path.getParent()tests/2020/2020-01-13
    path.getRoot()null
    path.toAbsolutePath()/happycoders/git/filedemo/tests/2020/2020-01-13/test1578953190701
    path.normalize()tests/2020/2020-01-13/test1578953190701

    nameCount has been increased accordingly, and the name array contains all directories of the path as well as the filename. Again, getParent() returns the complete known path to the directory, not just its name.

    Constructing relative file and directory paths with Path.resolve()

    An alternative way to construct the Path object for the path tests/2020/2020-01-13/test1578953190701 is to use the resolve() method. It combines the path on which the method is called with the path passed to it:

    Path testsDir = Paths.get("tests");
    Path yearDir = testsDir.resolve("2020");
    Path dayDir = yearDir.resolve("2020-01-13");
    Path path = dayDir.resolve("test1578953190701");Code language: GLSL (glsl)

    The resolve() operation is associative, i.e., the individual parts can also be joined in a different order, for example like this:

    Path testsDir = Paths.get("tests"); // tests
    Path yearDir = testsDir.resolve("2020"); // tests/2020
    Path dayDir = Paths.get("2020-01-13"); // 2020-01-13
    
    // 2020-01-13/test1578953190701
    Path fileInDayDir = dayDir.resolve("test1578953190701");
    
    // tests/2020/2020-01-13/test1578953190701
    Path path = yearDir.resolve(fileInDayDir);Code language: Java (java)

    Shortcut: Path.resolveSibling()

    Let’s assume we have the Path object we constructed in the previous section, and we want to create another file in the same directory. If we still have access to the Path object representing the directory, we can call resolve() on it with the new filename. Otherwise, we could access the directory with getParent() and then call resolve():

    Path sibling = path.getParent().resolve("test" + System.currentTimeMillis());Code language: Java (java)

    Exactly for this purpose, there is the shortcut resolveSibling(), which saves you five keystrokes and bytes:

    Path sibling = path.resolveSibling("test" + System.currentTimeMillis());Code language: Java (java)

    java.nio.file.Path: Absolute file and directory paths

    Similar to java.io.File, we can also create an absolute path with java.nio.file.Path from a String that we read from a configuration file or a system property. We can pass this path, as it is, to the factory method. We do not need to split it up first. Using the directory /var/log/myapp as an example again:

    Path path = Paths.get("/var/log/myapp");Code language: Java (java)

    Of course, we can also modify an absolute path using the resolve() method. The following example corresponds to the example of the absolute file path with java.io.File:

    Path tempDir = Path.of(System.getProperty("java.io.tmpdir"));
    Path subDir = tempDir.resolve("myapp");
    String fileName = "foo";
    Path file = subDir.resolve(fileName);Code language: Java (java)

    For this absolute path, the getter methods return:

    MethodReturn value
    path.getFileName()foo
    path.getNameCount()3
    path.getName(0)tmp
    path.getName(1)myapp
    path.getName(2)foo
    path.getParent()/tmp/myapp
    path.getRoot()/
    path.toAbsolutePath()/tmp/myapp/foo
    path.normalize()/tmp/myapp/foo

    Here we experience for the first time that path.getRoot() does not return null, but "/", the Linux root directory. On Windows, we would get “C:\” here (unless the temporary directory is in a different file system). The root directory is not part of the name array.

    java.nio.file.Path: Overview of its getter methods

    Here you can see a summary of what Path‘s getters return:

    MethodFile/directory nameRelative file/directory pathAbsolute file/directory path
    path.getFileName()File/directory nameFile/directory nameFile/directory name
    path.getNameCount()1Number of directories + fileNumber of directories + file
    path.getName(index)File/directory nameFile/directory names at the given position (0-based)File/directory names at the given position (0-based, root does not count)
    path.getParent()nullRelative path to parent directoryAbsolute path to parent directory
    path.getRoot()nullnullThe file system’s root, such as “/” or “C:\”
    path.toAbsolutePath()Absolute path from combination of current directory and file/directory nameAbsolute path from combination of current directory and file/directory nameAbsolute file/directory path
    path.normalize()Normalized file/directory nameNormalized relative file/directory nameNormalized absolute file/directory name

    Summary and outlook

    This article gave a detailed overview of how to construct file and directory paths independent of the operating system using the classes File, Path, and Paths.

    My recommendation is to use only the NIO.2 classes Path and Paths from Java 7 on, and from Java 11 on, use only Path. If you need a File object for a particular file operation, you can always create one with Path.toFile().

    The following parts of the series will deal with the following topics:

    In the later course we come to advanced topics:

    Do you have any questions, suggestions, ideas for improvement? Then I would be pleased with a comment. Do you know others who find the topic interesting? Then I would be happy if you share the article by using one of the buttons below. Would you like to be informed when the next part appears? Then click here to sign up for the HappyCoders newsletter.

  • How to Write Files Quickly and Easily (Java Files Tutorial)

    How to Write Files Quickly and Easily (Java Files Tutorial)

    After the first part of the series was about reading files in Java, this second part introduces the corresponding methods for writing small and large files.

    The article addresses the following questions in detail:

    • What is the easiest way to write a string or a list of strings to a text file?
    • How to write a byte array to a binary file?
    • When processing large amounts of data, how do you write the data directly to files (without first having to build up the complete contents of the file in memory)?
    • When to use FileWriterFileOutputStreamOutputStreamReaderBufferedOutputStream and BufferedWriter?
    • When to use Files.newOutputStream() and Files.newBufferedWriter()?

    I already mentioned the topic of operating system independence in the first part, i.e., what to consider when coding characters, line breaks, and path names.

    What is the easiest way to write to a file in Java?

    Up to and including Java 6, there was no easy way to write files. You had to open a FileOutputStream or a FileWriter, if necessary, wrap it with a BufferedOutputStream or BufferedWriter, write into it, and finally – also in case of an error – close all streams again.

    In Java 7, the utility class java.nio.file.Files was added with the “NIO.2 File API” (NIO stands for New I/O). This class contains methods to write a byte array, a String, or a list of Strings to a file with a single command.

    Writing a byte array to a binary file

    You can write a byte array to a file with the following command:

    String fileName = ...;
    byte[] bytes = ...;
    Files.write(Path.of(fileName), bytes);Code language: Java (java)

    The method expects a Path object as the first parameter. It describes a file or directory name and provides utility methods for constructing it. In the example, the static Path.of() method – available since Java 11 – is used to create a Path object from a file name. Before Java 11, you can use Paths.get() instead. Internally, both methods call FileSystems.getDefault().getPath().

    Writing a String to a text file

    It is just as easy to write a string to a file – but only since Java 11:

    String fileName = ...;
    String text = ...;
    Files.writeString(Path.of(fileName), text);Code language: Java (java)

    Writing a list of Strings to a text file

    Often you don’t write a single String into a text file, but several Strings as lines. With the following command, you can write a String list (or more precisely: an Iterable<? extends CharSequence>) into a text file:

    String fileName = ...;
    List<String> lines = ...;
    Files.write(Path.of(fileName), lines);Code language: Java (java)

    Writing a String Stream to a text file

    There is no one-to-one equivalent of the Stream-generating method Files.lines(), that is, no method that writes directly from a String Stream to a file. However, with a small workaround, it is still possible:

    String fileName = ...;
    Stream<String> lines = ...;
    Files.write(Path.of(fileName), (Iterable<String>) lines::iterator);Code language: Java (java)

    What are we doing here? The Files.write() method used here is the same as in the previous example, that is, the one that accepts an Iterable<String>. A Java 8 Stream itself is not an Iterable since you cannot iterate over it multiple times, but only once. Therefore you cannot pass the Stream itself as a parameter.

    However, Iterable is a functional interface whose only method iterator() returns an Iterator. Therefore we can pass a method reference to lines.iterator() (which also returns an iterator) as Iterable.

    You can this because you can assume that Files.write() calls the referenced iterator() method only once. If the iterator() method were called a second time, the Stream would acknowledge this with an IllegalStateException with the message “stream has already been operated upon or closed.”

    Writing files with java.nio.file.Files – Summary

    In this chapter, you got to know the utility methods of the java.nio.file.Files class. These methods are suitable for all use cases where the data you want to write to a file is completely stored in memory.

    However, if the data is generated incrementally, you should also write it to a file incrementally. You should not first “collect” all the bytes in memory and then write them to a file in one go using one of the methods shown above. Only if the amount of data is only a few kilobytes, this is okay.

    In such a case, you’d better work (directly or indirectly) with a FileOutputStream. The following chapter explains how to do that.

    How to write data to a file without having to collect its entire content in memory first?

    To progressively write data to a file, use a FileOutputStream (or related classes). These were available before Java 7 and made writing small files unnecessarily complicated. In the following sections, I present various options.

    Writing individual bytes with FileOutputStream

    The primary class is FileOutputStream. It writes data byte by byte into a file. The following example shows how bytes returned by the imaginary process() method are successively written to a file (until the method returns -1):

    String fileName = ...;
    try (FileOutputStream out = new FileOutputStream(fileName)) {
      int b;
      while ((b = process()) != -1) {
        out.write(b);
      }
    }Code language: GLSL (glsl)

    Writing individual bytes is an expensive operation. Writing 100,000,000 bytes to a test file takes about 230 seconds on my system; that’s just a little more than 0.4 MB per second.

    Writing byte arrays with FileOutputStream

    Using FileOutputStream, you can also write byte arrays. In the following example, the process() method returns byte arrays instead of individual bytes (and null if no more data is available):

    String fileName = ...;
    try (FileOutputStream out = new FileOutputStream(fileName)) {
      byte[] bytes;
      while ((bytes = process()) != null) {
        out.write(bytes);
      }
    }Code language: GML (gml)

    This method is several times faster. If you write 10 bytes 10,000,000 times (the same amount in total), you only need 24 seconds, a little more than a tenth of the previous time. If you write 100 bytes 1,000,000 times, it’s only 2.6 seconds, which is a little more than a hundredth of the previous time.

    What is relevant here is primarily the number of write operations, not the actual amount of data. This is because the data is written block-wise to the storage medium. Naturally, this only applies up to a specific buffer size. Writing ten gigabytes at a time is no faster than writing ten times one gigabyte. The optimal value for the buffer size depends on the hardware as well as the formatting of the medium. Using a small test program, I measured the write speed in relation to the buffer size:

    FileOutputStream – write speed in relation to buffer size
    FileOutputStream – write speed in relation to buffer size

    On my system, the optimal buffer size is 8 KB. At this size, the write speed reaches 1,050 MB per second. 8 KB is also the optimal size on most other systems, which is why Java uses this value as default, as you can see in a later section.

    Writing binary data with the NIO.2 OutputStream

    In Java 7, a new method to create an OutputStream, Files.newOutputStream() was added:

    String fileName = ...;
    try (OutputStream out = Files.newOutputStream(Path.of(fileName))) {
      int b;
      while ((b = process()) != -1) {
        out.write(b);
      }
    }Code language: Java (java)

    This method returns a ChannelOutputStream instead of a FileOutputStream. On my system, there is no relevant speed difference compared to new FileOutputStream() when writing individual bytes or byte blocks.

    Write faster with BufferedOutputStream

    We have previously observed that writing blocks is much faster than writing individual bytes. BufferedOutputStream takes advantage of this fact by first buffering the bytes to be written in a buffer and then writing them to disk when the buffer is full. By default, this buffer is 8 KB in size, which is precisely the size that leads to optimal write speed.

    String fileName = ...;
    try (FileOutputStream out = new FileOutputStream(fileName);
         BufferedOutputStream bout = new BufferedOutputStream(out)) {
      int b;
      while ((b = process()) != -1) {
        bout.write(b);
      }
    }Code language: GLSL (glsl)

    Using BufferedOutputStream, my system needs about 250 ms to write 100,000,000 individual bytes. That’s about 400 MB per second. The reason we’re not reaching the 1,050 MB/s from the previous test is the overhead of the buffering logic.

    Writing byte arrays with BufferedOutputStream

    Just like FileOutputStream, BufferedOutputStream can write not only individual bytes but also byte blocks:

    String fileName = ...;
    try (FileOutputStream out = new FileOutputStream(fileName);
         BufferedOutputStream bout = new BufferedOutputStream(out)) {
      byte[] bytes;
      while ((bytes = process()) != null) {
        bout.write(bytes);
      }
    }Code language: Java (java)

    This method combines the advantages of writing byte arrays with those of a buffer. It almost always delivers optimum write speeds. For writing binary data, I always recommend using this method.

    Writing text files with FileWriter

    For writing text to a file, it must be converted to binary data. Character-to-byte conversion is the OutputStreamWriter‘s responsibility. You wrap it around the FileOutputStream as follows. The process() method in the following example produces individual characters.

    String fileName = ...;
    try (FileOutputStream out = new FileOutputStream(fileName);
         OutputStreamWriter writer = new OutputStreamWriter(out)) {
      int c;
      while ((c = process()) != -1) {
        writer.write(c);
      }
    }Code language: Java (java)

    FileWriter is more convenient. It combines FileOutputStream and OutputStreamWriter. The following code is equivalent to the previous one:

    String fileName = ...;
    try (FileWriter writer = new FileWriter(fileName)) {
      int c;
      while ((c = process()) != -1) {
        writer.write(c);
      }
    }Code language: Java (java)

    OutputStreamWriter also uses an 8 KB buffer internally. Writing 100,000,000 characters to a text file takes about 2.5 seconds.

    Write text files faster with BufferedWriter

    You can accelerate writing even further with BufferedWriter:

    String fileName = ...;
    try (FileWriter writer = new FileWriter(fileName);
         BufferedWriter bufferedWriter = new BufferedWriter(writer)) {
      int c;
      while ((c = process()) != -1) {
        bufferedWriter.write(c);
      }
    }Code language: Java (java)

    BufferedWriter adds another 8 KB buffer for characters, which are then encoded in one go when the buffer is written (instead of character by character). This second buffer reduces the writing time for 100,000,000 characters to approximately 370 ms.

    Write text files faster with the NIO.2 BufferedWriter

    In Java 7, the method Files.newBufferedWriter() was added to create a BufferedWriter:

    String fileName = ...;
    try (BufferedWriter bufferedWriter = Files.newBufferedWriter(Path.of(fileName))) {
      int c;
      while ((c = process()) != -1) {
        bufferedWriter.write(c);
      }
    }Code language: Java (java)

    The write speed on my system is about the same as the speed of the “classically” created BufferedWriter.

    Performance overview: writing files

    In the following diagram, you can see how much time the methods presented need to write 100,000,000 bytes or characters into a binary or text file:

    Comparison of the times needed to write 100 million bytes / characters to a file
    Comparison of the times needed to write 100 million bytes/characters to a file

    Due to the large gap between unbuffered and buffered writing, the buffered methods hardly stand out here. The following diagram, therefore, only shows the methods that use a buffer:

    Comparison of the times needed to write 100 million bytes / characters to a file (buffered)
    Comparison of the times needed to write 100 million bytes/characters to a file (buffered)

    Overview FileOutputStream, FileWriter, OutputStreamWriter, BufferedOutputStream, BufferedWriter

    The following diagram shows the context of the java.io classes presented in this article for writing binary and text files:

    Diagram showing Java classes for writing to files

    Solid lines represent binary data; dashed lines represent text data. FileWriter combines FileOutputStream and OutputStreamWriter.

    Character encoding

    The subject of character encoding and the problems that go with it have been discussed in detail in the previous article.

    Therefore, I’ve limited the following sections to those aspects that are relevant for writing text files with Java.

    What character encoding does Java use by default to write text files?

    If you do not specify a character encoding when writing a text file, Java uses a standard encoding. But be careful: Which one that is depends on the method and the Java version used.

    • The FileWriter and OutputStreamWriter classes internally use StreamEncoder.forOutputStreamWriter(). If you call this method without a specific character encoding, it uses Charset.defaultCharset(). This method, in turn, reads the character encoding from the system property “file.encoding”. If the system property is not specified, it uses ISO-8859-1 by default up to Java 5 and UTF-8 since Java 6.
    • The Files.writeString(), Files.write() and Files.newBufferedWriter() methods all use UTF-8 as default encoding without reading the system property mentioned above.

    Due to these inconsistencies, you should always specify the character encoding. I always recommend using UTF-8. According to Wikipedia, UTF-8 encoding is used on 94.4% of all websites and can, therefore, be regarded as a de-facto standard. An exception is, of course, when you have to work with old files written in a different encoding.

    How to specify the character encoding when writing a text file?

    In the following you will find an example for all methods discussed so far with the character encoding set to UTF-8:

    • Files.writeString(path, string, StandardCharsets.UTF_8)
    • Files.write(path, lines, StandardCharsets.UTF_8)
    • new FileWriter(file, StandardCharsets.UTF_8) // this method only exists since Java 11
    • new InputStreamWriter(outputStream, StandardCharsets.UTF_8)
    • Files.newBufferedWriter(path, StandardCharsets.UTF_8)

    Summary and outlook

    This article has shown different methods for writing byte arrays and Strings in binary and text files in Java.

    In the third part of the series, you will learn how to use the classes File, Path and Paths to construct file and directory paths.

    In future articles of this series, I will show:

    In the further course of the series, more advanced topics will be covered:

    • The NIO channels and buffers introduced in Java 1.4 to speed up working with large files in particular.
    • Memory-mapped I/O for ultra-fast file access without streams.
    • File locking to access the same files from multiple threads or processes in parallel without conflict.

    Would you like to be informed when future articles are published? Then click here to sign up for the HappyCoders newsletter. If you liked the article, I’m also happy if you share it via one of the buttons at the end.

  • How to Read Files Easily and Fast (Java Files Tutorial)

    How to Read Files Easily and Fast (Java Files Tutorial)

    The packages java.io and java.nio.file contain numerous classes for reading and writing files in Java. Since the introduction of the Java NIO.2 (New I/O) File API, it is easy to get lost – not only as a beginner. Since then, you can perform many file operations in several ways.

    This article series starts by introducing simple utility methods for reading and writing files. Later articles will cover more complex and advanced methods: from channels and buffers to memory-mapped I/O (it doesn’t matter if that doesn’t tell you anything at this point).

    The first article covers reading files. First, you learn how to read files that fit entirely into memory:

    • What is the easiest way to read a text file into a string (or a string list)?
    • How to read a binary file into a byte array?

    After that we continue to larger files and the respective classes:

    • How do you read larger files and process them at the same time (so you don’t have to keep the entire file in memory)?
    • When to use FileReader, FileInputStream, InputStreamReader, BufferedInputStream und BufferedReader?
    • When to use Files.newInputStream() and Files.newBufferedReader()?

    Besides (and this applies to both small and large files):

    • What do I have to keep in mind for file access to work properly on any operating system?

    What is the easiest way to read a file in Java?

    Up to and including Java 6, you had to write several lines of program code around a FileInputStream to read a file. You had to make sure that you close the stream correctly after reading – also in case of an error. “Try-with-resources” (i.e., the automatic closing of all resources opened in the try block) did not exist at that time.

    Only third-party libraries (e.g., Apache Commons or Guava) provided more convenient options.

    With Java 7, JSR 203 brought the long-awaited “NIO.2 File API” (NIO stands for New I/O). Among other things, the new API introduced the utility class java.nio.file.Files, through which you can read entire text and binary files with a single method call.

    You’ll find out in the following sections what these methods are in detail.

    Reading a binary file into a byte array

    You can read the complete contents of a file into a byte array using the Files.readAllBytes() method:

    String fileName = ...;
    byte[] bytes = Files.readAllBytes(Path.of(fileName));Code language: Java (java)

    The class Path is an abstraction of file and directory names, the details of which are not relevant here. I will go into this in more detail in a future article. First of all, it is enough to know that you can create a Path object via Paths.get() or – since Java 11 a bit more elegantly – via Path.of().

    Reading a text file into a string

    If you want to load the contents of a text file into a String, use – since Java 11 – the Files.readString() method as follows:

    String fileName = ...;
    String text = Files.readString(Path.of(fileName));Code language: Java (java)

    The method readString() internally calls readAllBytes() and then converts the binary data into the requested String.

    Reading a text file into a String list, line by line

    In most cases, text files consist of multiple lines. If you want to process the text line by line, you don’t have to bother splitting up the imported text by yourself. That is done automatically when reading the file using the readAllLines() method available since Java 8:

    String fileName = ...;
    List<String> lines = Files.readAllLines(Path.of(fileName));Code language: Java (java)

    Then you can iterate over the received string list to process it.

    Reading a text file into a String stream, line by line

    Java 8 introduced streams. Correspondingly, in the same Java version, the Files class was extended by the method lines(), which returns the lines of a text file not as a String list, but as a stream of Strings:

    String fileName = ...;
    Stream<String> lines = Files.lines(Path.of(fileName));Code language: GLSL (glsl)

    For example, with only one code statement, you could output all lines of a text file that contain the String “foo”:

    Files.lines(Path.of(fileName))
          .filter(line -> line.contains("foo"))
          .forEach(System.out::println);Code language: Java (java)

    java.nio.file.Files – Summary

    The four methods shown above cover many use cases. However, the files read should not be too large, since they are loaded completely into RAM. So you shouldn’t try that with an HD movie. But also for smaller files, there are good reasons not to load them completely into RAM:

    • You may want to process the data as quickly as possible before the file is completely loaded.
    • If your software runs in containers or a “function-as-a-service” environment, memory may be relatively expensive.

    The following chapter describes how you can read files piece by piece and process them at the same time.

    How to process large files without keeping them entirely in memory?

    This question takes us to the classes and methods that were already available before Java 7 – those that made “let’s quickly read a file” a complicated matter.

    Reading large binary files with FileInputStream

    In the simplest case, we read a binary file byte by byte and then process these bytes. The FileInputStream class performs this task. In the following example, it is used to output the contents of a file to the console byte by byte.

    String fileName = ... ;
    try (FileInputStream is = new FileInputStream(fileName)) {
      int b;
      while ((b = is.read()) != -1) {
        System.out.println("Byte: " + b);
      }
    }Code language: Java (java)

    The FileInputStream.read() method reads one byte at a time from the file. When it reaches the end of the file, it returns -1. Most of the functionality of this class is implemented natively (i.e., not in Java), since it directly accesses the I/O functionality of the operating system.

    This access is relatively expensive: Loading a test file of 100 million bytes via FileInputStream takes about 190 seconds on my system. That’s only about 0.5 MB per second.

    Reading large binary files with the NIO.2 InputStream

    With the NIO.2 File API in Java 7, a second method to create an InputStream, Files.newInputStream(), was introduced:

    String fileName = ...;
    try (InputStream is = Files.newInputStream(Path.of(fileName))) {
      int b;
      while ((b = is.read()) != -1) {
        System.out.println("Byte: " + b);
      }
    }Code language: Java (java)

    This method returns a ChannelInputStream instead of a FileInputStream because NIO.2 works with so-called channels under the hood. This difference doesn’t affect the speed in my tests.

    Reading faster with BufferedInputStream

    You can accelerate reading the data with BufferedInputStream. It is placed around a FileInputStream and loads data from the operating system not byte by byte, but in blocks of 8 KB and stores them in memory. The bytes can then be read out again bit by bit – and from the main memory, which is much faster.

    String fileName = ...;
    try (FileInputStream is = new FileInputStream(fileName);
         BufferedInputStream bis = new BufferedInputStream(is)) {
      int b;
      while ((b = bis.read()) != -1) {
        System.out.println("Byte: " + b);
      }
    }Code language: Java (java)

    This code reads the same file in only 270 ms, which is 700 times faster. That is 370 MB per second, an excellent value.

    You should almost always use BufferedInputStream. The only exception is if you do not read data byte by byte, but in larger blocks whose size is adjusted to the block size of the file system. If you are unsure whether BufferedInputStream is worthwhile for your particular application, try it out.

    Reading large text files with FileReader

    After all, text files are binary files, too. When being loaded, an InputStreamReader can be used to convert their bytes into characters. Place it around a FileInputStream, and you can read characters instead of bytes:

    String fileName = ...;
    try (FileInputStream is = new FileInputStream(fileName);
         InputStreamReader reader = new InputStreamReader(is)) {
      int c;
      while ((c = reader.read()) != -1) {
        System.out.println("Char: " + (char) c);
      }
    }Code language: Java (java)

    It’s a bit more comfortable with FileReader: It combines FileInputStream and InputStreamReader, resulting in the following code, which is equivalent to the one above:

    String fileName = ...;
    try (FileReader reader = new FileReader(fileName)) {
      int c;
      while ((c = reader.read()) != -1) {
        System.out.println("Char: " + (char) c);
      }
    }Code language: GLSL (glsl)

    InputStreamReader also uses an internal 8 KB buffer. Reading the 100 million byte text file character by character takes about 3.8 s.

    Read text files faster with BufferedReader

    Although InputStreamReader is already quite fast, reading a text file can be further accelerated – with BufferedReader:

    String fileName = ...;
    try (FileReader reader = new FileReader(fileName);
         BufferedReader bufferedReader = new BufferedReader((reader))) {
      int c;
      while ((c = bufferedReader.read()) != -1) {
        System.out.println("Char: " + (char) c);
      }
    }Code language: Java (java)

    Using a BufferedReader reduces the time for reading the test file to about 1.3 seconds. BufferedReader achieves this by extending the InputStreamReader‘s 8 KB buffer with another buffer for 8,192 decoded characters.

    Another advantage of BufferedReader is that it offers the additional method readLine(), which allows you to read and process the text file not only character by character but also line by line:

    String fileName = ...;
    try (FileReader reader = new FileReader(fileName);
         BufferedReader bufferedReader = new BufferedReader((reader))) {
      String line;
      while ((line = bufferedReader.readLine()) != null) {
        System.out.println("Line: " + line);
      }
    }Code language: GLSL (glsl)

    Reading complete lines further reduces the total time for reading the test file to about 600 ms.

    Reading text files faster with the NIO.2 BufferedReader

    With Files.newBufferedReader(), the NIO.2 File API provides a method to create a BufferedReader directly:

    String fileName = ...;
    try (BufferedReader reader = Files.newBufferedReader(Path.of(fileName))) {
      int c;
      while ((c = reader.read()) != -1) {
        System.out.println("Char: " + (char) c);
      }
    }Code language: Java (java)

    The speed corresponds to the speed of the “classically” created BufferedReader and also needs about 1.3 seconds to read the entire file.

    Overview performance

    The following diagram shows all the methods presented, including the time they need to read a file of 100 million bytes:

    Comparing the times for reading a 100 million byte file in Java
    Comparing the times for reading a 100 million byte file in Java

    The big gap between “unbuffered” and “buffered” leads to the fact that the “buffered” methods are hardly recognizable in the diagram above. Therefore, below is a second diagram that shows only the buffered methods:

    Comparing the times for reading a 100 million byte file in Java (buffered)
    Comparing the times for reading a 100 million byte file in Java (buffered)

    Overview FileInputStream, FileReader, InputStreamReader, BufferedInputStream, BufferedReader

    The last sections introduced numerous classes for reading files from the java.io package. The following diagram shows, once again, the relationships of these classes. If this topic is new to you, it helps to take a look at it from time to time.

    Overview Java classes: FileInputStream, FileReader, InputStreamReader, BufferedInputStream, BufferedReader

    The solid lines represent the flow of binary data; the dashed lines show the flow of text data, i.e., characters and strings. FileReader is a combination of FileInputStream and InputStreamReader.

    Operating system independence

    In the last chapter, we read text files without any worries. Unfortunately, it’s not always that easy: character encodings, line breaks, and path separators make life difficult even for experienced programmers.

    Character encoding

    As long as you only deal with English texts, you may have got around the problem. If you also work with texts in other languages, you probably have seen something like this at some point (the example is a German Pangramm):

    Der Text "Zwölf Boxkämpfer jagen Viktor quer über den großen Sylter Deich." mit fehlerhaft dargestellten Umlauten

    Or something like this?

    Der Text "Zwölf Boxkämpfer jagen Viktor quer über den großen Sylter Deich." mit fehlerhaft dargestellten Umlauten

    Those strange characters are the result of different character encodings being applied for reading and writing a file.

    When I introduced the InputStreamReader class, I briefly mentioned that it converts bytes (numbers) into characters (such as letters and special characters). The so-called character encoding determines which character is encoded by which number.

    A brief history of character encodings

    For historical reasons, various character encodings exist. The first character encoding, ASCII, was standardized in 1963. Initially, ASCII could represent only 128 characters and control characters. Neither did it include German umlauts nor non-Latin letters such as Cyrillic or Greek ones. Therefore, ISO-8859 introduced 15 additional character encodings, each containing 256 characters, for various purposes. For example, ISO-8859-1 for Western European languages, ISO-8859-5 for Cyrillic or ISO-8859-7 for Greek. Microsoft slightly modified ISO-8859-1 for Windows and created its custom encoding, Windows-1252.

    To eliminate this chaos, Unicode, a globally uniform standard, was created in 1991. Currently (as of November 2019), Unicode contains 137,994 different characters. A single byte can represent a maximum of 256 characters. Therefore, different encodings were developed to map all Unicode characters to one or more bytes. The most widely used encoding is UTF-8. Currently, 94.4% of all websites use UTF-8 (according to the previously linked Wikipedia page).

    UTF-8 uses the same bytes as ASCII to represent the first 128 characters (e.g., ‘A’ to ‘Z’, ‘a’ to ‘z’, and ‘0’ to ‘9’). That is the reason why these characters are always readable – even if the encoding is set incorrectly. UTF-8 represents German umlauts by two bytes each. Therefore, in the first example above (in which I saved the text as UTF-8 and then loaded it as ISO-8559-1), there are two special characters at the places of the umlauts. In the second example, I saved the text as ISO-8859-1 and loaded it as UTF-8. Since the one-byte representation of the umlauts from ISO-8859-1 makes no sense in UTF-8, the InputStreamReader inserted question marks at the respective places.

    Therefore, always make sure to use the same character when reading and writing a file.

    What character encoding does Java use by default to read text files?

    If no character encoding is specified (as in the previous examples), a standard encoding is applied. And now it gets dangerous: The encoding can be different depending on which Java version and which method is used to read the file:

    • If you use FileReader or InputStreamReader, the method StreamDecoder.forInputStreamReader() is called internally, which uses Charset.defaultCharset() if the character encoding is not specified. This method reads the encoding from the system property “file.encoding”. If you haven’t specified that either, it uses ISO-8859-1 until Java 5, and UTF-8 since Java 6.
    • If, on the other hand, you use Files.readString(), Files.readAllLines(), Files.lines() or Files.newBufferedReader() without character encoding, UTF-8 is used directly, without checking the system property mentioned above.

    To be on the safe side, you should always specify a character encoding. If possible (i.e. if no compatibility with old files needs to be guaranteed) you should use the most common encoding, UTF-8.

    How to specify the character encoding when reading a text file?

    All methods presented so far offer a variant in which you can explicitly specify the character encoding. You need to pass it as an object of the Charset class. You can find constants for standard encodings in the StandardCharsets class. In the following, you find all methods with the explicit specification of UTF-8 as encoding:

    • Files.readString(path, StandardCharsets.UTF_8)
    • Files.readAllLines(path, StandardCharsets.UTF_8)
    • Files.lines(path, StandardCharsets.UTF_8)
    • new FileReader(file, StandardCharsets.UTF_8) // this method only exists since Java 11
    • new InputStreamReader(is, StandardCharsets.UTF_8)
    • Files.newBufferedReader(path, StandardCharsets.UTF_8)

    Line breaks

    Another obstacle when loading text files is the fact that line breaks are encoded differently on Windows than on Linux and Mac OS.

    • On Linux and Mac OS, a line break is represented by the “line feed” character (escape sequence “\n”, ASCII code 10, hex 0A).
    • Windows uses the combination “carriage return” + “line feed” (escape sequence “\r\n”, ASCII codes 13 and 10, hex 0D0A).

    Fortunately, most programs today can handle both encodings. It was not always like this. In the past, when people exchanged text files between different operating systems, either all line breaks disappeared, and the entire text was in one line, or special characters appeared at the end of each line.

    When you read a text file line by line with Files.readAllLines() or Files.lines(), Java automatically recognizes the line breaks correctly. If you want to split a text into lines in your program code, you can use String.split() as follows:

    String[] lines = text.split("r?n");Code language: Java (java)

    When writing files (see the article “How to write files quickly and easily”), I recommend using the Linux version because, nowadays, almost every Windows program (since 2018, even Notepad!) can handle it.

    When creating a formatted string with String.format(), you need to pay attention to how you specify the line break:

    • String.format("Hallo%n") inserts an operating system specific line break. The result differs depending on the operating system on which your program is running.
    • String.format("Hallo\n") always inserts a Linux line break regardless of the operating system.

    You can try it with the following program:

    public class LineBreaks {
      public static void main(String[] args) {
        System.out.println(String.format("Hallo%n").length());
        System.out.println(String.format("Hallon").length());
      }
    }Code language: GLSL (glsl)

    On Linux and Mac OS, the output is 6 and 6. On Windows, however, it is 7 and 6, since the line break generated with “%n” consists of one more character.

    If you need the line separator of the current system, you can get it through System.lineSeparator().

    Path names

    Also, with path names, we must consider differences between the operating systems. While on Windows, absolute paths begin with a drive letter and a colon (e.g. “C:”) and directories are separated by a backslash (‘\’), on Linux they are separated by a forward slash (‘/’), which also indicates the beginning of absolute paths.

    For example, the path to my Maven configuration file is:

    • … on Windows: C:\Users\sven\.m2\settings.xml
    • … on Linux: /home/sven/.m2/settings.xml

    You can access the separator used in the current operating system via the File.separator constant or the FileSystems.getDefault().getSeparator() method.

    You usually should not need the separator directly. Java provides the classes java.io.File and, starting with Java 7, java.nio.file.Path to construct directory and file paths without having to specify the separator.

    At this point, I am not going into further detail. File and directory names, relative and absolute path information, old API, and NIO.2 render the topic quite complex. I will, therefore, cover the topic in a separate article.

    Summary and outlook

    In this article, we have explored various methods of reading text and binary files in Java. We also looked at what you need to consider if you want your software to run on operating systems other than your own.

    In the second part, you will learn about the corresponding methods for writing files in Java.

    Subsequently, we’ll discuss the following topics:

    And at the end of the series, we will turn to advanced topics:

    If you want to be informed when the second part is published, please click here to sign up for the HappyCoders newsletter. the following form. And I would also be happy if you share the article using one of the buttons below.

  • How to Convert String to Int in Java – Peculiarities and Pitfalls

    How to Convert String to Int in Java – Peculiarities and Pitfalls

    In the previous article, I showed you that "" + i is the fastest way to convert an int into a String in Java. All the way from Java 7 to Java 14.

    Today you will learn what to consider in the opposite direction, i.e., when parsing a String to an int. You can find the source code for this article in my GitHub repository.

    Parsing decimal numbers

    Let’s first look at the options to parse a String into an int (or Integer). Up to Java 7, we have these two methods:

    • int i = Integer.parseInt(s); (→ JavaDoc)
    • Integer i = Integer.valueOf(s); (→ JavaDoc)

    The second method internally calls the first method and converts the result to an Integer object.

    The String to convert must contain only digits, optionally with a plus or minus sign in front. These are allowed:

    • Integer.parseInt("47")
    • Integer.parseInt("+86400")
    • Integer.parseInt("-1")

    The following Strings are not allowed and result in NumberFormatExceptions:

    • Integer.parseInt("") // Empty string not allowed
    • Integer.parseInt(" 1") // Space not allowed
    • Integer.parseInt("3.14") // Decimal point not allowed
    • Integer.parseInt("1,000") // Thousands separator not allowed

    Parsing hexadecimal and binary numbers

    The above methods parse decimal numbers. To parse other number systems, the following overloaded methods are available:

    • int i = Integer.parseInt(s, radix); (→ JavaDoc)
    • Integer i = Integer.valueOf(s, radix); (→ JavaDoc)

    The parameter radix specifies the base of the number system. A hexadecimal number can be parsed as follows:

    • Integer.parseInt("CAFE", 16)

    And a binary number like this:

    • Integer.parseInt("101111", 2)

    Signed vs. unsigned ints

    In all the above cases, the number to be parsed must be within the range Integer.MIN_VALUE (= -231 = -2,147,483,648) to Integer.MAX_VALUE (= 231-1 = 2,147,483,647).

    It becomes interesting (not to say: confusing) if, for example, we convert the valid int value 0xCAFEBABE into a hex String and then back into an int:

    int hex = 0xCAFEBABE;
    String s = Integer.toHexString(hex);
    int i = Integer.parseInt(s, 16);Code language: Java (java)

    This attempt results in the following error:

    Exception in thread "main" java.lang.NumberFormatException: For input string: "cafebabe"

    Why is that?

    First of all: The String s contains “cafebabe” as expected. Why can’t this String be converted back to an int?

    The reason is that the parseInt() method assumes the given number to be positive unless a minus sign precedes it. If you convert “cafebabe” to the decimal system, you get 3,405,691,582. This number is higher than Integer.MAX_INT and therefore, cannot be represented as an int.

    Then why can we assign the number to the int variable hex? The binary representation of the numbers plays an (intended) trick on us. 0xCAFEBABE corresponds to binary 11001010,11111110,10111010,10111110 – a 32-digit binary number with the first bit being 1. In an int – which is always signed in Java – the first bit stands for the sign. If it is 1, the number is negative (for details on negative numbers, see this Wikipedia article). Let’s add some debug output to the code above:

    int hex = 0xCAFEBABE;
    System.out.println("hex        = " + hex);
    System.out.println("hex binary = " + Integer.toBinaryString(hex));
    
    String s = Integer.toHexString(hex);
    System.out.println("s          = " + s);
    
    int i = Integer.parseInt(s, 16);
    System.out.println("i          = " + i);Code language: Java (java)

    We see that hex contains the negative value -889,275,714 (I’ve inserted the thousands separators here for the sake of clarity). Hexadecimally, this negative number is represented as the positive value “cafebabe”, which in turn cannot be converted back by the parseInt() method.

    To make this work, after all, the language creators added the following methods to Java 8:

    • int i = Integer.parseUnsignedInt(s); (→ JavaDoc)
    • int i = Integer.parseUnsignedInt(s, radix); (→ JavaDoc)

    These methods allow us to parse numbers in the range 0 to 4,294,967,295 (= 0xffffffff hexadecimal or 32 ones in the binary system). In Java 8, we can adjust the penultimate line of the above example as follows:

    int i = Integer.parseUnsignedInt(s, 16);Code language: Java (java)

    As output, we don’t see 3,405,691,582. Rather, as the Java int is always signed, -889,275,714, which is the same value we get when we assign 0xCAFEBABE to an int.

    And how do we get to 3,405,691,582? Therefore we have to parse “cafebabe” (or “CAFEBABE” – the case is insignificant) into a long:

    long l = Long.parseLong(s, 16);Code language: Java (java)

    Finally, what does 3,405,691,582 look like in binary and hexadecimal notation?

    System.out.println("l binary = " + Long.toBinaryString(l));
    System.out.println("l hex    = " + Long.toHexString(l));Code language: Java (java)

    Again, we get the same representations as for the int value -889,275,714, i.e. 11001010,11111110,10111010,10111110 and “cafebabe”. The same binary or hexadecimal number thus leads – depending on whether it is stored in an int or in a long – to a different decimal number (if it is larger than Integer.MAX_VALUE). In the following section, we’ll take a look at some more examples.

    parseInt() vs. parseUnsignedInt()

    To illustrate the difference between parseInt() and parseUnsignedInt() once again, I wrote a small program, which you can find here in my GitHub repository, and which parses different (threshold) values using both methods.

    In the following table, you find the result summarized (the dashes stand for NumberFormatExceptions):

    StringBemerkungparseInt()Hexparse
    Unsigned
    Int()
    Hex
    -2147483649Integer.MIN_VALUE – 1
    -2147483648Integer. MIN_VALUE-214748364880000000
    -1000000000-1000000000c4653600
    -1-1ffffffff
    00000
    100000000010000000003b9aca0010000000003b9aca00
    2147483647Integer.MAX_VALUE21474836477fffffff21474836477fffffff
    2147483648Integer.MAX_VALUE +1-214748364880000000
    3000000000-1294967296b2d05e00
    42949672952 * Integer.MAX_VALUE + 1-1ffffffff
    42949672962 * Integer.MAX_VALUE + 2

    One can see here well:

    • In the range 0 to Integer.MAX_VALUE, parseInt() and parseUnsignedInt() return the same results.
    • parseInt() also covers the range up to Integer.MIN_VALUE and returns exactly the value passed.
    • parseUnsignedInt() covers the range up to 2 * Integer.MAX_VALUE + 1 – with the result in the range above Integer.MAX_VALUE always being a negative number. Its hexadecimal representation, converted to the decimal system, corresponds to the input value.

    Auto-boxing and -unboxing the result

    We have seen above that there are separate methods to convert a String to an int primitive or an Integer object. But what happens if we use the wrong method?

    1. Integer i = Integer.parseInt("42");
    2. int i = Integer.valueOf("555");

    The first case is not particularly elegant but does not pose a problem either: Integer.parseInt() works internally with primitive values and the result is – just as with Integer.valueOf() – eventually converted into an Integer object by auto-boxing.

    The second case is different: here, the result is converted to an Integer object inside Integer.valueOf() and then back to an int primitive when it is assigned to i. IntelliJ recognizes this (Eclipse doesn’t) and displays a warning with the recommendation to replace valueOf() with parseInt():

    Screenshot of the IntelliJ warning regarding redundant boxing
    IntelliJ warning regarding redundant boxing

    We will examine the extent to which the compiler or HotSpot forgives us for this error in the next chapter, “performance”.

    Performance of the String-to-int conversion

    Similar to the last article, I did the following comparison measurements with the Java Microbenchmark Harness – JMH:

    • Speed of various String-to-int conversion methods with Java 8:
      • parseInt() with positive numbers, positive numbers with preceding plus sign, and negative numbers,
      • parseUnsignedInt() with positive numbers and positive numbers with a preceding plus sign,
      • valueOf() with positive numbers,
      • parseInt() with subsequent conversion into an integer object,
      • valueOf() with subsequent conversion into an int primitive,
    • Comparison of the parseInt() method across all Java versions from Java 7 to Java 14.

    Performance of various String-to-int conversion methods

    You can find the source code of this test in my GitHub repository. The test results are in the results/ directory. The following table shows the performance of the various method calls using Java 8:

    MethodOperations per secondConfidence interval (99,9%)
    parseInt() positive value25,157,28924,959,166 – 25,355,412
    parseInt() positive value with plus25,056,42724,974,885 – 25,137,970
    parseInt() negative value25,143,74025,039,972 – 25,247,508
    parseUnsignedInt() positive value25,124,02725,060,833 – 25,187,221
    parseUnsignedInt() positive value with plus25,015,08224,914,320 – 25,115,843
    parseInt() with subsequent boxing24,594,33624,421,316 – 24,767,355
    valueOf() positive value24,531,18724,413,040 – 24,649,334
    valueOf() with subsequent unboxing24,325,34724,183,155 – 24,467,538
    Performance of the various String-to-int conversion methods using Java 8
    Performance of the various String-to-int conversion methods using Java 8

    As you can see, the first five measurements are almost identical. This can be explained quickly: the executed code is the same in all cases. valueOf() and parseInt() with subsequent boxing are about 2% slower. This should correspond to the overhead for converting into an Integer object. valueOf() with subsequent unboxing is about 1% slower, which means that neither the compiler nor HotSpot have forgiven us for the “boxing with subsequent unboxing” error.

    Parsing negative numbers should be slightly faster because internally, negative numbers are added up, and in case of a positive number, the result is multiplied by -1. However, there are no differences in the benchmarks. Multiplying by -1 is apparently so fast that even at 25 million multiplications per second, this is of no significance.

    Performance of String-to-int conversion across Java versions

    Since in the end, all variants of the String-to-int conversion call Integer.parseInt(), I have restricted myself to measuring the performance of calling this particular method across different Java versions. I used the same test class as for the previous test and commented out all methods except integerParsePositiveInt(). I compiled and ran the code with the respective Java versions. You also find the results of these tests in the results/ folder. Here is a summary of the results:

    Java version Operations per second Confidence interval (99.9%)
    Java 725,223,11725,069,748 – 25,376,488
    Java 825,157,28924,959,166 – 25,355,412
    Java 922,580,11722,471,102 – 22,689,132
    Java 1022,129,42521,889,153 – 22,369,698
    Java 1123,657,22823,494,292 – 23,820,165
    Java 1223,604,65723,385,208 – 23,824,106
    Java 1323,626,04823,473,823 – 23,778,273
    Java 1423,599,65823,440,825 – 23,758,490
    Performance of the String-to-int conversion across Java versions
    Performance of the String-to-int conversion across Java versions

    Interestingly, the Integer.parseInt() method became significantly slower in Java 9 (nearly 10%), again 2% slower in Java 10 and faster again in Java 11, but since then has stayed about 5% behind the performance of Java 7 and 8. To confirm this measurement result, I ran all benchmark tests (which are repeated 25 times anyway) again – with similar results.

    In search of the cause, I first compared the source codes of Integer.parseInt() of all Java versions. Versions 7 and 8 are identical. In Java 9, the code was slightly restructured, e.g., variables were declared elsewhere. The algorithm itself was not changed. The minimal code changes should not affect performance. From Java 9 to the Early Access Release of Java 14, there was no further change, except that in Java 12, the radix was included in the error message for non-parseable numbers.

    To check whether the changes in Java 9 affected performance, I copied the Integer.parseInt() source codes from Java 8 and 9 and tested these copies with JMH. Both were the same speed. (This test is not in the GitHub repository because I don’t know to what extent I can publish Java source codes.)

    In another experiment, I compiled the Integer.parseInt() source code with Java 8 and ran the resulting class file with Java 9 to 14. This led to a similar result as the initial performance test, i.e., Java 9 and 10 were slower, and Java 11 was a bit faster again. The reason for the different speeds must, therefore, lie within the JVM. If any of you know the exact cause, I would be happy to receive an enlightening comment.

    Summary

    In this article, I have shown how to parse numbers in decimal and other number systems and what the difference is between parseInt() and parseUnsignedInt(). Be careful not to box unnecessarily from int to Integer, or vice versa, or – worst of all – both in a row. If you find the article helpful, I’d be happy if you shared it with one of the following share buttons.

  • How to Convert int to String in Java – The Fastest Way

    How to Convert int to String in Java – The Fastest Way

    In this article, I show you how to convert an int into a String in Java the fastest way. The answer is probably surprising for some. I present four variants and measure and compare their speed using JMH microbenchmarks. I analyze the measurement results looking at the Java source code and also the generated bytecode. If you want to skip the details, you can use this link to scroll down directly to the result.

    Java int-to-String conversion variants

    The following four options are available (apart from intentionally more complicated variants):

    • Option 1: Integer.toString(i)
    • Option 2: String.valueOf(i)
    • Option 3: String.format("%d", i)
    • Option 4: "" + i

    In the following sections, I first perform detailed benchmarks and then interpret the results based on the Java source code and the generated bytecode.

    Performance measurements of the int-to-String conversion

    To find out which of the options is the fastest, I ran several benchmarks with the Java Microbenchmark Harness – short: JMH.

    JMH is a framework that facilitates benchmark tests for short code sections and provides meaningful measurements in milli-, micro- and nano-second ranges. Tests are repeated hundreds of thousands of times, and the actual measurement process is only started after a warm-up phase to give the just-in-time compiler sufficient lead time for code optimization.

    A good tutorial for beginners can be found on tutorials.jenkov.com.

    IntelliJ comes with a JMH plugin by default so that you can run the benchmark tests directly in your IDE.

    Source code of the microbenchmarks

    Below you find the complete source code of the int-to-String benchmark. You can copy the code directly into your IDE or clone it as a Maven project from my GitHub repository. When you create a project yourself, you need to add the following two dependencies:

    package eu.happycoders.int2string;
    
    import org.openjdk.jmh.annotations.*;
    import org.openjdk.jmh.infra.Blackhole;
    
    import java.util.concurrent.ThreadLocalRandom;
    
    public class IntToStringBenchmark {
    
      @State(Scope.Thread)
      public static class MyState {
        public int i;
    
        @Setup(Level.Invocation)
        public void doSetup() {
          // always 7-digits, so that the String always has the same length
          i = 1_000_000 + ThreadLocalRandom.current().nextInt(9_000_000);
        }
      }
    
      @Benchmark
      public void option1(MyState state, Blackhole blackhole) {
        String s = Integer.toString(state.i);
        blackhole.consume(s);
      }
    
      @Benchmark
      public void option2(MyState state, Blackhole blackhole) {
        String s = String.valueOf(state.i);
        blackhole.consume(s);
      }
    
      @Benchmark
      public void option3(MyState state, Blackhole blackhole) {
        String s = String.format("%d", state.i);
        blackhole.consume(s);
      }
    
      @Benchmark
      public void option4(MyState state, Blackhole blackhole) {
        String s = "" + state.i;
        blackhole.consume(s);
      }
    
    }Code language: Java (java)

    A few remarks about the source code:

    • We assign a random number to the int-variable i so that it is not replaced by a constant, which would result in the complete String conversion being optimized away.
    • The random number is generated in the setup() method of a so-called “state” so that the execution time for it is not measured.
    • The @Setup(Level.Invocation) annotation causes the setup() method to be executed before each invocation of the test method; thus, each invocation receives a new random number.
    • The conversion result is always passed to the Blackhole – again so that the compiler does not optimize away the conversion.

    Microbenchmark results

    In the following sections, you find the measurement results on my Dell XPS 15 9570 with an Intel Core i7-8750H. Detailed results (including all single tests, minimums, maximums, and standard deviations) can be found in the results/ directory of my GitHub repository.

    Measurement results int-to-String on Java 7

    MethodOperations per secondConfidence ​​interval (99.9%)
    Integer.​​toString(i)20,365,94720,276,015 – 20,455,879
    String.​​valueOf(i)20,318,31620,251,621 – 20,385,011
    String.​​format("%d", i)2,107,3972,075,553 – 2,139,240
    "" + i23,358,66823,178,506 – 23,538,831
    Java 7 int-to-String performance
    Java 7 int-to-String performance

    The first two variants can be regarded as equally fast, which is to be expected since String.valueOf(i) simply calls Integer.toString(i), and this call is inlined by the HotSpot compiler.

    As expected, the third variant is slower, since the format string must be parsed here.

    The fourth variant ("" + i) is significantly faster under Java 7 (almost 15%) than the first two variants.

    Measurement results int-to-string on Java 8

    MethodOperations per secondConfidence ​interval (99.9%)
    Integer.​toString(i)20,939,91020,699,671 – 21,180,149
    String.​valueOf(i)20,920,35920,737,898 – 21,102,821
    String.​format("%d", i)2,284,0272,218,004 – 2,350,050
    "" + i23,777,73823,651,239 – 23,904,237
    Java 8 int-to-String performance
    Java 8 int-to-String performance

    Java 8 shows a very similar result as Java 7, with all variants having increased in speed between 2% and 8%.

    Measurement results int-to-string on Java 9

    MethodOperations per secondConfidence ​​interval (99.9%)
    Integer.​toString(i)28,025,70027,829,430 – 28,221,969
    String.​​valueOf(i)27,732,47427,646,937 – 27,818,010
    String.​​format("%d", i)2,718,3772,680,574 – 2,756,179
    "" + i28,354,69028,151,883 – 28,557,497
    Java 9 int-to-String performance
    Java 9 int-to-String performance

    Java 9 makes it interesting: All variants have significantly increased throughput (20 to 30%). However, the margin of variant four ("" + i) has dropped back to about 2%. To exclude measurement inaccuracies, I repeated the test several times.

    Measurement results int-to-string on Java 11

    I skip Java 10. Java 11 is the current LTS (Long Term Support) release. Java 9 was the first release after the new release cycle and came three and a half years after Java 8, so I included it.

    MethodOperations per secondConfidence ​interval (99.9%)
    Integer.​toString(i)27,755,91427,537,830 – 27,973,998
    String.​valueOf(i)27,836,73527,676,576 – 27,996,894
    String.​format("%d", i)2,717,5512,602,165 – 2,832,937
    "" + i28,237,06627,965,904 – 28,508,227
    Java 11 int-to-String performance
    Java 11 int-to-String performance

    There were no significant changes from Java 9 to Java 11. I attribute the minimal fluctuations to measurement inaccuracies.

    Measurement results int-to-string on Java 13

    I also skip Java 12 and come directly to the current release, Java 13.

    MethodOperations per secondConfidence ​interval (99.9%)
    Integer.​toString(i)27,664,97627,591,996 – 27,737,955
    String.​valueOf(i)27,718,09627,646,080 – 27,790,112
    String.​format("%d", i)1,800,3451,763,017 – 1,837,672
    "" + i28,293,22828,156,241 – 28,430,215
    Java 13 int-to-String performance
    Java 13 int-to-String performance

    The variants one, two, and four are virtually unchanged; variant four is still the front runner. Something interesting happened to variant three (String.format("%d", i)): compared to Java 11 it is 34% slower.

    Measurement results int-to-string on Java 14

    For the sake of completeness, I also tested the latest early access build of Java 14 (ea+19).

    MethodOperations per secondConfidence ​interval (99.9%)
    Integer.​toString(i)27,642,63027,484,253 – 27,801,007
    String.​valueOf(i)27,571,93827,456,427 – 27,687,448
    String.​format("%d", i)1,828,3821,780,958 – 1,875,807
    "" + i28,226,17528,030,308 – 28,422,042
    Java 14 int-to-String performance
    Java 14 int-to-String performance

    Here we see almost the same result as with Java 13. "" + i is still the fastest way. The 2% lead over the first two variants has proven to be stable in the last four Java versions measured so that we can rule out measurement uncertainty.

    Measurement result overview of all Java versions

    Here you can see all measurement results summarized in one diagram:

    Java int-to-String performance
    Java int-to-String performance

    We can summarize – regardless of the Java version:

    "" + i
    is the fastest method
    to convert an int into a String.

    … whereby the margin up to Java 8 with almost 15% was clearly more significant than since Java 9 with about 2%.

    Analysis of performance differences

    The measurements have raised the following questions, which I would like to clarify in this section:

    • Why have all variants significantly increased in speed in Java 9?
    • Why does "" + i perform best throughout all Java versions?
    • Why has String.format(i) become so slow in Java 13?

    I will, therefore, analyze the JDK source code and the generated byte code.

    Why have all variants significantly increased in speed in Java 9?

    My first guess was that “Compact Strings“, which are enabled by default in Java 9, are responsible for the increased performance. However, disabling them (VM option “-XX:-CompactStrings”) did not result in any relevant speed change.

    My second approach was to compare the Java source code of the Integer.toString(i) methods of Java 8 and Java 9. While the Java 9 code is easy to understand, the Java 8 code looks pretty cryptic and optimized. To see if it’s this code change (and not JVM optimizations), I extracted the Java 8 source code from Integer, copied it into a class Integer8 under Java 9, and repeated the benchmark test with it. And indeed: The Integer8.toString(i)-Method was also much slower under Java 9, but a bit faster than under Java 8. So the main reason for the performance gain lies in code improvements, and besides, there are some JVM optimizations.

    MethodOperations per secondConfidence ​interval (99.9%)
    Java 8 code on Java 820,939,91020,699,671 – 21,180,149
    Java 8 code on Java 921,737,98121,517,415 – 21,958,547
    Java 9 code on Java 928,025,70027,829,430 – 28,221,969
    Performance of the Integer.toString() method on Java 8 and Java 9
    Performance of the Integer.toString() method on Java 8 and Java 9

    I didn’t put the corresponding source code in my GitHub repository, because I’m not sure to what extent I can publish code from the JDK or even parts of it.

    I have not further investigated variants three and four at this point. I assume that also, their algorithms have been massively improved.

    Why does "" + i perform best throughout all Java versions?

    To find out why "" + i is the fastest, let’s first look at the generated byte code. We do this as follows:

    We create a file IntToStringFast.java with the following content.

    package eu.happycoders.int2string;
    
    import java.util.Random;
    
    public class IntToStringFast {
      public static void main(String[] args) {
        int i = new Random().nextInt();
        System.out.println("" + i);
      }
    }Code language: Java (java)

    We compile the file as follows:

    javac IntToStringFast.javaCode language: plaintext (plaintext)

    And look at the byte code with the following command:

    javap -c IntToStringFast.classCode language: plaintext (plaintext)

    Variant "" + i on Java 7 and Java 8

    With Java 7 and Java 8 the following byte code is generated (here only the relevant excerpt):

    14: new           #6          // class java/lang/StringBuilder
    17: dup
    18: invokespecial #7          // Method java/lang/StringBuilder."":()V
    21: ldc           #8          // String
    23: invokevirtual #9          // Method java/lang/StringBuilder.append:(Ljava/lang/String;)Ljava/lang/StringBuilder;
    26: iload_1
    27: invokevirtual #10         // Method java/lang/StringBuilder.append:(I)Ljava/lang/StringBuilder;
    30: invokevirtual #11         // Method java/lang/StringBuilder.toString:()Ljava/lang/String;Code language: Java (java)

    The bytecode corresponds to the following Java code (interestingly append("") was not eliminated – this task is apparently left to the HotSpot compiler):

    new StringBuilder().append("").append(i).toString();Code language: Java (java)

    To confirm this assumption, I repeat the benchmark with the StringBuilder.append(i) code and come to the same result as for "" + i.

    Looking at the AbstractStringBuilder.append(int i) method, we realize that in both Java 7 and Java 8, it contains virtually the same code as Integer.toString(int i). The only difference I could see is that StringBuilder internally first creates a char array of length 16, which is then copied in the toString() method via System.arraycopy() into an array of the required length; while Integer.toString() creates a char array of the final required length from the start. To check if this makes a difference, I create another test in which I pass 7 as capacity when creating the StringBuilder (only 7-digit random numbers are generated in the test). However, this also leads to the same result.

    This is a short interim result of my current test:

    Benchmark                                                        Mode  Cnt         Score   Error  Units
    IntToStringBenchmarkStringBuilder.integerToString               thrpt    2  21168090.044          ops/s
    IntToStringBenchmarkStringBuilder.stringBuilderCapacity7        thrpt    2  23968649.108          ops/s
    IntToStringBenchmarkStringBuilder.stringBuilderCapacityDefault  thrpt    2  23769306.792          ops/s
    IntToStringBenchmarkStringBuilder.stringPlus                    thrpt    2  23989334.180          ops/sCode language: plaintext (plaintext)

    All StringBuilder variations are almost equally fast and, still, significantly faster than Integer.toString(). To get to the bottom of this, I copy the source code from both Integer and StringBuilder and run the tests again. I get the following result (the benchmarks with the “8” are the ones with the copied source code):

    Benchmark                                                  Mode  Cnt         Score   Error  Units
    IntToStringBenchmarkStringBuilderInline.integerToString   thrpt    2  20518228.534          ops/s
    IntToStringBenchmarkStringBuilderInline.integer8ToString  thrpt    2  19681140.450          ops/s
    IntToStringBenchmarkStringBuilderInline.stringBuilder     thrpt    2  23873235.183          ops/s
    IntToStringBenchmarkStringBuilderInline.stringBuilder8    thrpt    2  19990576.858          ops/s Code language: plaintext (plaintext)

    Interesting: In the copied source code, Integer.toString(i) and "" + i are almost equally fast – as I would have expected after viewing the source code. However, both copied classes are slower than the classes from the JDK. So what does this mean?

    Do the compiled classes in the JDK not match the source code provided? To check this, I remove the file src.zip from the JDK directory so that IntelliJ does not display the source code when clicking on a class, but decompiles the class. The decompiled class looks exactly like the source code (except that local variable names are generic).

    At this point, I stop the analysis for Java 7 and Java 8 for the time being. You could now use the VM options -XX:+PrintCompilation -XX:+UnlockDiagnosticVMOptions -XX:+PrintInlining to see how HotSpot optimizes the code in detail, but I don’t have enough time to do that.

    Variante "" + i since Java 9

    Since Java 9, different byte code is generated from "" + i – only a single line:

    15: invokedynamic #6,  0      // InvokeDynamic #0:makeConcatWithConstants:(I)Ljava/lang/String;Code language: Java (java)

    The makeConcatWithConstants() method “facilitate the creation of String concatenation methods, that can be used to efficiently concatenate a known number of arguments of known types” (see StringConcatFactory’s JavaDoc). I looked at the source code of StringConcatFactory.makeConcatWithConstants(). Eventually, it also invokes StringBuilder.append(int) using a MethodHandle. Therefore also here I cannot see why this variant is faster than Integer.toString(). Again, sophisticated HotSpot optimizations seem to be at work.

    Why has String.format(i) become so slow in Java 13?

    The method String.format() invokes – in both Java 11 and Java 13 – Formatter().format(format, args).toString(). To check if it’s the int-to-String conversion or the formatter in general, I do a test with the format string “%s”. As parameter, I pass a random number again, which I already convert into a String in the “state” and pass it as such to the test method (you can also find this test in the GitHub repository).

    Java versionOperations per secondConfidence ​interval (99.9%)
    Java 112,978,2412,377,067 – 3,579,416
    Java 131,924,1831,624,398 – 2,223,968
    Performance der String.format()-Method unter Java 11 und Java 13
    Performance of the String.format() Method on Java 11 and Java 13

    So the formatter has generally become much slower, not only when converting integers to Strings. Unfortunately, I don’t have the time to analyze further details here. This article has already become much longer than originally planned.

    Summary

    Extensive benchmark tests have shown that across all Java versions, "" + i is the fastest way to convert an integer to a String. While the margin for Java 7 and Java 8 was still an impressive 15%, it has dropped to about 2% since Java 9, so today it’s basically a matter of taste which variant you use.

    Unfortunately, I did not succeed in finding out the underlying reason. Do you know the cause? Or do you know other performant ways to convert ints into Strings? Then I look forward to your comment!

    In the next article, I’ll show you what to consider in the opposite direction, i.e. when converting Strings into ints.

  • How to Write Quality Code and Enforce Java Code Standards

    How to Write Quality Code and Enforce Java Code Standards

    Today is my last working day at AndroidPIT. After building AndroidPIT and developing it for ten years, a few months ago, I decided to start my own business as a freelance programmer to gain new experiences.

    After programming alone for a few months back in 2009, we started hiring additional programmers shortly after that. Working in a team was different because suddenly developers with different programming styles and experiences were working on the same code. In code reviews, we spent much of our time unifying the code style and fixing similar types of bugs.

    Reason enough to check whether this work can somehow be automated.

    What are the challenges in detail?

    Challenges

    No consistent coding standard

    Maybe you know the problem: There are no code style guidelines in your development team – or there are, but not every developer adheres to them. As a result, you need more time to understand another developer’s code, and much of a review is “wasted” adapting the code to the style guidelines.

    Modern IDEs can format code automatically, but every developer on the team has to configure this feature properly.

    Non-maintainable or incorrect code

    Another problem is that developers in teams have different levels of experience in areas such as software craftmanship and clean code. Besides, everyone makes mistakes, regardless of their experience. Consequently, program code may be faulty, hard to read, and poorly maintainable.

    Security vulnerabilities in the code

    Most development teams have no security experts. Thus program code often causes security holes in the application, which can lead to severe data breaches. Even if security experts are present, they are only human and can overlook errors, or face such a large codebase that they can check it in detail only with extremely high effort.

    In this series of articles, I explain:

    • How to enforce coding style compliance
    • How to improve code quality and thus increase maintainability
    • How to increase software security and minimize vulnerabilities

    Traditional solution: code reviews

    The classic approach to solving these problems is regular code reviews. These are at best part of the “Definition of Done,” i.e., no task is done until a second developer has checked the associated code.

    However, code reviews, crucial as they are, have the following drawbacks:

    • They are tedious, time-consuming, and therefore, expensive. Besides, they are rarely fun. Therefore they are – especially under time pressure (which we are always under) – either not made at all or at least occasionally omitted. Especially when it comes to very complex changes – or small changes to already checked code locations.
    • They are prone to errors because the reviewer is only a human being – with more or less experience – and in most cases, no security expert.
    • They require at least two programmers in the team who are familiar with the technology. Ideally, this should be the case to reduce the “bus factor” (the risk of a failing employee endangering the project).

    Code reviews can, fortunately, be automated quite well. The technique is called “static program analysis” or “static code analysis.”

    For static code analysis, numerous excellent open-source tools are available that address all the problems mentioned above. I will present them in detail in the third part of this series.

    Once the appropriate tools have been set up, they can check the source code extremely quickly and give the developer numerous recommendations for improvement – regarding coding style, potential errors, bad practices, poor maintainability, and potential security gaps.

    What exactly is Static Code Analysis?

    Static code analysis refers to the analysis of software without executing it. The analysis is done by automatically examining the entire source code according to a set of pre-defined rules and then notifying the programmer of the rule violations found.

    Most static code analysis tools can be integrated into the development environment as plug-ins and highlight rule violations directly in the source code. IDE integration is a powerful feature, as the developer receives immediate feedback about possible vulnerabilities or bad practices during programming. If these are found later in the development cycle, the correction is much more time-consuming and thus more expensive.

    Likewise, static code analysis tools can be integrated into automated build processes, generate reports and alerts, and – depending on the configuration – cause the build to fail.

    Static code analysis is thus a beneficial, automated code review process. Nevertheless, it can not replace manual reviews. First, static code analysis can’t detect 100% of all errors (it doesn’t even know the functional requirements of the software), and second, it’s essential to share knowledge about the code within the team.

    Strength of Static Code Analysis

    Higher speed

    Manual code reviews are tedious. The great strength of static code analysis lies in the fast and automatic checking of the entire codebase without the need to execute the code, therefore significantly reducing the effort required to detect problems in the code.

    Reducing the workload on developers

    Manual code reviews involve developers. Automation takes the pressure off developers and allows them to focus more on the development of the software.

    Excellent scalability

    You can seamlessly integrate static code analysis into the Continuous Delivery process. It can, therefore, be performed entirely automatically and regularly. If a tool is extended to detect new problems, you can immediately detect those problems in the entire code base.

    Finding problems early in the development process

    The earlier you find a defect, the lower the cost of its elimination. By integrating static code analysis tools into the IDE, problems can be detected and fixed very early, during programming. Developers are notified of this directly in the code – along with explanations and suggestions for improvements.

    Accuracy

    By automating the process, you can check the complete code – even code passages that the developers rarely see. Besides, static code analysis tools can analyze and verify all execution paths of an application, including those not covered by tests. Human errors are possible when configuring the tools, but not when executing them.

    Better quality at lower costs

    Ultimately, all of the benefits mentioned above lead to better code and product quality at a lower cost for the entire development project. The continuous delivery of secure, reliable, and maintainable software enhances the reputation of the developers and the company at which they work.

    Weaknesses of Static Code Analysis

    Upfront costs

    Static code analysis tools must be evaluated, studied, installed, and configured. However, these costs usually pay for themselves in just a few weeks. This series of articles should help to minimize preparation time and costs.

    Rollout strategy required for use on an existing code base

    When you apply static code analysis tools to existing code, you may see thousands of problems, usually resulting in developers simply ignoring these messages. Therefore, a rollout strategy is required. It is best to prioritize the problem types and initially display only the ones with the highest priority. Only when you’ve entirely fixed these, will the next most significant category be displayed and handled.

    Not all errors are detected automatically (“false negative”)

    Style guide violations or specific error patterns can be reliably detected. Security problems – for example, in the authentication process, newly discovered security holes in external libraries, new attack patterns or incorrect configuration outside the source code – are challenging to find. Errors in the implementation of concurrent code that can lead to race conditions are also difficult to detect by static code analysis.

    Correct code can be recognized as incorrect (“false positive”)

    Occasionally, static code analyzers mark correct code as incorrect. Such a false positive can happen when a tool is “insecure,” e.g. when the integrity of input data is not verifiable, or the application interacts with closed source components.

    What are Dynamic Code Analyzers?

    While this article series focuses on static code analysis, I would like to distinguish it from dynamic code analysis in at least one sentence: Unlike static code analysis, which checks program code without executing it, dynamic code analysis checks code during its execution. Examples for this are unit testing and profiling.

    Summary and outlook

    In this article, I have described software development challenges that are traditionally solved by code reviews. Since manual code reviews are complicated and expensive, they can be supported by tools for static code analysis.

    In the next article, I will explain what types of static code analysis exist and how they address these challenges. I will, in particular, answer the following questions:

    • How do I enforce a consistent coding standard?
    • How do I find potential bugs in the code?
    • How do I improve code quality and maintainability?
    • How do I minimize potential security vulnerabilities?

    In the third and final part of the series, I will present the most relevant free Java tools for static code analysis in detail.

    If you know someone else who might be interested in this article, then as always I am pleased if you share it using one of the following buttons.